Articles
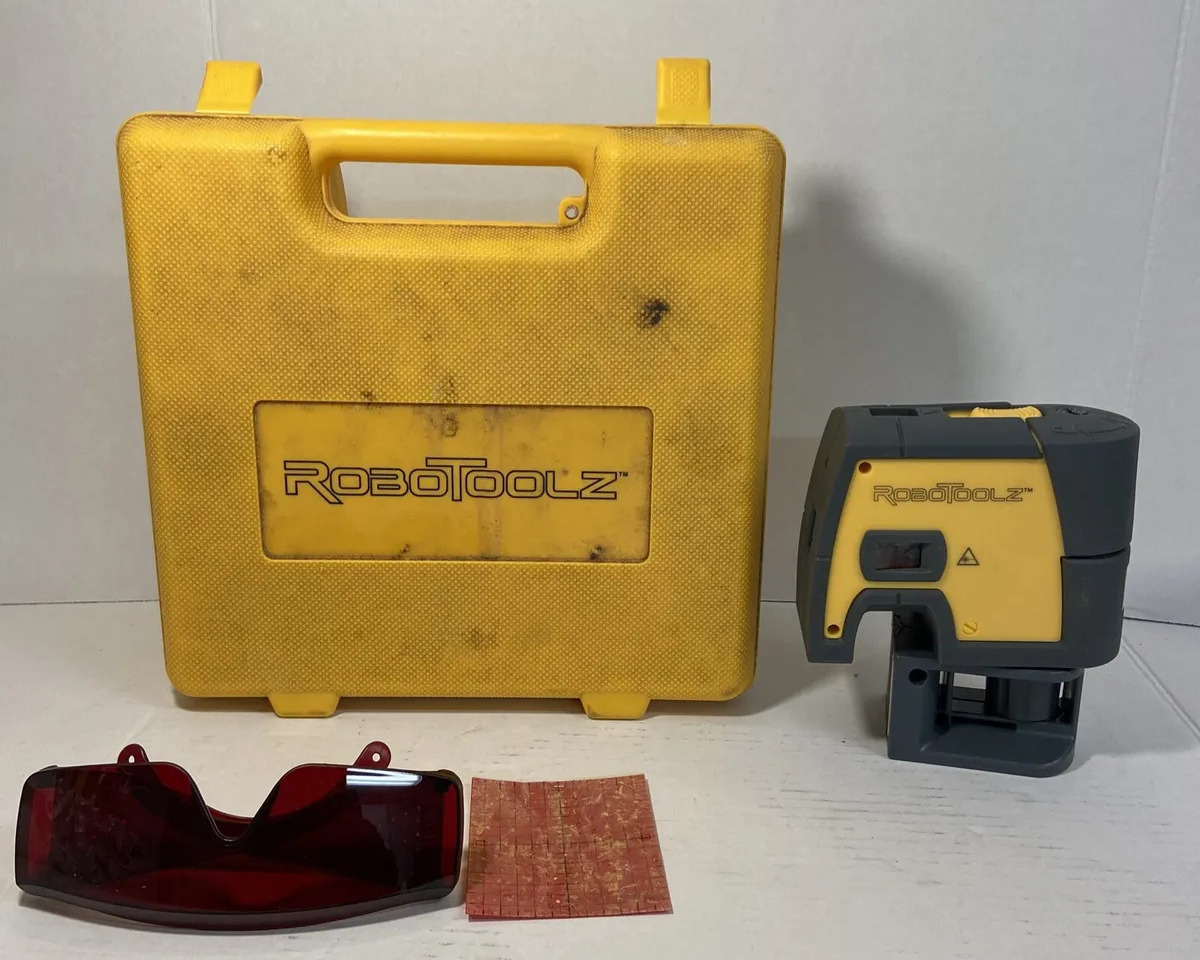
How To Rebuild A RoboToolz Laser Level
Modified: September 1, 2024
Learn how to easily rebuild your Robo Toolz laser level with our informative articles. Get step-by-step instructions and expert tips to restore the functionality of your favorite tool.
(Many of the links in this article redirect to a specific reviewed product. Your purchase of these products through affiliate links helps to generate commission for Storables.com, at no extra cost. Learn more)
Introduction
Welcome to this comprehensive guide on how to rebuild a Robo Toolz laser level. Whether you’re a DIY enthusiast or a professional in need of a functional laser level, this article will provide you with step-by-step instructions to restore your Robo Toolz laser level to its optimal performance. By following these instructions and using the right tools and materials, you can save money on purchasing a new laser level and extend the lifespan of your existing one.
A Robo Toolz laser level is a highly handy and versatile tool used for leveling and aligning various objects, such as shelves, cabinets, tiles, and more. Over time, due to wear and tear or accidental damage, it’s not uncommon for these laser levels to require maintenance and repair. That’s where this guide comes in handy, as it will walk you through the process of disassembling, inspecting, cleaning, replacing parts, reassembling, calibrating, testing, and troubleshooting your Robo Toolz laser level.
Before we dive into the details, it’s important to gather the necessary tools and materials. This will help ensure that you have everything you need to successfully rebuild your Robo Toolz laser level. Let’s take a look at what you’ll need.
Key Takeaways:
- Save money and extend the lifespan of your Robo Toolz laser level by following step-by-step instructions to disassemble, inspect, clean, replace parts, reassemble, calibrate, and troubleshoot with safety precautions.
- Enhance your knowledge and skills in rebuilding and maintaining your laser level by utilizing additional tips and resources, such as taking pictures, labeling components, joining online communities, and regularly cleaning and maintaining your device.
Read more: How To Level A Laser Level Tripod
Tools and Materials Needed
Before getting started with the process of rebuilding your Robo Toolz laser level, it’s important to gather the following tools and materials:
- Screwdriver set (both Phillips and flathead)
- Allen wrench set
- Tweezers or small needle-nose pliers
- Cleaning supplies (such as microfiber cloth, isopropyl alcohol, and compressed air)
- Lubricant (such as silicone-based lubricant)
- Replacement parts (if necessary)
- Calibration tool (specific to your Robo Toolz model)
- Safety goggles
Make sure to have all these tools and materials ready before you proceed with the rebuilding process. Having them on hand will save you time and make the process smoother.
Safety Precautions
When working on any electronic device, it’s important to prioritize your safety. Here are some safety precautions to keep in mind while rebuilding your Robo Toolz laser level:
- Disconnect the power: Before starting the disassembly process, ensure that the laser level is completely disconnected from any power source. This will prevent any electrical accidents from occurring.
- Wear safety goggles: Protect your eyes by wearing safety goggles throughout the rebuilding process. This will shield your eyes from any debris or small parts that may be released during disassembly or reassembly.
- Work in a well-ventilated area: If you’ll be using any cleaning supplies or lubricants, make sure you’re working in a well-ventilated area to avoid inhaling fumes. Opening windows or working near a fan can help improve air circulation.
- Handle small parts with care: Some parts of the laser level may be small or delicate. Use tweezers or small needle-nose pliers to handle these parts carefully to avoid damaging them or injuring yourself.
- Follow manufacturer instructions: Refer to the manufacturer’s instructions or user manual for any specific safety precautions or guidelines for your particular model of Robo Toolz laser level.
- Clean and dry your hands: Before working on your laser level, ensure that your hands are clean and dry. This will help prevent any accidental slips or damage caused by moisture on the device.
By adhering to these safety precautions, you can minimize the risk of accidents and ensure a safe working environment while rebuilding your Robo Toolz laser level.
Step 1: Disassembly
Before you can begin inspecting and cleaning your Robo Toolz laser level, you’ll need to disassemble it. Follow these steps to safely disassemble your laser level:
- Ensure the laser level is turned off and disconnected from any power source.
- Refer to the manufacturer’s instructions or user manual for guidance on how to open the laser level housing. Some models may have screws or clips that need to be removed or released.
- Use the appropriate screwdriver or tool to remove any screws or fasteners holding the housing together. Keep track of the screws and fasteners as you’ll need them for reassembly later.
- Gently pry apart the housing, taking care not to force any parts or damage any delicate components. Use a plastic opening tool or your fingers, if possible.
- As you disassemble the laser level, take note of the position and orientation of the various components. This will help you during reassembly and ensure the laser level functions properly.
- Set aside the housing and any other parts that are not essential to the disassembly process. Lay them in a safe and organized manner to avoid misplacing or damaging them.
- Once you’ve disassembled the laser level, take a moment to inspect the internal components for any signs of damage, wear, or dirt accumulation. This will help you identify the areas that need cleaning or replacement.
With the laser level disassembled, you’re now ready to move on to the next step: inspection and cleaning.
Step 2: Inspection and Cleaning
After disassembling your Robo Toolz laser level, it’s time to inspect and clean the internal components. This step is crucial as it helps identify any issues or areas that require attention. Follow these steps to effectively inspect and clean your laser level:
- Inspect the laser diode: Carefully examine the laser diode for any signs of damage, such as cracks or discoloration. If you notice any issues, you may need to replace the laser diode.
- Check the battery contacts: If your laser level operates on batteries, inspect the battery contacts for signs of corrosion or debris. Clean the contacts with a soft cloth or a cotton swab dipped in isopropyl alcohol to ensure a solid connection.
- Inspect the optics: Take a close look at the optics, including the lenses and mirrors, for any dirt, smudges, or scratches. Clean them using a microfiber cloth or lens cleaning solution to maintain clear and accurate laser beams.
- Examine the leveling mechanism: Inspect the leveling mechanism, such as the pendulum or digital leveling sensor, for any obstructions or misalignment. Gently remove any dirt or debris using compressed air or a soft brush.
- Clean the housing: Wipe down the inside of the housing with a microfiber cloth to remove dust, dirt, and any loose debris. If necessary, use compressed air to blow out any hard-to-reach areas.
- Inspect the wiring: Carefully inspect the wiring for any loose connections, frayed wires, or signs of damage. Ensure that all connections are secure and free from any debris or dirt.
- Clean the buttons and controls: If your laser level has buttons or controls, clean them using isopropyl alcohol and a soft cloth. This will remove any dirt or residue that may affect their functionality.
By thoroughly inspecting and cleaning the internal components of your laser level, you can address any issues and ensure optimal performance. Once you’re satisfied with the inspection and cleaning, you can move on to the next step: replacement parts (if necessary).
Read more: How To Work A Water Level Or Laser Level
Step 3: Replacement Parts
In some cases, during the inspection process, you may discover that certain components of your Robo Toolz laser level need to be replaced. Whether it’s a damaged laser diode, a faulty leveling sensor, or worn-out buttons, replacing these parts can help restore the functionality of your laser level. Follow these steps to determine and replace any necessary parts:
- Identify the faulty or damaged components: Based on your inspection, make a list of the components that need to be replaced. This could include the laser diode, leveling sensor, buttons, or any other parts that are not functioning properly.
- Order the replacement parts: Once you’ve identified the parts you need, search for reputable suppliers or contact the manufacturer to order the exact replacements. Ensure that you provide the specific model and serial number of your laser level to get the compatible parts.
- Remove the old parts: Carefully remove the faulty or damaged components from your laser level. This may involve unscrewing them, detaching wires, or using specialized tools for extraction.
- Install the new parts: Take the new replacement parts and install them in their respective positions. Follow any specific installation instructions provided by the manufacturer to ensure proper alignment and functioning of the components.
- Secure the new parts: Once the new parts are in place, secure them using screws, bolts, or any other fasteners specified by the manufacturer. Ensure that all connections are tight and secure.
- Double-check the installation: Before proceeding to the next step, double-check that all new parts are installed correctly and securely. This will help avoid any issues or malfunctions during the reassembly and calibration process.
By replacing any necessary parts, you can address any issues and ensure that your Robo Toolz laser level operates at its full potential. Once you’re satisfied with the replacement process, you can move on to the next step: reassembly.
When rebuilding a Robo Toolz laser level, make sure to carefully clean all the components and check for any damaged or worn parts before reassembling. This will ensure the level functions properly and accurately.
Step 4: Reassembly
After inspecting, cleaning, and replacing any necessary parts of your Robo Toolz laser level, it’s time to reassemble it. Follow these steps to ensure a successful and proper reassembly:
- Gather all the components: Collect all the parts you previously removed during the disassembly process. This includes the housing, screws, and any other accessories that were set aside.
- Refer to the manufacturer’s instructions: Consult the manufacturer’s instructions or user manual for guidance on the proper reassembly procedure specific to your Robo Toolz model.
- Start with the housing: Begin by aligning the housing pieces in their original positions. Pay close attention to any tabs, notches, or guides that indicate the correct alignment.
- Secure the housing: Once aligned, use the appropriate screws or fasteners to secure the housing pieces together. Start with a few screws to hold the housing in place and then insert the remaining screws.
- Tighten the screws: Gradually tighten all the screws, making sure not to overtighten as it could damage the housing or components. Use the appropriate screwdriver or tool for the type of screws used.
- Test the housing stability: After tightening the screws, gently shake the laser level housing to ensure it is securely fastened. If there is any movement or rattling, recheck the screws and tighten them as needed.
- Connect any detached wires: If any wires were disconnected during the disassembly process, carefully reconnect them to their respective terminals or connectors. Ensure that the connections are secure.
- Double-check the positioning: Verify that all the internal components are positioned correctly and haven’t shifted during the reassembly. Refer to any notes or photos you took during the disassembly process.
- Confirm the functionality: Before moving forward, it’s a good idea to perform a quick functionality check. Turn on the laser level to see if it powers up and responds properly to any buttons or controls.
By following these steps and paying attention to detail, you can successfully reassemble your Robo Toolz laser level. Once you’re satisfied with the reassembly, it’s time to move on to the next step: calibration.
Step 5: Calibration
Calibrating your Robo Toolz laser level is a crucial step to ensure accurate and precise leveling. Here’s a step-by-step guide on how to calibrate your laser level:
- Refer to the user manual: Consult the user manual or manufacturer’s instructions for specific calibration procedures tailored to your Robo Toolz model. This will provide you with the most accurate and relevant information.
- Find a stable surface: Set up the laser level on a stable and level surface. Use a bubble level or other leveling tool to confirm that the surface is level.
- Turn on the laser level: Power on the laser level and give it a few moments to stabilize.
- Adjust the leveling mechanism: Use the built-in leveling mechanism, whether it’s a pendulum or digital leveling sensor, to adjust and level the laser output. Follow the specific instructions for your model to achieve accurate leveling.
- Check the laser beam: Verify that the laser beam projects a straight, level line on a wall or surface. Adjust the leveling mechanism if necessary to ensure the laser line is perfectly horizontal or vertically plumb.
- Perform a distance test: Measure a known distance between two points and use the laser level to project a line between them. Verify that the laser line remains consistent and accurate throughout the measured distance.
- Adjustments and fine-tuning: If needed, use the calibration tool specific to your Robo Toolz model to make any additional adjustments or fine-tuning to achieve optimal accuracy.
- Repeat the calibration process if necessary: If you’re not satisfied with the calibrations results, repeat the process from step 2. It may take a few attempts to achieve the desired accuracy.
Calibration is essential to ensure that your Robo Toolz laser level provides accurate measurements. Take your time during this step to ensure precision and reliability. Once you are confident in the calibration, move on to the final step: testing and troubleshooting.
Step 6: Testing and Troubleshooting
After calibrating your Robo Toolz laser level, it’s important to thoroughly test its functionality and address any potential issues. Follow these steps to test and troubleshoot your laser level:
- Power on the laser level: Ensure that the laser level is turned on and ready for operation.
- Test the leveling feature: Place the laser level on a stable surface and activate the leveling mechanism. Verify that the laser beam remains level and steady, without any significant fluctuations or deviations.
- Check for alignment accuracy: Use the laser level to project a line onto a wall or surface and measure its alignment with a bubble level or other leveling tool. Confirm that the laser line aligns perfectly with the reference line.
- Test functionality of additional features: If your laser level has additional features, such as multiple laser lines, plumb dots, or slope modes, test each feature to ensure they are functioning correctly.
- Verify visibility range: Move to different distances from the laser level and check the visibility of the laser beam. Ensure that the beam remains visible and doesn’t fade or diminish significantly at various distances.
- Troubleshoot any issues: If you encounter any issues or inconsistencies during the testing phase, consult the user manual or manufacturer’s instructions for troubleshooting guidance. Common issues may include weak laser output, inaccurate leveling, or buttons not responding.
- Follow troubleshooting steps: Follow the recommended troubleshooting steps to address any identified issues. This may involve resetting the laser level, checking battery connections, cleaning optical components, or contacting customer support for further assistance.
- Retest after troubleshooting: Once you have attempted to troubleshoot and resolve any issues, retest the laser level to verify that the problems have been resolved. Repeat the necessary steps to ensure accurate and reliable performance.
Thoroughly testing your Robo Toolz laser level and addressing any troubleshooting needs will help ensure that your laser level is functioning optimally. By following these steps, you can confidently use your laser level for various leveling and alignment tasks. Congratulations on successfully rebuilding and restoring your Robo Toolz laser level!
Read more: How Dangerous Is Laser Level
Conclusion
Congratulations on successfully rebuilding your Robo Toolz laser level! By following the step-by-step instructions outlined in this guide, you have taken the necessary measures to restore your laser level to its optimal performance. Not only have you saved money by avoiding the purchase of a new laser level, but you have also extended the lifespan of your existing one.
Throughout the rebuilding process, you learned how to disassemble the laser level, inspect and clean its internal components, replace any faulty parts, reassemble the laser level, calibrate it for accurate leveling, and test its functionality. These steps are crucial for ensuring that your laser level provides precise measurements and reliable performance in various leveling and alignment applications.
Remember to always prioritize safety throughout the rebuilding process by following the recommended safety precautions. Disconnected from any power source, wearing safety goggles, and working in a well-ventilated area are just a few steps you can take to protect yourself while working with electronic devices.
Regular maintenance and cleaning of your Robo Toolz laser level will help prolong its lifespan and maintain its accuracy. If you notice any issues or inconsistencies in the future, refer back to this guide for troubleshooting tips or consult the manufacturer’s instructions.
Thank you for using this comprehensive guide to rebuild your Robo Toolz laser level. We hope that it has been a helpful resource and that your laser level now functions as good as new. Enjoy the precise and reliable performance of your laser level for all your leveling and alignment needs!
Additional Tips and Resources
Here are some additional tips and resources to further enhance your knowledge and ensure the successful rebuilding of your Robo Toolz laser level:
- Take pictures or videos: As you disassemble your laser level, take pictures or videos of each step. This will serve as a visual reference during reassembly and help ensure that you don’t miss any important details.
- Label components: Use small labels or sticky notes to mark and label the various components and their positions. This will make the reassembly process much easier and help prevent any confusion.
- Keep a clean work area: Maintain a clean and organized work area to avoid misplacing or losing small parts during the disassembly and reassembly process. Use small containers or trays to keep track of screws and other small components.
- Refer to online communities: Join online communities and forums related to laser levels, DIY projects, or Robo Toolz equipment. These platforms can provide valuable advice, troubleshooting tips, and additional resources.
- Read user reviews: Read user reviews and feedback on the specific model of Robo Toolz laser level you own. This can give you insights into common issues, repair suggestions, and alternative solutions.
- Regularly clean and maintain your laser level: Even after rebuilding your laser level, it’s important to regularly clean and maintain it. Remove any dust or debris, keep it stored in a protective case, and perform routine checks to ensure optimal performance.
- Contact customer support: If you encounter any technical difficulties or have further questions during the rebuilding process, don’t hesitate to reach out to the manufacturer’s customer support. They can provide additional guidance and assistance specific to your Robo Toolz laser level.
By utilizing these additional tips and resources, you can further enhance your skills and knowledge in rebuilding and maintaining your Robo Toolz laser level. Enjoy the benefits of a fully functional laser level for your various projects and applications!
Frequently Asked Questions about How To Rebuild A RoboToolz Laser Level
Was this page helpful?
At Storables.com, we guarantee accurate and reliable information. Our content, validated by Expert Board Contributors, is crafted following stringent Editorial Policies. We're committed to providing you with well-researched, expert-backed insights for all your informational needs.


0 thoughts on “How To Rebuild A RoboToolz Laser Level”