Articles
How To Recover Dining Room Seat Cushions
Modified: October 30, 2024
Learn how to recover your dining room seat cushions with our helpful articles. Find step-by-step guides and expert tips to revitalize your seating.
(Many of the links in this article redirect to a specific reviewed product. Your purchase of these products through affiliate links helps to generate commission for Storables.com, at no extra cost. Learn more)
Introduction
Welcome to our guide on how to recover dining room seat cushions. Over time, dining room seat cushions can become worn, stained, or outdated, making them less appealing and comfortable to sit on. However, instead of replacing your dining room chairs altogether, recovering the seat cushions is a cost-effective and straightforward solution.
In this article, we will walk you through the step-by-step process of recovering your dining room seat cushions. We will cover everything from preparing the necessary supplies to replacing the foam padding and attaching the new fabric. By following these instructions, you can give your dining room chairs a fresh new look and restore their comfort.
Before we dive into the details, let’s go over the supplies you will need for this project:
Supplies:
- Fabric of your choice
- Foam padding
- Scissors
- Tape measure or ruler
- Staple gun
- Staples
- Screwdriver (if necessary)
- Optional: Batting for extra cushioning
Once you have gathered all the necessary supplies, you will be ready to start recovering your dining room seat cushions. So let’s get started!
Key Takeaways:
- Transform worn dining room seat cushions into fresh, stylish additions by following a cost-effective recovery process. Choose durable fabric, replace foam padding, and secure the new fabric for a polished look.
- Personalize your dining room chairs with custom fabric choices and decorative details. Maintain recovered seat cushions by promptly cleaning spills, regular vacuuming, and periodic rotation for extended comfort and longevity.
Preparing the Supplies
Before you begin the process of recovering your dining room seat cushions, it’s important to gather and prepare all the necessary supplies. This will ensure that you have everything you need within reach as you progress through the steps. Here’s what you should do:
Step 1: Choose Your Fabric
Start by selecting the fabric for your dining room seat cushions. Consider the color scheme and style of your dining room to choose a fabric that complements the existing decor. It’s also important to select a fabric that is durable and easy to clean, especially if you have young children or frequently host guests.
Step 2: Measure Your Seat Cushions
Take precise measurements of your seat cushions to ensure that you purchase the right amount of fabric. Use a tape measure or ruler to measure the length, width, and thickness of each seat cushion. Add an extra inch to each measurement to account for seam allowances and room for error.
Step 3: Gather the Necessary Tools
Check that you have all the tools required for this project. You will need a pair of scissors for cutting the fabric, a staple gun for securing the fabric to the seat cushions, and a screwdriver if you need to remove the seat cushions from the chairs. Additionally, make sure you have an ample supply of staples to complete the process smoothly.
Step 4: Optional – Consider Adding Batting
If you want to provide extra cushioning to your seat cushions or give them a plumper appearance, consider adding a layer of batting. Batting can be placed on top of the foam padding before attaching the fabric. This step is purely optional and depends on your personal preference.
By taking the time to prepare your supplies before starting the actual recovery process, you set yourself up for a smoother and more efficient experience. Once you have all the necessary materials at hand, you can proceed to the next steps of removing the seat cushions from the chairs.
Removing the Seat Cushions
Now that you have gathered and prepared all the necessary supplies, it’s time to move on to the next step: removing the seat cushions from your dining room chairs. Follow these instructions to ensure a seamless and hassle-free process:
Step 1: Locate the Attachment Points
First, identify how the seat cushions are attached to the chairs. Most dining room chairs have screws or bolts securing the seat cushions in place. Flip the chair upside down and inspect the underside to find the attachment points. Alternatively, some chairs may have seat cushions that are simply held in place by gravity or hooks.
Step 2: Remove the Attachment Screws or Bolts
If your seat cushions are attached with screws or bolts, use a screwdriver or appropriate tool to carefully remove them. Place the screws or bolts in a safe place to avoid misplacing them. Keep track of the number of screws or bolts for each cushion, as you will need to reinstall them later.
Step 3: Detach the Cushion from the Chair
Once the attachment screws or bolts are removed, gently lift the seat cushion away from the chair. Be cautious of any wires or hooks that may be keeping the cushion in place. If necessary, carefully disengage these attachments to fully free the cushion from the chair.
Step 4: Repeat for Each Seat Cushion
Repeat the above steps for each seat cushion of your dining room chairs. Take your time and ensure that each cushion is detached properly to avoid any damages to the chair or the cushion itself.
By properly removing the seat cushions from the chairs, you create a clean canvas for the next steps of cleaning and recovering the cushions. Store the cushions in a safe place to prevent them from getting dirty or damaged during the remaining stages of the process.
Cleaning the Seat Cushions
Once you have successfully removed the seat cushions from your dining room chairs, it’s time to give them a thorough cleaning. Over time, seat cushions can accumulate dust, dirt, and stains, which can impact their appearance and comfort. Follow these steps to clean your seat cushions effectively:
Step 1: Vacuum the Cushions
Start by using a vacuum cleaner with an upholstery attachment to remove any loose debris, dust, or crumbs from the seat cushions. Pay special attention to the crevices and corners, as these areas tend to accumulate more dirt.
Step 2: Spot Clean Stains
If you notice any stains on your seat cushions, spot clean them using a mild detergent or upholstery cleaner. Dilute the cleaner according to the instructions and gently dab a clean cloth or sponge onto the stain. Be careful not to oversaturate the cushion and allow it to dry completely before moving on to the next step.
Step 3: Machine Wash (if applicable)
If your seat cushion covers are removable and machine washable, check the care label for instructions. If permitted, remove the covers and wash them in a delicate or gentle cycle using a mild detergent. Hang them to air dry or use a low heat setting in the dryer, if recommended.
Step 4: Air Dry the Seat Cushions
If your seat cushion covers are not removable or machine washable, it’s best to air dry the cushions after spot cleaning. Find a well-ventilated area or place them outside in a shaded spot to dry. Avoid direct sunlight, as it can fade or deform the fabric. Allow the seat cushions to fully dry before proceeding with the next steps.
Step 5: Optional – Refreshing with Fabric Freshener
If desired, you can spritz your seat cushions with a fabric freshener to give them a pleasant smell and eliminate any lingering odors. Choose a fabric freshener specifically designed for upholstery and follow the instructions on the bottle.
By taking the time to clean your seat cushions, you not only improve their appearance but also remove any allergens or dirt that may have accumulated over time. Once the seat cushions are clean and dry, you can proceed with the next steps of replacing the foam padding and attaching the new fabric.
Replacing the Foam Padding
With the seat cushions clean and dry, it’s time to address the foam padding. Over time, foam padding can lose its shape and support, affecting the comfort of your dining room chairs. Follow these steps to replace the foam padding and restore optimal cushioning:
Step 1: Measure and Assess the Existing Foam
Start by measuring the dimensions of the existing foam padding. Use a tape measure or ruler to determine the length, width, and thickness of the foam. Assess the condition of the foam and determine if it needs to be replaced entirely or if it can be reused by reshaping and fluffing it up.
Step 2: Purchase New Foam Padding
If the existing foam is worn out or doesn’t meet your comfort standards, purchase new foam padding of the same dimensions. You can find foam padding at craft stores or online suppliers. Opt for high-density foam that provides support and durability.
Step 3: Remove the Old Foam Padding (if necessary)
If you decide to replace the existing foam padding, carefully remove it from the seat cushion. Use a utility knife or scissors to cut away the old foam. Take care not to damage or puncture the seat cushion fabric during this process.
Step 4: Cut the New Foam Padding
Using the measurements you took earlier, cut the new foam padding to the appropriate size. Use a sharp utility knife or an electric carving knife for a clean and precise cut. Ensure that the new foam fits snugly within the seat cushion without bulging or sagging.
Step 5: Insert the New Foam Padding
Carefully place the new foam padding into the seat cushion, ensuring that it sits evenly and covers the entire surface area. Press down on the foam to ensure a secure fit. If necessary, trim any excess foam using a utility knife.
Step 6: Optional – Add Additional Layers of Batting
If you want to provide extra cushioning or achieve a plumper look, consider adding an additional layer of batting on top of the foam padding. This step is purely optional and depends on your personal preference.
By replacing the foam padding, you ensure that your dining room seat cushions regain their support and comfort. With the new foam padding in place, you are now ready to move on to the next steps of measuring and cutting the fabric for recovering the seat cushions.
Measuring and Cutting the Fabric
Now that you have replaced the foam padding, it’s time to measure and cut the fabric for recovering your dining room seat cushions. Follow these steps to ensure that you get accurate measurements and achieve a professional-looking finish:
Step 1: Lay Out the Fabric
Find a clean and spacious surface to work on. Lay out your chosen fabric with the right side facing down. Smooth out any wrinkles or creases to ensure an even and accurate measurement.
Step 2: Measure the Seat Cushions
Using a tape measure or ruler, measure the length and width of the seat cushions. Add an extra inch to each measurement to account for seam allowances and room for error. Write down the measurements for reference.
Step 3: Mark and Cut the Fabric
Using a fabric marking tool or pins, mark the measurements you took on the wrong side of the fabric. Double-check your markings to ensure accuracy. Once you are confident with the markings, use sharp fabric scissors to cut along the lines, following a straight and clean cut.
Step 4: Repeat for Each Seat Cushion
If you have multiple seat cushions to recover, repeat the measuring and cutting process for each cushion, ensuring consistency in size and shape. Take your time to achieve precise measurements and clean cuts for a professional finish.
Step 5: Optional – Add Seam Allowances
If you plan to sew the fabric edges together instead of using a no-sew method, add an additional half inch to each side of the fabric measurements to account for seam allowances. This will ensure that you have enough fabric to properly secure the edges when stitching.
By measuring and cutting the fabric accurately, you ensure that it fits snugly over the seat cushions and creates a polished and tailored look. With the fabric cut to size, you are now ready to move on to the next steps of attaching the fabric to the seat cushions and securing them back onto the dining room chairs.
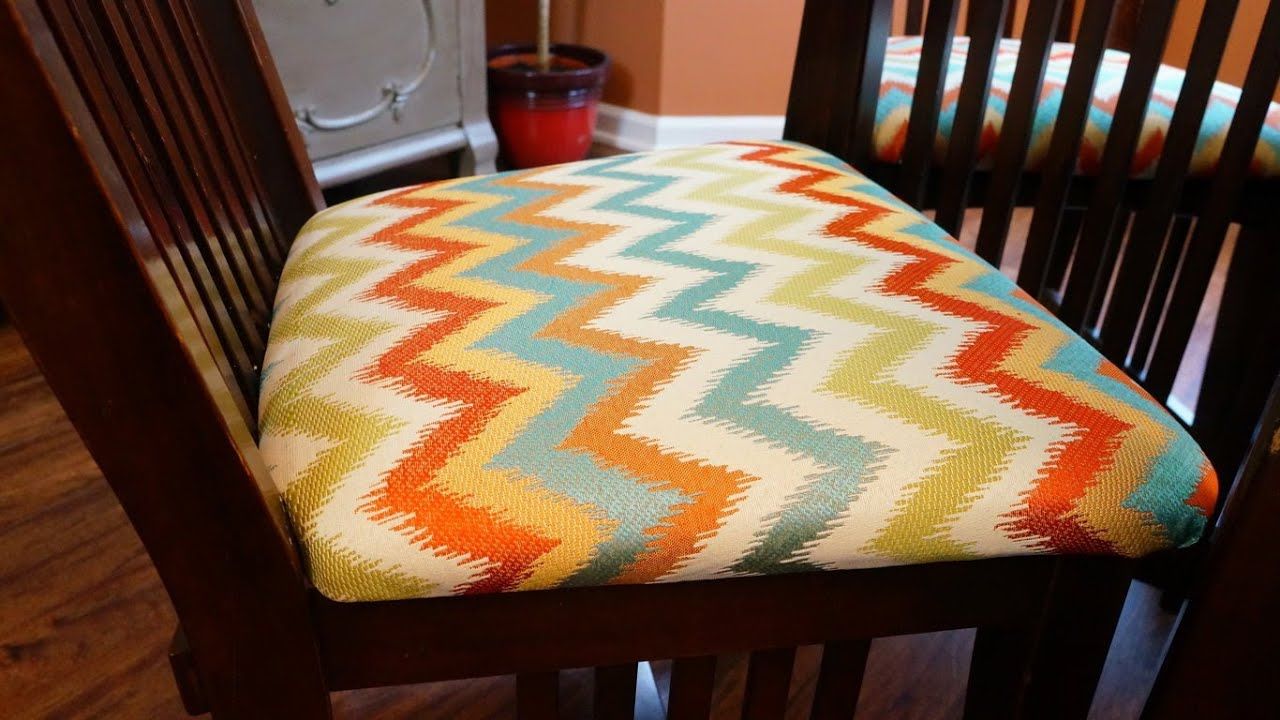
To recover dining room seat cushions, measure the dimensions of the cushions and select a fabric that is durable and easy to clean. Use a staple gun to secure the fabric to the cushion, pulling it taut for a smooth finish.
Attaching the Fabric to the Seat Cushions
With the fabric cut to size, it’s time to move on to attaching it to the seat cushions. Follow these steps to securely and neatly attach the fabric, giving your dining room chairs a fresh new look:
Step 1: Position the Fabric
Place the fabric piece over the top of the seat cushion, ensuring that the right side of the fabric is facing down. Align the edges of the fabric with the edges of the seat cushion, making sure there is an equal amount of excess fabric on all sides.
Step 2: Secure the first side
Starting on one side of the seat cushion, use a staple gun to attach the fabric to the underside of the cushion. Begin by stapling the center of the fabric edge, pulling it taut but not too tight. Gradually work your way toward the corners, spacing the staples approximately 2 inches apart.
Step 3: Secure the opposite side
Move to the opposite side of the cushion and repeat the stapling process. Ensure that the fabric is smooth and wrinkle-free as you staple it to the cushion. The fabric should be taut but not overly stretched.
Step 4: Secure the remaining sides
Continue to staple the fabric to the remaining two sides of the seat cushion, pulling it taut as you go. Take care to maintain a consistent and even tension across the entire cushion. Trim any excess fabric if necessary to ensure a clean and neat finish.
Step 5: Check the Fabric Alignment
Once all sides are secured, double-check the alignment of the fabric to ensure that it is straight and centered on the seat cushion. Make any necessary adjustments by loosening the staples and repositioning the fabric before re-stapling.
Step 6: Trim Excess Fabric
After confirming that the fabric is properly aligned and securely attached, trim any excess fabric from the underside of the seat cushion. Use scissors or a utility knife to cut the fabric close to the edge of the staples, taking care not to damage the fabric or cushion.
By following these steps, you can effectively attach the fabric to the seat cushions, providing a smooth and tailored appearance. With the fabric securely in place, you are now ready to move on to the final steps of securing the seat cushions back onto the dining room chairs and adding some finishing touches.
Securing the Seat Cushions Back to the Chairs
Now that you have attached the fabric to the seat cushions, it’s time to secure them back onto the dining room chairs. Follow these steps to ensure the seat cushions are properly fastened and provide a comfortable seating experience:
Step 1: Align the Seat Cushion
Take the seat cushion with the newly attached fabric and position it on top of the chair frame. Align the cushion so that it fits snugly within the chair, making sure it is centered and positioned correctly.
Step 2: Locate the Attachment Points
Refer back to the attachment points you identified earlier when removing the seat cushions. Depending on the design of your chair, these may be screws, bolts, hooks, or other types of fasteners.
Step 3: Reattach the Seat Cushion
If your chair uses screws or bolts, use a screwdriver or appropriate tool to carefully reattach the seat cushion to the chair frame. Line up the attachment points on the cushion with the corresponding holes or hooks on the chair. Securely tighten the screws or bolts to hold the cushion in place.
Step 4: Test the Stability
Once the seat cushion is attached, gently press down on it to ensure it is securely fastened. The cushion should feel stable and not shift or wobble when pressure is applied. Make any necessary adjustments to the attachment to achieve the desired stability.
Step 5: Repeat for each Chair
If you have multiple dining room chairs, repeat the above steps for each chair to secure the seat cushions back in place. Take your time to ensure all the cushions are properly attached and provide a consistent and comfortable seating experience.
Step 6: Align the Fabric
Before completing the process, double-check the alignment of the fabric on each seat cushion. Smooth out any wrinkles or imperfections to ensure a clean and professional appearance.
By securely attaching the seat cushions back onto the chairs, you provide stability and longevity to your newly recovered dining room chairs. With the seat cushions in place, it’s time to add some final touches and consider some maintenance tips to keep them in great condition.
Final Touches and Maintenance Tips
As you near the completion of recovering your dining room seat cushions, there are a few final touches you can add to enhance their appearance, as well as some maintenance tips to ensure their longevity. Follow these steps to put the finishing touches and keep your seat cushions in great condition:
Step 1: Trim Any Loose Threads
Inspect the fabric on the seat cushions and trim any loose threads with scissors. This will give a neat and clean finish to the cushions and prevent any further fraying or unraveling of the fabric.
Step 2: Add Decorative Details (Optional)
If desired, you can further personalize your seat cushions by adding decorative details such as piping, buttons, or contrasting fabric panels. This step is purely optional and depends on your personal preference and the overall aesthetic of your dining room.
Step 3: Fluff and Arrange the Cushions
Before using the dining room chairs, make sure to fluff and arrange the cushions so they are even and comfortable. Smooth out any wrinkles or lumps in the fabric and adjust the foam padding if needed to achieve optimal comfort.
Step 4: Clean Spills and Stains Promptly
To keep your seat cushions looking fresh, it’s important to clean up any spills or stains as soon as possible. Blot liquids with a clean cloth, and treat stains with a suitable upholstery cleaner according to the manufacturer’s instructions. Prompt action will prevent permanent stains from setting in.
Step 5: Vacuum or Brush Regularly
Regularly vacuum or brush your seat cushions to remove dust and debris. Use a soft brush attachment or a handheld vacuum to gently clean the fabric surface and keep the cushions looking clean and maintained.
Step 6: Rotate and Flip the Seat Cushions
To distribute wear and prolong the lifespan of the seat cushions, consider rotating and flipping them periodically. This helps to even out the pressure on the cushions and prevent one area from becoming overly worn or compressed.
By adding these final touches and following these maintenance tips, you can keep your recovered dining room seat cushions in excellent condition for years to come. Now, step back and admire your refreshed and inviting dining room chairs!
Conclusion
Congratulations! You have successfully learned how to recover your dining room seat cushions. By following the step-by-step guide provided in this article, you have transformed worn, stained, or outdated seat cushions into fresh, comfortable, and visually appealing additions to your dining room chairs.
Throughout the process, you have prepared the necessary supplies, removed the seat cushions from the chairs, cleaned the cushions, replaced the foam padding, measured and cut the fabric, attached the fabric securely to the cushions, and reinstalled the cushions back onto the chairs. Finally, you added some final touches and learned how to maintain the longevity and beauty of the recovered seat cushions.
Recovering dining room seat cushions not only provides a budget-friendly alternative to replacing the entire chair but also allows for customization and a fresh new look. You can choose fabrics that match your décor, experiment with different textures, or add personalized details to truly make your dining room chairs unique.
Remember to regularly clean and maintain your recovered seat cushions to extend their lifespan and keep them looking their best. It’s also a good idea to periodically assess the condition of the cushions and make any necessary repairs or replacements to ensure ongoing comfort and support.
With your newly recovered seat cushions, you can now enjoy comfortable and stylish dining experiences with family and friends. So take a seat, relish the beauty of your revamped chairs, and savor every moment in your refreshed dining space.
Frequently Asked Questions about How To Recover Dining Room Seat Cushions
Was this page helpful?
At Storables.com, we guarantee accurate and reliable information. Our content, validated by Expert Board Contributors, is crafted following stringent Editorial Policies. We're committed to providing you with well-researched, expert-backed insights for all your informational needs.


0 thoughts on “How To Recover Dining Room Seat Cushions”