Articles
How To Replace A Door Threshold And Sill
Modified: August 27, 2024
Learn how to replace a door threshold and sill with our step-by-step guide. Our articles provide valuable insights and tips for a successful replacement project.
(Many of the links in this article redirect to a specific reviewed product. Your purchase of these products through affiliate links helps to generate commission for Storables.com, at no extra cost. Learn more)
Introduction
Welcome to the ultimate guide on how to replace a door threshold and sill. Your door’s threshold and sill play a crucial role in preventing drafts, maintaining energy efficiency, and providing a seamless transition between the interior and exterior of your home. Over time, these components can become worn, damaged, or inefficient, necessitating their replacement.
In this article, we will walk you through the step-by-step process of removing the old door threshold and sill and installing new ones. We will also provide you with a list of tools and materials you will need for the project. So, whether you are a seasoned DIY enthusiast or a beginner looking to tackle your first home improvement project, this guide is here to help you.
Before we dive into the details, it is essential to mention that it is crucial to prioritize safety while working on any home improvement project. Ensure that you have the appropriate protective gear such as safety glasses and gloves, and exercise caution throughout the process.
Now, let’s get started on replacing your door threshold and sill, giving your entrance a fresh and functional update.
Key Takeaways:
- Replacing a door threshold and sill is a manageable DIY project that can significantly improve energy efficiency and enhance the appearance of your home’s entrance. Prioritize safety, take your time, and enjoy the benefits of a well-sealed and attractive doorway.
- Proper preparation, precise measurements, and careful installation are key to successfully replacing a door threshold and sill. By following the step-by-step process and adding the finishing touches, you can achieve a professional-looking and long-lasting result.
Read more: How To Replace Sill Plate In A Crawl Space
Tools and Materials Required
Before you begin replacing your door threshold and sill, you’ll need to gather a few essential tools and materials. Having these items on hand will make the process much smoother and more efficient. Here’s a comprehensive list of what you’ll need:
Tools:
- Screwdriver (both flathead and Phillips)
- Utility knife
- Tape measure
- Pry bar
- Chisel
- Pencil
- Hammer
- Circular saw or hand saw
- Drill
- Clamps
- Paintbrush
- Caulking gun
Materials:
- New door threshold and sill
- Wood shims
- Screws
- Nails
- Construction adhesive
- Weatherstripping
- Exterior caulk
- Wood putty
- Primer and paint (if desired)
Make sure to have all the necessary tools and materials before you start the project. This will help to avoid unnecessary delays and ensure a smoother replacement process.
With the tools and materials list complete, let’s move on to the step-by-step process of replacing the old door threshold and sill.
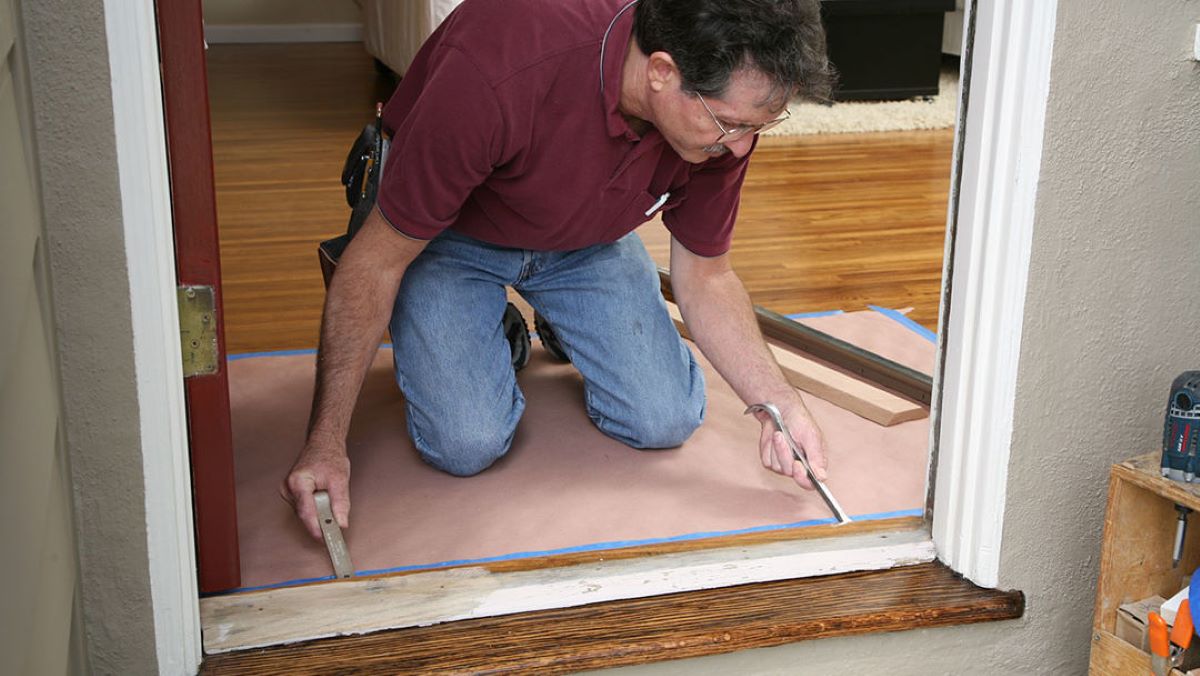
Step 1: Remove the Old Door Threshold and Sill
The first step in replacing a door threshold and sill is to remove the old ones. This process may require some effort and careful maneuvering, but with the right tools and technique, it can be done effectively. Here’s how to do it:
- Start by opening the door completely and propping it open to ensure stability.
- Inspect the existing threshold and sill to identify any screws or nails holding them in place. Use a screwdriver or pry bar to remove these fasteners.
- Once the fasteners are removed, use a utility knife to score along the edges where the threshold and sill meet the door frame. This will help loosen any adhesive or caulking holding them in place.
- Use a pry bar and hammer to gently pry and lift the old threshold and sill away from the door frame. Take your time and be careful not to damage the surrounding frame or flooring.
- If the threshold and sill are secured with additional adhesive, use a chisel and hammer to carefully break the seal and remove any remaining pieces.
- Inspect the door frame for any damage or rot. If necessary, repair or replace any damaged sections before proceeding with the installation of the new threshold and sill.
Remember, patience and caution are key during this step. Take your time to ensure that the old threshold and sill are fully removed, and that the door frame is in good condition for the installation of the new components. With the old threshold and sill removed, you’re ready to move on to the next step: preparing the door opening.
Read more: How To Replace A Patio Door
Step 2: Prepare the Door Opening
Now that you have successfully removed the old door threshold and sill, it is crucial to prepare the door opening before installing the new components. Preparing the door opening ensures a proper fit and helps to achieve a seamless installation. Follow these steps to prepare the door opening:
- Measure the width of the door opening using a tape measure. This measurement will guide you when cutting the new door threshold to ensure an accurate fit.
- Inspect the subfloor and remove any debris or adhesive residue from the old threshold and sill. Ensure that the subfloor is clean and level for the installation of the new components.
- If necessary, use wood shims to adjust and level the subfloor. Place the shims strategically under the door opening, making sure they are secure and provide a level surface for the new threshold.
- Check the height of the door opening to determine if any adjustments are needed. If the new threshold is higher than the current opening, you may need to trim the bottom of the door to accommodate a proper fit.
- Using a pencil, mark any areas where the new threshold may need to be notched or trimmed to fit around door jambs or other obstructions. This will help guide you when cutting the threshold later.
By preparing the door opening, you are ensuring that the new threshold and sill will fit properly and function effectively. It is essential to take the time to measure, level, and make any necessary adjustments before proceeding with the installation. With the door opening prepared, you’re ready to move on to the next step: measuring and cutting the new door threshold and sill.
Step 3: Measure and Cut the New Door Threshold and Sill
With the door opening prepared, it’s time to measure and cut the new door threshold and sill. Accurate measurements and precise cuts are crucial for a proper fit and a professional-looking installation. Follow these steps to measure and cut the new components:
- Measure the width of the door opening using a tape measure. This measurement will guide you when cutting the door threshold.
- Transfer the width measurement to the new door threshold, marking it with a pencil. Ensure that the mark is straight and clearly visible.
- If the new door threshold needs to be notched or trimmed to fit around door jambs or obstructions, use a circular saw or hand saw to make the necessary cuts. Follow the marked lines carefully to achieve clean and precise cuts.
- Test-fit the new door threshold in the prepared opening to ensure a proper fit. Make any necessary adjustments by trimming or notching the threshold further if needed. It’s better to cut slightly less than needed and gradually trim more until achieving a perfect fit.
- Repeat the measuring and cutting process for the new door sill, if required. The length of the sill should match the width of the door opening, and any notches or cuts should align with the door frame and other components.
Remember to wear appropriate safety gear, such as safety glasses, when cutting the new components. Take your time during this step, as accurate measurements and precise cuts are crucial for a successful installation. With the new door threshold and sill measured and cut to the correct dimensions, you’re ready to move on to the next step: installing the new door threshold.
Step 4: Install the New Door Threshold
Now that you have measured and cut the new door threshold, it’s time to install it in the door opening. A properly installed threshold will help prevent drafts, improve energy efficiency, and provide a seamless transition between the interior and exterior of your home. Follow these steps to install the new door threshold:
- Apply a bead of construction adhesive along the bottom of the door opening. This adhesive will help secure the threshold in place and prevent any movement or shifting.
- Carefully position the new door threshold in the opening, ensuring that it aligns with the marks and notches made during the preparation stage. Press it firmly into the adhesive, making sure it sits flush against the subfloor and is level.
- Use screws or nails to secure the new door threshold to the door opening. Place the fasteners at strategic points, ensuring that they penetrate both the threshold and the subfloor for maximum stability.
- If the new door threshold has adjustable screws or leveling features, make any necessary adjustments to ensure a level surface. This will help create a smooth and seamless transition between the threshold and the flooring.
- Check the functionality of the door by opening and closing it. Ensure that it moves smoothly over the new threshold and that there are no obstructions or interference.
Properly installing the new door threshold is crucial for the overall performance and appearance of your door. Take your time to ensure a secure and level installation. With the new door threshold in place, you’re ready to move on to the next step: installing the new door sill.
When replacing a door threshold and sill, make sure to measure and cut the new threshold to fit the opening precisely. Use a waterproof sealant to ensure a tight and secure fit.
Step 5: Install the New Door Sill
After successfully installing the new door threshold, it’s time to move on to installing the new door sill. The door sill provides support and helps maintain the integrity of the door frame. Follow these steps to install the new door sill:
- Apply a generous amount of construction adhesive to the bottom of the door frame, where the door sill will be installed. This adhesive will help secure the sill in place and prevent any movement or shifting.
- Position the new door sill in the adhesive, ensuring that it aligns with the edges of the door frame and the marks made during the preparation stage. Press it firmly into place, making sure it sits flush against the subfloor and the threshold.
- Use screws or nails to secure the new door sill to the door frame. Place the fasteners at strategic points along the length of the sill, ensuring that they penetrate both the sill and the subfloor for maximum stability.
- Check the levelness of the door sill using a level. Make any necessary adjustments by adding shims under the sill to achieve a level surface.
- Apply a bead of exterior caulk along the edges of the door sill, where it meets the door frame and the threshold. This will help seal any gaps and prevent water infiltration.
- Allow the adhesive and caulk to dry according to the manufacturer’s instructions before subjecting the door sill to regular use.
By properly installing the new door sill, you are ensuring the stability and longevity of your door frame. Take your time to align and secure the sill correctly. With the new door sill in place, you’re ready to move on to the final step: sealing and finishing the door threshold and sill.
Read more: How To Replace Closet Door
Step 6: Seal and Finish the Door Threshold and Sill
Sealing and finishing the door threshold and sill is the final step in the replacement process. This step ensures that the components are properly protected, enhance their appearance, and improve their performance. Follow these steps to seal and finish the door threshold and sill:
- Inspect the edges of the door threshold and sill for any gaps or openings. Fill any gaps with wood putty, using a putty knife. Smooth out the putty and allow it to dry according to the manufacturer’s instructions.
- Once the putty is dry, sand down any rough areas on the door threshold and sill using sandpaper. This will create a smooth and even surface for further treatment.
- Apply a coat of primer to the door threshold and sill, using a paintbrush. The primer will help seal the wood, improve adhesion, and provide a base for the final finish. Allow the primer to dry completely before proceeding.
- Choose a suitable paint or stain color for the door threshold and sill. Apply the paint or stain according to the manufacturer’s instructions, using a paintbrush or a foam applicator. Ensure even coverage and allow the first coat to dry before applying additional coats, if necessary.
- After the final coat of paint or stain has dried, apply a clear sealant or varnish to the door threshold and sill. This will provide an added layer of protection and enhance the durability of the finish. Allow the sealant to dry completely before subjecting the door threshold and sill to regular use.
- Clean up any remaining debris or dust from the installation process and dispose of it properly. Store any leftover materials or tools for future use or proper disposal.
Sealing and finishing the door threshold and sill not only protects them from moisture and wear but also adds an aesthetic touch to your entrance. Take your time to apply the finishes carefully and ensure that they are fully dry before using the door. With the door threshold and sill sealed and finished, your replacement project is complete!
Congratulations on successfully replacing your door threshold and sill. By following this comprehensive guide, you have improved the functionality, energy efficiency, and overall appearance of your doorway. Enjoy the benefits of your newly installed components for years to come.
Conclusion
Replacing a door threshold and sill may seem like a daunting task, but with the right guidance and a little effort, you can accomplish it successfully. By following the step-by-step process outlined in this guide, you have learned how to remove the old door threshold and sill, prepare the door opening, measure and cut the new components, and install them properly. Additionally, you have learned how to seal, finish, and add the final touches to ensure a professional-looking and long-lasting result.
A well-functioning door threshold and sill are essential for maintaining energy efficiency, preventing drafts, and providing a seamless transition between the interior and exterior of your home. By replacing these components, you have improved these aspects significantly while enhancing the overall appearance of your entrance.
Throughout the process, it’s essential to prioritize safety by using the appropriate tools and protective gear. Take your time and exercise caution to ensure a smooth and successful installation. Remember that it’s okay to seek professional help if you’re unsure about any aspect of the project.
Now that you have successfully replaced your door threshold and sill, take a moment to appreciate your hard work. Enjoy the benefits of a well-sealed and attractive door entrance. Whether you’re looking to boost your home’s energy efficiency or simply update the look of your doorway, this project is sure to make a noticeable difference.
Thank you for following this comprehensive guide on how to replace a door threshold and sill. We hope this article has provided you with the knowledge and confidence to tackle your next home improvement project. Happy renovating!
Frequently Asked Questions about How To Replace A Door Threshold And Sill
Was this page helpful?
At Storables.com, we guarantee accurate and reliable information. Our content, validated by Expert Board Contributors, is crafted following stringent Editorial Policies. We're committed to providing you with well-researched, expert-backed insights for all your informational needs.


0 thoughts on “How To Replace A Door Threshold And Sill”