
Articles
How To Replace A Maglite LED Bulb
Modified: August 16, 2024
Discover step-by-step articles on how to easily replace your Maglite LED bulb for improved lighting and functionality. Find expert advice and tips!
(Many of the links in this article redirect to a specific reviewed product. Your purchase of these products through affiliate links helps to generate commission for Storables.com, at no extra cost. Learn more)
Overview
Replacing the LED bulb in your Maglite flashlight can be a simple and cost-effective way to ensure its longevity and performance. LED bulbs are known for their energy efficiency and long lifespan, making them a popular choice for flashlight enthusiasts. Whether your Maglite’s LED bulb has burnt out or you simply want to upgrade to a brighter or different color option, this article will guide you through the process of replacing the bulb with ease.
Before embarking on the replacement process, it is important to gather the necessary materials and familiarize yourself with the Maglite model you own. Different models may have slightly different procedures for bulb replacement, so consulting the manufacturer’s instructions can be helpful.
The steps involved in replacing the Maglite LED bulb are straightforward and can be completed by following a few simple instructions. However, it is essential to handle the bulb and the Maglite with care to avoid any damage during the process. Additionally, choosing the right replacement bulb is crucial for optimal performance.
This article will outline the step-by-step process for replacing the LED bulb in your Maglite flashlight. It will also provide tips and considerations to ensure a successful replacement and enhance the overall performance and lifespan of your flashlight. By following these guidelines, you can confidently replace the LED bulb and continue enjoying the reliable illumination that Maglite flashlights are known for.
So, let’s dive into the steps involved in replacing the bulb and explore some useful tips and considerations along the way to make the process as smooth as possible.
Key Takeaways:
- Replacing the LED bulb in your Maglite flashlight is a simple process that can enhance brightness and efficiency, ensuring reliable illumination for years to come. Follow the steps and tips provided for a successful upgrade.
- Handle the LED bulb with care, refer to manufacturer’s instructions, choose the right replacement bulb, and keep your Maglite clean and dry to maintain optimal performance and longevity. Enjoy improved illumination and reliability with a new LED bulb.
Read also: 11 Best LED Bulb For Maglite for 2025
Introduction
If you own a Maglite flashlight and notice that the LED bulb is no longer functioning as it should, it may be time to replace it. Fortunately, replacing the LED bulb in a Maglite is a relatively simple process that can be done at home with just a few tools and some basic knowledge. This article will provide you with a step-by-step guide on how to replace the LED bulb in your Maglite flashlight.
Before we dive into the steps, it’s important to note that Maglite flashlights come in different sizes and models, each with its own specifications and methods for bulb replacement. Therefore, it’s recommended to consult the user manual or official resources provided by Maglite to ensure that you are following the correct procedure for your specific flashlight model.
Steps to Replace Maglite LED Bulb
Step 1: Gather Required Materials
The first step is to gather all the necessary materials for the replacement process. You will need a replacement LED bulb that is compatible with your Maglite flashlight model. Additionally, make sure to have a small screwdriver, such as a Phillips or flathead, depending on the type of screws used to secure the bulb inside the flashlight.
Step 2: Prepare the Maglite
Before removing the existing LED bulb, it’s crucial to ensure that the Maglite flashlight is turned off to prevent any accidents. Unscrew the tailcap to access the battery compartment and remove the batteries. This will ensure your safety and prevent any potential damage to the flashlight during the replacement process.
Read more: How To Replace Light Bulb Socket
Step 3: Remove the Existing LED Bulb
Next, locate the LED bulb inside the flashlight. Depending on the model, the bulb may be secured with screws or clips. Carefully remove any screws or clips that hold the bulb in place. Gently pull out the existing bulb from its socket, being cautious not to damage any wiring or connectors.
Step 4: Install the New LED Bulb
Take the new LED bulb and align the pins or connectors on the base of the bulb with the corresponding connectors inside the Maglite flashlight’s socket. Insert the bulb into the socket, making sure it is securely seated. If there were any screws or clips that held the previous bulb, reattach them to secure the new bulb in place.
Step 5: Test the Replacement
Once the new bulb is in place, reinsert the batteries into the flashlight and screw the tailcap back on. Turn on the flashlight to ensure that the new LED bulb is working properly. If the light does not turn on, double-check the bulb’s installation and make sure the batteries are properly inserted.
That’s it! You have successfully replaced the LED bulb in your Maglite flashlight. Now you can enjoy the improved illumination and extended lifespan that a new LED bulb provides.
Keep in mind that these steps serve as general guidelines, and specific flashlight models may have slight variations in the replacement process. Always refer to the manufacturer’s instructions or official resources for your particular flashlight model to ensure accurate and safe bulb replacement.
Step 1: Gather Required Materials
The first step in replacing the LED bulb in your Maglite flashlight is to gather all the materials you will need for the process. By being prepared with the necessary tools and components, you can efficiently complete the replacement without any interruptions. Here is a list of materials you will need:
- Replacement LED Bulb: Make sure to choose an LED bulb that is compatible with your specific Maglite flashlight model. Refer to the user manual or check Maglite’s official website for information on compatible bulbs.
- Small Screwdriver: Depending on the type of screws used to secure the bulb inside the flashlight, you will need a small screwdriver. It is recommended to have both a Phillips and a flathead screwdriver to cater to different models.
Having these materials readily available before starting the replacement process will save you time and allow for a seamless experience. Once you have gathered the required materials, you can move on to the next step in replacing the LED bulb in your Maglite flashlight.
Keep in mind that while these are the essential materials needed for the replacement process, it is always a good idea to have a clean cloth or microfiber towel on hand to wipe away any dust or debris that may have gathered inside the flashlight. This will help ensure optimal performance and prevent any issues with the new LED bulb.
Now that you have all the necessary materials, you are ready to proceed to the next step: preparing your Maglite flashlight for the bulb replacement. This step involves turning off the flashlight and removing the batteries to ensure your safety and prevent any damage during the replacement process.
Read more: How To Replace Pool Light Bulb
Step 2: Prepare the Maglite
Before beginning the process of replacing the LED bulb in your Maglite flashlight, it is essential to properly prepare the flashlight to ensure a safe and successful replacement. By following these steps, you can avoid any potential accidents or damage during the process.
The first thing you need to do is turn off the Maglite flashlight. This will prevent any accidental activation of the flashlight while you are working on it. It is important to note that some Maglite models have a separate power switch, while others operate by fully tightening or loosening the head or tailcap. Consult the user manual or instructions for your specific flashlight model to determine the correct method for turning off your flashlight.
Once the flashlight is turned off, it is time to remove the batteries. Unscrew the tailcap of the flashlight to access the battery compartment. Carefully remove the batteries from the compartment, taking note of their orientation for reinstallation later. Removing the batteries not only prevents any accidental activation but also ensures your safety by removing the power source from the flashlight.
After removing the batteries, take a moment to inspect the battery compartment and contacts. Wipe away any dirt or debris using a clean cloth or a microfiber towel. Keeping the battery compartment clean ensures optimal electrical conductivity and prevents any potential issues with the new LED bulb. If you notice any corrosion or damage to the battery contacts, gently clean them using a cotton swab dipped in a small amount of rubbing alcohol.
Additionally, it is a good practice to inspect the outer body of the flashlight for any dirt or grime. Wipe down the exterior of the flashlight using a clean cloth or microfiber towel to remove any dust or residue that may have accumulated. This step is especially important if your flashlight has been used in dusty or dirty environments.
By properly preparing the Maglite flashlight, you ensure a clean and safe workspace for the LED bulb replacement. With the flashlight turned off, batteries removed, and the exterior clean, you are ready to proceed to the next step of removing the existing LED bulb from the Maglite flashlight.
Step 3: Remove the Existing LED Bulb
Now that you have prepared your Maglite flashlight, it’s time to remove the existing LED bulb. This step requires caution to avoid damaging any internal components of the flashlight. Follow these instructions to safely remove the bulb:
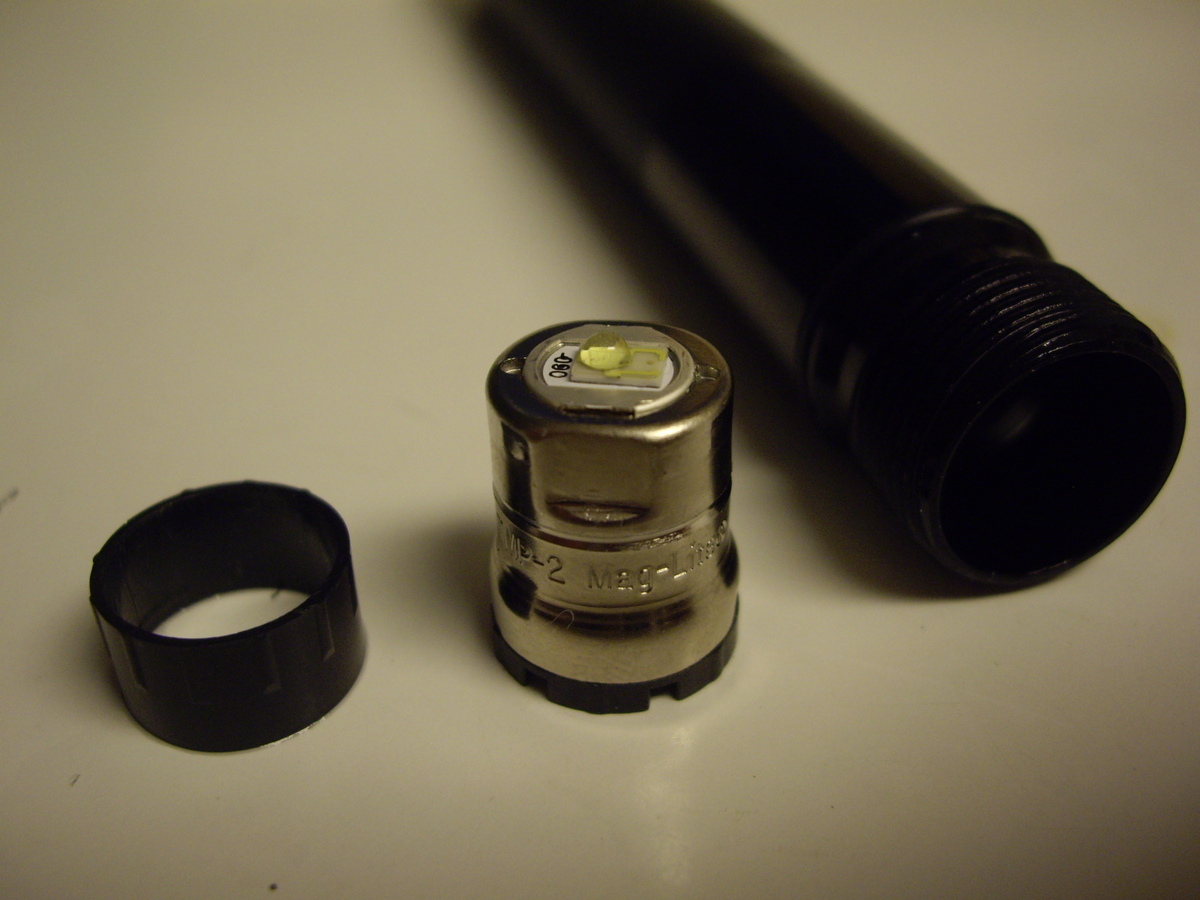
- Locate the LED bulb inside the flashlight. The exact location may vary depending on the model of your Maglite flashlight. In most cases, the bulb is found at the front end of the flashlight, just behind the lens.
- Inspect the bulb to determine how it is secured inside the flashlight. Some models have screws that hold the bulb in place, while others use clips or other fastening mechanisms. Refer to the user manual or online resources for your specific flashlight model to identify the appropriate method of bulb attachment.
- If your flashlight has screws securing the bulb, use a small screwdriver (Phillips or flathead, depending on the type of screws) to carefully remove them. Take note of the number of screws and their location for reassembly later.
- If your flashlight uses clips or other fastening mechanisms, gently release or disengage them to free the bulb. Be careful not to apply excessive force as it may cause damage.
- Once the bulb is no longer secured, gently pull it out from its socket. If the bulb resists, wiggle it slightly while pulling to loosen it from the connectors. Be mindful of any wires or connectors attached to the bulb, ensuring they are not pulled or damaged in the process.
During the removal process, it is essential to handle the existing LED bulb with care. Avoid touching the bulb itself as the oils from your skin can reduce its lifespan or cause it to malfunction. Instead, hold the bulb by its base or wear latex gloves to prevent direct contact.
Once you have successfully removed the existing LED bulb from your Maglite flashlight, set it aside in a safe place. This will allow you to compare it with the new replacement bulb later, ensuring a proper fit and compatibility.
The next step involves installing the new LED bulb in your Maglite flashlight, which will significantly enhance its performance and brightness. Follow the instructions in the next step to complete the replacement process successfully.
Step 4: Install the New LED Bulb
With the existing LED bulb successfully removed from your Maglite flashlight, it’s time to install the new bulb. This step is crucial in ensuring that the replacement bulb fits securely and functions properly in your flashlight. Follow these steps to install the new LED bulb:
- Take the new LED bulb and carefully inspect it to make sure it is the correct replacement for your Maglite flashlight. Compare it with the previously removed bulb to ensure a similar size, shape, and connector layout.
- Align the pins or connectors on the base of the new bulb with the corresponding connectors inside the Maglite flashlight’s socket. It’s important to line them up properly to establish a secure electrical connection.
- Gently insert the new LED bulb into the socket, applying even pressure until it is fully seated. Take care not to use excessive force, as this may damage the bulb or the flashlight.
- If your flashlight used screws to secure the previous bulb, reattach them to hold the new bulb in place. Use the same screwdriver that you used during the removal process to ensure a proper fit. Make sure to tighten the screws just enough to secure the bulb without over-tightening.
- For flashlights that used clips or other fastening mechanisms, ensure that the new bulb is securely held in place by engaging the clips or fasteners. Double-check that the bulb is firmly attached and does not move or shake when the flashlight is handled.
During the installation process, it is important to handle the new LED bulb with care. Avoid touching the bulb itself, as the oils from your skin can affect its performance or cause premature failure. If you accidentally touch the bulb, clean it with a lint-free cloth or isopropyl alcohol before installation.
Once the new LED bulb is securely installed in your Maglite flashlight, give it a gentle tug or twist to ensure that it is properly seated and won’t come loose during use. A securely fitted bulb will provide reliable illumination and optimize the performance of your flashlight.
In the final step, you will test the replacement to ensure that the new LED bulb is functioning correctly. Follow the instructions in the next step to complete the process and verify the success of your LED bulb replacement.
Step 5: Test the Replacement
Now that you have successfully installed the new LED bulb in your Maglite flashlight, it’s time to test the replacement and ensure that everything is functioning correctly. Follow these steps to test the newly replaced LED bulb:
- Reinsert the batteries into the flashlight, making sure they are properly oriented according to the manufacturer’s instructions. Securely screw the tailcap back onto the flashlight.
- Turn on the flashlight by either using the power switch or fully tightening the head or tailcap, depending on the flashlight model. If your flashlight has multiple brightness settings or additional features, make sure to cycle through them to verify that all functions are working.
- Observe the beam of light produced by the new LED bulb. It should be bright, even, and consistent. If the light is dim, flickering, or exhibiting any abnormalities, double-check the bulb’s installation and battery orientation. Ensure that the batteries are fully charged or replace them if necessary.
- If the new LED bulb is functioning correctly, congratulations! You have successfully replaced the bulb in your Maglite flashlight. Take a moment to appreciate the improved illumination and extended lifespan that the new bulb provides.
- If the light is not working, first, ensure that the batteries are properly inserted and charged. If the issue persists, double-check the bulb’s installation, making sure it is securely seated and the connectors have proper alignment. If the problem continues, consider consulting a professional or contacting Maglite customer support for further assistance.
Testing the replacement ensures that the newly installed LED bulb is functioning as expected, providing you with reliable illumination. If any issues arise during the testing process, refer to the troubleshooting steps outlined above or seek the guidance of a professional to address the problem.
Read more: How To Replace Light Bulb In Microwave
Tips and Considerations
Here are some additional tips and considerations to keep in mind when replacing the LED bulb in your Maglite flashlight:
- Handle the Bulb with Care: As mentioned before, avoid touching the bulb with your bare hands to prevent oil transfer. Use gloves or handle the bulb by its base to maintain its performance and longevity.
- Refer to the Manufacturer’s Instructions: While the steps outlined in this guide provide general guidelines for bulb replacement, it’s always advisable to consult your Maglite flashlight’s user manual or official resources for specific instructions and model-specific details.
- Choose the Right Replacement Bulb: Ensure that the replacement LED bulb you select is compatible with your Maglite flashlight model. Check the specifications and requirements provided by the manufacturer to guarantee a proper fit and optimal performance.
- Keep the Maglite Clean and Dry: Regularly clean the exterior and interior components of your Maglite flashlight to prevent dirt, dust, or moisture from affecting its performance. Wipe down the flashlight and remove any debris to maintain its functionality over time.
By following these tips and considerations, you can ensure a successful LED bulb replacement and continue enjoying the reliable and powerful illumination provided by your Maglite flashlight.
Tip 1: Handle the Bulb with Care
When replacing the LED bulb in your Maglite flashlight, it is crucial to handle the bulb with care to avoid any damage or compromised performance. Here are some tips on how to handle the bulb properly:
Avoid Touching the Bulb with Bare Hands: The oils from your skin can transfer onto the bulb’s surface, potentially affecting its performance or causing premature failure. To prevent this, avoid touching the bulb directly with your bare hands.
Wear Gloves: To minimize direct contact with the bulb, it is advisable to wear gloves while handling it. Latex gloves are a good option as they provide a barrier between your skin and the bulb’s surface. This prevents the transfer of oils and ensures a clean installation.
Handle the Bulb by the Base: Instead of gripping the bulb or touching the glass, hold the bulb by its base. The base is typically the metal or plastic part that connects to the flashlight’s socket. Handling the bulb by the base helps reduce the risk of any accidental damage to the fragile components.
Use a Clean, Lint-Free Cloth: If you accidentally touch the bulb with your bare hands, or if it becomes dirty during the replacement process, use a clean, lint-free cloth to wipe it clean. Gently remove any oils, fingerprints, or debris from the bulb’s surface before installing it into the flashlight.
Protect the Bulb from Impact: The LED bulb is a delicate component, and any impact or rough handling can potentially damage it. Be mindful of where you place the bulb during the replacement process and avoid accidentally dropping or bumping it against any hard surfaces.
Store Spare Bulbs Properly: If you have spare LED bulbs for your Maglite flashlight, store them in a cool, dry place, away from direct sunlight and excessive heat. This helps preserve their integrity and ensures they are ready for future replacements when needed.
By following these tips and handling the LED bulb with care, you can protect its performance and longevity. Proper handling ensures that the bulb remains in optimal condition, providing you with efficient and reliable illumination whenever you use your Maglite flashlight.
When replacing the Maglite LED bulb, make sure to use the correct replacement bulb size and type to ensure proper fit and function. Always follow the manufacturer’s instructions for safe and effective replacement.
Tip 2: Refer to the Manufacturer’s Instructions
When replacing the LED bulb in your Maglite flashlight, it is always advisable to refer to the manufacturer’s instructions or official resources. Maglite provides specific guidelines for each flashlight model, ensuring a seamless and safe replacement process. Here are the reasons why you should always consult the manufacturer’s instructions:
Model-Specific Information: Each Maglite flashlight model may have slightly different specifications, assembly methods, or bulb replacement procedures. By referring to the manufacturer’s instructions, you can ensure that you are following the correct process for your specific flashlight model. This helps eliminate any guesswork and minimizes the risk of errors during the replacement process.
Important Safety Guidelines: The manufacturer’s instructions often include safety precautions and guidelines that are specific to the flashlight. These guidelines may highlight potential hazards, precautions to take while replacing the bulb, or recommendations for personal protective equipment (PPE) to ensure your safety. Following these safety guidelines is essential to prevent accidents or damage to the flashlight or yourself.
Troubleshooting and Maintenance Tips: The manufacturer’s instructions often provide additional troubleshooting tips or maintenance suggestions. These resources can help you troubleshoot any potential issues that may arise during the replacement process or provide guidance for proper maintenance to ensure the long-term performance of your flashlight. Following these tips will not only assist you during the bulb replacement but also contribute to the overall longevity and reliability of your Maglite flashlight.
Warranty and Support Information: The manufacturer’s instructions may also include information regarding the warranty period and procedures for claiming support or assistance from Maglite. Being aware of the warranty terms and knowing how to reach out to Maglite’s customer support can be valuable if you encounter any issues or have questions during the replacement process.
By referring to the manufacturer’s instructions, you can have confidence in the accuracy and reliability of the information you are following. These instructions are tailored specifically to your Maglite flashlight model and will provide detailed guidance to ensure a successful bulb replacement while prioritizing your safety and maintaining the integrity of the flashlight.
Make it a habit to keep the user manual or manufacturer’s instructions in a safe place for future reference. If you no longer have the physical copy, you can often find digital copies on the manufacturer’s website or contact Maglite’s customer support for assistance.
Tip 3: Choose the Right Replacement Bulb
When replacing the LED bulb in your Maglite flashlight, it is essential to choose the right replacement bulb for optimal performance and compatibility. Here are some tips to consider when selecting a replacement bulb:
Check the Maglite Model and Specifications: Before purchasing a replacement LED bulb, identify the specific model of your Maglite flashlight and review its specifications. The manufacturer’s instructions or official website will provide information on the compatible bulb types, wattage, voltage, and other relevant details. Ensure that the replacement bulb matches these specifications to ensure a proper fit and optimal performance.
Consider Lumens and Color Temperature: LED bulbs come in different brightness levels, measured in lumens. Consider the desired brightness for your flashlight and select a bulb with an appropriate lumen rating. Additionally, think about the color temperature of the bulb, as some LED bulbs offer different color options (e.g., cool white, warm white). Choose a color temperature that suits your preference and intended use of the flashlight.
Check for Dimming Compatibility: Some LED bulbs are dimmable, allowing you to adjust the brightness level according to your needs. If dimming functionality is important to you, ensure that the replacement bulb you choose is compatible with the dimming feature of your Maglite flashlight.
Consider Energy Efficiency and Runtime: LED bulbs are known for their energy efficiency and longer battery life compared to traditional incandescent bulbs. When selecting a replacement bulb, consider its energy efficiency rating, as this can contribute to extended battery life and overall runtime. This is especially important if you rely on your flashlight for extended periods without easy access to battery replacement or recharging.
Read User Reviews and Recommendations: To gain insights into the performance and quality of a specific LED bulb, consider reading user reviews and recommendations. Reviews from other Maglite flashlight users can provide valuable information about the brightness, durability, and overall satisfaction with a particular replacement bulb. Take note of any consistent positive or negative feedback to make an informed decision.
Purchase from Reputable Sellers: To ensure the authenticity and quality of the replacement bulb, purchase from reputable sellers or directly from the manufacturer. This helps to avoid counterfeit or low-quality bulbs that may not perform as expected or could potentially damage your flashlight.
By carefully considering these factors and choosing the right replacement LED bulb, you can maximize the performance, reliability, and longevity of your Maglite flashlight. A properly matched bulb will ensure that your flashlight continues to provide bright and dependable illumination for all your needs.
Tip 4: Keep the Maglite Clean and Dry
Proper maintenance and care are essential to prolonging the lifespan and performance of your Maglite flashlight. Here are some tips to keep your Maglite clean and dry:
Regular Cleaning: Regularly clean the exterior of your Maglite flashlight using a soft cloth or a microfiber towel. Wipe away any dust, dirt, or residue that may accumulate on the surface. This not only helps maintain the appearance of the flashlight but also prevents any potential interference with its functionality.
Remove Accumulated Debris: Over time, debris may gather in various parts of your flashlight, such as the battery compartment or the lens area. Regularly inspect and clean these areas to ensure smooth operation and prevent any blockages or impediments to the light output.
Avoid Excessive Moisture: Exposure to excessive moisture can damage the internal components of your Maglite flashlight. Keep your flashlight away from water sources and ensure it does not get submerged. If the flashlight does come into contact with water, promptly dry it thoroughly to prevent any potential damage.
Store in a Dry Location: When not in use, store your Maglite flashlight in a dry location. Avoid storing it in damp or humid environments, as moisture can lead to corrosion or other forms of damage. It’s also advisable to remove the batteries if you won’t be using the flashlight for an extended period.
Inspect O-Rings regularly: O-rings are an important component of waterproofing in Maglite flashlights. Regularly inspect the O-rings, located at the head and tailcap, for any signs of wear or damage. If needed, apply a thin layer of silicone lubricant to maintain their effectiveness and prevent water penetration.
By following these tips and keeping your Maglite flashlight clean and dry, you can enjoy optimal performance and protect your investment in the long run. Proper maintenance not only ensures reliable performance but also extends the lifespan of your flashlight.
Conclusion
Replacing the LED bulb in your Maglite flashlight is a straightforward process that can significantly improve its brightness and efficiency. By following the step-by-step instructions outlined in this article, along with the provided tips and considerations, you can successfully replace the bulb and maintain the performance of your flashlight for years to come.
Remember to gather the required materials, like a compatible replacement LED bulb and a small screwdriver, before starting the process. Prepare your flashlight by turning it off and removing the batteries. Then, carefully remove the existing LED bulb, making note of the attachment method. Install the new LED bulb, ensuring a secure fit, and test the replacement to verify its functionality.
Additionally, remember to handle the bulb with care, refer to the manufacturer’s instructions for specific guidance, choose the right replacement bulb for optimal performance, and keep your Maglite clean and dry for longevity. These tips will contribute to the overall performance, reliability, and satisfaction you experience with your Maglite flashlight.
Now that you are equipped with the knowledge and steps to replace the LED bulb in your Maglite flashlight, go ahead and give your flashlight a new lease on life. Brighten up your adventures, light up your surroundings, and embrace the improved illumination that the new LED bulb brings!
If you've mastered replacing your Maglite's LED bulb, why stop there? Enhance every corner of your space with optimal lighting solutions. Our next guide dives into the best LED replacements for fluorescent tubes, set to transform your indoor ambiance in 2024. Perfect for those eager to upgrade their home or office lighting with energy-efficient options. Don't miss out on shedding new light with our detailed recommendations!
Frequently Asked Questions about How To Replace A Maglite LED Bulb
Was this page helpful?
At Storables.com, we guarantee accurate and reliable information. Our content, validated by Expert Board Contributors, is crafted following stringent Editorial Policies. We're committed to providing you with well-researched, expert-backed insights for all your informational needs.


0 thoughts on “How To Replace A Maglite LED Bulb”