Articles
How To Take Weight Off RV Electrical Cord
Modified: August 17, 2024
Learn the best articles to help you take weight off your RV electrical cord for hassle-free camping. Discover expert tips and tricks today!
(Many of the links in this article redirect to a specific reviewed product. Your purchase of these products through affiliate links helps to generate commission for Storables.com, at no extra cost. Learn more)
Introduction
When it comes to RV camping, having a reliable electrical cord is crucial. It ensures a steady power supply to run your appliances and keep your RV functioning properly. However, over time, the weight of the electrical cord can become a burden. It can be challenging to manage, especially when you’re on the move or storing it for long periods.
In this article, we will guide you through the process of taking weight off your RV electrical cord. By following these steps, you can make your camping experience more convenient and hassle-free. So, let’s get started!
Key Takeaways:
- Keep your RV electrical cord in top condition by inspecting for damage, cleaning it regularly, and storing it properly. This ensures a hassle-free camping experience and prevents potential hazards.
- Prioritize safety by disconnecting the electrical cord properly, checking for damage, and using the right tools for maintenance. Enjoy worry-free camping trips with a well-maintained RV electrical cord.
Read more: How To Take Electrical Cord Off Dishwasher
Step 1: Gather the necessary tools
Before you begin taking weight off your RV electrical cord, it’s essential to gather the necessary tools. Having the right equipment will make the process easier and more efficient. Here are the tools you will need:
- Utility knife or wire cutters: These tools will come in handy if you need to trim or remove any excess material from the cord.
- Cord reel or storage bag: Investing in a cord reel or storage bag will help you keep your electrical cord organized and protected when not in use.
- Cleaning supplies: You may need a damp cloth or electrical contact cleaner to clean the cord and socket.
- Gloves: It’s a good idea to wear gloves to protect your hands while working with the electrical cord.
Once you have gathered these tools, you’re ready to move on to the next step.
Step 2: Inspect the electrical cord
Before you take weight off your RV electrical cord, it’s important to inspect it for any signs of wear or damage. This step will help ensure your safety and the longevity of the cord. Here’s what you should do:
- Unroll the cord: Start by unrolling the electrical cord completely, ensuring that it is fully extended.
- Check for cuts or frays: Carefully examine the entire length of the cord for any cuts, frays, or exposed wires. These can be potential hazards and should be addressed immediately.
- Inspect the connectors: Take a close look at the connectors on both ends of the cord. Make sure they are intact and not damaged.
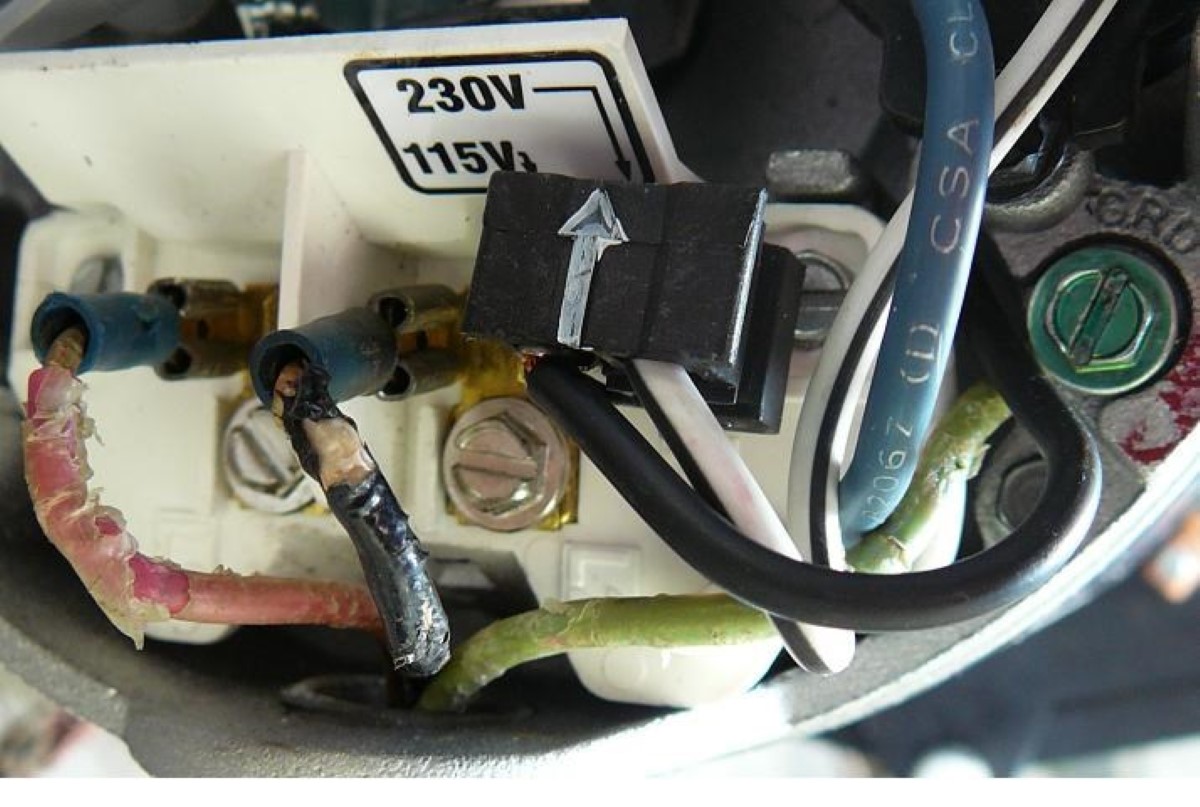
- Check for discoloration or melting: Look for any signs of discoloration or melting on the cord or connectors. These can indicate overheating or electrical issues.
- Flexibility of the cord: Bend the cord gently to check its flexibility. If it feels stiff or rigid in certain areas, it may be a sign of internal damage.
If you notice any significant damage or issues during your inspection, it’s crucial to address them before continuing to use the cord. In some cases, it may be necessary to replace the cord entirely for safety reasons.
Once you have thoroughly inspected the electrical cord and found no major issues, you can move on to the next step.
Step 3: Disconnect the electrical cord
Now that you have inspected the electrical cord and ensured its integrity, it’s time to disconnect it from your RV. Here’s how you can safely disconnect the cord:
- Turn off the power supply: Before disconnecting the electrical cord, make sure to turn off the power supply from the campground or your RV’s power pedestal. This will help avoid any electrical shocks or accidents.
- Unplug the cord: Carefully unplug the cord from the power outlet or the RV’s electrical socket. Take your time and ensure a smooth and gradual removal.
- Avoid yanking or pulling forcefully: It’s important to avoid yanking or pulling the cord forcefully, as this can put strain on the connectors and potentially damage them.
- Secure the cord ends: Once the cord is unplugged, you can secure the ends by placing protective caps or wrapping them in a clean cloth. This will help prevent dirt and debris from entering the connectors, ensuring their longevity.
By following these steps to disconnect the electrical cord properly, you can protect both the cord and its connectors.
Now that the cord is disconnected, you can proceed to the next step.
When removing weight from an RV electrical cord, be sure to unplug it from the power source first. Then, carefully untangle and straighten the cord to remove any unnecessary stress and weight.
Step 4: Clean the cord and socket
Keeping your RV electrical cord and socket clean is essential for maintaining good electrical connections and preventing any issues down the line. Here’s how you can effectively clean them:
- Prepare the cleaning solution: If you’re using an electrical contact cleaner, follow the instructions on the product label to prepare the cleaning solution. If you don’t have a specific cleaner, you can also use a mild detergent mixed with water.
- Dampen a cloth: Dip a clean cloth into the cleaning solution or water and wring out any excess liquid. The cloth should be damp but not dripping wet.
- Clean the cord: Gently wipe down the entire length of the electrical cord with the damp cloth. Pay special attention to any areas that may be dirty or have stubborn stains. It’s important to avoid excessively wetting the cord to prevent damage.
- Clean the socket: Use the same damp cloth to clean the electrical socket on your RV. Wipe away any dirt, debris, or oxidation that may have accumulated. Be careful not to insert the cloth too deeply into the socket to avoid any damage.
- Dry thoroughly: After cleaning, allow the cord and socket to air dry completely. Make sure there is no moisture left before proceeding to the next step.
Regularly cleaning your RV electrical cord and socket not only helps maintain their functionality but also prolongs their lifespan.
With the cord and socket clean and dry, let’s move on to the next step.
Read more: What Electrical Cord Do I Need For My RV
Step 5: Check for any damage
After cleaning the electrical cord and socket, it’s important to perform a thorough check for any potential damage that may affect their performance. Here’s what you need to do:
- Inspect the cord for cuts or frays: Carefully examine the entire length of the cord again to ensure there are no new cuts, frays, or exposed wires that may have been missed during the initial inspection.
- Check the connectors: Inspect the connectors on both ends of the cord to make sure they are securely attached and undamaged. Look for any signs of corrosion, loose connections, or bent pins.
- Test the cord for flexibility: Gently bend the cord in different areas to check for any stiffness or rigidity. A flexible cord is less likely to have internal damage or breakdown.
- Check for discoloration or melting: Inspect the cord and connectors again for any signs of discoloration, melting, or burn marks. These can indicate overheating or electrical issues.
- Test the electrical connection: If possible, plug the cord back into the power source or RV socket to verify that the electrical connection is secure and functioning properly.
If you notice any new damage or issues during this inspection, it’s crucial to address them before using the electrical cord again. Small repairs can often be done using electrical tape, but significant damage may require professional assistance or cord replacement.
Once you have ensured that the cord is in good condition, you can proceed to the final step.
Step 6: Store the electrical cord properly
Proper storage of your RV electrical cord is essential to prevent it from tangling or getting damaged when not in use. Follow these steps to store your cord safely:
- Coil the cord: Start by coiling the electrical cord neatly. Hold one end of the cord in your hand and use the other hand to create loops as you gradually bring the cord together.
- Avoid twisting or kinking: Make sure the cord is coiled without any twisting or kinking. Twisted or kinked cords can weaken and become damaged over time.
- Secure with a cord reel or storage bag: Once the cord is properly coiled, secure it using a cord reel or place it inside a suitable storage bag. This will help protect the cord from dust, dirt, and potential damage.
- Store in a dry and safe location: Find a dry and secure location to store the cord. Avoid areas where it may be exposed to extreme temperatures, moisture, or potential hazards.
- Keep away from heavy objects: Ensure that the stored cord is not placed under heavy objects or compressed, as this can lead to damage or deformation.
- Inspect before each use: Before using the cord again, always inspect it for any signs of damage or wear. This will help ensure its safety and reliability.
By following these steps, you can keep your RV electrical cord organized, protected, and ready for the next adventure.
With the cord safely stored, you have successfully completed the process of taking weight off your RV electrical cord. Congratulations!
Conclusion
Taking weight off your RV electrical cord is an important step in ensuring a hassle-free camping experience. By following the steps outlined in this article, you can effectively manage and maintain your electrical cord, making it easier to handle and reducing the risk of damage.
Remember to gather the necessary tools before starting, inspect the cord for any signs of wear or damage, safely disconnect it from your RV, and clean both the cord and socket. Additionally, checking for any further damage and storing the cord properly will help prolong its lifespan and ensure its reliability for future use.
Regular maintenance of your RV electrical cord is not only crucial for your safety but also for the overall performance of your RV’s electrical system. By taking the time to inspect and care for your cord, you can prevent potential hazards and enjoy worry-free camping trips.
Now that you have learned how to take weight off your RV electrical cord, put this knowledge into practice and enjoy the convenience and peace of mind it brings to your camping adventures.
Safe travels!
Frequently Asked Questions about How To Take Weight Off RV Electrical Cord
Was this page helpful?
At Storables.com, we guarantee accurate and reliable information. Our content, validated by Expert Board Contributors, is crafted following stringent Editorial Policies. We're committed to providing you with well-researched, expert-backed insights for all your informational needs.


0 thoughts on “How To Take Weight Off RV Electrical Cord”