Articles
How To Use Stanley S2 Laser Level Square
Modified: October 18, 2024
Learn how to effectively use the Stanley S2 Laser Level Square with these informative articles. Discover tips, tricks, and step-by-step guides to achieve accurate and precise measurements for your construction projects.
(Many of the links in this article redirect to a specific reviewed product. Your purchase of these products through affiliate links helps to generate commission for Storables.com, at no extra cost. Learn more)
Introduction – Overview of the Stanley S2 Laser Level Square
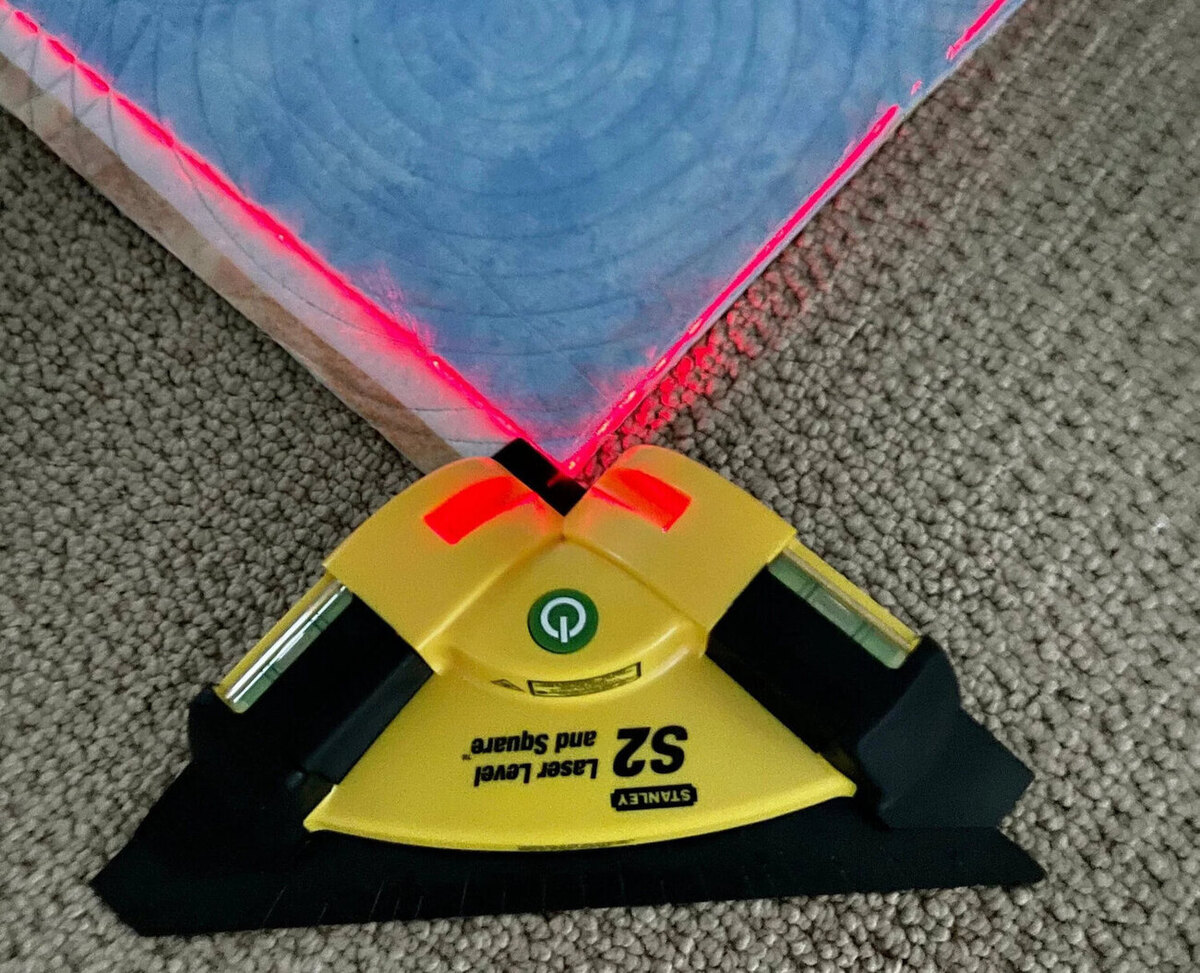
The Stanley S2 Laser Level Square is a versatile and essential tool for both professional craftsmen and DIY enthusiasts. This innovative laser level square combines the precision of laser technology with the practicality of a traditional square, making it an indispensable companion for a wide range of projects.
With its compact design and user-friendly features, the Stanley S2 Laser Level Square is suitable for various applications, including carpentry, tiling, picture hanging, and more. It is designed to provide accurate measurements, alignment, and angles, enhancing the efficiency and precision of your work.
Equipped with a powerful laser diode, the Stanley S2 Laser Level Square emits a bright and highly visible laser beam that can be projected up to 30 feet away. This makes it ideal for both indoor and outdoor use, ensuring that your measurements and alignments are accurate and reliable in any environment.
One of the key advantages of the Stanley S2 Laser Level Square is its ease of use. The controls are straightforward, allowing even beginners to operate it with confidence. The clear and intuitive interface ensures that you can quickly and accurately set up the square, saving you valuable time and effort.
The Stanley S2 Laser Level Square also features a built-in spirit level, further enhancing its functionality. This allows you to check for level and plumb surfaces, ensuring that your work is perfectly aligned. The self-leveling function is another useful feature that automatically adjusts the laser’s position to ensure accurate horizontal and vertical lines.
Additionally, the Stanley S2 Laser Level Square offers the flexibility to switch between different measurement units, making it convenient for users who work with both metric and imperial systems. With just the press of a button, you can toggle between inches, centimeters, feet, and meters, catering to your specific needs and preferences.
Overall, the Stanley S2 Laser Level Square is a reliable and efficient tool that simplifies the process of measuring, aligning, and creating accurate angles. Whether you are working on a small DIY project or undertaking a larger professional task, this laser level square will undoubtedly become an invaluable asset in your arsenal of tools.
Key Takeaways:
- The Stanley S2 Laser Level Square is a versatile and user-friendly tool that combines laser precision with traditional square functionality. Its advanced features, including a built-in spirit level and self-leveling function, enhance accuracy and efficiency in various projects.
- Proper maintenance and care, along with troubleshooting techniques, ensure the optimal performance of the Stanley S2 Laser Level Square. Regular cleaning, battery replacement, and addressing common issues such as weak laser beams or inaccurate measurements are essential for smooth and accurate workflow.
Read also: 11 Best Stanley Laser Level for 2025
Getting Started – Unboxing and Initial Setup – Familiarizing with the Controls and Features
When you first receive your Stanley S2 Laser Level Square, it’s important to start by unboxing and familiarizing yourself with its controls and features. This will ensure that you can fully utilize the tool and make the most out of its capabilities.
Unboxing
Begin by carefully opening the packaging of your Stanley S2 Laser Level Square. Inside, you will find the laser level square itself, along with any accompanying accessories such as a carrying case, batteries, or user manual. Take a moment to inspect the contents and ensure that everything is intact and in good condition.
If any accessories or parts are missing or damaged, contact the manufacturer or your supplier immediately for assistance.
Initial Setup
Before using the Stanley S2 Laser Level Square, it’s essential to ensure that it is properly set up and calibrated. Here are the steps to follow for the initial setup:
- Insert Batteries: Open the battery compartment and insert the required batteries as per the instructions provided. Make sure to follow the correct polarity indicated inside the compartment.
- Power On: Once the batteries are inserted, locate the power button or switch on the laser level square and turn it on. You should see the laser beam emitting from the device.
- Adjust Settings: Depending on your project requirements, you may need to adjust the settings on the laser level square. This includes selecting the desired measurement unit (inches, centimeters, feet, or meters) and activating any additional features such as the self-leveling function.
- Calibration: Some laser level squares may require calibration before their first use or occasionally after extended use. Consult the user manual for specific calibration instructions for your model.
Once you have completed the initial setup, you can now familiarize yourself with the various controls and features of the Stanley S2 Laser Level Square.
Familiarizing with the Controls and Features
The Stanley S2 Laser Level Square is designed with user-friendly controls that are easy to understand and operate. Here are the key controls and features to familiarize yourself with:
- Power Button: This button turns the laser level square on and off. Press it to activate the laser beam and again to deactivate it.
- Measurement Unit Switch: Use this switch to toggle between different measurement units (inches, centimeters, feet, or meters) based on your preference and requirements.
- Self-Leveling Button: If your model has the self-leveling function, this button activates or deactivates it. When activated, the laser level square automatically adjusts to ensure accurate horizontal and vertical lines.
- Spirit Level: Built into the square, the spirit level helps you check for level and plumb surfaces. Align your work with the integrated spirit level to ensure accuracy.
- Battery Compartment: This is where you insert the batteries to power the laser level square. It is typically located on the back or bottom of the device.
By becoming familiar with these controls and features, you will be ready to confidently use the Stanley S2 Laser Level Square for your projects. Refer to the user manual for more detailed information on the specific functions and operations of your model.
Read also: 10 Amazing Square Laser Level for 2025
Basic Usage – Adjusting the Laser Level Square – Aligning Objects or Surfaces Using the Laser – Measuring Angles with the Square
Once you have completed the initial setup and familiarized yourself with the controls and features of the Stanley S2 Laser Level Square, you are ready to start using it for various tasks. Here are the basic usage instructions for adjusting the laser level square, aligning objects or surfaces, and measuring angles with the square.
Adjusting the Laser Level Square
To ensure accurate measurements and alignments, it is important to adjust the laser level square properly. Follow these steps:
- Secure Placement: Place the laser level square on a stable surface or use the built-in mounting holes to attach it to a tripod or wall bracket. Ensure that it is securely positioned.
- Positioning the Laser: Using the controls on the laser level square, adjust the position of the laser beam to the desired direction or angle. This can usually be done by rotating or tilting the device.
- Leveling the Laser: Activate the self-leveling function, if available, to ensure that the laser lines are perfectly horizontal or vertical. Use the built-in spirit level or the device’s visual indicators to guide you in achieving a level position.
- Fine-Tuning: For precise adjustments, use the fine-tuning controls (if available) to make slight movements to the laser beam until it aligns precisely with your desired reference point.
Aligning Objects or Surfaces Using the Laser
The Stanley S2 Laser Level Square is invaluable for aligning objects or surfaces, such as hanging pictures, installing shelves, or laying tiles. Follow these steps for accurate alignment:
- Choose the Reference Line: Identify the reference line or plane that you want to align your object or surface with. This can be a horizontal or vertical line.
- Position the Laser: Place the laser level square in a position that allows the laser beam to project along the desired reference line. Adjust the laser level square if needed to align the beam precisely.
- Align the Object or Surface: Position your object or surface according to the laser beam’s alignment. Make sure it is parallel or perpendicular to the reference line indicated by the laser.
- Secure the Object or Surface: Once properly aligned, secure your object or surface in place using appropriate fasteners or methods. This will ensure that it remains aligned with the reference line.
Measuring Angles with the Square
In addition to aligning objects and surfaces, the Stanley S2 Laser Level Square can also be used to measure angles accurately. Here’s how:
- Position the Square: Place the laser level square on the object or surface where you want to measure the angle.
- Align the Laser: Adjust the laser beam to project along one of the lines you want to measure the angle between. Ensure that the laser line is clearly visible and aligned with the reference line.
- Take the Measurement: Place a protractor or angle measuring tool along the laser line and the other line of the object or surface. Read the angle measurement indicated by the protractor.
By following these basic usage instructions, you can make the most out of your Stanley S2 Laser Level Square. Remember to always refer to the user manual for specific instructions and guidelines for your model.
Advanced Features – Using the Built-in Spirit Level – Utilizing the Self-leveling Function – Switching Between Measurement Units
The Stanley S2 Laser Level Square is equipped with advanced features that enhance its functionality and versatility. These features, including the built-in spirit level, self-leveling function, and the ability to switch between measurement units, provide added convenience and accuracy for your projects. Let’s explore these advanced features in detail.
Using the Built-in Spirit Level
The built-in spirit level is a valuable feature of the Stanley S2 Laser Level Square that allows you to check for level and plumb surfaces. Here’s how to use it:
- Activate the Spirit Level: Ensure that the laser level square is turned on, and locate the spirit level bubble on the device. It is usually located on the side or top of the square.
- Place the Square on the Surface: Position the laser level square on the surface you want to check for level or plumb. Ensure that it is securely positioned.
- Observe the Bubble: Look at the spirit level bubble and adjust the position of the laser level square until the bubble is centered between the indicators. This indicates that the surface is perfectly level or plumb.
- Proceed with Accuracy: Once the surface is level or plumb, you can confidently proceed with your measurements or alignments, knowing that your work will be accurate and precise.
Utilizing the Self-leveling Function
The self-leveling function of the Stanley S2 Laser Level Square is a time-saving feature that ensures accurate horizontal and vertical lines without manual adjustments. Here’s how to utilize this function:
- Activate the Self-leveling Mode: Check if your model has a self-leveling function, and if so, locate the self-leveling button or switch on the laser level square.
- Engage the Self-leveling Function: Press the self-leveling button or switch to activate the self-leveling mode on the laser level square. This will allow the device to automatically adjust the laser position to ensure level lines.
- Wait for Self-leveling: Once the self-leveling mode is engaged, give the laser level square a moment to calibrate and level itself. The device will emit a visual or audible indicator when it is ready.
- Work with Accuracy: With the self-leveling function active, you can confidently use the laser level square to create perfectly horizontal or vertical lines, saving you time and ensuring accuracy in your projects.
Switching Between Measurement Units
The Stanley S2 Laser Level Square offers the flexibility to switch between different measurement units. Here’s how to change the measurement unit settings:
- Locate the Unit Switch: Look for the unit switch or button on the laser level square. It is typically labeled with the different measurement unit options.
- Select the Desired Unit: Press or toggle the unit switch to cycle through the available measurement units. Options may include inches, centimeters, feet, or meters.
- Verify the Unit Display: As you switch between the measurement units, ensure that the unit display on the laser level square’s screen or indicator changes accordingly.
- Use the Preferred Unit: Once you have selected your desired measurement unit, you can now use the laser level square with the chosen unit for precise measurements and alignments that match your specific project requirements.
These advanced features of the Stanley S2 Laser Level Square provide added versatility and convenience. By utilizing the built-in spirit level, self-leveling function, and the ability to switch between measurement units, you can elevate your projects to new levels of accuracy and efficiency.
Read more: How To Use A Laser Level
Maintenance and Care – Cleaning and Storing the Laser Level Square – Battery Replacement
Maintaining and caring for your Stanley S2 Laser Level Square is essential to ensure its longevity and optimal performance. By following proper cleaning and storage practices, as well as knowing when to replace the batteries, you can keep your laser level square in excellent condition. Here are some maintenance and care tips to consider:
Cleaning and Storing the Laser Level Square
- Regular cleaning: After each use, wipe down the laser level square with a soft, dry cloth to remove any dust or debris. Avoid using harsh chemicals or abrasive cleaners, as they can damage the device.
- Protect the laser lens: The laser lens is a sensitive component of the device. Use a clean, lint-free cloth to gently wipe the lens if needed. Avoid touching the lens with your fingers, as oils and dirt can interfere with the laser performance.
- Store in a secure case: When not in use, it is advisable to keep your laser level square in a protective case. This will prevent it from getting accidentally damaged or exposed to excessive dust and moisture.
- Avoid extreme temperatures: Avoid storing or using the laser level square in extreme hot or cold temperatures, as it can affect its performance. Store it in a cool, dry place away from direct sunlight and extreme temperature fluctuations.
- Handle with care: Always handle the laser level square with care, avoiding any rough handling or unnecessary impacts. This will help prevent any accidental damage to the device.
Battery Replacement
The battery life of your Stanley S2 Laser Level Square will depend on usage and the type of batteries used. Here are the steps to follow when replacing the batteries:
- Power off the device: Before replacing the batteries, ensure that the laser level square is turned off to prevent any accidental activation.
- Access the battery compartment: Locate the battery compartment, which is typically located on the back or bottom of the device. Open it using the provided latch or mechanism.
- Remove the old batteries: Take out the old batteries from the compartment, properly disposing of them in accordance with local regulations.
- Insert new batteries: Insert the fresh batteries into the compartment, ensuring they are correctly aligned with the polarities indicated inside.
- Close the compartment: Close the battery compartment securely to avoid any issues with power supply or damage to the device.
- Verify power and functionality: Turn on the laser level square to ensure that the new batteries are providing power and that the device is functioning correctly.
Regularly check the battery life and replace the batteries as needed to maintain optimal performance and prevent any interruptions during your work.
By following these maintenance and care practices, you can prolong the lifespan of your Stanley S2 Laser Level Square and ensure its reliable performance for years to come.
Troubleshooting – Common Issues and Fixes
While the Stanley S2 Laser Level Square is a reliable and efficient tool, you may encounter some common issues during its operation. Here are a few troubleshooting tips to help resolve these issues:
Read more: How To Laser Level A Floor With GLL 2
No Laser Beam or Weak Laser Beam
If you find that the laser beam is not visible or is weak, try the following solutions:
- Check battery status: Ensure that the batteries are properly inserted and have sufficient charge. Replace them if needed.
- Clean the laser lens: Use a clean, lint-free cloth to gently wipe the laser lens, as dirt or debris may obstruct the laser beam.
- Adjust the brightness settings: Some laser level squares have adjustable brightness settings. Increase the brightness to enhance the visibility of the laser beam.
- Verify ambient lighting conditions: Bright ambient light can sometimes make the laser beam less visible. Use the laser level square in dimmer lighting conditions or consider using a laser detector for outdoor use.
Inaccurate Measurements or Alignments
If you are experiencing accuracy issues with your measurements or alignments, try the following solutions:
- Ensure a stable setup: Make sure the laser level square is placed on a stable surface or securely mounted on a tripod to avoid potential movement or vibrations that can affect accuracy.
- Verify proper calibration: Check and recalibrate the laser level square if required, following the instructions provided in the user manual.
- Verify level and plumb: Use the built-in spirit level or an external level to ensure your laser level square is perfectly level or plumb before use.
- Correct positioning: Double-check the positioning of the laser level square and ensure it is aligned correctly with the reference line or surface.
- Check for obstacles: Make sure there are no obstructions or obstacles interfering with the laser beam, as this can cause inaccuracies in measurements or alignments.
Device Malfunction or Error Messages
In the event of device malfunction or error messages, consider the following steps:
- Refer to the user manual: Consult the user manual for specific troubleshooting steps and error code explanations for your model of the Stanley S2 Laser Level Square.
- Reset the device: Try turning off the device, removing the batteries, and reinserting them after a few seconds. This can reset the laser level square and resolve temporary issues.
- Contact customer support: If the issue persists or you are unsure of the solution, contact the customer support team of Stanley or the authorized service center for assistance.
Remember, proper maintenance, regular calibration checks, and following the manufacturer’s instructions are essential to maintaining the optimal performance of your Stanley S2 Laser Level Square. By troubleshooting common issues and applying the necessary fixes, you can ensure a smooth and accurate workflow in your projects.
Conclusion – Summary and Final Thoughts
In summary, the Stanley S2 Laser Level Square is a versatile and reliable tool that combines laser precision with the functionality of a traditional square. Equipped with advanced features, this tool is designed to enhance accuracy and efficiency in a wide range of projects.
During the initial setup, unboxing the laser level square and familiarizing yourself with its controls and features is crucial. Adjusting the laser level square properly ensures accurate measurements and alignments, while the built-in spirit level and self-leveling function add convenience and precision to your work.
Basic usage involves adjusting the laser level square, aligning objects or surfaces with the laser, and measuring angles with the square. By following these instructions, you can achieve precise results in your projects with ease.
The advanced features of the Stanley S2 Laser Level Square, such as the built-in spirit level, self-leveling function, and the ability to switch between measurement units, offer added versatility and convenience. These features enhance the accuracy and efficiency of your work, allowing you to achieve professional results.
To maintain the optimal performance of your laser level square, proper maintenance and care are essential. Regular cleaning, storing in a protective case, and handling the device with care will prolong its lifespan. Additionally, monitoring battery life and replacing them when necessary ensures uninterrupted operation.
In the event of common issues or errors, troubleshooting techniques including checking battery status, cleaning the laser lens, recalibration, and proper positioning will help resolve the problem.
In conclusion, the Stanley S2 Laser Level Square is a valuable tool for both professional craftsmen and DIY enthusiasts. With its ease of use, advanced features, and accurate measurement capabilities, it simplifies and enhances a wide range of projects. By following the provided guidelines and troubleshooting tips, you can fully utilize the potential of the Stanley S2 Laser Level Square and achieve exceptional results in your endeavors.
Frequently Asked Questions about How To Use Stanley S2 Laser Level Square
Was this page helpful?
At Storables.com, we guarantee accurate and reliable information. Our content, validated by Expert Board Contributors, is crafted following stringent Editorial Policies. We're committed to providing you with well-researched, expert-backed insights for all your informational needs.


0 thoughts on “How To Use Stanley S2 Laser Level Square”