Articles
How To Disconnect Doorbell
Modified: October 19, 2024
Learn how to disconnect your doorbell with our helpful articles. Find step-by-step guides and expert tips to safely remove your doorbell.
(Many of the links in this article redirect to a specific reviewed product. Your purchase of these products through affiliate links helps to generate commission for Storables.com, at no extra cost. Learn more)
Introduction
When it comes to disconnecting a doorbell, whether for repairs, upgrades, or renovations, it’s essential to follow the proper steps to ensure safety and avoid any mishaps. Disconnecting a doorbell involves disconnecting the wires from the transformer and chime. By doing so, you can effectively disable the doorbell and work on it without any electrical interruptions.
In this article, we will guide you through the step-by-step process of disconnecting a doorbell. We will outline the necessary tools you’ll need, how to safely turn off the power, locate the doorbell transformer, disconnect the wires, and insulate them properly. By following this guide, you’ll be able to disconnect your doorbell safely and with confidence.
Please keep in mind that when working with electrical systems, it’s crucial to exercise caution at all times. If you’re unsure about any of the steps or feel uncomfortable working with electrical wiring, it’s always best to consult a licensed electrician to ensure the job is done correctly.
Key Takeaways:
- Safety first! Gather the right tools, turn off the power, and locate the transformer before disconnecting your doorbell. Insulate the wires properly to avoid electrical mishaps and always consult a professional if unsure.
- Follow the step-by-step guide to confidently disconnect your doorbell. Test for power, insulate the wires, and secure the chime cover before restoring power. Prioritize safety and seek professional help if needed.
Read more: How To Disconnect A Nest Thermostat
Step 1: Gather the necessary tools
Before you begin the process of disconnecting your doorbell, it’s essential to gather the necessary tools to ensure a smooth and efficient process. Here are the tools you’ll need:
- Insulated gloves – These gloves will protect your hands from any potential electrical shocks.
- Screwdriver – You’ll need a screwdriver to remove screws and panels from the doorbell chime and transformer.
- Voltage tester – A voltage tester is crucial for checking if there’s any electrical current present to ensure your safety during the process.
- Wire cutters/strippers – These tools will help you trim or strip the wires as needed.
- Electrical tape – You’ll need electrical tape to insulate the exposed wires after disconnecting them.
Once you have gathered these tools, you’ll be ready to proceed with disconnecting your doorbell. Keep in mind that having the right tools will make the process much easier and safer.
Step 2: Turn off the power
Before you begin working on disconnecting your doorbell, it’s crucial to turn off the power to avoid any risk of electrical shock. Here’s how to turn off the power:
- Locate the circuit breaker panel in your home. It is usually located in the basement, garage, or utility room.
- Identify the circuit breaker labeled “doorbell” or “doorbell transformer.” If you’re unsure which circuit breaker controls the doorbell, you can turn off the main power supply to ensure safety.
- Flip the switch to the “off” position corresponding to the doorbell circuit.
- Double-check that the power is off by testing the doorbell. If the doorbell doesn’t ring or produce any sound, it indicates that the power has been successfully turned off.
It’s essential to verify that the power is indeed turned off before proceeding with disconnecting the doorbell wires. This step will help prevent any potential electrical accidents and ensure your safety throughout the process.
Step 3: Locate the doorbell transformer
The doorbell transformer is a crucial component of the doorbell system, as it regulates the voltage and supplies power to the doorbell chime. To disconnect the doorbell, you’ll need to locate the transformer. Here’s how:
- Start by inspecting your home’s electrical panel or fuse box. The transformer is typically connected to one of the circuit breakers or fuses.
- If the transformer is not located in the electrical panel, it may be situated near the chime or even inside the walls or ceilings. Look for any small metal boxes or rectangular devices attached to the wall or ceiling.
- If you still can’t find the transformer, check the area around the main entrance or near a junction box. It’s common for the transformer to be installed in these locations for easy access.
- Once you locate the doorbell transformer, visually inspect it to ensure it is not damaged or showing any signs of wear. If you notice any damage, it’s best to consult a licensed electrician to address the issue before proceeding.
Locating the doorbell transformer is essential as it will allow you to disconnect the power supply effectively. By following these steps, you’ll be on your way to disconnecting the doorbell and proceeding with any repairs or upgrades you may have planned.
Step 4: Disconnect the wires from the transformer
Now that you’ve located the doorbell transformer, it’s time to disconnect the wires connected to it. Here’s how:
- Put on your insulated gloves to protect yourself from any potential electrical shocks.
- Using a screwdriver, remove the screws that secure the wires to the transformer. Keep in mind that there may be multiple wires connected, typically two or three.
- Gently pull the wires out of the terminals by grasping them close to the connection point. Avoid pulling on the wires themselves, as this can damage them.
- Once the wires are disconnected, carefully tuck them away to prevent any accidental contact with live electrical components.
Ensure that the wires are fully detached from the transformer before moving on to the next step. It’s crucial to handle the wires with care to prevent any damage or accidental electrical contact.
If you’re unsure about which wires to disconnect or encounter any difficulties during this step, don’t hesitate to seek the assistance of a professional electrician for guidance.
Read more: How To Disconnect A Washing Machine
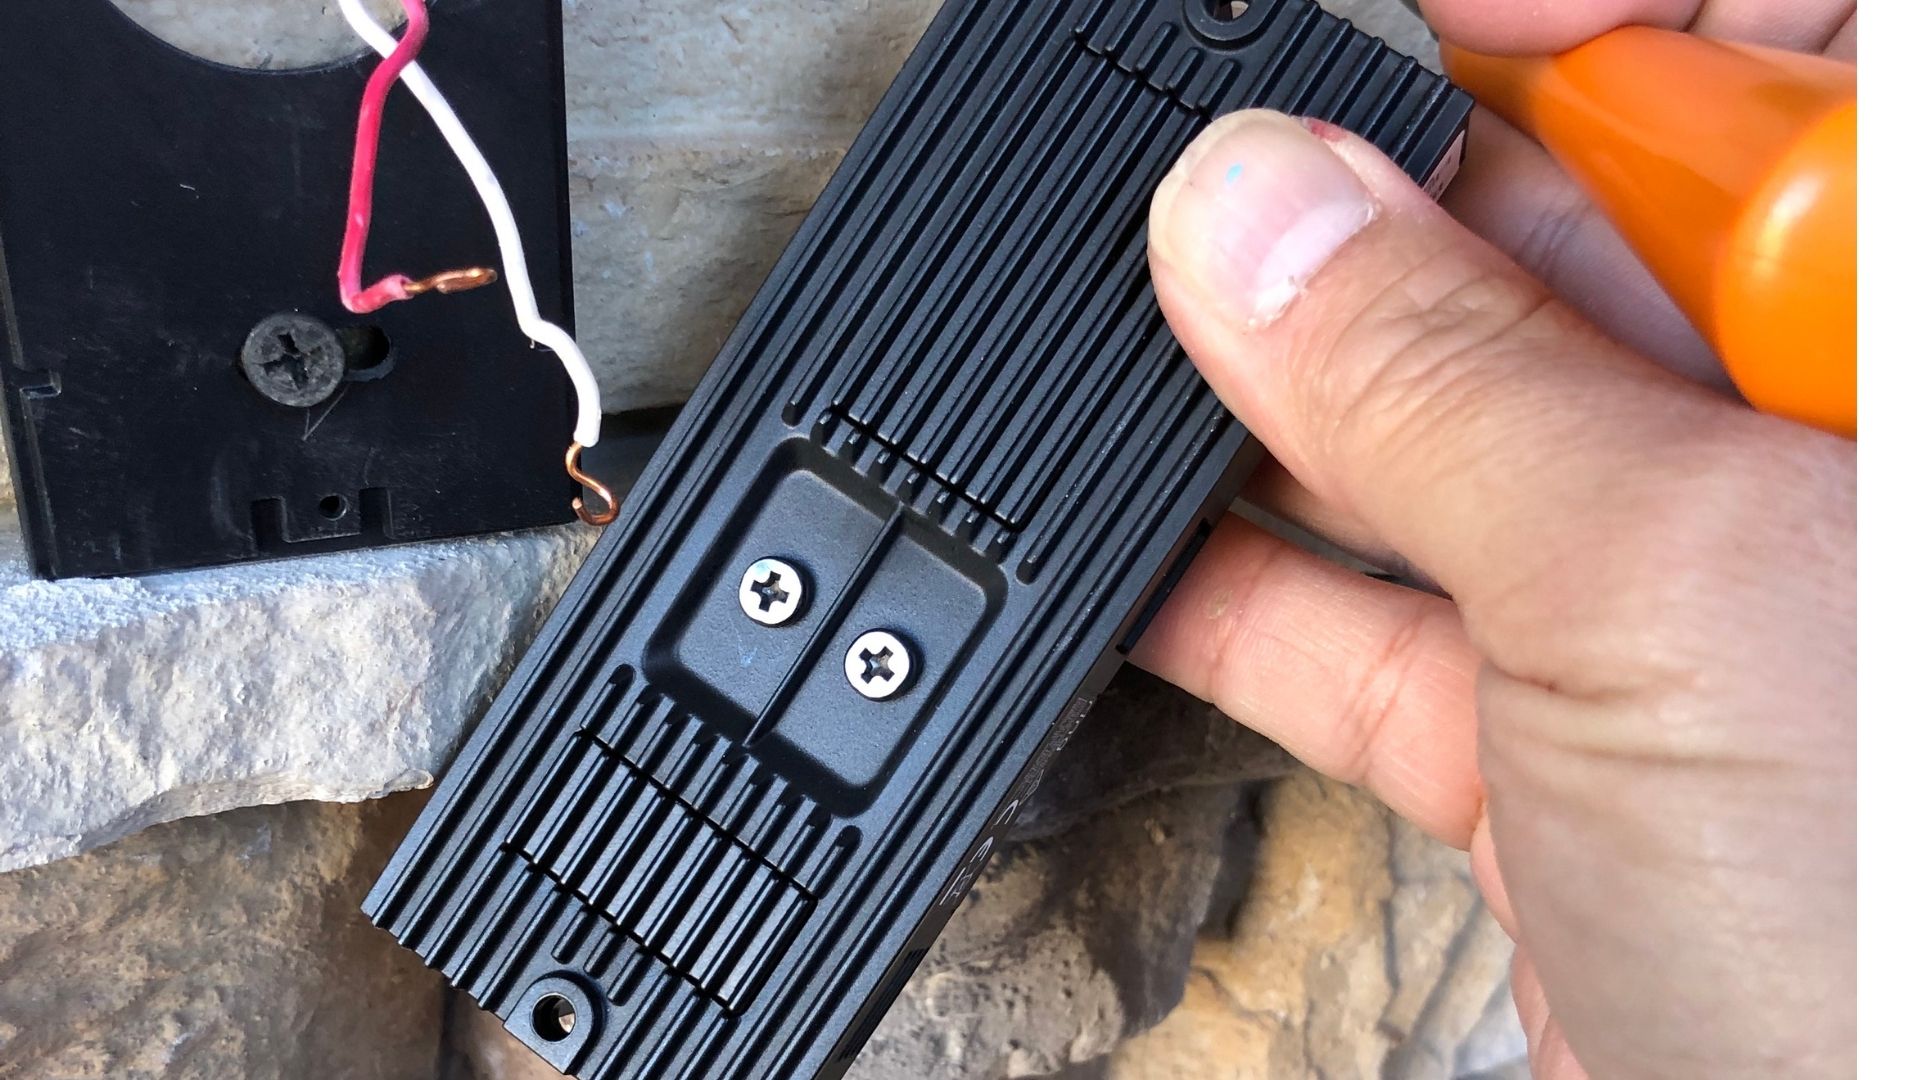
Step 5: Remove the doorbell chime cover
With the wires disconnected from the transformer, the next step is to remove the cover of the doorbell chime. Here’s how:
- Inspect the doorbell chime for any screws or fasteners holding the cover in place.
- Using a screwdriver, carefully remove the screws or fasteners to detach the cover from the chime.
- Gently pull the cover away from the chime, being cautious not to damage any internal components or wires.
Once the cover is removed, you will have access to the internal components of the chime. This step is essential for disconnecting the wires connected to the chime in the next step.
If you encounter any difficulties removing the chime cover or are unsure about the process, refer to the manufacturer’s instructions or seek the assistance of a professional electrician.
Before disconnecting a doorbell, always turn off the power at the circuit breaker to avoid any electrical hazards. Use a voltage tester to ensure the power is off before starting the disconnection process.
Step 6: Disconnect the wires from the chime
Now that you have removed the cover of the doorbell chime, it’s time to disconnect the wires from the chime itself. Follow these steps:
- Locate the wires connecting the chime to the doorbell system. Typically, there will be two wires: one connected to the front terminal and another connected to the transformer terminal.
- Using a screwdriver or a pair of wire cutters/strippers, loosen the screws or clips holding the wires in place.
- Gently pull the wires out of the terminals, taking care not to damage them or the chime.
- Once the wires are disconnected, tuck them back into the wall or wrap them around a secure object to prevent them from dangling or causing any potential hazards.
Remember, when handling the wires, always wear insulated gloves to protect yourself from any electrical shocks. Take your time to ensure a proper disconnection, as this will make it easier if you choose to reconnect the doorbell chime in the future.
If you’re uncertain about which wires to disconnect or encounter any difficulties, it’s advisable to consult a professional electrician for guidance and assistance.
Step 7: Test for power
After disconnecting the wires from the doorbell chime, it’s essential to test for power to ensure that there is no electrical current running through the system. Follow these steps to test for power:
- Put on your insulated gloves for safety.
- Using a voltage tester, carefully touch the probes to the exposed wires that were disconnected from the chime.
- If the voltage tester detects any electrical current or if it beeps, it indicates that there is still power running through the wires. In this case, double-check that you have turned off the correct circuit breaker and follow steps 2 and 3 again to ensure the power is completely shut off.
- If the voltage tester shows no electrical current or does not beep, it is safe to proceed with the next steps.
Testing for power is a crucial step as it ensures your safety while working on the doorbell system. Make sure to conduct the test diligently and verify that there is no power present before continuing.
If you’re unsure about how to use a voltage tester or are uncomfortable with the process, consult a qualified electrician for assistance.
Step 8: Insulate the exposed wires
With the power turned off and the wires disconnected, it’s important to properly insulate the exposed wires to ensure safety and prevent any accidental contact with live electrical components. Follow these steps to insulate the exposed wires:
- Using electrical tape, wrap each exposed wire individually. Start by wrapping the tape tightly around the wire’s end, then continue wrapping in a spiral motion along the length of the exposed area.
- Make sure to cover the entire exposed portion of the wire with multiple layers of electrical tape for added insulation.
- Press the tape firmly to ensure it adheres securely to the wire, preventing any potential unraveling or exposure.
- Repeat this process for each wire that was disconnected from the doorbell transformer and chime.
Insulating the exposed wires is crucial to prevent any accidental contact or short circuits. It helps protect against electrical shocks and ensures the safety of anyone working on or around the doorbell system.
Remember to handle the wires with care and take your time to properly insulate each one. If you have any doubts about the insulation process or the condition of the wires, consult a professional electrician for expert guidance.
Read more: How To Wire An AC Disconnect
Step 9: Secure the chime cover back in place
Now that the wires have been properly insulated, it’s time to secure the doorbell chime cover back in place. Follow these steps to ensure a secure reinstallation:
- Align the chime cover with the chime unit, ensuring that any screw holes or fasteners line up.
- Using a screwdriver, reinsert and tighten the screws or fasteners to secure the chime cover in place.
- Double-check that the cover is firmly attached and that there are no loose or protruding parts.
Securing the chime cover is important as it protects the internal components of the chime from dust, moisture, and any potential damage. It also gives a finished and polished look to your doorbell system.
Ensure that all the screws or fasteners are tightened properly, but be careful not to over-tighten them as it could cause damage to the cover or the chime unit.
If you encounter any difficulties during this step or notice any issues with the chime cover, consult the manufacturer’s instructions or seek the assistance of a professional electrician.
Step 10: Turn the power back on
After completing the necessary steps to disconnect and insulate the doorbell system, it’s time to restore power and ensure the system is functioning properly. Follow these steps to turn the power back on:
- Locate the circuit breaker panel in your home.
- Identify the circuit breaker that controls the doorbell system. It should be labeled accordingly.
- Flip the switch to the “on” position to restore power to the doorbell.
Once the power is restored, listen for the doorbell chime or press the doorbell button to confirm that the system is functioning correctly. If the chime rings or produces a sound, it indicates that the power has successfully been restored.
It’s important to test the doorbell functionality to ensure everything is in order. If you experience any issues or if the doorbell does not ring, double-check the connections and consult a professional electrician if needed.
Remember to exercise caution when working with electricity and be aware of your surroundings. If you’re uncertain about any step or encounter any difficulties, it’s always best to seek the assistance of a licensed electrician to ensure the job is done safely and correctly.
Conclusion
Disconnecting a doorbell may seem like a daunting task, but by following the proper steps, you can safely and effectively disconnect the doorbell system. Whether you’re making repairs, upgrades, or renovations, it’s important to prioritize safety and take the necessary precautions.
In this article, we have outlined a step-by-step guide to disconnecting a doorbell. From gathering the necessary tools to turning off the power, locating the transformer, disconnecting the wires, and insulating them properly, each step is crucial to ensure a smooth and safe process.
Remember, when working with electrical systems, always wear insulated gloves to protect yourself from electrical shocks. Take your time and carefully follow each step, ensuring that the power is turned off before disconnecting any wires.
If you’re unsure about any step or encounter any difficulties, it’s never a bad idea to consult a licensed electrician. They have the expertise and knowledge to guide you through the process and ensure that everything is done correctly and safely.
By following this guide, you can confidently disconnect your doorbell and proceed with any necessary work or upgrades. Just remember to test the system after reapplying power to ensure it functions properly. And if in doubt, always seek professional assistance.
Now that you have the knowledge and understanding of how to disconnect a doorbell, you can proceed with your project, making the necessary changes or upgrades without any worries. Happy disconnecting!
Frequently Asked Questions about How To Disconnect Doorbell
Was this page helpful?
At Storables.com, we guarantee accurate and reliable information. Our content, validated by Expert Board Contributors, is crafted following stringent Editorial Policies. We're committed to providing you with well-researched, expert-backed insights for all your informational needs.


0 thoughts on “How To Disconnect Doorbell”