Articles
Why Is My Fridge Leaking Water Onto The Floor
Modified: August 20, 2024
Learn why your fridge is leaking water onto the floor with our informative articles. Find solutions to prevent and fix this common issue in your home.
(Many of the links in this article redirect to a specific reviewed product. Your purchase of these products through affiliate links helps to generate commission for Storables.com, at no extra cost. Learn more)
Introduction
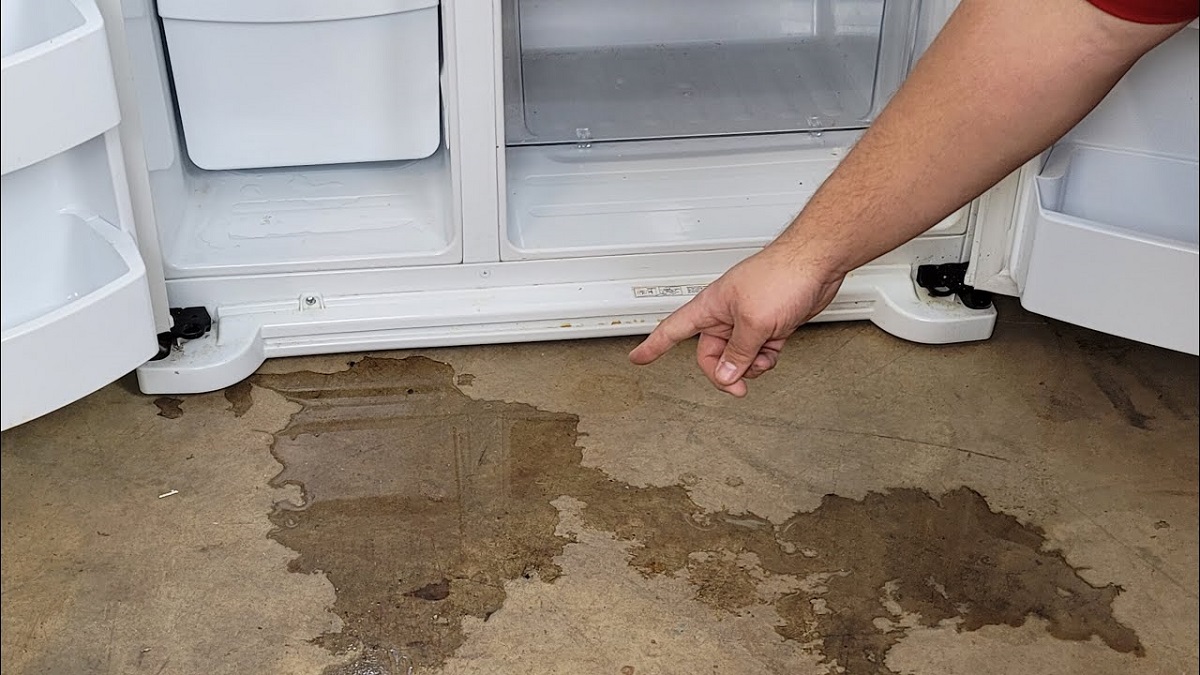
Welcome to our guide on why your fridge may be leaking water onto the floor. Nothing is more frustrating than discovering a puddle of water around your beloved refrigerator. Not only can it cause damage to your flooring, but it can also be a sign of an underlying issue with your appliance. In this article, we will explore the common causes of fridge leaks and provide you with practical solutions to fix and prevent them.
Fridge leaks can occur for various reasons, ranging from simple maintenance issues to more complex mechanical malfunctions. By understanding the potential causes, you can diagnose the problem and determine the necessary course of action. So, let’s dive in and discover why your fridge may be leaking water onto the floor.
Key Takeaways:
- Regularly inspect and maintain your fridge to prevent leaks. Address issues with the defrost drain, water supply line, and door gaskets promptly to ensure efficient and trouble-free operation.
- Prioritize safety by unplugging the fridge before maintenance. Take proactive measures to prevent future leaks, such as minimizing door openings and monitoring temperature and humidity levels.
Common Causes of Fridge Leaks
When it comes to fridge leaks, there are several common culprits to consider. Here are some of the most frequent causes:
- Blocked or Frozen Defrost Drain: One of the primary reasons for a leaking fridge is a blocked or frozen defrost drain. This drain is responsible for directing melted ice and condensation from the freezer to a pan located at the bottom of the fridge. If the drain becomes obstructed or frozen, the water will overflow and leak onto the floor.
- Faulty Water Supply Line: If your fridge has a built-in water dispenser or an ice maker, a defective water supply line could be the source of the leak. Over time, these water lines can develop cracks, loose connections, or even get pinched, leading to water leaks.
- Improperly Sealed Door Gaskets: The door gaskets are the rubber seals that go around the fridge and freezer doors. If these gaskets are worn out, torn, or not properly sealed, warm outside air can enter the fridge, causing condensation and water accumulation.
- Clogged or Overflowing Drain Pan: The drain pan, located underneath the fridge, collects the water that drips from the defrost drain. If the drain pan becomes clogged or overflows, it can result in water leaking onto the floor.
- Condensation Issues: Excessive condensation inside the fridge can also contribute to leaks. This can happen if the fridge door is frequently opened and closed or if the temperature and humidity levels inside the fridge are not properly regulated.
- Leaking Ice Maker or Water Filter: If your fridge is equipped with an ice maker or a water filter, a leak from one of these components could be the cause of the water on your floor. The connection points or valves associated with these features may develop leaks over time.
Understanding these common causes of fridge leaks is the first step in finding a solution. In the next sections, we will discuss how to address each issue to fix the leaking problem.
Blocked or Frozen Defrost Drain
One of the most common causes of a leaking fridge is a blocked or frozen defrost drain. The defrost drain is responsible for directing melted ice and condensation from the freezer to a pan located at the bottom of the fridge. When the drain becomes blocked or frozen, the water has nowhere to go and begins to leak onto the floor.
To fix a blocked or frozen defrost drain, follow these steps:
- Unplug the fridge: Before performing any maintenance on your fridge, always unplug it from the power source to ensure your safety.
- Locate the defrost drain: The defrost drain is typically located at the back of the freezer. You may need to remove the food and shelves inside the freezer to access it.
- Clear the drain opening: Using a thin, flexible object such as a pipe cleaner or a turkey baster, gently clear any debris or ice that may be blocking the drain opening. Be careful not to push the obstruction further into the drain.
- Flush the drain: Once the drain opening is clear, pour a mixture of hot water and mild detergent down the drain to flush it. This will help remove any remaining ice or debris that may be obstructing the drain.
- Check the drain pan: While you’re addressing the defrost drain issue, it’s a good idea to check the drain pan located at the bottom of the fridge. Ensure that it is not cracked or overflowing. If needed, clean or replace the drain pan.
- Reassemble and plug in the fridge: Once you have cleared the defrost drain and checked the drain pan, reassemble the freezer shelves and food items. Plug the fridge back into the power source and monitor it for any further leaks.
Clearing a blocked or frozen defrost drain is relatively straightforward and can often resolve the issue of water leaking onto the floor. However, if the problem persists or if you’re uncomfortable performing the task yourself, it is advisable to seek assistance from a professional appliance repair technician.
Faulty Water Supply Line
If your fridge has a built-in water dispenser or an ice maker, a faulty water supply line can be a common culprit behind fridge leaks. Over time, these water lines can develop cracks, loose connections, or even get pinched, causing water to leak onto the floor.
To address a faulty water supply line, follow these steps:
- Unplug the fridge: Before performing any maintenance on your fridge, always unplug it from the power source to ensure your safety.
- Locate the water supply line: The water supply line is usually located at the back of the fridge. It connects to the water source and leads to the ice maker or water dispenser.
- Inspect the water line: Carefully examine the water supply line for any visible signs of damage, such as cracks, leaks, or loose connections. If you spot any issues, they will need to be addressed.
- Replace damaged parts: If you find any cracks or leaks in the water supply line, you will need to replace the affected parts. This may involve replacing the entire water line or simply repairing the damaged section.
- Check for pinched lines: In some cases, the water supply line may get pinched, restricting water flow and causing leaks. Ensure that the water line is properly positioned and not being pinched by any surrounding objects or the fridge itself.
- Tighten connections: If you notice any loose connections, tighten them using an adjustable wrench or pliers. Make sure all connections are secure to prevent water leakage.
- Test for leaks: After addressing any issues with the water supply line, plug in the fridge and test for leaks. Run the water dispenser and check if water is flowing smoothly without any leakage. If you observe any leaks, double-check the connections and consider seeking professional assistance.
Repairing or replacing a faulty water supply line requires basic plumbing knowledge. If you are unsure or uncomfortable with performing these tasks, it is advisable to contact a professional plumber or appliance repair technician to assist you.
Improperly Sealed Door Gaskets
The door gaskets, also known as rubber seals, are an essential component of your fridge. They create an airtight seal when the doors are closed, helping to maintain the proper temperature inside. However, worn-out or improperly sealed door gaskets can lead to warm air seeping into the fridge, resulting in condensation and water accumulation.
To address improperly sealed door gaskets and prevent fridge leaks, follow these steps:
- Unplug the fridge: As a safety precaution, always unplug the fridge from the power source before performing any maintenance tasks.
- Examine the door gaskets: Inspect the rubber seals around the fridge and freezer doors for any signs of wear, tears, or damage. Look for areas where the gaskets are not fully sealed or are loose.
- Clean the door gaskets: Use a mild detergent, warm water, and a soft cloth or sponge to clean the door gaskets. Remove any dirt, debris, or sticky residue that may be interfering with the proper sealing of the gaskets.
- Apply silicone lubricant: After cleaning the door gaskets, apply a thin layer of silicone lubricant along the entire length of the gaskets. This will help the gaskets create a better seal when the doors are closed.
- Check the alignment: Make sure that the doors are aligned properly and close tightly. If necessary, adjust the hinges or leveling feet to ensure a snug fit between the doors and the fridge body.
- Test the door seal: Close the doors and inspect the seals to ensure they are making full contact with the fridge body. You can perform a simple test by placing a dollar bill between the seal and the fridge and gently pulling it out. If the bill slides out easily, the gaskets may need further adjustment or replacement.
- Replace damaged gaskets: If you find significant damage or the door gaskets are beyond repair, they will need to be replaced. Contact your fridge manufacturer or a professional appliance repair service to obtain the correct replacement gaskets.
- Regular maintenance: To prevent future issues with door gaskets, periodically clean them and inspect for any signs of wear or damage. Replace the gaskets as needed to maintain proper sealing.
By ensuring the door gaskets are properly sealed, you can minimize condensation and prevent water leaks from occurring. Remember to consult your fridge’s manual or seek professional assistance if you are unsure or need additional guidance.
Read more: Why Is My Water Pump Leaking
Clogged or Overflowing Drain Pan
The drain pan is an essential component located at the bottom of your fridge. Its purpose is to collect the water that drips from the defrost drain. However, if the drain pan becomes clogged or overflows, it can result in water leaking onto the floor.
To address a clogged or overflowing drain pan, follow these steps:
- Unplug the fridge: Before performing any maintenance on your fridge, always unplug it from the power source to ensure your safety.
- Locate the drain pan: The drain pan is usually located at the bottom of the fridge, behind the kick plate or grille. You may need to remove the kick plate or grille to access it.
- Inspect the drain pan: Carefully examine the drain pan for any signs of clogs, debris, or overflowing water. The drain pan should be empty or have only a small amount of water collected in it.
- Remove and clean the drain pan: If you find any debris or standing water in the drain pan, remove it and clean it thoroughly. Empty the water and wash the pan with warm, soapy water. Use a sponge or brush to scrub away any residue or buildup.
- Clear the drain line: Once the drain pan is clean, locate the drain line that connects to the pan. It may be a small tube or hose. Gently clear any obstructions in the drain line, such as debris or buildup, using a pipe cleaner or a thin, flexible brush.
- Flush the drain line: After clearing any obstructions, flush the drain line with a mixture of hot water and mild detergent. This will help remove any remaining debris and ensure that the line is clear.
- Replace the drain pan and kick plate or grille: Once the drain pan is clean and the drain line is clear, replace the drain pan in its original position. Secure it properly and reattach the kick plate or grille.
- Plug in the fridge: Plug the fridge back into the power source and monitor it for any further leaks. Check the drain pan periodically to ensure it remains empty or has only a small amount of water accumulated.
Regular maintenance of the drain pan and drain line can help prevent clogs and overflow, reducing the chances of water leaking onto the floor. If you continue to experience issues with a clogged or overflowing drain pan, it is recommended to consult a professional appliance repair technician for further assistance.
Condensation Issues
Excessive condensation inside the fridge can contribute to leaks and water accumulation on the floor. This can happen due to a variety of reasons, such as frequent opening and closing of the fridge door, improper temperature and humidity control, or a faulty door seal.
To address condensation issues and prevent fridge leaks, consider the following steps:
- Check the door seal: Inspect the door gaskets to ensure they are properly sealed and making full contact with the fridge body. If the door seal is compromised, warm air may enter the fridge, leading to condensation. Clean the door gaskets and apply a thin layer of silicone lubricant to improve sealing.
- Minimize door openings: Limit the frequency and duration of opening the fridge door. Every time the door is opened, warm air enters, causing condensation. Be mindful of keeping the door closed as much as possible.
- Check temperature settings: Ensure that the temperature settings of the fridge are appropriately set. If the temperature is too low or too high, it can create excess condensation. Refer to the manufacturer’s guidelines for recommended temperature ranges.
- Monitor humidity levels: High humidity inside the fridge can contribute to condensation. If your fridge has a humidity control setting, adjust it to maintain optimal humidity levels. Consider using moisture-absorbing products, such as baking soda or silica gel packs, to help control humidity.
- Avoid hot or uncovered food: Avoid placing hot or uncovered food items directly into the fridge. Allow hot food to cool down before storing it to reduce condensation. Cover food containers tightly to minimize moisture evaporation.
- Clean up spills promptly: Any spills or moisture inside the fridge should be cleaned up promptly. Wipe down surfaces and remove excess moisture to prevent condensation buildup.
- Properly store food: Arrange food items in a way that allows for proper airflow inside the fridge. Avoid overcrowding or blocking vents, as this can lead to inadequate air circulation and increased condensation.
By addressing condensation issues and implementing proper maintenance practices, you can minimize the occurrence of excess condensation and reduce the risk of water leaks from your fridge.
Leaking Ice Maker or Water Filter
If your fridge is equipped with an ice maker or a water filter, a leak from one of these components could be the cause of water on your floor. The connection points or valves associated with these features may develop leaks over time.
To address a leaking ice maker or water filter, follow these steps:
- Unplug the fridge: Before performing any maintenance on your fridge, always unplug it from the power source to ensure your safety.
- Locate the ice maker and water filter: The ice maker is typically located in the freezer compartment, while the water filter is often found inside the fridge. Refer to your fridge’s manual if you’re unsure of their exact locations.
- Inspect the connections: Check the connection points between the ice maker or water filter and the water supply line. Look for any visible signs of leaks, such as dripping water or moisture around the connections.
- Tighten connections: If you notice any loose connections, use an adjustable wrench or pliers to tighten them. Ensure that the connections are secure and properly sealed to prevent water leakage.
- Check for damaged hoses or valves: Examine the hoses and valves associated with the ice maker and water filter for any signs of damage or wear. Cracks or leaks in these components could be the source of the leakage. If you find any damage, they may need to be repaired or replaced.
- Replace faulty parts: If you identify a specific component that is causing the leak, such as a damaged hose or valve, it may be necessary to replace the faulty part. Contact the fridge manufacturer or a professional appliance repair service to obtain the correct replacement parts.
- Reset and test the ice maker: If the ice maker is the source of the leak, follow the manufacturer’s instructions to reset it. Once reset, observe the ice maker for any further leaks. Run a test cycle to ensure proper functioning without water leakage.
- Monitor the water filter: If the water filter is leaking, ensure it is properly installed and seated in its housing. Monitor the filter for any signs of leaks or dripping water. Replace the filter as recommended by the manufacturer to prevent potential issues.
- Regular maintenance: Periodically check the ice maker and water filter for any signs of leaks. Clean and maintain these components according to the manufacturer’s instructions to ensure their proper functioning.
By addressing leaking issues with the ice maker or water filter, you can prevent water from accumulating on your fridge floor and ensure the proper functioning of these features. If the problem persists or if you’re unsure about performing the tasks yourself, it is recommended to seek assistance from a professional appliance repair technician.
How to Fix a Leaking Fridge
A leaking fridge can be a frustrating and concerning problem. Fortunately, many common causes of fridge leaks can be addressed and resolved with a few simple steps. Here’s a guide on how to fix a leaking fridge:
Read more: Why Is My Freezer Leaking Water
Step 1: Unplug the Fridge
Before you begin any maintenance or repair tasks, always unplug the fridge from the power source. This will ensure your safety as you work on the appliance.
Step 2: Clear the Defrost Drain
If your fridge has a blocked or frozen defrost drain, it can result in water leakage. Locate the defrost drain at the back of the freezer and clear any obstructions using a pipe cleaner or a turkey baster. Flush the drain with a mixture of hot water and mild detergent to remove any remaining debris.
Step 3: Check the Water Supply Line
If your fridge has a water dispenser or an ice maker, a faulty water supply line could be the cause of the leak. Inspect the water supply line for any cracks, leaks, or loose connections. Replace or repair any damaged parts and ensure that all connections are secure.
Step 4: Inspect and Replace Door Gaskets
Worn-out or improperly sealed door gaskets can allow warm air to enter the fridge, leading to condensation and water accumulation. Clean the door gaskets and apply silicone lubricant to improve their sealing. If the gaskets are damaged beyond repair, they may need to be replaced.
Read more: Why Is My Kettle Leaking Water
Step 5: Clean or Replace the Drain Pan
A clogged or overflowing drain pan can cause water to leak onto the floor. Remove the drain pan and clean it thoroughly to remove any debris or standing water. If the drain pan is damaged, it may need to be replaced.
Step 6: Address Condensation Problems
Excessive condensation inside the fridge can contribute to water leaks. Check the door seal, minimize door openings, adjust temperature and humidity settings, and properly store food to reduce condensation buildup.
Step 7: Repair or Replace the Ice Maker or Water Filter
If your fridge has an ice maker or a water filter, leaks from these components may be the issue. Inspect the connections, tighten any loose parts, and replace any damaged hoses or valves. Reset and test the ice maker, and monitor the water filter for leaks or drips.
Remember to plug in the fridge after completing the necessary repairs and monitor it for any further leaks. Regular maintenance and prompt action can help prevent future fridge leaks and ensure the optimal functioning of your appliance.
Step 1: Unplug the Fridge
When it comes to fixing a leaking fridge, it’s essential to start by prioritizing safety. Before you begin any maintenance or repair tasks, the first step is to unplug the fridge from the power source. This simple action ensures your safety and prevents any potential electrical accidents.
Unplugging the fridge serves multiple purposes. Firstly, it eliminates the risk of electric shock while you work on the appliance. It ensures that you won’t accidentally come into contact with any live electrical components. Secondly, it allows you to work on the fridge without the interference of any moving parts or power supply.
Here’s how you can safely unplug your fridge:
- Locate the power cord: The power cord can typically be found at the back of the fridge, near the bottom. It is usually connected to an electrical outlet or a power strip.
- Gently pull the plug: Firmly grasp the plug, not the cord, and gently pull it out of the outlet. Avoid yanking or pulling forcefully, as this can damage the cord or the outlet.
- Double-check the power supply: Once the plug is disconnected, verify that the fridge is indeed unplugged by checking that the lights and any display screens have turned off.
Unplugging the fridge is a crucial first step before conducting any repairs or maintenance tasks. It not only ensures your safety but also prevents any potential damage to the appliance or the surrounding area.
Remember to only proceed with any repairs or maintenance once you have confirmed that the fridge is no longer connected to a power source. You can then proceed to diagnose and address the cause of the leaking issue with peace of mind.
Read more: Why Is My Portable AC Leaking Water
Step 2: Clear the Defrost Drain
If your fridge is leaking water onto the floor, a blocked or frozen defrost drain could be the culprit. The defrost drain is responsible for directing melted ice and condensation from the freezer to a pan located at the bottom of the fridge. When the drain becomes obstructed, water can overflow and leak out instead of being properly drained away.
Follow these steps to clear the defrost drain:
- Locate the defrost drain: In most cases, the defrost drain is situated at the back of the freezer compartment. Access may require removing any food items and shelves from inside.
- Identify the obstruction: Inspect the defrost drain and surrounding area for any visible signs of debris, ice buildup, or blockages. Common culprits include food particles, ice chunks, or freezer frost that has accumulated over time.
- Clear the drain opening: Use a thin, flexible object such as a pipe cleaner, a turkey baster, or a small brush to gently clear the opening of the drain. Be cautious not to push the obstruction further into the drain.
- Flush the drain: Once the drain opening is cleared, flush the drain with a mixture of hot water and mild detergent. This helps to remove any remaining debris or ice from the drain line.
- Inspect the drain pan: While addressing the defrost drain, it’s a good idea to inspect the drain pan located at the bottom of the fridge. Ensure that it is not cracked, overflowing, or damaged. If needed, clean or replace the drain pan accordingly.
- Reassemble and plug in the fridge: After clearing the defrost drain and ensuring the drain pan is in good condition, reassemble the freezer shelves and food items. Plug the fridge back into the power source, and monitor it for any further leaks.
- Unplug the fridge: Before inspecting or working on the water supply line, unplug the fridge from the power source to ensure your safety.
- Locate the water supply line: The water supply line is usually located at the back of the fridge. It is connected to the water source and leads to the ice maker or water dispenser.
- Inspect the water line: Carefully examine the water supply line for any visible signs of damage, such as cracks, leaks, or loose connections. Pay close attention to the areas near the connections and valves.
- Tighten connections: If you notice any loose connections, use an adjustable wrench or pliers to tighten them. Make sure all connections are secured tightly to prevent water leakage.
- Check for pinched lines: Inspect the water supply line to ensure it is not pinched or kinked. A pinched line restricts water flow and can lead to leaks. Adjust the positioning of the line if necessary to prevent any pinching.
- Replace damaged parts: If you find any cracks, leaks, or damage to the water supply line, you will need to replace the affected parts. This may involve replacing the entire line or repairing a specific section.
- Test for leaks: After addressing any issues with the water supply line, plug in the fridge and test for leaks. Run the water dispenser and check if water flows smoothly without any leakage. Keep an eye on the connections and valves for any signs of moisture or drips.
- Unplug the fridge: Before inspecting or replacing the door gaskets, unplug the fridge from the power source to ensure your safety.
- Locate the door gaskets: The door gaskets are rubber seals that run along the edges of the fridge and freezer doors. They create an airtight seal when the doors are closed.
- Inspect the gaskets: Carefully examine the gaskets for any signs of wear, tears, cracks, or damage. Pay attention to areas where the gaskets may be loose or not making full contact with the fridge body.
- Clean the gaskets: Use a mild detergent, warm water, and a soft cloth or sponge to clean the door gaskets. Remove any dirt, debris, or sticky residue that may interfere with proper sealing. Ensure that the gaskets are completely dry before proceeding.
- Check the seal: Close the fridge and freezer doors and inspect the gaskets to ensure they are making full contact with the fridge body. Slide a piece of paper or a dollar bill between the gaskets and the fridge, then gently pull it out. If the paper slides out easily, the gaskets may not be sealing properly and may need adjustment or replacement.
- Replace damaged gaskets: If you find significant damage or the gaskets are beyond repair, they will need to be replaced. Contact your fridge manufacturer or a professional appliance repair service to obtain the correct replacement gaskets. Follow the manufacturer’s instructions for proper installation.
- Ensure proper alignment: After installing new gaskets or adjusting the existing ones, ensure that the fridge and freezer doors are aligned properly and close tightly. If necessary, adjust the hinges or leveling feet to achieve a snug fit between the doors and the fridge body.
- Unplug the fridge: Before working on the drain pan, unplug the fridge from the power source for safety.
- Locate the drain pan: The drain pan is typically located at the bottom of the fridge, behind the kick plate or grille. You may need to remove the kick plate or grille to access it.
- Inspect the drain pan: Carefully inspect the drain pan for any signs of clogs, debris, cracks, or overflowing water. It should be empty or have only a small amount of water collected in it.
- Clean the drain pan: If you find any debris or standing water in the drain pan, remove it and clean the pan thoroughly. Empty the water and wash the pan with warm, soapy water. Use a sponge or brush to scrub away any residue or buildup.
- Replace the drain pan (if necessary): If the drain pan is cracked, damaged, or beyond cleaning, it may need to be replaced. Contact your fridge manufacturer or a professional appliance repair service to obtain the correct replacement drain pan.
- Reassemble and plug in the fridge: After cleaning or replacing the drain pan, reassemble the kick plate or grille. Plug the fridge back into the power source.
- Monitor for leaks: Monitor the fridge for any further leaks. Check the drain pan periodically to ensure it remains empty or has only a small amount of water accumulated.
- Check the door seal: Make sure the door gaskets are properly sealed and making full contact with the fridge body. Clean the gaskets and apply a thin layer of silicone lubricant to improve sealing. A proper seal prevents warm air from entering the fridge, reducing condensation.
- Minimize door openings: Limit the frequency and duration of opening the fridge door. Every time the door is opened, warm air enters, leading to condensation. Be mindful of keeping the door closed as much as possible.
- Check temperature settings: Ensure that the temperature settings inside the fridge are appropriately set. Extreme temperatures can contribute to excess condensation. Refer to the manufacturer’s guidelines for recommended temperature ranges.
- Monitor humidity levels: High humidity inside the fridge can encourage condensation. If your fridge has a humidity control setting, adjust it to maintain optimal humidity levels. Consider using moisture-absorbing products, such as baking soda or silica gel packs, to help control humidity.
- Avoid hot or uncovered food: Placing hot or uncovered food items directly into the fridge can contribute to condensation. Allow hot food to cool down before storing it, and cover food containers tightly to minimize moisture evaporation.
- Clean up spills promptly: Any spills or moisture inside the fridge should be cleaned up promptly. Wipe down surfaces and remove excess moisture to prevent condensation buildup.
- Properly store food: Arrange food items in a way that allows for proper airflow inside the fridge. Avoid overcrowding or blocking vents, as this can lead to inadequate air circulation and increased condensation.
- Unplug the fridge: Before working on the ice maker or water filter, unplug the fridge from the power source for safety.
- Inspect the connections: Carefully examine the connections between the ice maker or water filter and the water supply line. Look for any visible signs of leaks, such as dripping water or moisture around the connections.
- Tighten connections: If you notice any loose connections, use an adjustable wrench or pliers to tighten them. Ensure all connections are secured tightly to prevent water leakage.
- Check for damaged hoses or valves: Inspect the hoses and valves associated with the ice maker and water filter for any signs of damage or wear. Cracked or leaky hoses may need to be replaced. Faulty valves may require repair or replacement by a professional.
- Reset and test the ice maker: If the ice maker is the source of the leak, follow the manufacturer’s instructions to reset the ice maker. Monitor it for any further leaks. Run a test cycle to ensure proper functioning without water leakage.
- Monitor the water filter: If the water filter is leaking, ensure it is properly installed and seated in its housing. Monitor the filter for any signs of leaks or dripping water. Replace the filter as recommended by the manufacturer to prevent potential issues.
- Seek professional assistance: If you’re unable to identify or fix the issue with the ice maker or water filter, consult a professional appliance repair technician. They have the expertise and tools to diagnose and address the problem effectively.
- Regularly inspect and clean the fridge: Take the time to visually inspect your fridge on a regular basis. Look for any signs of wear or damage, including cracks, loose connections, or damaged components. Clean the interior of the fridge, paying attention to the drain pan, defrost drain, and door gaskets.
- Maintain proper temperature and humidity levels: Ensure that your fridge is set to the recommended temperature to prevent excessive condensation. Avoid frequent temperature changes and monitor humidity inside the fridge. Applying moisture-absorbing products can help control humidity levels.
- Keep the fridge door closed: Limit how often you open the fridge door and avoid leaving it open for extended periods. This minimizes the amount of warm air that enters the fridge, reducing the potential for condensation and leaks.
- Check and replace door gaskets as needed: Over time, door gaskets can wear out or become loose, compromising the fridge’s seal. Inspect the gaskets regularly and replace them if they are damaged or no longer provide a tight seal.
- Regularly maintain the defrost drain: The defrost drain can become clogged or frozen, leading to leaks. Clear the drain regularly to ensure proper water drainage. Keep the drain pan clean and free from debris.
- Monitor the water supply line: If your fridge has a water dispenser or ice maker, regularly check the water supply line for any signs of damage, such as cracks or leaks. Replace the water supply line as needed to prevent future leaks.
- Use and maintain the ice maker and water filter correctly: follow the manufacturer’s guidelines for installation, usage, and maintenance of the ice maker and water filter. Regularly replace the water filter as recommended by the manufacturer to prevent leaks and ensure clean water.
- Consider professional maintenance: Schedule periodic professional maintenance for your fridge. A technician can inspect and service the appliance, identifying any potential issues before they escalate into major leaks or problems.
Step 3: Check the Water Supply Line
If your fridge has a built-in water dispenser or an ice maker, a faulty water supply line can be a common cause of leaks. Over time, the water supply line can develop cracks, loose connections, or become pinched, resulting in water leakage. To address this issue, follow these steps:
It’s important to take precautions while working with the water supply line. If you’re uncertain about inspecting or replacing the line yourself, consider contacting a professional appliance repair technician who can assist you with the task.
By checking and addressing any issues with the water supply line, you can prevent water leaks and ensure a properly functioning water dispenser or ice maker in your fridge.
Step 4: Inspect and Replace Door Gaskets
Improperly sealed door gaskets can contribute to fridge leaks by allowing warm air to enter the fridge, leading to condensation and water accumulation. To address this issue, it’s important to regularly inspect and maintain the door gaskets. Here’s how you can inspect and replace door gaskets:
Regular maintenance of the door gaskets is essential to ensure an effective seal, preventing warm air from entering the fridge and causing condensation. Properly sealing the doors helps to minimize water accumulation and reduce the risk of fridge leaks.
If you’re unsure about replacing the door gaskets yourself or if the problem persists after replacement, consider consulting a professional appliance repair technician for further assistance.
Check the defrost drain to make sure it’s not clogged. If it is, clear the blockage to allow the water to properly drain and prevent leakage onto the floor.
Step 5: Clean or Replace the Drain Pan
A clogged or overflowing drain pan can be a common cause of fridge leaks. The drain pan, located at the bottom of the fridge, collects water that drips from the defrost drain. If the drain pan becomes clogged or damaged, it can lead to water leaking onto the floor. Follow these steps to clean or replace the drain pan:
Cleaning or replacing the drain pan helps to ensure that water is properly collected and drained away, preventing leaks and potential water damage to your fridge and floor. Regular maintenance of the drain pan can help avert future clogging or overflow issues.
If you continue to experience problems with a clogged or overflowing drain pan, or if you’re unsure about performing these tasks yourself, it’s recommended to seek assistance from a professional appliance repair technician.
Read more: Why Is My Espresso Machine Leaking Water?
Step 6: Address Condensation Problems
Excessive condensation inside the fridge can contribute to leaks and water accumulation on the floor. Addressing condensation issues can help prevent unnecessary leaks and maintain optimal functioning of your fridge. Follow these steps to address condensation problems:
Addressing condensation problems requires regular maintenance and proper usage of the fridge. By following these steps, you can minimize condensation inside the fridge, reduce the risk of leaks, and preserve the freshness of your food.
If you continue to experience excessive condensation or leaks after following these steps, consider reaching out to a professional appliance technician to further assess and diagnose the issue.
Step 7: Repair or Replace the Ice Maker or Water Filter
If your fridge has an ice maker or a water filter, leaks from these components can be the source of water on the floor. To address this issue, follow these steps:
Repairing or replacing the ice maker or water filter components may require specific knowledge and skills. If you’re unsure or uncomfortable performing these tasks, it’s best to seek professional assistance to avoid further damage or potential safety hazards.
By addressing any issues with the ice maker or water filter, you can prevent water leaks and ensure the efficient and reliable operation of these features in your fridge.
Preventing Future Leaks
Preventing future leaks in your fridge is crucial to maintain its functionality and prolong its lifespan. Here are some preventive measures you can take to avoid potential leaks:
By following these preventive measures, you can minimize the risk of future leaks and maintain the performance and efficiency of your fridge. Regular maintenance and prompt attention to any issues will help prolong the lifespan of your appliance while ensuring a leak-free and trouble-free operation.
Conclusion
A leaking fridge can be a frustrating and inconvenient problem, but with proper maintenance and timely action, it can be resolved. By understanding the common causes of fridge leaks and following the necessary steps, you can fix the issue and prevent future leaks.
Throughout this guide, we have explored various causes of fridge leaks, including blocked defrost drains, faulty water supply lines, improperly sealed door gaskets, clogged drain pans, condensation issues, and problems with the ice maker or water filter. Each issue has been addressed with detailed steps to identify and fix the problem.
Preventing future leaks requires regular inspection and maintenance of your fridge. By keeping an eye on the door gaskets, maintaining proper temperature and humidity levels, minimizing door openings, and taking care of the defrost drain and water supply line, you can reduce the risk of leaks occurring again.
Remember, safety should be your top priority when working on your fridge. Always unplug the appliance before conducting any maintenance or repair tasks. If you’re unsure or uncomfortable with any step, it’s best to seek the assistance of a professional appliance repair technician.
By taking proactive measures and promptly addressing any leaks or issues, you can ensure your fridge operates efficiently, extend its lifespan, and maintain a leak-free environment in your kitchen.
In conclusion, with the knowledge and guidance provided in this guide, you are now equipped to tackle fridge leaks effectively. Remember, preventive maintenance and regular inspections are key to avoiding leaks and ensuring the longevity of your fridge. So, roll up your sleeves, follow the steps outlined, and say goodbye to those pesky fridge leaks!
Frequently Asked Questions about Why Is My Fridge Leaking Water Onto The Floor
Was this page helpful?
At Storables.com, we guarantee accurate and reliable information. Our content, validated by Expert Board Contributors, is crafted following stringent Editorial Policies. We're committed to providing you with well-researched, expert-backed insights for all your informational needs.


0 thoughts on “Why Is My Fridge Leaking Water Onto The Floor”