Articles
Why Does My Refrigerator Leak Water
Modified: January 19, 2024
Learn about the common causes of refrigerator water leaks in this informative article. Discover helpful tips to troubleshoot and resolve the issue.
(Many of the links in this article redirect to a specific reviewed product. Your purchase of these products through affiliate links helps to generate commission for Storables.com, at no extra cost. Learn more)
Why Does My Refrigerator Leak Water?
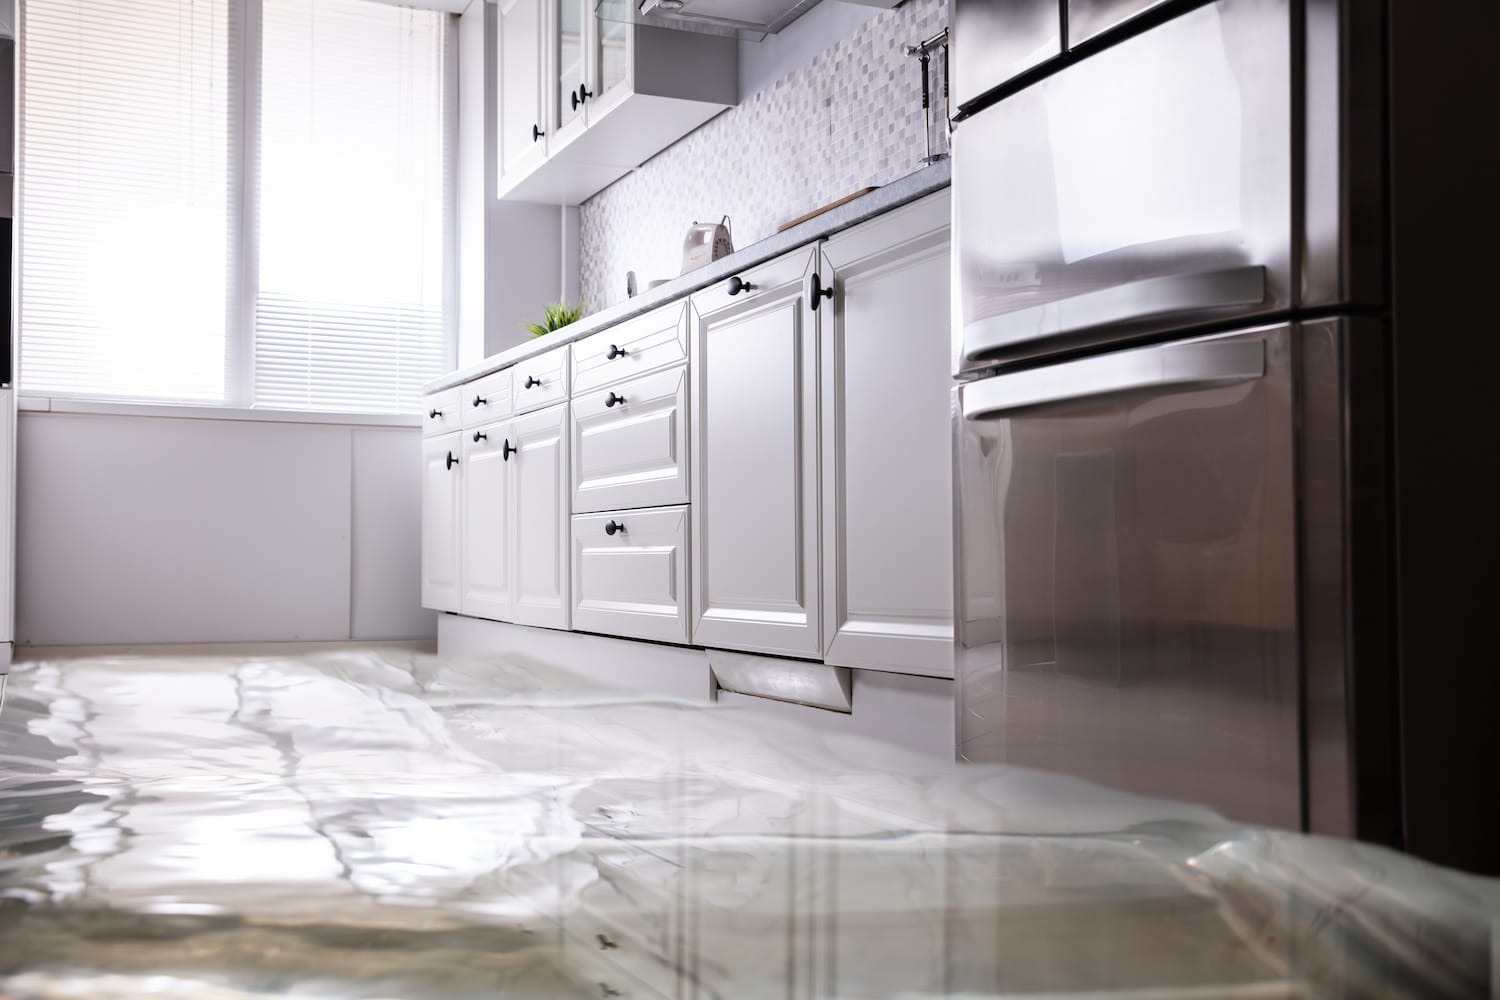
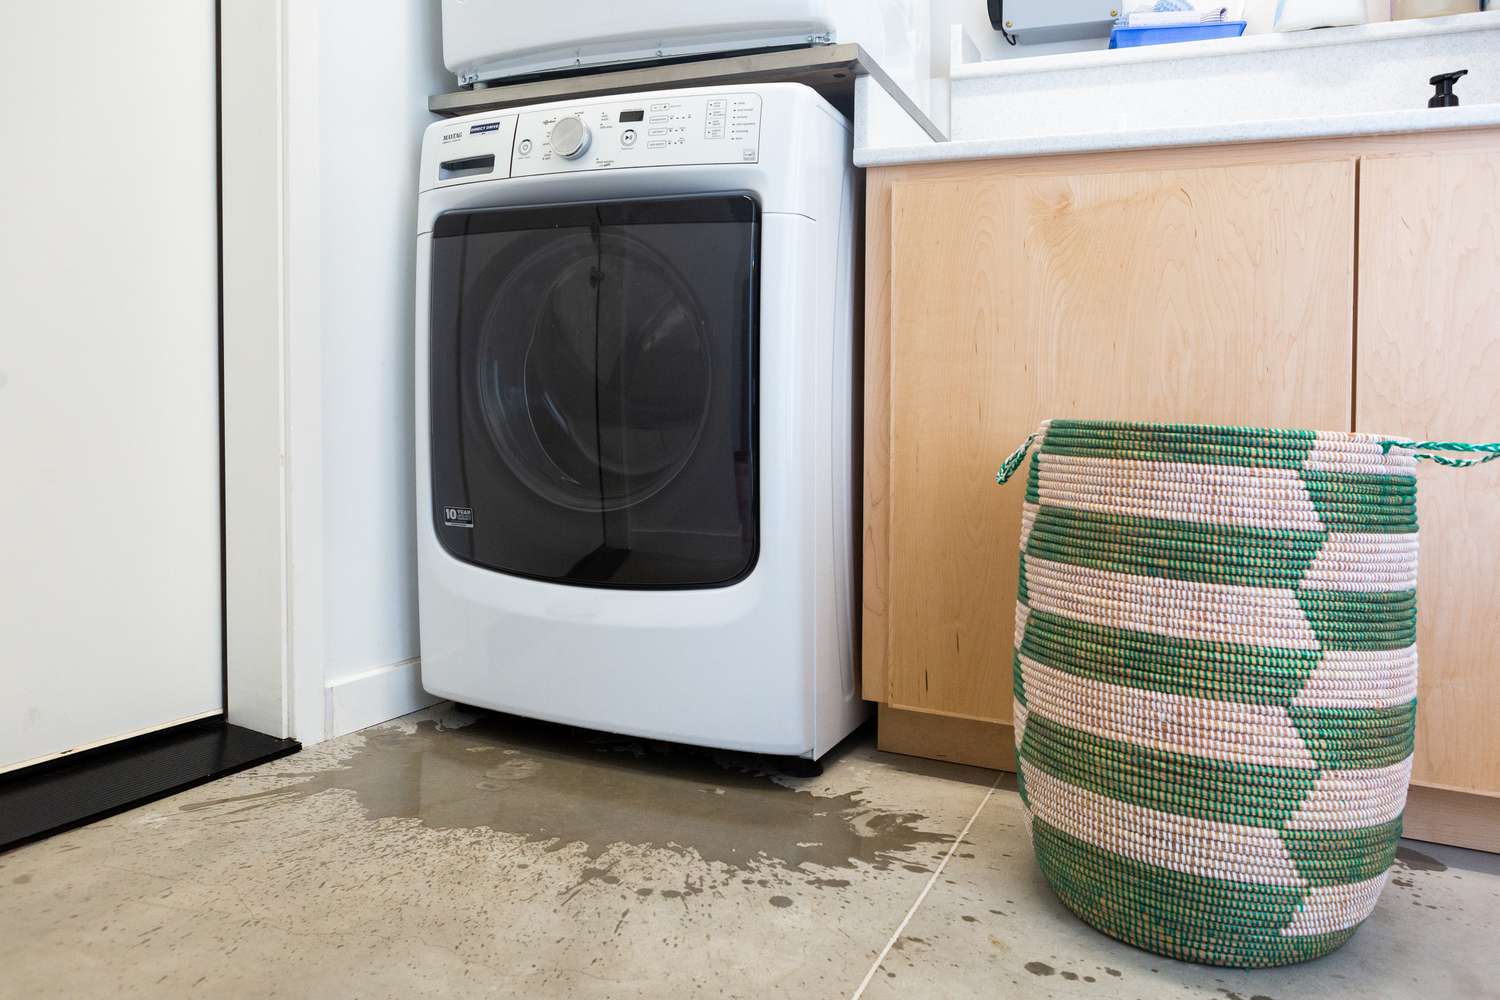
Refrigerators are an essential appliance in every household, but they can occasionally develop issues that require attention. One frustrating problem that many homeowners encounter is a refrigerator leaking water. Not only can this be a nuisance, but it can also lead to water damage and potential mold growth if left unaddressed. In this article, we will explore the common causes of refrigerator leaks and provide practical steps to identify and fix the issue.
Key Takeaways:
- Regularly inspect and maintain the defrost drain, water supply line, water inlet valve, drain pan, and door seals to prevent refrigerator leaks and ensure optimal functionality.
- Addressing refrigerator leaks promptly through proper diagnosis and repairs can save on costly repairs, prevent water damage, and extend the lifespan of the appliance.
Read more: Why Does My Chimney Leak Water
Common Causes of Refrigerator Leaks
1. Clogged or Frozen Defrost Drain:
The defrost drain is responsible for allowing water that accum
Introduction
Refrigerators are an essential appliance in every household, helping to preserve food and keep it fresh. However, it can be quite frustrating when you discover that your refrigerator is leaking water. Not only can this be a nuisance, but it can also lead to water damage and potential mold growth if left untreated.
Understanding the causes of refrigerator leaks and how to address them is crucial for maintaining the functionality and longevity of your appliance. In this article, we will explore the common causes of refrigerator leaks and provide practical steps to identify and fix the issue.
Refrigerator leaks can stem from various sources, including a clogged or frozen defrost drain, a damaged water supply line, a faulty or cracked water inlet valve, a leaking drain pan, or improperly sealed refrigerator doors. Each of these issues requires a different approach for diagnosis and repair.
By familiarizing yourself with the common causes of refrigerator leaks, you can take the necessary steps to troubleshoot and resolve the problem without the need for costly repairs or replacements. Whether you are dealing with a minor leak or a more significant issue, this article will guide you through the process of identifying the cause and implementing the appropriate solution.
It’s important to note that while some refrigerator leaks can be fixed with relative ease, there may be instances where professional assistance is required. If you are uncertain or uncomfortable with performing any of the repair steps, it is always best to consult a qualified technician.
Now, let’s dive into the common causes of refrigerator leaks and explore how to diagnose and fix the problem to keep your refrigerator running smoothly and your kitchen free from unwanted water damage.
Key Takeaways:
- Regularly inspect and maintain the defrost drain, water supply line, water inlet valve, drain pan, and door seals to prevent refrigerator leaks and ensure optimal functionality.
- Addressing refrigerator leaks promptly through proper diagnosis and repairs can save on costly repairs, prevent water damage, and extend the lifespan of the appliance.
Read more: Why Does My Chimney Leak Water
Common Causes of Refrigerator Leaks
A refrigerator leaking water can be caused by various factors. Understanding these common causes will help you identify the source of the leak and take appropriate measures to resolve the issue. Here are the most frequent culprits:
1. Clogged or Frozen Defrost Drain: Inside your refrigerator, there is a defrost drain that collects water from the defrost cycle. If this drain becomes clogged with food particles or ice, the water will overflow and leak onto the floor. Clearing the clog or melting the ice in the drain can resolve this problem.
2. Damaged Water Supply Line: Some refrigerators are equipped with a water supply line that connects to the ice maker or water dispenser. If this line gets damaged, either from aging or physical impact, it can cause water to leak. Inspect the water supply line for any cracks or tears, and replace it if necessary.
3. Faulty or Cracked Water Inlet Valve: The water inlet valve controls the water flow into the refrigerator’s ice maker and water dispenser. If this valve leaks or has a crack, it can result in water leakage. You may need to replace the valve to resolve the issue.
4. Leaking Drain Pan: Located beneath the refrigerator, the drain pan collects excess water that drips down from the freezer during the defrosting process. If the drain pan is cracked or misplaced, it can cause water to leak onto the floor. Check the condition of the drain pan and replace it if necessary.
5. Improperly Sealed Refrigerator Doors: A poor seal around the refrigerator doors can allow warm air to enter, leading to condensation and water leakage. Make sure the seals are clean, intact, and properly aligned with the doors. If needed, replace the door gaskets to ensure a tight seal.
Identifying the specific cause of the leak is crucial for determining the appropriate solution. In the next section, we will discuss how to diagnose the source of the leak and provide step-by-step guidance on resolving the issue.
Clogged or Frozen Defrost Drain
One of the common causes of refrigerator leaks is a clogged or frozen defrost drain. Inside your refrigerator, there is a drain that collects water from the defrost cycle. This water is then directed to a drain pan located beneath the appliance.
Over time, the defrost drain can become clogged with food particles, debris, or even ice. When this happens, water has nowhere to go and can overflow, resulting in puddles on the floor. Fortunately, unclogging the defrost drain is a relatively simple process.
To unclog a defrost drain, follow these steps:
1. Unplug the refrigerator: Ensure your safety by disconnecting the refrigerator from the power source.
2. Locate the defrost drain: The defrost drain is usually found at the back of the freezer compartment. It may be covered by a small panel or located behind the rear wall. Consult your refrigerator’s manual for specific instructions on accessing the drain.
3. Clear the drain opening: Using a funnel or a turkey baster, pour hot water into the drain opening. This will help melt any ice blockage and flush out any debris. You can also use a pipe cleaner or a thin wire to gently remove any stubborn clogs. Be careful not to damage the drain or push the clog further down.
4. Clean the drain pan: While you’re working on the defrost drain, take the opportunity to clean the drain pan beneath the refrigerator. Remove any excess water, debris, or mold buildup. Wipe it down with a mixture of warm water and mild detergent to ensure cleanliness.
5. Reassemble and plug in the refrigerator: Once the drain is clear and the drain pan is clean, carefully reassemble the components and plug in the refrigerator. Monitor the appliance for any further leaks to ensure the issue is resolved.
Regular maintenance can help prevent future clogs in the defrost drain. Consider cleaning the drain every few months to keep it free from debris. Additionally, avoid placing food or objects near the drain opening in the freezer to minimize the risk of blockages.
By unclogging the defrost drain, you can eliminate one of the potential causes of refrigerator leaks. However, if the leak persists or you are unsure about performing the repairs yourself, it is advisable to consult a professional technician for further assistance.
Read more: Why Does My Window AC Leak Water
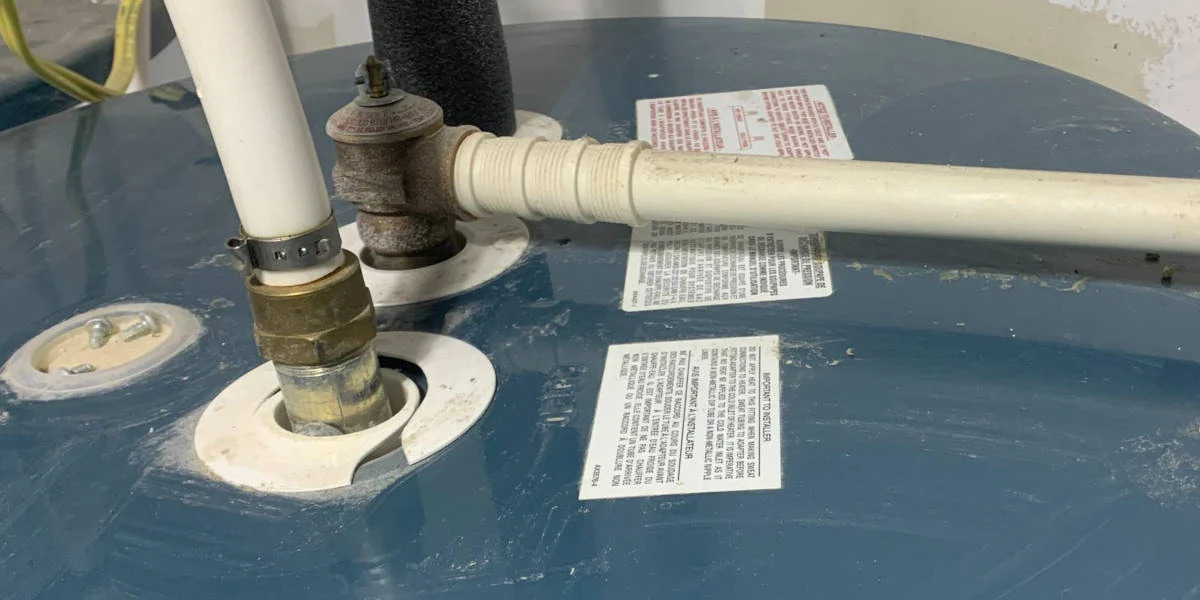
Damaged Water Supply Line
Another common cause of refrigerator leaks is a damaged water supply line. Many modern refrigerators are equipped with a water supply line that connects to the ice maker and water dispenser. Over time, this line can become worn out, develop cracks, or experience damage, leading to water leakage.
To determine if a damaged water supply line is causing the leak, follow these steps:
1. Turn off the water supply: Locate the shut-off valve for the refrigerator’s water supply line. Typically, this valve is located beneath the sink or near the water line connection. Turn the valve clockwise to shut off the water flow to the refrigerator.
2. Inspect the water supply line: Carefully examine the water supply line for any visible signs of damage, such as cracks, tears, or bulges. Pay close attention to areas where the line bends or connects to the refrigerator and water source. If you notice any damage, it’s likely the source of the leak.
3. Replace the water supply line: If the water supply line is damaged, it will need to be replaced. Disconnect the old line from both the refrigerator and the water source. Take note of the line’s length and diameter to ensure you purchase the correct replacement. Install the new line, making sure to tighten the connections properly.
4. Turn on the water supply: Once the new water supply line is securely connected, turn the water supply valve counterclockwise to restore the water flow to the refrigerator. Ensure there are no leaks around the connections and observe the appliance for any signs of water leakage.
It’s essential to use a high-quality water supply line specifically designed for refrigerators to minimize the chances of future leaks. Braided stainless steel lines are highly recommended as they are more durable and less prone to damage.
If you are unsure about replacing the water supply line yourself, or if the leak persists even after replacing the line, it’s best to seek the assistance of a professional technician. They will have the expertise and tools necessary to diagnose and fix the issue effectively.
By addressing the damaged water supply line, you can eliminate the potential source of the leak and restore proper functionality to your refrigerator’s water and ice dispenser system. Remember to regularly inspect the water supply line for any signs of wear and tear and take preventive measures to extend its lifespan.
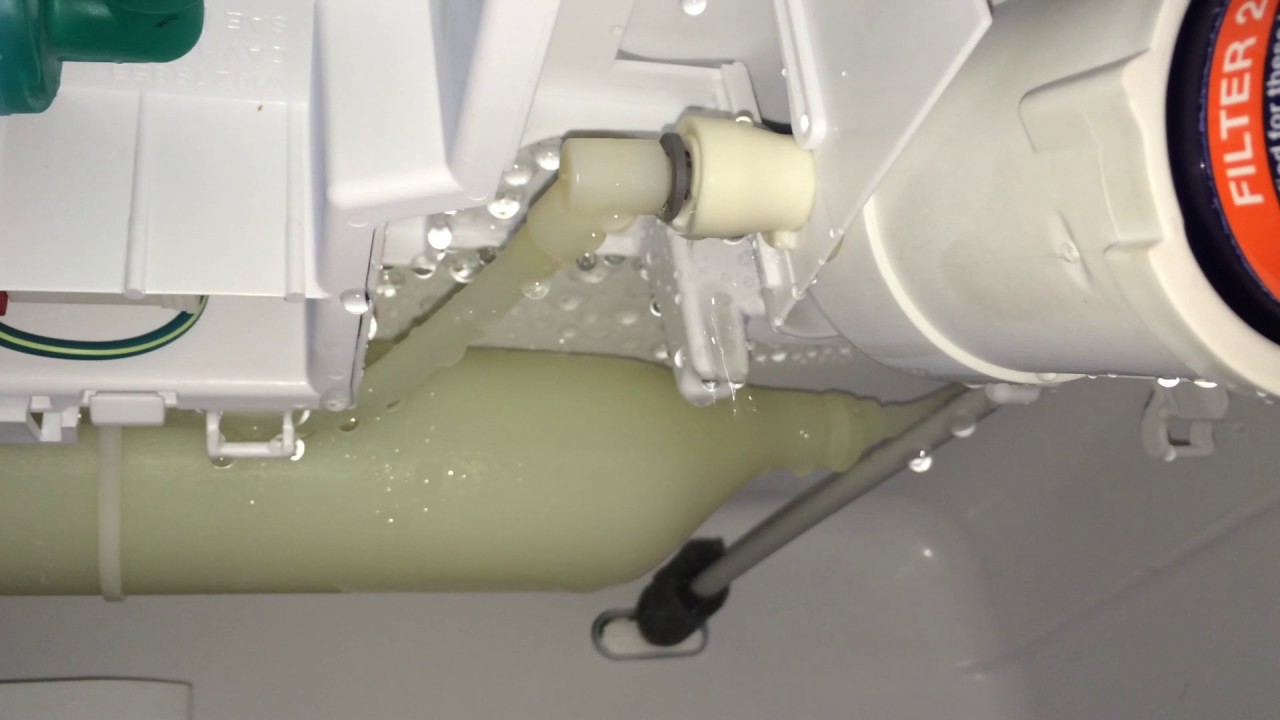
Faulty or Cracked Water Inlet Valve
A faulty or cracked water inlet valve can also be the cause of a refrigerator leak. The water inlet valve controls the flow of water into the refrigerator’s ice maker and water dispenser. If this valve becomes damaged or develops a crack, it can result in water leakage.
To determine if a faulty or cracked water inlet valve is causing the leak, follow these steps:
1. Unplug the refrigerator: Ensure your safety by disconnecting the refrigerator from the power source before starting any repairs.
2. Locate the water inlet valve: The water inlet valve is usually found at the back of the refrigerator, near the bottom. It is connected to the water supply line. Refer to your refrigerator’s manual for the exact location and access instructions.
3. Inspect the water inlet valve: Carefully examine the valve for any signs of damage, such as cracks, leaks, or mineral deposits. Use a flashlight if needed to get a better view. If you notice any abnormalities, it is likely that the valve needs to be repaired or replaced.
4. Replace the water inlet valve: If the water inlet valve is faulty or cracked, it will need to be replaced. Consult your refrigerator’s manual or contact the manufacturer for the correct replacement part. Follow the manufacturer’s instructions or seek professional assistance to ensure proper installation.
5. Test for leaks: Once the new water inlet valve is installed, carefully reconnect the water supply line. Turn on the water supply and plug in the refrigerator. Monitor the appliance for any signs of water leakage around the water inlet valve. If there are no further leaks, the issue is resolved.
It’s important to note that replacing a water inlet valve can be more complex than other repairs. If you are unsure about performing the replacement yourself, it is recommended to seek the help of a professional technician. They will have the experience and expertise to handle the task effectively and safely.
Regularly inspecting the water inlet valve for any signs of damage, such as cracks or leaks, can help prevent future leaks. Additionally, ensure that the water pressure in your home is within the recommended range, as high water pressure can sometimes contribute to valve damage.
By addressing a faulty or cracked water inlet valve, you can eliminate the potential source of the leak and restore proper functioning to your refrigerator’s water and ice dispenser system. Taking immediate action will help prevent further water damage and ensure the longevity of your appliance.
Leaking Drain Pan
A leaking drain pan can be another common cause of a refrigerator leak. The drain pan is located beneath the refrigerator and is responsible for collecting excess water that drips down from the freezer during the defrosting process. Over time, the drain pan can develop cracks or get displaced, leading to water leakage.
To determine if a leaking drain pan is causing the issue, follow these steps:
1. Unplug the refrigerator: Always disconnect the refrigerator from the power source before attempting any repairs to ensure your safety.
2. Locate the drain pan: The drain pan is typically located at the bottom of the refrigerator, behind a kick plate or access panel. Consult your refrigerator’s manual for specific instructions on how to access the drain pan.
3. Inspect the drain pan: Carefully examine the drain pan for any signs of cracks, damage, or misalignment. Check for water pooling or dripping around the pan. If you notice any issues, it’s likely that the drain pan is causing the leak.
4. Clean or replace the drain pan: If the drain pan is dirty, clean it with warm soapy water to remove any debris or residue. If the drain pan is cracked or damaged, it will need to be replaced. Consult your refrigerator’s manufacturer for a compatible replacement part.
5. Reassemble and plug in the refrigerator: Once the drain pan is clean or replaced, carefully reassemble any panels or components that were removed. Plug in the refrigerator and monitor it for any signs of water leakage. Ensure that the drain pan is properly aligned and seated in its designated position.
Regular maintenance of the drain pan is essential to prevent future leaks. Clean the drain pan regularly by wiping away any accumulated water or debris. Additionally, check the drain line connected to the drain pan to ensure it is not clogged or obstructed.
If you are unsure about cleaning or replacing the drain pan yourself or if the leak persists after performing the repair, it’s best to consult a professional technician. They will have the necessary expertise to handle the repair or replacement efficiently.
Addressing a leaking drain pan will prevent further water damage and maintain the optimal functionality of your refrigerator. By taking the necessary steps to clean or replace the drain pan, you can resolve the issue and ensure that your refrigerator operates smoothly.
Improperly Sealed Refrigerator Doors
One of the potential causes of refrigerator leaks is improperly sealed refrigerator doors. A poor seal around the refrigerator doors can allow warm air from the surrounding environment to enter, leading to condensation and water leakage.
To determine if improperly sealed doors are causing the issue, follow these steps:
1. Inspect the door gaskets: Carefully examine the door gaskets, which are the rubber seals that line the edges of the refrigerator doors. Look for any signs of wear, tears, or damage. These issues can compromise the effectiveness of the seal.
2. Clean the door gaskets: Use a mixture of warm water and mild detergent to clean the door gaskets. Remove any debris or residue that may be preventing a proper seal. It’s important to keep the gaskets clean and free from any substances that could hinder their ability to create an airtight seal.
3. Check the alignment: Close the refrigerator doors and observe the alignment. Misaligned doors can result in gaps that compromise the seal. Adjust the position of the doors if necessary to ensure they are aligned properly. Refer to your refrigerator’s manual for guidance on how to make adjustments.
4. Perform the dollar bill test: To further test the door seal, place a dollar bill between the door and the refrigerator. Close the door, and then try to pull out the dollar bill. If you can easily remove the bill without resistance, it indicates a weak seal that needs to be addressed.
5. Replace the door gaskets: If the door gaskets are damaged or worn out, they may need to be replaced. Contact the manufacturer or search for compatible replacements online. Follow the manufacturer’s instructions or seek professional assistance to ensure proper installation.
Maintaining a proper seal on the refrigerator doors is important to prevent air leakage and subsequent condensation. Regularly inspect the door gaskets for any signs of wear and tear, and promptly address any issues to maintain the integrity of the seal.
By properly sealing the refrigerator doors, you can eliminate the potential source of water leakage and improve the energy efficiency of your appliance. This will not only prevent water damage but also help preserve the freshness of your food and reduce energy consumption.
If you have followed these steps and the issue persists, it may be best to consult a professional technician. They can perform a comprehensive inspection of your refrigerator and identify any underlying issues that may require further repair.
Read more: Why Is My Water Pump Leaking
How to Identify the Cause of the Leak
Identifying the cause of a refrigerator leak is crucial for effectively addressing the issue. By following these steps, you can pinpoint the source of the leak and take appropriate measures to resolve it:
1. Locate the origin of the water: Start by identifying where the water is coming from. Is it pooling inside the refrigerator, around the base, or on the floor near the appliance? Determining the location of the leak will provide valuable clues about the potential causes.
2. Inspect the interior: Look inside the refrigerator for any signs of water leakage. Check the shelves, drawers, and the bottom of the freezer compartment. Examine the walls and back panel for condensation or ice buildup. This will help narrow down the possible causes.
3. Check the external connections: Inspect the water supply line and its connection to the refrigerator. Look for signs of water dripping or pooling around the water inlet valve, the ice maker, or the water dispenser. Damaged or loose connections could be the source of the leak.
4. Examine the drain pan: Remove the kick plate or access panel at the base of the refrigerator to access the drain pan. Check for any cracks, misalignment, or pooling of water in the pan. A damaged or displaced drain pan can result in water leakage onto the floor.
5. Inspect the refrigerator doors: Carefully examine the door gaskets and the alignment of the refrigerator doors. Look for tears, gaps, or signs of wear in the gaskets. Misaligned doors can prevent a proper seal and lead to condensation and water leakage.
6. Monitor the timing: Take note of when the leak occurs. Does it happen during or after the defrosting cycle? Does it coincide with using the ice maker or water dispenser? Understanding the timing of the leak can help narrow down the possible causes.
7. Consider recent changes: Think about any recent changes or maintenance activities that may have triggered the leak. Have you recently replaced a water filter, adjusted the temperature settings, or moved the refrigerator? These changes may be connected to the leak.
By systematically inspecting these areas and considering the circumstances surrounding the leak, you can identify the potential cause with more clarity. It’s important to note that some issues, such as a clogged defrost drain or damaged water supply line, can be resolved easily by following the appropriate repair steps. However, for more complex issues, it is recommended to seek the assistance of a professional technician.
Remember to exercise caution when inspecting and troubleshooting your refrigerator. Always follow safety guidelines and, if needed, consult the refrigerator’s manual or contact the manufacturer for specific instructions.
Inspecting the Defrost Drain
When trying to identify the cause of a refrigerator leak, one common area to inspect is the defrost drain. The defrost drain is responsible for collecting water that accumulates during the automatic defrosting process. If the drain becomes clogged or frozen, it can lead to water backing up and leaking out of the refrigerator.
To inspect the defrost drain, follow these steps:
1. Unplug the refrigerator: Before beginning any inspection or repair work, ensure that the refrigerator is unplugged for your safety.
2. Locate the defrost drain: The defrost drain is typically found at the back of the freezer compartment. It may be covered by a small panel or located behind the rear wall. Consult your refrigerator’s manual to determine the exact location and access method.
3. Remove any obstruction: Clear away any items or debris that may be blocking access to the defrost drain. This will allow you to properly inspect and assess its condition.
4. Check for clogs or ice: Look for any visible signs of clogs or ice accumulation inside the defrost drain. This is the most common cause of water backing up and leaking out of the refrigerator. Use a flashlight if necessary to get a better view.
5. Clear the clog or ice: If you notice a blockage or ice buildup in the defrost drain, it’s important to clear it to restore proper drainage. Start by gently removing any visible debris using a soft cloth or a small brush. If dealing with ice, carefully melt it using hot water or a hairdryer set on low heat. Be cautious not to damage the drain or surrounding components.
6. Test the drain’s flow: Once the clog or ice has been cleared, you can test the drain’s flow by pouring a small amount of water into the drain. Observe how the water flows and ensure it is draining properly into the drain pan located underneath the refrigerator.
Regular maintenance of the defrost drain can help prevent future clogs. Consider cleaning the drain every few months to keep it free from debris. Additionally, avoid placing food or objects near the drain opening in the freezer to minimize the risk of blockages.
By inspecting and clearing the defrost drain, you can address one of the potential causes of refrigerator leaks. However, if the leak persists or you are unsure about performing the repairs yourself, it is advisable to consult a professional technician for further assistance.
Check the defrost drain to see if it’s clogged. If it is, clear the blockage to allow the water to properly drain and prevent leaks.
Examining the Water Supply Line
When trying to identify the cause of a refrigerator leak, examining the water supply line is essential. Many refrigerators have a water supply line that connects to the ice maker and water dispenser. If this line becomes damaged or has loose connections, it can result in water leakage.
To examine the water supply line, follow these steps:
1. Turn off the water supply: Locate the shut-off valve for the refrigerator’s water supply line. Typically, this valve is located near the water line connection or beneath the sink. Turn the valve clockwise to shut off the water flow to the refrigerator.
2. Access the water supply line: Depending on your refrigerator model, the water supply line may be visible at the back of the refrigerator or hidden behind a panel. Consult your refrigerator’s manual to determine the location and access method.
3. Inspect the water supply line: Look for any visible signs of damage, such as cracks, bulges, or leaks along the length of the water supply line. Pay close attention to areas where the line bends or connects to the refrigerator and the water source.
4. Tighten loose connections: Check the connections at both ends of the water supply line. Ensure that they are securely fastened and free from any leaks. Use an adjustable wrench to tighten any loose fittings if necessary.
5. Replace damaged water supply line: If you identify any cracks, bulges, or significant damage to the water supply line, it will need to be replaced. Disconnect the old line from both the refrigerator and the water source. Measure the dimensions of the line to ensure you purchase the correct replacement. Install the new line and tighten the connections properly.
6. Turn on the water supply: Once the new water supply line is installed, turn the water supply valve counterclockwise to restore the water flow to the refrigerator. Check for any leaks around the connections and observe the appliance for any signs of water leakage.
Regularly inspecting the water supply line is essential to prevent future leaks. Check for any signs of wear and tear, such as cracks or bulges, and address them promptly. Additionally, consider using a high-quality braided stainless steel water supply line as it is more durable and less prone to damage.
If you are unsure about replacing the water supply line yourself or if the leak persists even after replacing the line, it’s best to seek the assistance of a professional technician. They will have the expertise and tools necessary to diagnose and fix the issue effectively.
By examining the water supply line, you can pinpoint a potential source of refrigerator leaks and take appropriate action to resolve the problem. This will not only eliminate water leakage but also ensure a proper functioning water and ice dispenser system in your refrigerator.
Checking the Water Inlet Valve
When experiencing a refrigerator leak, it is crucial to check the water inlet valve as it plays a vital role in controlling the flow of water to the ice maker and water dispenser. If the water inlet valve becomes faulty or develops cracks, it can result in water leakage.
To check the water inlet valve, follow these steps:
1. Unplug the refrigerator: Start by disconnecting the refrigerator from the power source to ensure your safety during the inspection.
2. Locate the water inlet valve: The water inlet valve is typically found at the back of the refrigerator, near the bottom. It is connected to the water supply line. Consult your refrigerator’s manual or manufacturer’s website for specific instructions on locating the valve.
3. Inspect the water inlet valve: Carefully examine the valve for any signs of damage, such as cracks, leaks, or mineral deposits. Look for water pooling or dripping around the valve. If you notice any abnormalities, it is likely that the water inlet valve is the source of the leak.
4. Test the valve: If there are no visible signs of damage, you can perform a functional test of the water inlet valve. With the refrigerator still unplugged, disconnect the water supply line from the valve. Make sure to have a towel or a bucket handy to catch any water that may spill out. Slowly turn on the water supply and observe the valve. If water continues to flow when the valve is supposed to be closed, it indicates a faulty valve that needs to be replaced.
5. Replace the water inlet valve: If the water inlet valve is damaged, it will need to be replaced. Contact the manufacturer or consult your refrigerator’s manual for the specific replacement part. Follow the manufacturer’s instructions or seek professional assistance to ensure the proper installation of the new valve.
6. Test for leaks: After replacing the water inlet valve, reconnect the water supply line and ensure that the connections are tight. Plug in the refrigerator and turn on the water supply. Monitor the appliance for any signs of water leakage around the water inlet valve. If there are no further leaks, the issue has been resolved.
Regular maintenance and periodic inspection of the water inlet valve can help prevent future leaks. Check for any signs of wear, cracks, or leaks regularly, and address any issues promptly.
If you are unsure about replacing the water inlet valve on your own, or if the leak persists even after replacing the valve, it is advisable to seek the help of a professional technician. They will have the necessary expertise to diagnose and fix the issue effectively.
By checking the water inlet valve, you can determine if it is the cause of the refrigerator leak and take appropriate measures to resolve the problem. This will ensure the proper functioning of the water and ice dispenser system, allowing you to enjoy clean and refreshing drinks without worrying about leaks.
Assessing the Drain Pan Condition
When dealing with a refrigerator leak, it’s essential to assess the condition of the drain pan. The drain pan is located beneath the refrigerator and is responsible for collecting excess water that drips down during the defrosting process. If the drain pan is cracked, damaged, or improperly positioned, it can lead to water leakage.
To assess the drain pan condition, follow these steps:
1. Unplug the refrigerator: Prioritize your safety by disconnecting the refrigerator from the power source before performing any inspections or repairs.
2. Locate the drain pan: The drain pan is typically found at the bottom of the refrigerator, behind a kick plate or access panel. Refer to your refrigerator’s manual for specific instructions on how to access the drain pan.
3. Examine the drain pan: Carefully inspect the condition of the drain pan. Look for any visible cracks, damage, or misalignment. Pay attention to areas where the drain pan connects to the refrigerator and ensure it is properly seated.
4. Check for water pooling: If the drain pan is in place, check for any signs of water pooling or excessive moisture in the pan. Excess water in the drain pan may indicate a leak. Wipe away any moisture or water in the pan before proceeding.
5. Clean the drain pan: If the drain pan is dirty or has any debris buildup, clean it with warm soapy water. Remove any excess water, debris, or mold that may have collected in the pan. Wipe it down with a clean cloth to ensure it is thoroughly cleaned.
6. Inspect the drain line: Check the drain line connected to the drain pan. Ensure that it is not clogged or obstructed. Clear any debris or blockages using a pipe cleaner or a flexible brush. A clear drain line allows the water to flow freely into the drain pan.
7. Reassemble and plug in the refrigerator: Once you have assessed and cleaned the drain pan, carefully reassemble any panels or components that were removed. Plug in the refrigerator and monitor it for any signs of water leakage.
It’s important to note that if you discover any cracks or significant damage to the drain pan, it may need to be replaced. Contact the refrigerator manufacturer or search for compatible replacement parts online. Follow the manufacturer’s instructions or seek professional assistance to ensure the proper installation of the new drain pan.
By assessing the drain pan condition, you can determine if it is the source of the leak and take appropriate action to prevent further water leakage. Proper maintenance and regular cleaning of the drain pan will help keep it in good condition and prevent future leaks.
If the leak persists even after assessing and cleaning the drain pan, it’s advisable to consult a professional technician. They will have the expertise to diagnose and address the issue effectively.
Testing the Refrigerator Door Seals
When experiencing a refrigerator leak, it’s crucial to test the refrigerator door seals, also known as door gaskets. Improperly sealed doors can allow warm air from the surrounding environment to enter, leading to condensation and water leakage.
To test the refrigerator door seals, follow these steps:
1. Inspect the door seals: Carefully examine the door gaskets, which are the rubber seals that line the edges of the refrigerator doors. Look for any signs of wear, tears, or damage. Check for debris or residue that may affect the seal’s effectiveness.
2. Clean the door seals: Use a mixture of warm water and mild detergent to clean the door gaskets. Remove any dirt, grime, or sticky residue. Ensure the seals are clean and free from any substances that may hinder their ability to create an airtight seal. Dry the gaskets thoroughly after cleaning.
3. Check the alignment: Close the refrigerator doors and observe the alignment. Misaligned doors can result in gaps that compromise the seal. Check that the doors are level and properly aligned. If adjustment is needed, consult your refrigerator’s manual for guidance on how to align the doors correctly.
4. Perform the dollar bill test: To further test the door seals, perform the dollar bill test. Place a dollar bill between the door and the refrigerator at various points around the seal. Close the door gently on the bill, leaving a portion of it sticking out. Try to pull out the bill. If you can easily remove it without resistance, it indicates a weak seal that needs to be addressed.
5. Replace the door gaskets: If you notice significant wear, tears, or if the door seals fail the dollar bill test, replacement may be necessary. Contact the refrigerator manufacturer or search for compatible replacement gaskets online. Follow the manufacturer’s instructions or seek professional assistance to ensure the proper installation of the new door gaskets.
Remember to perform regular maintenance on the door seals to keep them in good condition. Clean the gaskets regularly, removing any debris or residue that may affect the seal. Inspect them for wear and tear and address any issues promptly.
By testing and maintaining the refrigerator door seals, you can ensure an airtight seal and prevent water leakage caused by warm air entering the refrigerator. Properly sealed doors not only eliminate leaks but also contribute to energy efficiency by maintaining consistent internal temperatures.
If the leak persists even after testing and replacing the door seals, it’s advisable to consult a professional technician. They have the expertise to diagnose and address the issue effectively.
Steps to Fix a Leaking Refrigerator
Dealing with a leaking refrigerator can be frustrating, but there are steps you can take to fix the issue and prevent further water damage. Here are the key steps to follow:
1. Identify the source: Start by identifying the source of the leak. It could be a clogged defrost drain, damaged water supply line, faulty water inlet valve, leaking drain pan, or improperly sealed refrigerator doors. By identifying the specific cause, you can take targeted action to fix the problem.
2. Unclog the defrost drain: If the defrost drain is clogged or frozen, clear the blockage by pouring hot water into the drain or using a pipe cleaner to remove debris. Ensure that the drain pan is clean and properly positioned.
3. Repair or replace the water supply line: Inspect the water supply line for damage. If there are cracks, tears, or other issues, it’s best to replace the line. Disconnect the old line, measure for a proper fit, and install the new line securely. Ensure that the connections at both ends are tight to prevent leaks.
4. Fix or replace the water inlet valve: Check the water inlet valve for cracks, leaks, or malfunctions. If it is damaged, replace it with a new one that is compatible with your refrigerator model. Follow the manufacturer’s instructions or seek professional help for the installation.
5. Clean or replace the drain pan: Assess the condition of the drain pan. If it is cracked, damaged, or improperly positioned, it may need to be replaced. Clean the drain pan regularly to prevent debris buildup. Ensure that the drain line connected to the pan is clear.
6. Seal the refrigerator doors properly: Inspect the door gaskets for wear, tears, or misalignment. Clean the gaskets regularly and ensure they are sealing tightly. Replace the gaskets if necessary. Check that the refrigerator doors are properly aligned to create a complete seal.
7. Monitor and test for leaks: After addressing the specific issues mentioned above, plug in the refrigerator and turn on the water supply. Monitor the appliance for any signs of leaks. Perform the dollar bill test to check the effectiveness of the door seals.
8. Consult a professional if needed: If the leak persists or if you are uncertain about performing repairs yourself, it’s best to consult a professional technician. They have the expertise and tools required to diagnose and fix more complex issues.
Remember to always prioritize your safety when working on your refrigerator. Unplug the appliance before conducting any repairs, and follow manufacturer instructions and guidelines.
By following these steps and addressing the specific causes of the leak, you can fix your leaking refrigerator and prevent further water damage. Regular maintenance and inspections can help catch potential issues early on and ensure the optimal performance and longevity of your appliance.
Unclogging the Defrost Drain
One of the common causes of a leaking refrigerator is a clogged defrost drain. The defrost drain is responsible for directing water that accumulates during the automatic defrost cycle to a drain pan located beneath the refrigerator. When the defrost drain becomes clogged with food particles, debris, or ice, water can back up and result in leakage.
To unclog the defrost drain, follow these steps:
1. Unplug the refrigerator: Begin by disconnecting the refrigerator from the power source for safety.
2. Locate the defrost drain: The defrost drain is typically located at the back of the freezer compartment. It may be covered by a small panel or located behind the rear wall. Refer to your refrigerator’s manual to find the exact location and access method.
3. Clear visible debris: Inspect the defrost drain and remove any visible debris, such as food particles or ice, using a sanitizing cloth or a small brush. Be careful not to damage the drain.
4. Melt any ice: If the defrost drain is clogged with ice, you will need to melt it. Use a turkey baster or a syringe to gently pour hot water into the drain, melting the ice. Alternatively, you can use a hairdryer on a low heat setting to melt the ice, taking care not to overheat the area.
5. Use a pipe cleaner or wire: For stubborn clogs that are not cleared with hot water or melting, gently insert a pipe cleaner or a thin wire into the drain to clear any remaining blockages. Move it in and out and rotate it to dislodge the debris. Avoid using excessive force to prevent damaging the drain.
6. Clean the drain pan: As you work on unclogging the defrost drain, take the opportunity to clean the drain pan located beneath the refrigerator. Remove any excess water, debris, or mold that may have accumulated in the pan. Use warm soapy water and a clean cloth to thoroughly clean the drain pan.
7. Reassemble and plug in the refrigerator: Once the defrost drain is clear and the drain pan is clean, carefully reassemble any panels or components that were removed. Plug in the refrigerator and restore power.
Regularly cleaning the defrost drain and removing any debris can help prevent future clogs and leaks. Consider performing this maintenance task every few months to keep the drain clear.
If the leak persists or you are unsure about performing the unclogging process yourself, it is advisable to consult a professional technician. They have the expertise to diagnose and fix more complex issues and can ensure the proper functioning of your refrigerator’s defrost system.
Read more: Why Is My Freezer Leaking Water
Repairing or Replacing the Water Supply Line
If you have determined that a damaged water supply line is the cause of your refrigerator leak, it is crucial to repair or replace the line to prevent further issues. The water supply line connects the refrigerator to the main water source and enables ice maker and water dispenser functionality. Here are the steps to repair or replace the water supply line:
1. Unplug the refrigerator: Begin by disconnecting the refrigerator from the power source for safety.
2. Turn off the water supply: Locate the shut-off valve for the water supply line. This valve is usually located beneath the sink or near the water line connection. Close the valve by turning it clockwise to stop the water flow.
3. Prepare the area: Place towels or a bucket underneath the water supply line to catch any water that may spill during the repair process.
4. Inspect the water supply line: Carefully examine the water supply line for any visible signs of damage, such as cracks, leaks, or bends. Be sure to check the entire length of the line, paying close attention to areas near connections and bends.
5. Repair small leaks: If you notice small leaks or cracks in the water supply line, you may be able to repair them. Use waterproof tape or silicone sealant to seal the damaged area. Make sure to dry the line thoroughly before applying any repairs.
6. Replace the water supply line: If the water supply line is significantly damaged or cannot be repaired effectively, it is best to replace it. Measure the length of the old supply line to ensure the new one is the correct size. Purchase a new water supply line compatible with your refrigerator model.
7. Disconnect the old line: To remove the old water supply line, first detach it from both the refrigerator and the water supply. Depending on the type of connection, you may need to use an adjustable wrench or pliers to loosen and remove fittings. Be cautious not to damage any surrounding components in the process.
8. Install the new line: Insert the new water supply line into both the refrigerator and the water supply, ensuring a secure fit. Use an adjustable wrench or pliers to tighten the fittings and ensure there are no leaks. Make sure the line is not kinked or twisted, as this can restrict water flow.
9. Turn on the water supply: Once the new water supply line is properly connected, slowly turn the water supply valve counterclockwise to resume the water flow. Observe the connections for any signs of leaks, and tighten them as needed.
10. Inspect for leaks: Monitor the water supply line and connections for any signs of leaks over the next few hours. If you notice any leaks, re-adjust and tighten the fittings accordingly.
By repairing or replacing the water supply line, you can eliminate leaks and restore proper functionality to your refrigerator’s ice maker and water dispenser. Remember to perform regular inspections and maintenance on the water supply line to catch any potential issues early on and ensure the long-term performance of your appliance.
If you are uncertain about performing the repair or replacement process yourself, it is advisable to consult a professional technician. They have the expertise to handle the task and can ensure a proper and safe installation.
Fixing or Replacing the Water Inlet Valve
If you have determined that a faulty or cracked water inlet valve is causing your refrigerator to leak, it is crucial to address the issue promptly. The water inlet valve controls the water flow into the refrigerator’s ice maker and water dispenser, and a malfunctioning valve can lead to water leakage. Here are the steps to fix or replace the water inlet valve:
1. Unplug the refrigerator: Begin by disconnecting the refrigerator from the power source for safety.
2. Locate the water inlet valve: The water inlet valve is usually located at the back of the refrigerator, near the bottom. It is connected to the water supply line and the refrigerator’s internal water lines. Refer to your refrigerator’s manual or consult the manufacturer’s website for the exact location.
3. Inspect the water inlet valve: Carefully examine the valve for any visible signs of damage, such as cracks, leaks, or mineral deposits. Look for water pooling or dripping around the valve. If you notice any abnormalities, it indicates that the water inlet valve is defective and needs attention.
4. Turn off the water supply: Before proceeding with any repairs, turn off the water supply to the refrigerator. Locate the shut-off valve and close it by turning it clockwise.
5. Disconnect the water supply line: Use an adjustable wrench or pliers to disconnect the water supply line from the water inlet valve. Have a towel or bucket ready to catch any water that may spill out.
6. Remove the mounting screws: Carefully remove the mounting screws that secure the water inlet valve to the back of the refrigerator. Keep track of the screws to ensure proper reinstallation.
7. Detach the electrical connectors: Pull off the electrical connectors that are attached to the water inlet valve. Take note of the connections to ensure proper reconnection later.
8. Replace the water inlet valve: If the water inlet valve is visibly damaged or malfunctioning, it is best to replace it with a new one. Consult your refrigerator’s manual or contact the manufacturer for the correct replacement part. Follow the manufacturer’s instructions for installation.
9. Reconnect the electrical connectors: Attach the electrical connectors back onto the new water inlet valve, ensuring a secure connection. Double-check that the connectors are matched correctly to their respective terminals.
10. Reinstall the water supply line: Attach the water supply line to the new water inlet valve, ensuring a tight and secure fit. Use an adjustable wrench or pliers to tighten the fittings without overtightening.
11. Turn on the water supply: Once the new water inlet valve is properly installed, turn on the water supply by opening the shut-off valve. Check for any signs of leaks around the connections and tighten them if necessary.
12. Plug in the refrigerator: Plug the refrigerator back into the power source and ensure that it is receiving power.
13. Test for leaks: Monitor the refrigerator for any signs of water leakage over the next few hours. Keep a close eye on the water inlet valve and the connections to ensure there are no leaks.
By fixing or replacing the water inlet valve, you can eliminate leaks and restore proper water flow to your refrigerator’s ice maker and water dispenser. Regular maintenance and inspection of the water inlet valve can help prevent future leaks and ensure the optimal performance of your appliance.
If you are unsure about performing the repair or replacement yourself, or if the leak persists after the repairs, it is advisable to consult a professional technician. They have the expertise to diagnose and address the issue effectively.
Cleaning or Replacing the Drain Pan
If you have identified a leaking drain pan as the cause of your refrigerator leak, it is important to clean or replace it to prevent further water leakage. The drain pan, located beneath the refrigerator, collects excess water that drips down from the freezer during the defrosting process. Here are the steps to clean or replace the drain pan:
1. Unplug the refrigerator: Begin by disconnecting the refrigerator from the power source to ensure your safety during the cleaning or replacement process.
2. Locate the drain pan: The drain pan is typically located at the bottom of the refrigerator, behind a kick plate or access panel. Refer to your refrigerator’s manual or manufacturer’s guidelines for specific instructions on how to access the drain pan.
3. Inspect the drain pan: Carefully examine the condition of the drain pan. Look for any visible cracks, damage, or misalignment. Pay attention to areas where the drain pan connects to the refrigerator and ensure it is properly seated.
4. Clean the drain pan: If the drain pan is dirty or has any debris buildup, clean it with warm soapy water. Use a sponge or cloth to remove any excess water, debris, or mold that may have collected in the pan. Rinse the pan thoroughly to ensure all cleaning solution residues are removed.
5. Assess the condition of the drain pan: After cleaning, carefully inspect the drain pan for any cracks or signs of damage. If the drain pan is cracked, damaged, or improperly positioned, it is necessary to replace it. Contact your refrigerator’s manufacturer or search for compatible replacement parts online.
6. Remove the old drain pan: If replacement is required, carefully remove the old drain pan by disconnecting any attachments or removing mounting screws. Follow the manufacturer’s instructions or refer to your refrigerator’s manual for guidance on how to remove the drain pan.
7. Install the new drain pan: Position the new drain pan in place, ensuring proper alignment with the refrigerator’s drainage system. Secure the drain pan with mounting screws or by reattaching any necessary attachments.
8. Reassemble and plug in the refrigerator: Once the drain pan is cleaned or replaced, carefully reassemble any panels or components that were removed. Plug in the refrigerator and restore power.
Regular cleaning of the drain pan is essential to prevent clogs and debris buildup, which can lead to leaks. Consider incorporating drain pan cleaning into your regular refrigerator maintenance routine.
If you are unsure about cleaning or replacing the drain pan yourself, or if the leak persists even after cleaning or replacing, it is advisable to consult a professional technician. They have the expertise to diagnose and address the issue effectively.
By cleaning or replacing the drain pan as needed, you can eliminate leaks and ensure proper drainage in your refrigerator. Proper maintenance will help prevent future water leakage and keep your appliance functioning optimally.
Sealing the Refrigerator Doors Properly
Improperly sealed refrigerator doors can be a common cause of water leakage. When the doors do not create a tight seal, warm air from the surrounding environment can enter the refrigerator, resulting in condensation and water buildup. To prevent this, it is important to seal the refrigerator doors properly. Here are the steps to follow:
1. Inspect the door gaskets: Begin by inspecting the door gaskets, which are the rubber seals that line the edges of the refrigerator doors. Check for any signs of wear, tears, or damage to the gaskets. Make sure to clean any debris or residue that may be affecting the seal.
2. Clean the gaskets: Use a mixture of warm water and mild detergent to clean the door gaskets. Gently scrub the gaskets to remove any dirt or sticky residue, ensuring they are clean and free from obstructions.
3. Check the alignment: Close the refrigerator doors and observe the alignment. Misaligned doors can result in gaps that compromise the seal. Check that the doors are properly aligned and level. If adjustment is needed, refer to your refrigerator’s manual for guidance on how to align the doors correctly.
4. Perform the dollar bill test: To further test the effectiveness of the door seals, perform the dollar bill test. Close the refrigerator door on a dollar bill, leaving a portion of the bill sticking out. Try to pull out the bill. If it slides out easily without resistance, it indicates a weak seal.
5. Replace the door gaskets if necessary: If the gaskets are worn out, torn, or do not pass the dollar bill test, they may need to be replaced. Contact the manufacturer or search for compatible replacement gaskets specific to your refrigerator model. Ensure that you follow the manufacturer’s instructions for installation.
6. Adjust the door hinges: If the doors still do not seal properly after replacing the gaskets, you may need to adjust the door hinges. Refer to your refrigerator’s manual for instructions on how to adjust the hinges to ensure a proper seal.
7. Regularly maintain the door seals: To prevent future issues, regularly inspect and clean the door gaskets. Wipe them down with a damp cloth to remove any dirt or residue that may affect the seal. Ensure that the gaskets are free from any debris that could compromise their effectiveness.
By sealing the refrigerator doors properly, you can prevent warm air from entering and causing condensation that can lead to water leakage. This will keep your refrigerator working efficiently and avoid potential water damage.
If you have followed these steps and the leak persists or if you are unsure about performing the repairs yourself, it is best to consult a professional technician. They have the expertise to diagnose and address the issue effectively and ensure your refrigerator is properly sealed.
Regular maintenance and attention to the door gaskets will contribute to the longevity of your refrigerator and help keep it operating optimally.
Read more: Why Does AC Leak Water
Conclusion
Dealing with a leaking refrigerator can be a frustrating and potentially damaging issue. However, by taking the time to identify the cause of the leak and implementing the necessary repairs, you can resolve the problem and prevent further water damage in your home.
Throughout this article, we have explored the common causes of refrigerator leaks, such as a clogged or frozen defrost drain, damaged water supply line, faulty water inlet valve, leaking drain pan, and improperly sealed refrigerator doors. By understanding these causes, you can better troubleshoot and address the issues specific to your refrigerator.
To identify the source of the leak, we discussed steps such as inspecting the defrost drain, examining the water supply line, checking the water inlet valve, assessing the drain pan condition, and testing the refrigerator door seals. These steps allow you to pinpoint the problem and apply the necessary repairs or replacements.
Whether it’s unclogging the defrost drain, repairing or replacing the water supply line, fixing or replacing the water inlet valve, cleaning or replacing the drain pan, or sealing the refrigerator doors properly, each action takes you one step closer to resolving the leak and ensuring your refrigerator functions optimally.
Remember, regular maintenance, such as cleaning and inspection, is essential to prevent future leaks and extend the lifespan of your refrigerator. Be attentive to any signs of wear and tear, and address them promptly to avoid potential issues down the line.
If you are uncertain about performing any repairs yourself or if the leak persists after you have attempted the necessary steps, it is always advisable to seek the expertise of a professional technician. They have the knowledge and experience to diagnose and resolve more complex issues, ensuring the safety and efficiency of your appliance.
By taking proactive measures and addressing refrigerator leaks promptly, you can save yourself from costly repairs, prevent water damage to your home, and ensure the longevity of your refrigerator. With proper care and maintenance, your refrigerator will continue to keep your food fresh and your kitchen running smoothly for years to come.
Frequently Asked Questions about Why Does My Refrigerator Leak Water
Was this page helpful?
At Storables.com, we guarantee accurate and reliable information. Our content, validated by Expert Board Contributors, is crafted following stringent Editorial Policies. We're committed to providing you with well-researched, expert-backed insights for all your informational needs.


0 thoughts on “Why Does My Refrigerator Leak Water”