Articles
Why Is My Kegerator All Foam
Modified: October 20, 2024
Discover the reasons why your kegerator is producing excessive foam. Read our informative articles and learn how to resolve this common issue.
(Many of the links in this article redirect to a specific reviewed product. Your purchase of these products through affiliate links helps to generate commission for Storables.com, at no extra cost. Learn more)
Introduction
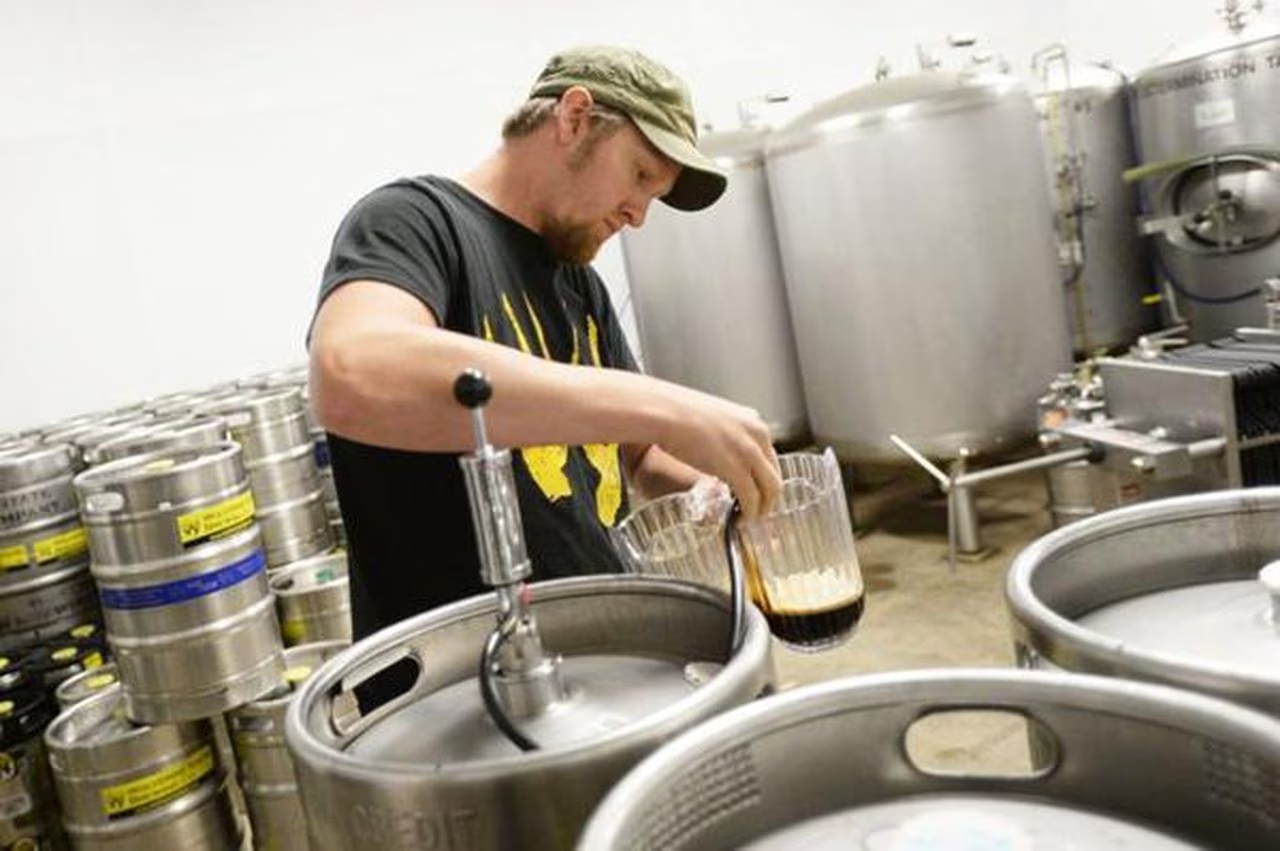
Having a kegerator is a dream come true for any beer enthusiast. It’s the perfect way to enjoy draft beer from the comfort of your own home. However, there’s nothing more frustrating than pouring a glass of foam instead of a perfectly carbonated beer. If you’ve been experiencing this issue, you’re not alone. Foam in a kegerator is a common problem that many people face.
In this article, we’ll explore the various causes of foam in a kegerator and provide solutions on how to fix it. Whether you’re a homebrewer or just a fan of draft beer, understanding these issues can help you ensure a smooth pour every time.
Key Takeaways:
- Mastering the pouring technique is crucial to minimize foam in a kegerator. Tilt the glass, pour slowly, and leave room for the head to achieve a well-balanced pour with minimal foam overflow.
- Properly regulating CO2 pressure and adjusting temperature settings are essential to prevent excessive foam in a kegerator. Maintaining clean beer lines and addressing clogged faucets also contribute to a foam-free pouring experience.
Read more: Why Is My Kegerator Not Pouring
Causes of Foam in a Kegerator
There are several factors that can contribute to foam in a kegerator. Understanding these causes will help you pinpoint the issue and take appropriate steps to fix it. Let’s take a closer look at each of these causes:
- Improper Temperature Settings: One of the main culprits behind foam is improper temperature settings. If the temperature inside the kegerator is too warm or too cold, it can cause excessive foaming. Ideally, the temperature should be set between 36-38°F (2-3°C) for most beers.
- Incorrect CO2 Pressure: Another common cause of foam is incorrect CO2 pressure. If the pressure is too high, it can cause the beer to overcarbonate and result in excessive foam. On the other hand, if the pressure is too low, it may lead to flat beer.
- Dirty or Damaged Beer Lines: Dirty or damaged beer lines can also contribute to foaming issues. If the lines are not cleaned regularly, the buildup of sediment, yeast, and bacteria can cause gas pockets and lead to excessive foam. Additionally, kinks or cracks in the lines can disrupt the flow and create turbulence, resulting in foam.
- Overcarbonated Beer: Overcarbonated beer, either due to incorrect carbonation during homebrewing or faulty kegging equipment, can cause excessive foam. High levels of dissolved CO2 will cause the beer to foam excessively when poured.
- Clogged or Faulty Faucet: A clogged or faulty faucet can restrict the flow of beer, causing turbulence and resulting in foam. If the faucet is dirty or has a buildup of residue, it may need to be cleaned or replaced.
- Improper Pouring Technique: Lastly, an improper pouring technique can also lead to excessive foam. Pouring the beer too quickly or at an angle can introduce turbulence and cause foam to form. It’s important to pour slowly and at a proper angle to minimize foam.
By understanding the potential causes of foam in a kegerator, you can now move on to addressing these issues and getting that perfect pour. In the next section, we’ll discuss the solutions to fix foam in a kegerator.
Improper Temperature Settings
One of the most common causes of foam in a kegerator is improper temperature settings. Beer is best served at a specific temperature to ensure optimal carbonation and flavor. If the kegerator is too warm or too cold, it can result in excessive foam when pouring.
When the temperature is too warm, the beer becomes overcarbonated, causing it to foam up when dispensed from the tap. On the other hand, if the temperature is too cold, the carbonation can be suppressed, resulting in a flat-tasting beer with minimal foam.
The ideal temperature for most beers is between 36-38°F (2-3°C). However, some specific styles, such as lagers or wheat beers, may require slightly different temperature ranges. It’s important to refer to the recommended serving temperature for the particular beer you’re trying to pour.
To ensure proper temperature settings in your kegerator:
- Adjust the thermostat: Locate the thermostat control panel in your kegerator and make the necessary adjustments to set it within the recommended temperature range. It may take some trial and error to find the perfect temperature for your specific setup.
- Monitor the temperature: Invest in a reliable thermometer to keep track of the temperature inside your kegerator. This will help you ensure that the temperature remains consistent and accurate.
- Consider a temperature controller: For more precise temperature control, you may want to consider using an external temperature controller. These devices can regulate the temperature with more accuracy, ensuring that your beer is always served at the perfect temperature.
- Insulate your kegerator: If you notice temperature fluctuations in your kegerator, you may need to improve insulation. Seal any gaps or cracks in the unit and ensure that it is well-insulated to maintain a stable temperature.
By adjusting your kegerator’s temperature settings to the recommended range and taking the necessary steps to monitor and maintain the temperature, you can minimize foam caused by improper temperature settings. Next, we’ll explore another common cause of foam in a kegerator: incorrect CO2 pressure.
Incorrect CO2 Pressure
Another common cause of foam in a kegerator is incorrect CO2 pressure. The pressure at which the CO2 is dispensed into the keg plays a crucial role in maintaining proper carbonation levels and preventing excessive foam during pouring.
If the CO2 pressure is too high, it can result in overcarbonation of the beer, leading to foaming issues. When the beer is exposed to high levels of CO2, it becomes overly effervescent, causing excessive foam when poured. On the contrary, if the pressure is too low, the beer may appear flat and lack foam altogether.
Here are some steps to ensure correct CO2 pressure in your kegerator:
- Check the recommended CO2 pressure: Different beer styles require different levels of carbonation, which translates to specific CO2 pressure settings. Consult the guidelines provided by the beer manufacturer or refer to a reputable resource to determine the appropriate pressure for the beer you are serving.
- Adjust the CO2 regulator: Locate the CO2 regulator on your kegerator and make necessary adjustments to set the desired pressure. Start with a lower pressure setting and gradually increase if needed, taking care not to exceed the recommended pressure for the specific beer style.
- Monitor the pressure gauge: Keep an eye on the pressure gauge to ensure that it remains within the desired range. If you notice fluctuations or inconsistencies, it may indicate a problem with the regulator or a leak in the CO2 system that needs to be addressed.
- Inspect connections and valves: Regularly inspect the connections and valves in your CO2 system to ensure that they are secure and functioning properly. Loose connections or damaged valves can cause pressure inconsistencies, leading to foaming issues.
- Purge excess pressure: If you accidentally overcarbonate the beer or encounter excessive foam, you can release excess pressure by gently depressing the relief valve or pulling the pressure release lever on the keg coupler. This can help alleviate foam and restore proper carbonation levels.
By properly adjusting and monitoring the CO2 pressure in your kegerator, you can prevent overcarbonation and minimize foam during pouring. In the next section, we’ll explore the impact of dirty or damaged beer lines on foam formation.
Dirty or Damaged Beer Lines
Dirty or damaged beer lines can contribute to foam formation in a kegerator. Over time, beer lines can accumulate sediment, yeast, bacteria, and other contaminants that can disrupt the flow of beer and create gas pockets, resulting in excessive foam during pouring.
To minimize foam caused by dirty or damaged beer lines, it’s important to regularly clean and maintain them. Here are some steps to follow:
- Clean the beer lines: Cleaning the beer lines is essential to remove any buildup of residue, sediment, or bacteria. Start by flushing the lines with a cleaning solution specifically designed for beer line cleaning. Follow the instructions provided by the manufacturer for the proper dilution and contact time. Then, flush the lines with clean water to rinse off any remaining cleaning solution.
- Use a beer line brush: For stubborn buildup, use a beer line brush to scrub the inside of the lines. This will help dislodge any debris and ensure a thorough clean.
- Inspect the lines: While cleaning the lines, take the opportunity to inspect them for any signs of damage such as kinks, cracks, or leaks. Damaged lines can disrupt the flow of beer and create turbulence, leading to foam. If you notice any issues, it’s important to replace the damaged section of the beer line.
- Regular maintenance: Establish a routine maintenance schedule for cleaning your beer lines. How often you’ll need to clean them will depend on factors such as the frequency of use and the type of beer being dispensed. As a general guideline, cleaning every two to four weeks is recommended.
- Proper storage: When not in use, it’s crucial to properly store your beer lines to avoid contamination. Disconnect the lines from both the keg and the faucet and ensure they are thoroughly cleaned and dried before storage.
By regularly cleaning your beer lines and addressing any damage or leaks, you can ensure a smooth flow of beer and minimize foam caused by debris or gas pockets. Proper maintenance and cleanliness will contribute to a better tasting draft beer experience.
Next, we’ll discuss the impact of overcarbonated beer on foam formation in a kegerator.
Read more: Why Are All My Alexa Devices Offline
Overcarbonated Beer
Overcarbonated beer is another common culprit behind foam formation in a kegerator. If the beer is carbonated at a higher level than recommended, it can lead to excessive foaming during pouring.
There are several factors that can contribute to overcarbonated beer, including incorrect carbonation during homebrewing or issues with the kegging equipment. Here are some steps to address overcarbonation:
- Check the beer carbonation level: Determine if the beer is truly overcarbonated by evaluating the level of carbonation. This can be done by examining the beer’s appearance and tasting it. Overcarbonated beer tends to have excessive bubbles and a foamy head that dissipates quickly.
- Release excess pressure: If you confirm that the beer is overcarbonated, you can alleviate the issue by releasing excess pressure from the keg. Depress the relief valve on the keg coupler or pull the pressure release lever to release some of the CO2 pressure. This will help reduce carbonation levels and minimize foam during pouring.
- Re-adjust carbonation: If you have control over the carbonation process, such as when homebrewing, adjust the carbonation level according to the recommended guidelines for the particular beer style. This can be done by adjusting the amount of priming sugar or CO2 used during the carbonation process.
- Allow for degassing: If possible, allow the overcarbonated beer to rest and degas for a period of time before serving. This can help dissipate excessive carbonation and reduce foam formation. However, be aware that this may affect the overall taste and carbonation of the beer.
- Seek professional help: If you are experiencing consistent issues with overcarbonated beer or are unable to troubleshoot the problem on your own, it may be beneficial to seek assistance from a professional brewer or technician. They can provide guidance and ensure that your beer is properly carbonated and dispensed.
By addressing overcarbonation and adjusting the carbonation levels to the appropriate range, you can minimize foam formation and enjoy a well-balanced, delicious pour of beer from your kegerator.
Next, we’ll delve into the impact of a clogged or faulty faucet on foam formation.
Clogged or Faulty Faucet
A clogged or faulty faucet can contribute to foam formation in a kegerator. If the faucet is not functioning properly, it can disrupt the flow of beer and create turbulence, resulting in excessive foam during pouring.
Here are some steps to address a clogged or faulty faucet:
- Inspect the faucet: Examine the faucet closely for any signs of clogging or damage. Look for debris, sediment, or residue that may be obstructing the flow. If the faucet is visibly dirty, it’s time for a thorough cleaning.
- Clean the faucet: Disassemble the faucet and clean it using a soft brush or cloth. Pay close attention to the spout and any internal parts that may be clogged. Use a cleaning solution specifically designed for beer faucet cleaning or a mixture of warm water and gentle detergent.
- Check for faulty parts: While cleaning the faucet, inspect the rubber washer, O-rings, and other components for any signs of wear or damage. If necessary, replace these parts to ensure a proper seal and smooth operation of the faucet.
- Reassemble and test: After cleaning and replacing any necessary parts, reassemble the faucet and test it by pouring a small amount of beer. Pay attention to the flow and whether there is any excessive foam or turbulence. If the issue persists, further troubleshooting or faucet replacement may be needed.
- Consider upgrading: If you’re consistently experiencing issues with a clogged or faulty faucet, it may be worth considering an upgrade to a higher-quality faucet. There are various models available that offer better functionality and improved pour control.
Regular cleaning and maintenance of your faucet is essential to ensure a smooth and consistent pour with minimal foam. By addressing any clogs or faults in the faucet and keeping it in optimal condition, you can enjoy a well-poured beer from your kegerator.
Next, we’ll discuss the importance of proper pouring technique in preventing foam formation.
Improper Pouring Technique
Believe it or not, the way you pour your beer can have a significant impact on the amount of foam you experience in your kegerator. Improper pouring technique, such as pouring too quickly or at the wrong angle, can introduce turbulence and result in excessive foam.
Here are some tips to master the art of pouring and minimize foam:
- Tilt the glass: Hold your glass at a 45-degree angle, positioning it directly under the faucet. This angle allows the beer to flow smoothly down the side of the glass, reducing the amount of foam that forms.
- Pour slowly: Slowly open the faucet and pour the beer into the tilted glass. Be patient and avoid rushing the process. A slow and steady pour allows the carbonation to be released gradually and minimizes agitation.
- Gradually straighten the glass: As the glass starts to fill with beer, gradually straighten the glass to an upright position, continuing to pour gently. This helps to create a well-balanced head of foam and prevents excessive foaming.
- Leave room for head: It’s important to leave an inch or two of headspace at the top of the glass. This not only allows room for the aroma and flavors to develop but also helps to prevent overflow and excessive foam.
- Avoid swirling or stirring: Once the beer is poured, avoid swirling or stirring it with a spoon or straw. This can introduce additional turbulence and cause the foam to rise further, resulting in a messy pour.
- Practice, practice, practice: Pouring the perfect beer takes practice. Experiment with different techniques and observe how your pour affects the amount of foam. Over time, you’ll develop a pouring technique that works best for your setup and preferences.
By mastering the art of pouring, you can significantly reduce foam formation in your kegerator. Remember to be patient, pour slowly, and follow the proper technique to achieve the perfect pour with minimal foam.
Now that we’ve explored the various causes of foam in a kegerator and provided solutions to address them, you’re equipped to troubleshoot and fix foam issues. With some adjustments and attention to detail, you’ll be able to enjoy a well-poured, delicious beer from your kegerator every time.
Happy pouring!
Check the CO2 pressure – if it’s too high, it can cause excessive foaming. Also, make sure the beer lines are clean and the temperature is set correctly.
Solutions to Fix Foam in a Kegerator
If you’re experiencing foam issues in your kegerator, there are several solutions you can try to fix the problem. By addressing the underlying causes of foam, you can ensure a smooth and enjoyable pouring experience. Here are some solutions to consider:
- Adjusting Temperature Settings: Improper temperature settings can lead to excessive foam in a kegerator. Ensure that the temperature is set within the recommended range for the type of beer you’re dispensing. Typically, a temperature of 36-38°F (2-3°C) is suitable for most beers.
- Regulating CO2 Pressure: Check and adjust the CO2 pressure to maintain the proper carbonation level. Too much pressure can result in overcarbonated beer and excessive foam, while too little pressure can cause flat beer. Consult the guidelines for the specific beer style to ensure the correct CO2 pressure.
- Cleaning and Maintaining Beer Lines: Dirty or damaged beer lines can contribute to foaming issues. Regularly clean the beer lines using a suitable cleaning solution and a beer line brush. Inspect the lines for any signs of damage and replace any faulty sections. Maintaining clean and functioning beer lines will help ensure a smooth flow of beer without excessive foam.
- Proper Carbonation Techniques: If you’re experiencing overcarbonated beer, review your carbonation techniques. Adjust the amount of priming sugar or CO2 used during the carbonation process to achieve the desired carbonation level for the beer style you’re brewing. Make sure to follow the recommended guidelines.
- Fixing a Clogged or Faulty Faucet: A clogged or faulty faucet can disrupt the flow of beer and cause turbulence, leading to foam. Clean the faucet thoroughly, ensuring that there is no debris or sediment obstructing the flow. If necessary, replace any worn-out parts or consider upgrading to a higher-quality faucet.
- Mastering the Pouring Technique: Improper pouring technique can introduce turbulence and result in excessive foam. Tilt the glass at a 45-degree angle, pour slowly, and gradually straighten the glass to an upright position. Leave enough room for the beer’s head and avoid stirring or swirling the beer after pouring.
By implementing these solutions, you can effectively reduce foam in your kegerator and enjoy a well-poured, refreshing beer. Remember, it may take some trial and error to find the right adjustments for your specific setup, so be patient and persistent. Cheers to a foam-free pour!
Read more: Why Does My Cat Water Fountain Foam
Adjusting Temperature Settings
One of the main causes of foam in a kegerator is improper temperature settings. If the temperature inside the kegerator is not calibrated correctly, it can lead to excessive foaming when pouring a beer. Understanding the importance of temperature control and making necessary adjustments can help you achieve the perfect pour with minimal foam.
Here are some steps to consider when adjusting the temperature settings in your kegerator:
- Refer to the recommended temperature range: Different beer styles have different temperature requirements, so it’s important to consult the recommended temperature range for the specific beer you are serving. Typically, the ideal temperature for most beers is between 36-38°F (2-3°C).
- Locate and adjust the thermostat: Locate the thermostat control in your kegerator. Depending on the model, it may be located inside the unit or externally accessible. Adjust the thermostat to set the desired temperature within the recommended range. It’s advisable to make small adjustments and monitor the temperature gradually over the course of a few hours to achieve the optimal setting.
- Use a reliable thermometer: To ensure accuracy, use a reliable thermometer to monitor the temperature inside the kegerator. Place the thermometer in the area where the beer kegs or the beer lines are located to get an accurate reading. This will help you confirm that the temperature remains within the desired range and make any necessary adjustments if needed.
- Consider the beer style and personal preference: While it’s important to adhere to the recommended temperature range, it’s also worth considering the specific beer style and personal preference. Some beer styles may require slightly different temperature ranges for optimal taste and carbonation. Experimentation and tasting will help you find the perfect temperature settings for your favorite beers.
- Insulate and seal the kegerator: Temperature fluctuations can occur if the kegerator is not properly insulated or sealed. Check for any gaps, cracks, or loose seals in the kegerator and ensure they are properly sealed. This will help maintain a stable and consistent temperature inside the unit.
By adjusting the temperature settings in your kegerator to the recommended range, monitoring the temperature with a reliable thermometer, and considering the beer style and personal preference, you can minimize foam formation during pouring. The proper temperature control will result in a refreshing beer with a smooth pour and optimal carbonation.
Next, we’ll discuss the significance of regulating CO2 pressure in preventing foam in a kegerator.
Regulating CO2 Pressure
Another important factor to consider when aiming to reduce foam in a kegerator is regulating the CO2 pressure. The pressure at which the CO2 is dispensed into the keg plays a crucial role in maintaining the proper carbonation levels and preventing excessive foam during pouring.
Here are some steps to effectively regulate the CO2 pressure in your kegerator:
- Refer to the recommended CO2 pressure: Different beer styles and personal preferences require different levels of carbonation. Consult the guidelines provided by the beer manufacturer or refer to a reputable resource to determine the appropriate CO2 pressure for the beer you are serving. Typically, the recommended pressure falls in the range of 8-14 PSI (pounds per square inch).
- Adjust the CO2 regulator: Locate the CO2 regulator on your kegerator. This is usually connected to the CO2 tank and has a pressure adjustment knob or dial. Adjust the pressure by turning the knob or dial clockwise to increase or counterclockwise to decrease the pressure. Make small adjustments and monitor the impact on pour quality and foam levels.
- Monitor the pressure gauge: Keep an eye on the pressure gauge located on the CO2 regulator. This gauge displays the current pressure reading. Ensure that the pressure remains within the desired range. If you notice significant fluctuations or inconsistencies, it may indicate a problem with the regulator or a potential leak in the CO2 system that needs to be addressed.
- Inspect connections and valves: Regularly inspect the connections and valves in your CO2 system. Ensure that all connections are secure and tight. Check for any signs of leaks or damage, such as hissing sounds or visible gas leakage. Faulty connections or damaged valves can cause pressure inconsistencies, leading to excessive foam.
- Purge excess pressure: In the event of accidentally overcarbonated beer or excessive foam, you can release excess pressure by gently depressing the relief valve on the keg coupler or pulling the pressure release lever. This will help alleviate foam and restore proper carbonation levels. However, it’s important to be cautious and avoid releasing too much pressure, as it can result in undercarbonated beer.
By effectively regulating the CO2 pressure in your kegerator, you can maintain the appropriate carbonation levels and minimize foam during pouring. Remember to refer to the recommended CO2 pressure, make gradual adjustments, monitor the pressure gauge, inspect connections and valves, and release excess pressure if necessary.
Next, we’ll discuss the significance of cleaning and maintaining beer lines in preventing foam formation in a kegerator.
Cleaning and Maintaining Beer Lines
One of the key factors that can contribute to foam formation in a kegerator is dirty or damaged beer lines. Over time, beer lines can accumulate sediment, yeast, bacteria, and other contaminants that can disrupt the flow of beer and create gas pockets. This often leads to excessive foam during pouring. To ensure a smooth pour and minimize foam, it is crucial to regularly clean and maintain the beer lines.
Here are some steps to effectively clean and maintain your beer lines:
- Establish a cleaning schedule: It is important to establish a routine cleaning schedule for your beer lines. The frequency of cleaning may depend on factors such as the type of beer being dispensed and the frequency of use. As a general guideline, cleaning every two to four weeks is recommended.
- Use a cleaning solution: Choose a cleaning solution specifically designed for beer line cleaning. Follow the instructions provided by the manufacturer for the proper dilution ratio and contact time. Typically, the cleaning solution is mixed with warm water and circulated through the beer lines to remove any buildup or contaminants.
- Flush with clean water: After the cleaning solution has been circulated through the beer lines, it is crucial to thoroughly flush the lines with clean water. This step helps to remove any remaining cleaning solution and debris, ensuring that the beer lines are clean and ready for use.
- Use a beer line brush: For stubborn buildup, use a beer line brush to scrub the inside of the lines. This will help dislodge any debris and ensure a thorough clean. Gently insert the brush into the line and scrub back and forth. Be sure to rinse the line thoroughly afterward.
- Inspect for damage: While cleaning the beer lines, take the opportunity to inspect them for any signs of damage such as kinks, cracks, or leaks. Damaged lines can disrupt the flow of beer and create turbulence, leading to foam issues. If you notice any issues, it is important to replace the damaged section of the beer line.
- Properly store beer lines: When not in use, it is crucial to properly store your beer lines to avoid contamination. Disconnect the lines from both the keg and the faucet and ensure they are thoroughly cleaned and dried. Store them in a clean and sanitary environment to maintain their cleanliness.
By following these steps and regularly cleaning and maintaining your beer lines, you can prevent the buildup of contaminants and ensure a smooth flow of beer without excessive foam. Proper maintenance and cleanliness of the beer lines are crucial for providing a high-quality and enjoyable pouring experience.
Next, we’ll discuss the significance of proper carbonation techniques in preventing foam formation in a kegerator.
Proper Carbonation Techniques
Proper carbonation is essential for achieving the desired flavor and mouthfeel in your beer. Incorrect carbonation levels can lead to excessive foam during pouring and affect the overall drinking experience. To prevent foam formation in a kegerator, it is important to follow proper carbonation techniques:
- Consult the beer style guidelines: Each beer style has its own recommended carbonation level. Consult reputable resources or the specific beer style guidelines to determine the appropriate carbonation level for the beer you are brewing or serving. The level of carbonation is typically measured in volumes of CO2 (VCO2).
- Adjust priming sugar: If you are carbonating your beer using priming sugar, ensure that you add the correct amount based on the beer style and desired carbonation level. Use a priming sugar calculator to determine the appropriate amount required for your specific batch of beer.
- Use a carbonation chart: A carbonation chart can serve as a valuable tool in determining the appropriate amount of CO2 to achieve the desired level of carbonation. The chart takes into account factors such as temperature and target carbonation level and provides guidance on the recommended CO2 pressure to achieve that carbonation level.
- Monitor carbonation levels: After carbonating your beer, it’s important to allow it to rest for a sufficient amount of time for the carbonation to properly develop. Monitor the carbonation level by occasionally sampling the beer. This will allow you to assess the progress and adjust if necessary.
- Avoid overcarbonation: Overcarbonation can lead to excessive foam when pouring. If you find that your beer is overcarbonated, you can release excess pressure by depressurizing the keg momentarily. However, be cautious not to release too much pressure, as it can result in undercarbonated beer.
- Seek professional advice: If you are experiencing consistent issues with carbonation or having trouble achieving the desired level, it can be helpful to seek advice from experienced homebrewers or professional brewers. They can provide guidance and offer insights into carbonation techniques specific to certain beer styles.
By following these proper carbonation techniques, you can ensure that your beer is carbonated to the appropriate level without excessive foam during pouring. Obtaining the correct carbonation will enhance the overall drinking experience and enable you to enjoy your beer to the fullest.
Next, we’ll discuss the significance of fixing a clogged or faulty faucet in preventing foam formation in a kegerator.
Read more: Why Is The Kegerator Making My Beer Flat?
Fixing a Clogged or Faulty Faucet
A clogged or faulty faucet can be a frustrating cause of foam formation in a kegerator. If the faucet is not functioning properly, it can disrupt the flow of beer and create turbulence, leading to excessive foam during pouring. However, with some troubleshooting and maintenance, you can fix a clogged or faulty faucet and enjoy a smooth pour.
Here are some steps to consider when addressing a clogged or faulty faucet:
- Inspect the faucet: Examine the faucet closely to identify any signs of clogging or damage. Look for debris, sediment, or residue that may be obstructing the flow. If the faucet is visibly dirty, it’s time for a thorough cleaning.
- Disassemble and clean the faucet: Disassemble the faucet by removing the handle and other detachable parts. Clean each component carefully using warm water and a gentle detergent. Use a brush or cloth to clean the spout and any crevices where debris may accumulate. Rinse with clean water and allow the parts to dry before reassembling.
- Check for faulty parts: While cleaning the faucet, inspect the rubber washer, O-rings, and other internal components for any signs of wear or damage. These parts are crucial for creating a proper seal and preventing leaks. If you notice any damage or deterioration, replace the faulty parts with new ones to ensure optimal function.
- Reassemble and test: After cleaning and replacing any necessary parts, reassemble the faucet and test it by pouring a small amount of beer. Observe the flow and check for excessive foam or turbulence. If the issue persists, further troubleshooting or faucet replacement may be required.
- Upgraded faucet: If you’re consistently experiencing issues with a clogged or faulty faucet, it may be worth considering an upgrade to a higher-quality faucet. There are various models available that offer better functionality, smoother pours, and improved pour control. Upgrading your faucet can enhance your pouring experience and minimize foam issues.
Regular cleaning and maintenance of your faucet are essential to ensure a smooth flow of beer without excessive foam. By following these steps and addressing any clogs or faults in the faucet, you can enjoy a well-poured beer from your kegerator.
Next, we’ll discuss the significance of mastering the pouring technique in preventing foam formation.
Mastering the Pouring Technique
Mastering the pouring technique is crucial to prevent excessive foam formation when pouring beer from a kegerator. The way you pour the beer plays a significant role in controlling the amount of foam and ensuring a smooth and enjoyable pouring experience. By following the proper pouring technique, you can minimize foam and achieve a well-balanced pour.
Here are some tips to help you master the pouring technique:
- Tilt the glass: Hold the glass at a 45-degree angle under the faucet. This angle allows the beer to flow gently down the side of the glass, reducing the agitation and minimizing the creation of foam.
- Pour slowly: Open the faucet slowly and pour the beer into the tilted glass in a slow and controlled manner. Be patient and avoid rushing the pour. This gradual pour allows the carbonation to release gradually and reduces the formation of foam.
- Gradually straighten the glass: As the glass fills up with the beer, gradually straighten the glass to an upright position while continuing the slow pour. This technique allows the perfect balance between beer and foam, resulting in a well-formed head and minimal foam overflow.
- Leave room for the head: It is essential to leave some space at the top of the glass to accommodate the beer’s head. Aiming for about an inch or two of headspace is generally recommended. This head helps to release the beer’s aroma and provides a pleasant visual appeal.
- Avoid swirling or stirring: Once the beer is poured, resist the temptation to swirl or stir it with a spoon or straw. These actions introduce additional agitation and can cause excessive foam formation. Allow the beer to settle naturally, and avoid disturbing it once poured.
- Practice makes perfect: Pouring the perfect beer takes practice. Experiment with different pouring techniques, glass angles, and pour speeds to find what works best for your kegerator setup. With time and experience, you’ll develop a knack for pouring a smooth beer with minimal foam.
By mastering the pouring technique, you can significantly reduce foam formation and achieve a well-poured beer from your kegerator. Remember to tilt the glass, pour slowly, gradually straighten the glass, leave room for the head, avoid swirling or stirring, and practice regularly.
With these tips in mind, you’ll be able to enjoy a perfectly poured beer with optimal flavor and minimal foam.
Now that we’ve explored various solutions to fix foam in a kegerator, you’re equipped to troubleshoot and address foam issues effectively. Cheers to a foam-free pouring experience!
Conclusion
Dealing with foam in a kegerator can be frustrating, but with the right knowledge and techniques, it’s a problem that can be solved. Throughout this article, we’ve explored the various causes of foam in a kegerator and provided solutions to help you fix the issue.
From improper temperature settings to incorrect CO2 pressure, dirty or damaged beer lines, overcarbonation, clogged or faulty faucets, and improper pouring technique, we’ve covered the major factors that can contribute to foam formation. By addressing each of these causes and implementing the appropriate solutions, you can minimize foam and enjoy a smooth and well-poured beer from your kegerator.
Adjusting temperature settings, regulating CO2 pressure, cleaning and maintaining beer lines, mastering proper carbonation techniques, fixing clogged or faulty faucets, and mastering the pouring technique are all crucial steps in achieving a foam-free pour. Remember to be patient and take the time to fine-tune each aspect of your kegerator setup to ensure optimal performance.
By following the recommendations outlined in this article and finding the right balance for your specific setup and preferences, you’ll be able to pour a refreshing beer with the perfect amount of foam and optimal carbonation.
Cheers to a foam-free and enjoyable beer pouring experience!
Frequently Asked Questions about Why Is My Kegerator All Foam
Was this page helpful?
At Storables.com, we guarantee accurate and reliable information. Our content, validated by Expert Board Contributors, is crafted following stringent Editorial Policies. We're committed to providing you with well-researched, expert-backed insights for all your informational needs.


0 thoughts on “Why Is My Kegerator All Foam”