Home>Construction & Tools>Building Materials>How To Repair Brick Foundation
Building Materials
How To Repair Brick Foundation
Modified: February 18, 2024
Learn how to repair brick foundation using the right building materials and techniques. Get expert tips for a successful foundation repair project.
(Many of the links in this article redirect to a specific reviewed product. Your purchase of these products through affiliate links helps to generate commission for Storables.com, at no extra cost. Learn more)
Introduction
Repairing a brick foundation is a crucial task that requires careful attention and expertise. Over time, various factors such as weathering, soil movement, and structural stress can lead to damage in a brick foundation. Addressing these issues promptly is essential to maintain the structural integrity of a building and prevent further deterioration.
In this comprehensive guide, we will delve into the essential steps and techniques for repairing a brick foundation. From assessing the damage to gathering materials and tools, preparing the work area, and executing the repair process, we will cover each aspect in detail. Whether you are a seasoned contractor or a determined DIY enthusiast, this guide will equip you with the knowledge and insights needed to effectively restore a brick foundation to its optimal condition.
As we embark on this journey, it's important to approach the task with a meticulous mindset and a commitment to quality craftsmanship. By understanding the intricacies of brick foundation repair and following the recommended procedures, you can ensure that the repaired structure not only regains its stability but also withstands the test of time.
Throughout this guide, we will explore the nuances of repairing cracks and holes, replacing damaged bricks, and implementing sealing and waterproofing measures to fortify the foundation against future damage. Each step is integral to the overall restoration process, and by mastering these techniques, you can elevate the durability and resilience of the brick foundation.
Whether you are addressing minor cracks or significant structural issues, this guide will provide you with the knowledge and confidence to tackle the repair project effectively. By the end of this journey, you will emerge equipped with the expertise to navigate the complexities of brick foundation repair, ensuring that the structural integrity of the building is safeguarded for years to come.
Key Takeaways:
- Repairing a brick foundation involves meticulous assessment, gathering the right materials and tools, and preparing the work area. By addressing cracks, replacing damaged bricks, and implementing sealing measures, the foundation can be restored effectively.
- Sealing and waterproofing are crucial for protecting a brick foundation from moisture damage. By applying waterproofing compounds, sealing cracks, and conducting regular maintenance, the foundation’s durability and resilience can be preserved.
Read more: How To Repair Brick Foundation
Assessing the Damage
Assessing the extent and nature of damage to a brick foundation is the crucial first step in the repair process. It involves a comprehensive evaluation of the foundation's condition to identify areas of concern and determine the appropriate course of action. Here's a detailed breakdown of the assessment process:
-
Visual Inspection: Begin by conducting a thorough visual inspection of the entire foundation. Look for visible cracks, gaps, or areas where the mortar has deteriorated. Pay close attention to any signs of bulging, leaning, or uneven settling, as these could indicate more severe structural issues.
-
Interior Examination: Check the interior of the building for any signs of foundation damage. Look for cracks in the walls, uneven floors, or doors and windows that are difficult to open or close. These interior indicators can provide valuable insights into the condition of the foundation.
-
Exterior Examination: Inspect the exterior of the building, paying particular attention to the brickwork. Look for cracks, spalling, or areas where the bricks appear to be shifting or separating from the mortar. Additionally, examine the surrounding soil for signs of erosion or excessive moisture, as these factors can contribute to foundation damage.
-
Professional Assessment: In cases where the damage is extensive or the cause of the damage is unclear, it may be advisable to seek a professional assessment from a structural engineer or a qualified contractor. Their expertise can provide a more in-depth understanding of the underlying issues and help determine the most effective repair strategies.
-
Documentation: As you assess the damage, document your findings with photographs and detailed notes. This documentation will serve as a valuable reference throughout the repair process, enabling you to track the progress and ensure that all identified issues are addressed.
By meticulously assessing the damage, you can gain a comprehensive understanding of the foundation's condition and the specific areas that require attention. This informed approach lays the groundwork for effective repair planning and execution, setting the stage for a successful restoration of the brick foundation.
Gathering Materials and Tools
Gathering the necessary materials and tools is a critical preparatory step before embarking on a brick foundation repair project. Having the right supplies at hand ensures that the repair process can proceed smoothly and efficiently. Here's a comprehensive list of materials and tools that are essential for repairing a brick foundation:
Materials
-
Bricks: Procure high-quality bricks that closely match the size, color, and texture of the existing bricks in the foundation. It's important to ensure that the new bricks seamlessly blend with the original ones, maintaining the aesthetic integrity of the structure.
-
Mortar: Select a suitable mortar mix that is compatible with the existing mortar used in the foundation. The mortar should adhere well to the bricks and provide strong, durable bonds.
-
Waterproofing Compound: Invest in a high-quality waterproofing compound to protect the repaired areas of the foundation from moisture infiltration. This compound helps to enhance the longevity of the repair and safeguard the foundation against water damage.
-
Reinforcement Materials: Depending on the extent of the damage, consider acquiring reinforcement materials such as steel rebar or wire mesh to strengthen the repaired sections of the foundation.
-
Cleaning Solution: Obtain a specialized cleaning solution designed for masonry surfaces. This solution will be used to clean the repair area, removing dirt, debris, and any remnants of deteriorated mortar.
-
Sealant: Acquire a reliable sealant to apply to the repaired areas, providing an additional layer of protection against water intrusion and environmental elements.
-
Protective Gear: Prioritize safety by ensuring that you have appropriate protective gear, including gloves, safety goggles, and a dust mask, to shield yourself from potential hazards during the repair process.
Tools
-
Masonry Trowel: A masonry trowel is essential for applying mortar and shaping it to match the surrounding brickwork. Choose a trowel with a comfortable grip and a sturdy, well-crafted blade for precise application.
-
Hammer and Chisel: These tools are indispensable for carefully removing damaged bricks and chipping away deteriorated mortar. Opt for high-quality, durable tools that provide excellent control and precision.
-
Wire Brush: A wire brush is instrumental in cleaning the repair area, effectively removing loose mortar, dirt, and debris from the brick surfaces.
-
Level: Ensure that you have a reliable level to assess the alignment and evenness of the repaired sections, maintaining the structural integrity of the foundation.
-
Bucket and Mixing Tools: Prepare for mortar mixing by having a sturdy bucket and appropriate mixing tools, such as a hoe or a mixing drill, to achieve the desired mortar consistency.
-
Scaffolding or Ladder: Depending on the height of the repair area, secure the necessary scaffolding or a stable ladder to access elevated sections of the foundation safely.
By diligently gathering these materials and tools, you can set the stage for a well-equipped and efficient repair process. Each item plays a crucial role in restoring the brick foundation to its optimal condition, ensuring that the repair work is executed with precision and durability in mind.
Read more: How To Parge A Brick Foundation Wall
Preparing the Work Area
Before commencing the repair work on a brick foundation, it is essential to meticulously prepare the work area to facilitate a smooth and organized process. Proper preparation not only ensures the safety of the individuals involved but also sets the stage for precise and effective repair execution. Here's a detailed breakdown of the steps involved in preparing the work area for brick foundation repair:
-
Clearing the Surrounding Area: Begin by clearing the immediate surroundings of the foundation. Remove any debris, vegetation, or objects that may obstruct access to the repair site. Clearing the area creates a safe and unobstructed workspace, allowing for seamless movement and operation during the repair process.
-
Establishing Safety Measures: Prioritize safety by setting up appropriate safety measures in the work area. This includes placing warning signs or barriers to alert individuals to the ongoing repair work. Additionally, ensure that all individuals involved in the repair project are equipped with the necessary personal protective equipment, such as gloves, safety goggles, and dust masks, to mitigate potential hazards.
-
Erecting Scaffolding or Ladder: If the repair area is located at an elevated position, secure the required scaffolding or a stable ladder to provide safe access to the work site. It is crucial to ensure that the scaffolding is erected on stable ground and meets safety standards to prevent accidents or falls during the repair process.
-
Cleaning the Repair Area: Thoroughly clean the repair area to remove dirt, debris, and remnants of deteriorated mortar. Utilize a wire brush and a specialized cleaning solution to effectively clean the brick surfaces, ensuring that the repair site is free from any contaminants that could compromise the adhesion of the new mortar.
-
Protecting Adjacent Surfaces: Take measures to protect adjacent surfaces and structures from accidental damage during the repair process. Cover nearby windows, doors, and delicate landscaping with protective materials to prevent mortar splatter or debris from causing unintended harm.
-
Organizing Materials and Tools: Arrange the gathered materials and tools in a convenient and accessible manner near the repair site. This includes setting up a mortar mixing station, organizing bricks, mortar, and other supplies, and ensuring that all necessary tools are readily available for use.
By meticulously preparing the work area, you can create an environment that is conducive to efficient and safe repair work. This proactive approach sets the stage for a successful restoration of the brick foundation, ensuring that the repair process unfolds with precision and attention to detail.
Repairing Cracks and Holes
Repairing cracks and holes in a brick foundation is a critical aspect of the restoration process, as these structural imperfections can compromise the stability and integrity of the entire foundation. Addressing cracks and holes promptly and effectively is essential to prevent further damage and ensure the long-term durability of the structure. Here's a comprehensive guide to repairing cracks and holes in a brick foundation:
Assessing the Damage
Before initiating the repair process, carefully assess the cracks and holes to determine their size, depth, and underlying causes. Small, hairline cracks may be superficial and primarily cosmetic, while larger cracks and holes could signify more significant structural issues. Additionally, identify any factors contributing to the damage, such as soil movement, water infiltration, or foundation settling, as addressing these root causes is crucial for long-lasting repairs.
Cleaning and Preparation
Begin by thoroughly cleaning the cracked and damaged areas, removing loose debris, dirt, and deteriorated mortar. Utilize a wire brush and a cleaning solution to ensure that the repair site is free from contaminants that could hinder the adhesion of the new mortar. Additionally, inspect the cracks and holes for any signs of moisture or water intrusion, as these areas must be completely dry before proceeding with the repair.
Read more: How To Build A Brick Chimney
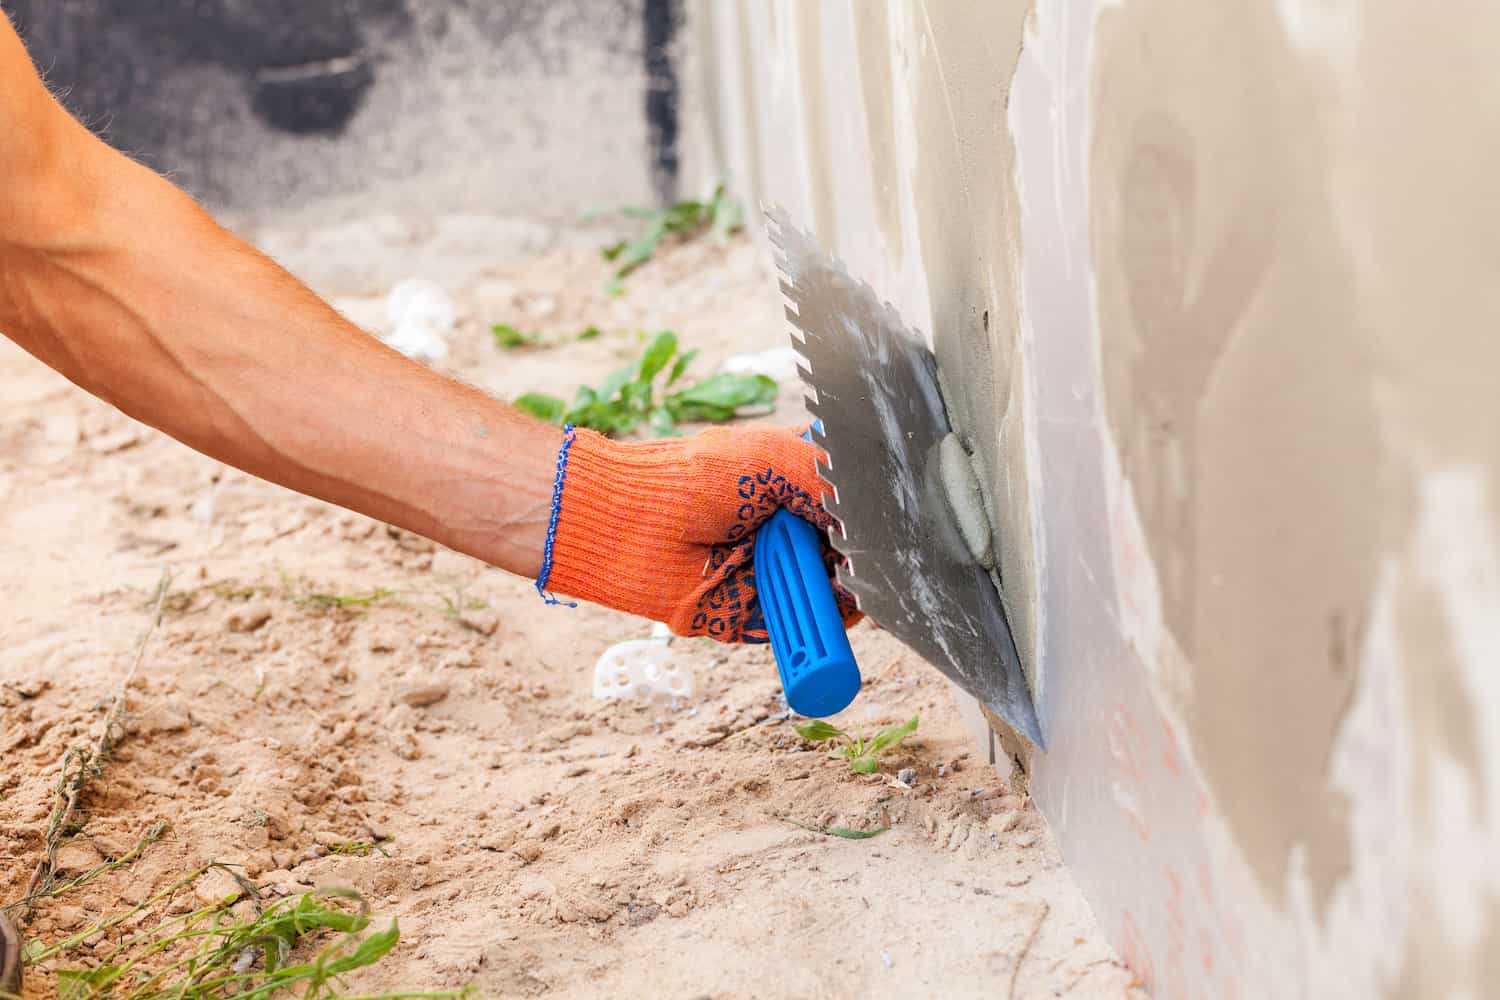
Applying Mortar
Prepare a suitable mortar mix, ensuring that it matches the composition and color of the existing mortar in the foundation. Using a masonry trowel, carefully apply the mortar into the cracks and holes, ensuring thorough coverage and a uniform finish. Press the mortar firmly into the damaged areas, smoothing the surface to blend seamlessly with the surrounding brickwork. For larger holes, consider using reinforcement materials such as steel rebar or wire mesh to strengthen the repair and prevent future cracking.
Finishing and Curing
Once the mortar is applied, carefully shape and sculpt it to match the texture and profile of the surrounding brickwork. Use a trowel or a jointing tool to create a seamless transition between the repaired areas and the existing foundation. Allow the mortar to cure according to the manufacturer's recommendations, ensuring that it achieves optimal strength and durability.
By meticulously following these steps, you can effectively repair cracks and holes in a brick foundation, restoring its structural integrity and safeguarding it against future damage. This meticulous approach ensures that the repaired areas seamlessly blend with the original foundation, resulting in a cohesive and resilient structure.
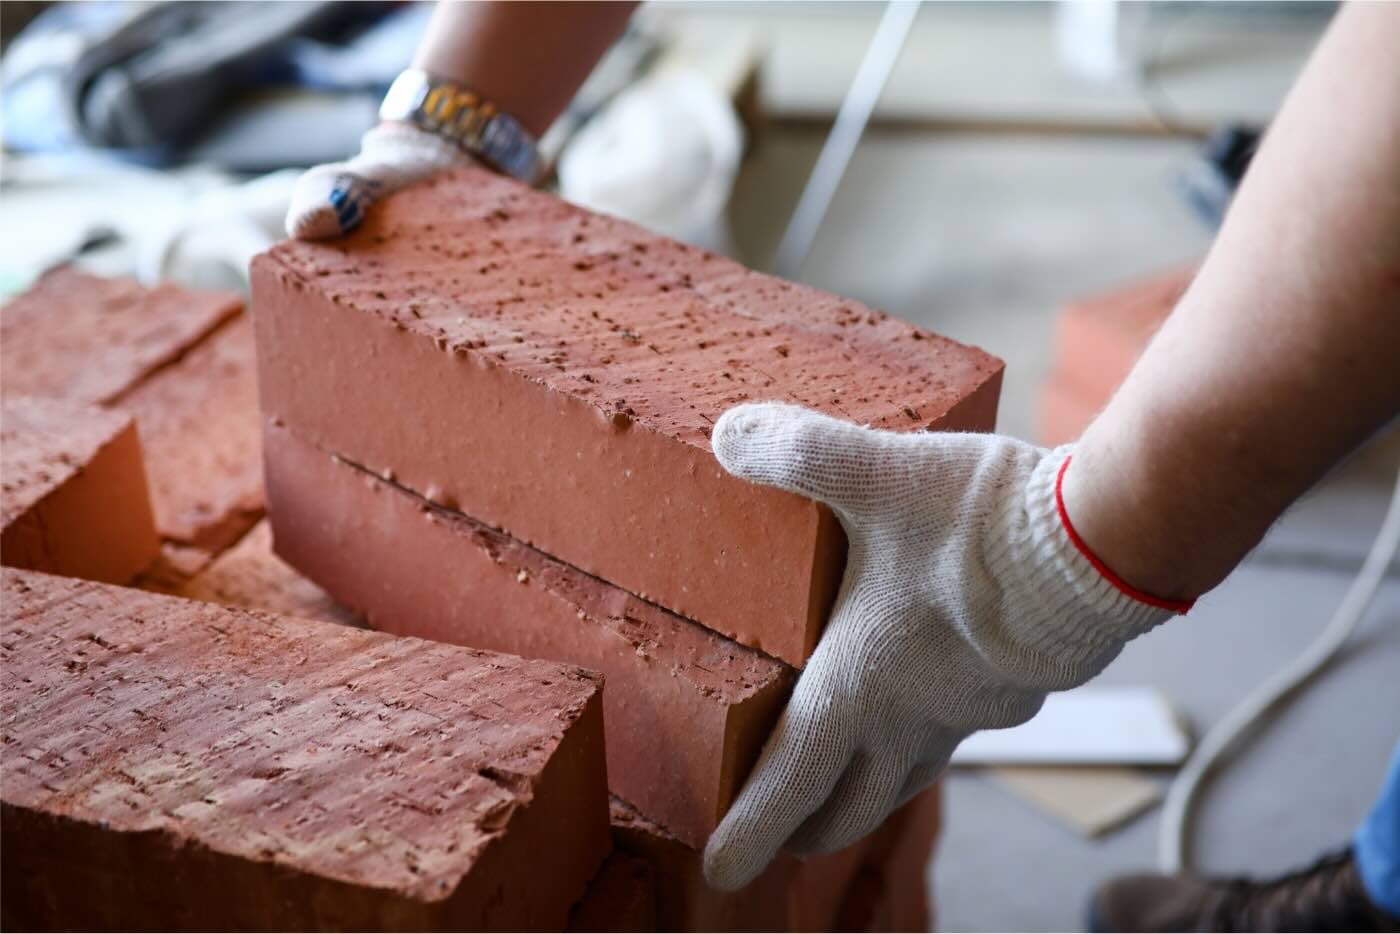
Replacing Damaged Bricks
When a brick foundation exhibits signs of wear and damage, replacing the affected bricks is a crucial step in restoring its structural integrity. Whether due to cracks, spalling, or other forms of deterioration, damaged bricks can compromise the stability and aesthetics of the foundation. Here's a detailed guide on the process of replacing damaged bricks to ensure a seamless and durable restoration.
Assessment and Preparation
Before initiating the replacement of damaged bricks, conduct a thorough assessment of the affected areas. Identify the extent of the damage, including the number of bricks requiring replacement and the underlying causes of the deterioration. Additionally, carefully inspect the surrounding mortar to assess its condition and determine if any repointing is necessary.
Once the assessment is complete, gather the necessary materials and tools for the replacement process. Ensure that the replacement bricks closely match the size, color, and texture of the existing bricks to maintain visual consistency. Acquire a suitable mortar mix, a masonry trowel, a hammer, a chisel, a joint raker, and a pointing trowel to facilitate the removal and replacement of the damaged bricks.
Read more: How To Repair Brick Chimney
Removal of Damaged Bricks
Using a hammer and a chisel, carefully remove the mortar surrounding the damaged bricks. Exercise caution to avoid causing additional damage to adjacent bricks or the surrounding mortar joints. Once the mortar is carefully chipped away, gently dislodge the damaged bricks from their position, taking care not to disturb the surrounding masonry.
After the damaged bricks are removed, clean the exposed area to remove any residual mortar and debris. Use a wire brush and a cleaning solution to ensure that the surface is free from contaminants, providing a clean and stable foundation for the replacement bricks.
Installation of Replacement Bricks
Prior to installing the replacement bricks, dampen the exposed masonry with water to prevent rapid absorption of moisture from the mortar. Apply a generous amount of mortar to the back and sides of the replacement brick, ensuring even coverage for strong adhesion. Carefully position the replacement brick in place, pressing it firmly into the mortar bed to achieve a secure bond.
Once the replacement brick is in position, use a joint raker to finish the mortar joints, ensuring a uniform and aesthetically pleasing appearance. Employ a pointing trowel to shape and smooth the mortar joints, seamlessly blending them with the surrounding brickwork.
Curing and Finishing
Allow the newly installed bricks and mortar joints to cure according to the manufacturer's recommendations. This curing period is essential for the mortar to achieve optimal strength and durability. Once the mortar has cured, conduct a final inspection to ensure that the replacement bricks seamlessly integrate with the existing masonry, creating a cohesive and structurally sound foundation.
By meticulously following these steps, the process of replacing damaged bricks contributes to the overall restoration of the brick foundation, ensuring that it regains its stability and visual appeal. This meticulous approach results in a seamlessly repaired foundation, ready to withstand the test of time.
Sealing and Waterproofing
Sealing and waterproofing are vital steps in the repair and maintenance of a brick foundation, serving as a protective barrier against moisture infiltration and environmental elements. By implementing effective sealing and waterproofing measures, the foundation can be safeguarded from water damage, prolonging its longevity and structural integrity.
Read more: How To Stucco A Foundation
Assessment of Vulnerable Areas
Before initiating the sealing and waterproofing process, it is essential to conduct a thorough assessment of the foundation to identify vulnerable areas that are susceptible to moisture intrusion. Common vulnerable points include mortar joints, cracks, and areas where the brickwork interfaces with other building materials. By pinpointing these areas, targeted sealing and waterproofing strategies can be employed to fortify the foundation against potential water damage.
Selection of Waterproofing Products
Selecting high-quality waterproofing products is paramount to ensure the effectiveness of the protective measures. Consider utilizing waterproofing compounds specifically designed for masonry surfaces, as well as sealants that offer durable protection against water penetration. It is crucial to choose products that are compatible with the materials used in the foundation and capable of forming a resilient barrier against moisture.
Application of Waterproofing Compounds
Begin the sealing and waterproofing process by applying waterproofing compounds to the exterior surface of the brick foundation. Utilize a brush or sprayer to ensure thorough coverage, paying close attention to vulnerable areas such as mortar joints and areas prone to water accumulation. The waterproofing compound forms a protective layer that prevents water from seeping into the masonry, effectively shielding the foundation from moisture-related deterioration.
Sealing of Cracks and Joints
Address any visible cracks or gaps in the foundation by applying specialized sealants designed for masonry repair. These sealants effectively fill and seal the cracks, preventing water intrusion and inhibiting further deterioration. Pay particular attention to areas where the mortar has deteriorated, ensuring that the sealant forms a durable barrier against moisture while seamlessly blending with the surrounding brickwork.
Read more: How To Repair Crumbling Foundation
Maintenance and Inspection
Following the application of waterproofing compounds and sealants, regular maintenance and inspection are essential to ensure the ongoing effectiveness of the protective measures. Periodically inspect the foundation for signs of water damage, such as efflorescence, mold growth, or damp spots. Address any emerging issues promptly by reapplying sealants or waterproofing compounds as needed to maintain the foundation's resilience against moisture.
By meticulously implementing sealing and waterproofing measures, the brick foundation is fortified against the detrimental effects of water infiltration, ensuring its long-term durability and structural stability. These proactive measures contribute to the overall resilience of the foundation, providing essential protection against environmental elements and preserving its integrity for years to come.
Conclusion
In conclusion, the repair of a brick foundation is a meticulous and essential endeavor that demands careful assessment, strategic planning, and precise execution. Throughout this comprehensive guide, we have explored the intricacies of repairing cracks, replacing damaged bricks, and implementing sealing and waterproofing measures to restore the structural integrity of a brick foundation.
By embarking on the repair journey with a thorough assessment of the damage, individuals can gain valuable insights into the condition of the foundation and identify the specific areas that require attention. This informed approach sets the stage for effective repair planning and execution, ensuring that the foundation is restored to its optimal condition.
The meticulous process of gathering materials and tools equips individuals with the necessary resources to undertake the repair project with confidence and efficiency. From high-quality bricks and mortar to essential tools such as masonry trowels and wire brushes, each item plays a crucial role in facilitating a seamless and durable repair process.
Preparing the work area is a foundational step that sets the stage for a safe, organized, and efficient repair process. By clearing the surroundings, establishing safety measures, and organizing materials and tools, individuals create an environment conducive to precision and attention to detail.
Repairing cracks and holes in the brick foundation involves a methodical approach, from assessing the damage to cleaning and preparation, applying mortar, and ensuring a seamless finish. By meticulously following these steps, individuals can effectively address structural imperfections and fortify the foundation against future damage.
The process of replacing damaged bricks contributes significantly to the overall restoration of the brick foundation, ensuring that it regains its stability and visual appeal. By carefully removing damaged bricks, installing replacements, and meticulously finishing the mortar joints, individuals can seamlessly integrate the new bricks with the existing masonry, creating a cohesive and resilient foundation.
Sealing and waterproofing measures serve as a protective barrier against moisture infiltration and environmental elements, safeguarding the foundation from water damage and prolonging its longevity and structural integrity. By assessing vulnerable areas, selecting high-quality waterproofing products, and applying protective compounds and sealants, individuals fortify the foundation against potential water-related deterioration.
In essence, the repair and maintenance of a brick foundation demand a blend of expertise, precision, and dedication to quality craftsmanship. By mastering the techniques and strategies outlined in this guide, individuals can navigate the complexities of brick foundation repair with confidence, ensuring that the structural integrity of the building is safeguarded for years to come.
Frequently Asked Questions about How To Repair Brick Foundation
Was this page helpful?
At Storables.com, we guarantee accurate and reliable information. Our content, validated by Expert Board Contributors, is crafted following stringent Editorial Policies. We're committed to providing you with well-researched, expert-backed insights for all your informational needs.


0 thoughts on “How To Repair Brick Foundation”