Home>Construction & Tools>Building Materials>How To Parge A Brick Foundation Wall
Building Materials
How To Parge A Brick Foundation Wall
Modified: August 28, 2024
Learn how to parge a brick foundation wall using the right building materials and techniques. Improve the appearance and durability of your foundation with our expert tips.
(Many of the links in this article redirect to a specific reviewed product. Your purchase of these products through affiliate links helps to generate commission for Storables.com, at no extra cost. Learn more)
Introduction
Parging a brick foundation wall is a crucial step in maintaining the structural integrity and aesthetic appeal of a building. Over time, exposure to the elements can cause wear and tear on the exterior of a foundation, leading to cracks and deterioration. Parging, a process of applying a thin coat of mortar or cement-based material to the surface of the foundation, serves as a protective barrier, preventing water infiltration and enhancing the overall appearance of the structure.
Whether you are a seasoned contractor or a determined DIY enthusiast, understanding the steps involved in parging a brick foundation wall is essential for achieving a successful outcome. By following a systematic approach and utilizing the right tools and materials, you can effectively restore and fortify the foundation, prolonging its lifespan and preserving its visual appeal.
In the following sections, we will delve into the detailed steps required to parge a brick foundation wall, from gathering the necessary tools and materials to the final touches of smoothing and finishing the parged wall. By the end of this guide, you will have a comprehensive understanding of the parging process, empowering you to tackle this essential task with confidence and precision. Let's embark on this journey to rejuvenate and protect the foundation of your structure through the art of parging.
Key Takeaways:
- Protect and beautify your building by parging a brick foundation wall. Gather tools, prepare the wall, mix and apply the material, and finish with finesse for a durable and visually appealing result.
- Parging is a crucial process to fortify and rejuvenate a brick foundation wall. With meticulous preparation, precise application, and dedication to quality, you can enhance the structural integrity and visual appeal of your building.
Read more: How To Parge Basement Walls
Step 1: Gather the necessary tools and materials
Before embarking on the parging process, it is crucial to gather all the essential tools and materials to ensure a smooth and efficient workflow. Here's a comprehensive list of items you will need:
Tools:
- Masonry Trowel: A versatile tool used for applying and smoothing the parging material onto the wall.
- Wire Brush: Essential for cleaning the surface of the foundation wall, removing any loose debris, and ensuring proper adhesion of the parging material.
- Bucket: To mix the parging material to the desired consistency.
- Hawk: A flat square surface attached to a handle, used to hold and transport the parging material to the wall.
- Safety Gear: Including gloves, safety goggles, and a dust mask to protect yourself from potential hazards during the parging process.
Materials:
- Parging Mix: Select a high-quality parging mix suitable for your specific project, ensuring it is designed for exterior applications and offers excellent adhesion and durability.
- Bonding Agent: A bonding agent or primer is essential to enhance the bond between the existing wall surface and the parging material, promoting long-term adhesion and preventing delamination.
- Water: Clean water for mixing the parging material to the recommended consistency.
- Concrete Sealer (Optional): If desired, a concrete sealer can be applied after the parging process to provide additional protection and enhance the aesthetic appeal of the wall.
By ensuring that you have all the necessary tools and materials at your disposal, you can streamline the parging process and minimize interruptions, allowing for a more efficient and effective application of the parging material. With these items in hand, you are well-equipped to proceed to the next step of preparing the foundation wall for the parging process.
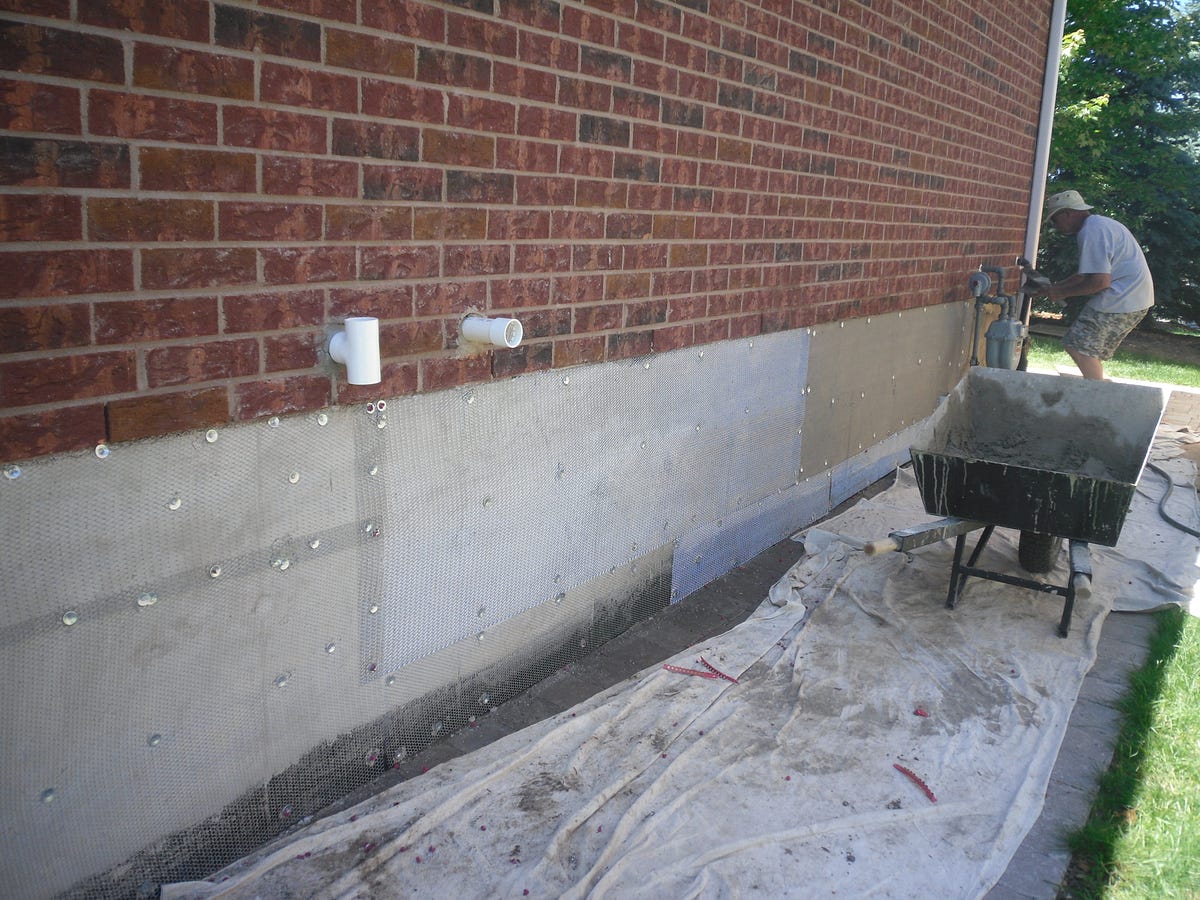
Step 2: Prepare the foundation wall
Before applying the parging material, it is crucial to prepare the foundation wall to ensure optimal adhesion and a smooth, long-lasting finish. The preparation process involves thorough cleaning, surface inspection, and the application of a bonding agent to promote a strong bond between the existing wall and the parging material.
Read more: How To Repair Brick Foundation
Cleaning the Wall Surface
Begin by thoroughly cleaning the surface of the foundation wall using a wire brush. This step is essential for removing any loose debris, dirt, and contaminants that may hinder the adhesion of the parging material. By diligently scrubbing the surface, you can create a clean and porous substrate, allowing the bonding agent and parging mix to adhere effectively.
Inspecting for Cracks and Imperfections
After cleaning the wall surface, carefully inspect the entire area for any cracks, gaps, or imperfections. Addressing these issues before applying the parging material is crucial for ensuring structural integrity and preventing water infiltration. Use a keen eye to identify any areas that require repair or filling, as addressing these concerns at this stage will contribute to a seamless and durable parging application.
Applying the Bonding Agent
Once the wall surface is clean and any necessary repairs have been made, it is time to apply the bonding agent. The bonding agent serves as a crucial intermediary layer, enhancing the bond between the existing wall and the parging material. Using a brush or roller, evenly apply the bonding agent to the entire surface, ensuring comprehensive coverage. Allow the bonding agent to dry as per the manufacturer's instructions, creating a strong and secure foundation for the subsequent application of the parging mix.
By meticulously preparing the foundation wall through thorough cleaning, inspection, and the application of a bonding agent, you establish the ideal canvas for the parging process. This meticulous preparation sets the stage for a successful and enduring parging application, ensuring that the foundation wall is fortified against the elements and exudes a visually appealing, uniform finish. With the foundation wall primed and ready, you are now poised to proceed to the next step of mixing the parging material, bringing you one step closer to revitalizing and protecting the structural integrity of the building.
Step 3: Mix the parging material
Mixing the parging material is a critical step that demands precision and attention to detail to ensure the optimal consistency and workability of the mixture. The quality of the parging mix and the accuracy of the mixing process directly impact the adhesion, strength, and overall performance of the applied material. Here's a comprehensive guide to effectively mix the parging material for a successful application:
Read more: How To Repair Foundation Wall
1. Selecting the Parging Mix
Choose a high-quality parging mix specifically designed for exterior applications. Ensure that the mix is formulated to provide excellent adhesion, durability, and resistance to weathering. It is essential to follow the manufacturer's recommendations regarding the suitability of the mix for your specific project requirements.
2. Measuring the Parging Mix
Begin by determining the quantity of parging mix required based on the surface area to be covered and the desired thickness of the parged layer. Accurately measure the parging mix according to the manufacturer's guidelines, taking into account the recommended water-to-mix ratio for achieving the desired consistency.
3. Mixing Process
In a clean bucket, gradually add the measured parging mix while simultaneously incorporating the appropriate amount of clean water. Use a mixing paddle or a drill with a mixing attachment to blend the components thoroughly. It is crucial to achieve a uniform consistency, free from lumps or dry pockets, to ensure the proper application and adhesion of the parging material.
4. Consistency Check
Once the parging mix and water are combined, assess the consistency of the mixture. The ideal consistency resembles that of a thick, creamy paste, allowing for easy application and manipulation on the wall surface. Avoid over-watering the mix, as excessive moisture can compromise the strength and adhesion of the parging material.
5. Adjustments
If the mixture is too dry, gradually add small amounts of water while continuing to mix until the desired consistency is achieved. Conversely, if the mixture is overly wet, incorporate additional parging mix to restore the proper balance. Exercise caution and patience during this process to attain the optimal consistency for the parging material.
By meticulously following these steps and adhering to the manufacturer's guidelines, you can ensure that the parging material is mixed to perfection, ready to be skillfully applied to the prepared foundation wall. The meticulous mixing process sets the stage for a seamless and durable parging application, laying the groundwork for the subsequent steps of applying and finishing the parged wall. With the parging material expertly mixed and prepared, you are now poised to advance to the next phase of the parging process, bringing you closer to achieving a fortified and visually appealing brick foundation wall.
Step 4: Apply the parging material to the wall
With the foundation wall meticulously prepared and the parging material expertly mixed, it is time to embark on the pivotal step of applying the parging material. This phase demands precision, finesse, and a systematic approach to ensure an even, durable coating that fortifies the foundation wall against the elements. Here's a detailed guide to effectively apply the parging material to the wall:
1. Load the Hawk
Begin by loading the hawk, a flat square surface attached to a handle, with the mixed parging material. Use the masonry trowel to transfer a suitable amount of the mixture onto the hawk, ensuring that it is easily accessible during the application process. This step sets the stage for a seamless and controlled application of the parging material onto the wall.
2. Application Technique
Using the masonry trowel, scoop a portion of the parging material from the hawk and apply it to the wall in a smooth, even manner. Start at the bottom of the wall and work your way upward, maintaining a consistent thickness of the applied layer. Employing a sweeping motion with the trowel, distribute the parging material evenly, covering the entire surface with precision and attention to detail.
Read more: How To Render A Brick Wall
3. Uniform Coverage
Strive for uniform coverage across the entire wall, ensuring that the parging material adheres securely and forms a cohesive layer. Pay close attention to any cracks, crevices, or imperfections, working the material into these areas to achieve a seamless, fortified surface. Consistent application and thorough coverage are essential for the long-term integrity and visual appeal of the parged wall.
4. Smooth and Level
As you apply the parging material, focus on achieving a smooth and level finish. Utilize the masonry trowel to gently smooth out the applied material, eliminating any ridges or uneven patches. This process contributes to the overall aesthetic quality of the parged wall while enhancing its ability to resist moisture and environmental stressors.
5. Work in Sections
To maintain control and precision, consider working in manageable sections, particularly for larger wall surfaces. By dividing the area into segments, you can concentrate on achieving consistent thickness and coverage, ensuring a cohesive and professional outcome across the entire expanse of the foundation wall.
By diligently following these steps and employing a meticulous approach, you can effectively apply the parging material to the wall, culminating in a fortified, visually appealing surface that safeguards the foundation against the elements. With the parging material expertly applied, you are now prepared to advance to the final step of smoothing and finishing the parged wall, bringing you closer to the successful completion of this essential rejuvenation process.
Step 5: Smooth and finish the parged wall
After the meticulous application of the parging material, the final step involves refining the surface to achieve a smooth, uniform finish that enhances both the visual appeal and protective capabilities of the parged wall. This critical phase demands attention to detail and a commitment to achieving a flawless outcome. Here's a comprehensive guide to effectively smooth and finish the parged wall:
Read more: How To Point A Brick Wall
1. Feathering the Edges
Begin by feathering the edges of the parged wall using the masonry trowel. This technique involves gently tapering the edges of the applied material to create a seamless transition between the parged surface and the surrounding areas. By skillfully blending the edges, you can achieve a cohesive and visually pleasing result while minimizing the visibility of the parged layer.
2. Smoothing the Surface
Employ the masonry trowel to smooth the entire parged surface, ensuring that any imperfections, ridges, or uneven areas are meticulously addressed. Utilize gentle, sweeping motions to refine the texture and achieve a consistent, level finish. This process contributes to the overall aesthetic quality of the parged wall, creating a visually appealing facade that complements the architectural integrity of the structure.
3. Final Inspection
Conduct a thorough visual inspection of the parged wall, scrutinizing the surface for any remaining irregularities or blemishes. Address any minor imperfections by delicately refining the affected areas, ensuring that the entire surface exudes a uniform and professional appearance. This meticulous attention to detail is instrumental in achieving a flawless finish that reflects the dedication to quality craftsmanship.
4. Curing and Protection
Allow the parged wall to cure according to the manufacturer's recommendations, providing ample time for the material to set and achieve optimal strength. Depending on the specific parging mix used, this curing period may vary, and it is essential to adhere to the prescribed guidelines to ensure the longevity and durability of the finished surface. Additionally, consider applying a concrete sealer to provide an extra layer of protection and enhance the resilience of the parged wall against environmental elements.
By meticulously following these steps and dedicating care and precision to the smoothing and finishing process, you can achieve a parged wall that not only fortifies the foundation against moisture and wear but also elevates the visual appeal of the structure. The culmination of this meticulous process results in a rejuvenated and resilient brick foundation wall, poised to withstand the test of time and exude enduring charm and structural integrity.
Read more: How To Waterproof A Brick Wall
Conclusion
In conclusion, the process of parging a brick foundation wall is a multifaceted endeavor that combines meticulous preparation, precise application, and a commitment to achieving a durable, visually appealing outcome. By following the systematic steps outlined in this guide, individuals can effectively rejuvenate and fortify the foundation of a structure, ensuring long-term resilience against environmental elements and enhancing its overall aesthetic quality.
Parging serves as a vital protective barrier, shielding the foundation wall from moisture infiltration, structural deterioration, and the impact of weathering. Through thorough cleaning, meticulous inspection, and the application of a bonding agent, the foundation wall is primed to receive the parging material, setting the stage for a seamless and enduring application.
The meticulous mixing of the parging material is a critical phase that demands precision and adherence to manufacturer's guidelines. Achieving the optimal consistency and workability of the mixture is paramount, laying the groundwork for a successful application that promotes strong adhesion and long-term durability.
The application of the parging material requires finesse and attention to detail, ensuring uniform coverage, smooth finish, and cohesive adhesion to the wall surface. By working in sections and employing a systematic approach, individuals can achieve a professional outcome that fortifies the foundation against the elements while enhancing its visual appeal.
The final phase of smoothing and finishing the parged wall is a testament to the dedication to quality craftsmanship. By feathering the edges, refining the surface, and conducting a thorough inspection, individuals can achieve a flawless finish that reflects a commitment to excellence.
Ultimately, the culmination of the parging process results in a rejuvenated and resilient brick foundation wall, poised to withstand the test of time and exude enduring charm and structural integrity. Whether undertaken as a DIY project or entrusted to skilled professionals, the art of parging represents a vital investment in the longevity and visual appeal of a structure's foundation.
By embracing the principles of meticulous preparation, precision in application, and a dedication to achieving a flawless finish, individuals can embark on the journey of parging a brick foundation wall with confidence, knowing that they are contributing to the preservation and enhancement of a fundamental element of architectural integrity.
Frequently Asked Questions about How To Parge A Brick Foundation Wall
Was this page helpful?
At Storables.com, we guarantee accurate and reliable information. Our content, validated by Expert Board Contributors, is crafted following stringent Editorial Policies. We're committed to providing you with well-researched, expert-backed insights for all your informational needs.


0 thoughts on “How To Parge A Brick Foundation Wall”