Home>Furniture & Design>Bathroom Accessories>How To Change The Color Of A Bathtub
Bathroom Accessories
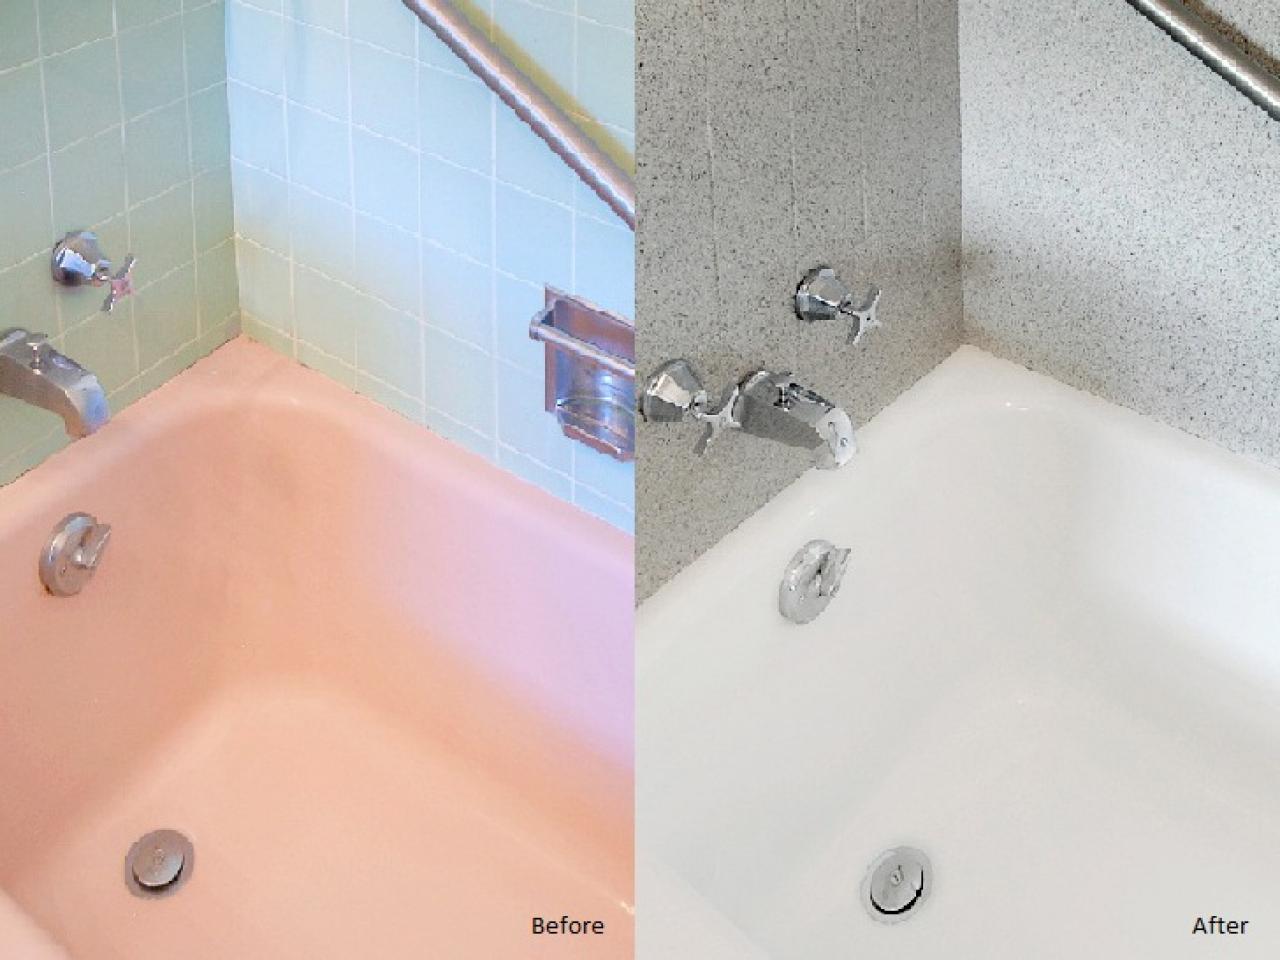
How To Change The Color Of A Bathtub
Modified: October 21, 2024
Learn how to change the color of your bathtub with our expert tips and transform your bathroom accessories to match your style. Upgrade your bathroom with a fresh new look!
(Many of the links in this article redirect to a specific reviewed product. Your purchase of these products through affiliate links helps to generate commission for Storables.com, at no extra cost. Learn more)
Introduction
Changing the color of a bathtub can breathe new life into a bathroom, transforming the space and giving it a fresh, updated look. Whether you're looking to revamp your bathroom's aesthetic or simply want to cover up an outdated or worn-out bathtub, this DIY project can make a significant impact. With the right materials, preparation, and technique, you can achieve a professional-looking finish without the cost of a full replacement.
The process of changing the color of a bathtub involves several key steps, including gathering the necessary materials, preparing the bathtub surface, applying a primer, adding the new color, and sealing the new finish. Each step plays a crucial role in ensuring a successful and long-lasting outcome.
By following the steps outlined in this guide, you can take on the challenge of transforming your bathtub's color with confidence. Whether you're a seasoned DIY enthusiast or a first-time home improver, this project offers a rewarding opportunity to personalize your bathroom and elevate its overall appeal.
Now, let's delve into the specific steps required to change the color of a bathtub, from gathering the essential materials to achieving a professional-grade finish. With careful attention to detail and a willingness to embrace the creative process, you can embark on this exciting endeavor and bring a renewed sense of style to your bathroom space.
Key Takeaways:
- Transform your bathroom with a DIY bathtub color change. Gather materials, prep the surface, apply primer, add color, and seal for a professional finish. Embrace creativity and enjoy a refreshed space!
- Changing your bathtub’s color is a rewarding DIY project. Follow steps carefully, from cleaning to sealing, for a stunning and durable transformation. Embrace creativity and enjoy your personalized bathroom!
Read more: How To Change Bathtub Fixtures
Step 1: Gather the necessary materials
Before embarking on the journey of transforming the color of your bathtub, it's essential to gather all the necessary materials to ensure a smooth and successful process. Here's a comprehensive list of the items you'll need:
-
Bathtub Refinishing Kit: This kit typically includes the necessary chemicals, primer, and topcoat specifically designed for refinishing bathtubs. Ensure that the kit is suitable for the material of your bathtub, whether it's porcelain, fiberglass, or acrylic.
-
Protective Gear: Safety should always be a priority. Equip yourself with a respirator mask, safety goggles, and gloves to protect against fumes and chemicals during the refinishing process.
-
Cleaning Supplies: To prepare the bathtub surface, you'll need heavy-duty cleaners such as trisodium phosphate (TSP) or a specialized bathtub cleaner. Additionally, gather scrubbing pads or sponges to thoroughly clean the surface.
-
Sandpaper or Sanding Pads: These are essential for smoothing out the bathtub surface and creating a suitable texture for the primer to adhere to.
-
Painter's Tape and Plastic Sheeting: Use painter's tape to mask off areas around the bathtub that you don't want to refinish. Plastic sheeting will protect the surrounding area from overspray and drips.
-
Drop Cloths or Old Sheets: Cover the bathroom floor and any nearby fixtures with drop cloths or old sheets to prevent accidental spills and splatters.
-
Ventilation: Ensure proper ventilation in the bathroom by opening windows and using fans to exhaust fumes from the refinishing process.
-
Stir Sticks and Paint Trays: These will come in handy for mixing the refinishing materials and applying them evenly to the bathtub surface.
-
Appropriate Clothing: Wear old, long-sleeved clothing to protect your skin from accidental splashes and spills.
-
Utility Knife: Use a utility knife to remove old caulk and silicone sealant around the bathtub.
By gathering these essential materials, you'll be well-prepared to tackle the first step in the bathtub color-changing process. With a focus on safety, thorough preparation, and attention to detail, you can set the stage for a successful refinishing project that will breathe new life into your bathroom space.
Step 2: Prepare the bathtub surface
Preparing the bathtub surface is a critical step in the process of changing its color. Proper preparation ensures that the new finish adheres effectively and results in a smooth, professional-looking outcome. Here's a detailed guide on how to prepare the bathtub surface for refinishing:
Clean the Surface
Begin by thoroughly cleaning the bathtub surface to remove any dirt, soap scum, and residue. Use a heavy-duty cleaner such as trisodium phosphate (TSP) or a specialized bathtub cleaner. These cleaners are effective in removing built-up grime and preparing the surface for the refinishing process. Scrub the surface using a scrubbing pad or sponge, paying close attention to areas with stubborn stains. Rinse the bathtub thoroughly to remove any cleaning residue and allow it to dry completely.
Remove Caulk and Sealant
Inspect the bathtub for old caulk and silicone sealant around the edges. Use a utility knife to carefully remove the old caulk, ensuring that the edges are clean and free from any residual sealant. This step is crucial as it allows for a clean and seamless application of the new finish.
Read more: How To Change Brick Color
Sand the Surface
Once the bathtub is clean and dry, use fine-grit sandpaper or sanding pads to lightly sand the entire surface. The goal is to create a slightly rough texture that will promote adhesion of the primer and new finish. Be thorough but gentle to avoid damaging the bathtub surface. After sanding, wipe down the bathtub with a damp cloth to remove any dust or debris.
Mask Off Surrounding Areas
To protect the surrounding areas from overspray and drips, use painter's tape to mask off the edges and fixtures around the bathtub. Additionally, cover the floor and any nearby items with plastic sheeting or drop cloths to prevent accidental spills and splatters.
Ventilation
Proper ventilation is essential during the refinishing process. Ensure that the bathroom is well-ventilated by opening windows and using fans to exhaust fumes. This step is crucial for your safety and comfort during the refinishing process.
By meticulously preparing the bathtub surface, you set the stage for a successful color-changing process. The combination of thorough cleaning, removal of old sealant, surface sanding, and protective measures ensures that the new finish will adhere effectively and result in a durable and visually appealing transformation.
Step 3: Apply the primer
Applying the primer is a crucial step in the process of changing the color of a bathtub. The primer serves as the foundation for the new finish, promoting adhesion and ensuring a durable and long-lasting result. Here's a detailed guide on how to apply the primer effectively:
Read more: How To Change Bathtub Faucet Handle
Choose the Right Primer
Selecting the appropriate primer is essential for achieving a successful refinishing outcome. Ensure that the primer is specifically designed for use on bathtubs and is compatible with the refinishing kit you've chosen. The primer acts as a bonding agent, creating a secure base for the new color to adhere to the bathtub surface.
Mix and Prepare the Primer
Before applying the primer, carefully read and follow the manufacturer's instructions for mixing and preparing the product. Use stir sticks to thoroughly mix the primer, ensuring that it reaches a consistent and uniform texture. Proper mixing is essential for activating the primer's bonding properties and ensuring an even application.
Apply the Primer Evenly
Using a high-quality paintbrush or a paint roller, apply the primer evenly to the entire bathtub surface. Work in small sections to ensure thorough coverage and a smooth finish. Pay close attention to areas with textured surfaces or crevices, ensuring that the primer reaches all the necessary areas for optimal adhesion.
Allow Sufficient Drying Time
After applying the primer, allow it to dry according to the manufacturer's recommended drying time. Proper drying is essential for the primer to bond effectively to the bathtub surface, creating a strong foundation for the new color. Ensure that the bathroom remains well-ventilated during the drying process to facilitate proper air circulation and drying.
Read more: How To Change Cabinet Color
Inspect for Uniform Coverage
Once the primer has dried completely, inspect the bathtub surface for uniform coverage. Look for any areas that may require additional primer to ensure consistent adhesion and a professional-grade finish. Address any uneven areas or missed spots before proceeding to the next step of applying the new color.
By following these steps and paying careful attention to detail, you can effectively apply the primer as a crucial preparatory stage in the bathtub color-changing process. The primer serves as the cornerstone for the new finish, laying the groundwork for a visually stunning and long-lasting transformation of your bathtub.
Step 4: Apply the new color
Applying the new color to the bathtub is the pivotal stage in the transformation process, where the desired aesthetic vision comes to life. This step requires precision, patience, and a meticulous approach to ensure a flawless and enduring finish. Here's a comprehensive guide on how to apply the new color effectively:
Choose the Right Refinishing Material
Select a high-quality bathtub refinishing kit that includes the new color or coating. Ensure that the chosen color complements the overall design scheme of your bathroom and aligns with your personal preferences. It's essential to follow the manufacturer's instructions regarding the application of the new color to achieve the best results.
Mix and Prepare the New Color
Carefully follow the instructions provided with the refinishing kit to mix and prepare the new color. Thoroughly stir the product to achieve a consistent texture and ensure that any pigments or additives are evenly distributed. Proper mixing is crucial for achieving a uniform color application and a professional-grade finish.
Read more: How To Change Out Bathtub Drain
Apply the New Color Evenly
Using a high-quality paintbrush or a paint sprayer, apply the new color evenly to the entire bathtub surface. Work in small, manageable sections to ensure thorough coverage and a smooth, uniform finish. Pay close attention to detail, ensuring that the new color reaches all areas of the bathtub surface for a seamless and visually appealing result.
Allow Sufficient Drying Time
After applying the new color, allow it to dry according to the manufacturer's recommended drying time. Proper drying is essential for the new color to cure and bond effectively to the bathtub surface, resulting in a durable and long-lasting finish. Maintain proper ventilation during the drying process to facilitate optimal air circulation and drying.
Inspect for Consistency and Quality
Once the new color has dried completely, inspect the bathtub surface for consistency and quality. Look for any imperfections, uneven areas, or missed spots that may require additional touch-ups. Address any discrepancies to ensure a flawless and professional-grade finish that meets your expectations.
By following these steps and exercising attention to detail, you can successfully apply the new color to your bathtub, bringing your vision of a refreshed and stylish bathroom to fruition. With a focus on precision and a commitment to achieving a flawless finish, this stage of the process sets the stage for a stunning transformation of your bathtub's color.
Step 5: Seal the new color
Sealing the new color is the final and crucial step in the process of changing the color of a bathtub. The sealing process not only enhances the visual appeal of the bathtub but also ensures the durability and longevity of the newly applied finish. Here's a detailed guide on how to effectively seal the new color and achieve a professional-grade outcome.
Read more: How To Change Light Color With Alexa
Choose the Right Sealant
Selecting a high-quality sealant designed specifically for bathtub refinishing is essential. The sealant should be compatible with the refinishing kit used and provide a durable, waterproof, and protective layer over the new color. It's important to follow the manufacturer's recommendations regarding the application and drying process for the chosen sealant.
Prepare the Sealant
Before applying the sealant, carefully read and follow the manufacturer's instructions for mixing and preparing the product. Thoroughly stir the sealant to ensure a consistent texture and uniform distribution of any additives or protective agents. Proper preparation is crucial for achieving an even and effective application of the sealant.
Apply the Sealant Evenly
Using a high-quality paintbrush or a paint sprayer, apply the sealant evenly to the entire surface of the bathtub. Work in small sections to ensure thorough coverage and a smooth, uniform finish. Pay close attention to detail, ensuring that the sealant reaches all areas of the bathtub surface for comprehensive protection and enhancement of the new color.
Allow Sufficient Drying Time
After applying the sealant, allow it to dry according to the manufacturer's recommended drying time. Proper drying is essential for the sealant to form a strong, protective barrier over the new color. Maintain proper ventilation during the drying process to facilitate optimal air circulation and drying.
Read more: How To Change Hardwood Floor Color
Inspect for Quality and Uniformity
Once the sealant has dried completely, inspect the bathtub surface for quality and uniformity. Look for any imperfections, uneven areas, or missed spots that may require additional touch-ups. Address any discrepancies to ensure a flawless and professional-grade finish that enhances the visual appeal and durability of the newly applied color.
By following these steps and paying careful attention to detail, you can effectively seal the new color on your bathtub, ensuring a visually stunning and long-lasting transformation. The sealing process not only enhances the aesthetic appeal of the bathtub but also provides essential protection, ensuring that the newly applied color retains its beauty and durability for years to come.
Conclusion
In conclusion, the process of changing the color of a bathtub is a transformative DIY project that offers the opportunity to revitalize and personalize your bathroom space. By following the comprehensive steps outlined in this guide, you can embark on this creative endeavor with confidence, knowing that each stage plays a crucial role in achieving a professional-grade finish.
From gathering the necessary materials to preparing the bathtub surface, applying the primer, adding the new color, and sealing the new finish, each step contributes to the overall success of the color-changing process. Attention to detail, proper preparation, and a commitment to quality are essential elements that ensure a visually stunning and long-lasting outcome.
By meticulously preparing the bathtub surface, including thorough cleaning, removal of old sealant, and proper ventilation, you set the stage for a successful color-changing process. The application of the primer serves as the cornerstone for the new finish, creating a secure base for the new color to adhere to the bathtub surface. Applying the new color requires precision, patience, and a meticulous approach to ensure a flawless and enduring finish. Finally, sealing the new color provides essential protection and enhancement, ensuring that the newly applied color retains its beauty and durability for years to come.
As you embark on this DIY journey, it's important to approach each step with a sense of creativity, patience, and a willingness to embrace the process. Whether you're aiming to refresh the aesthetic of your bathroom or simply seeking a cost-effective alternative to bathtub replacement, this project offers a rewarding opportunity to personalize your living space and elevate its overall appeal.
Ultimately, the process of changing the color of a bathtub is a testament to the transformative power of DIY home improvement projects. With the right materials, preparation, and technique, you can achieve a professional-looking finish without the cost of a full replacement. Embrace the creative process, exercise attention to detail, and enjoy the satisfaction of bringing a renewed sense of style to your bathroom space through this engaging and fulfilling endeavor.
Frequently Asked Questions about How To Change The Color Of A Bathtub
Was this page helpful?
At Storables.com, we guarantee accurate and reliable information. Our content, validated by Expert Board Contributors, is crafted following stringent Editorial Policies. We're committed to providing you with well-researched, expert-backed insights for all your informational needs.


0 thoughts on “How To Change The Color Of A Bathtub”