Home>Interior Design>How To Caulk A Bathtub: Easy Steps To DIY Success
Interior Design
How To Caulk A Bathtub: Easy Steps To DIY Success
Modified: March 2, 2024
Learn how to caulk a bathtub like a pro with our easy step-by-step guide! Achieve DIY success in interior design with these simple tips.
(Many of the links in this article redirect to a specific reviewed product. Your purchase of these products through affiliate links helps to generate commission for Storables.com, at no extra cost. Learn more)
Introduction
When it comes to bathroom maintenance and improvement, one task that often needs to be tackled is caulking the bathtub. Over time, the caulking around the edges of the tub can deteriorate, resulting in unsightly gaps and potential water damage. Caulking not only helps keep the bathtub watertight but also gives it a clean, finished look.
While hiring a professional to caulk your bathtub is always an option, you can save time and money by taking on this simple do-it-yourself (DIY) project. Learning how to caulk a bathtub is not as challenging as it may seem, and with the right tools and techniques, you can achieve professional-looking results. In this article, we will guide you through the process of caulking your bathtub, step by step.
But first, let’s go over the supplies you will need to complete this project:
- Caulk gun: This tool is used to apply the caulk smoothly and evenly.
- Caulk: Choose a high-quality, waterproof caulk specifically designed for use in bathrooms.
- Caulk remover: If there is old caulk present, a caulk remover will help you remove it effectively.
- Putty knife: This will be used to scrape away any old caulk residue.
- Clean cloth: You’ll need a cloth to wipe away excess caulk and keep the work area clean.
- Painter’s tape: This tape will help create clean, straight lines and prevent any unintentional smearing of the caulk.
Now that we have our supplies ready, let’s move on to preparing the bathtub for the caulking process.
Key Takeaways:
- Easily achieve professional-looking results by learning how to caulk your bathtub with the right tools and techniques, saving time and money on bathroom maintenance.
- Prepare your bathtub, apply the new caulk, and finish with finesse to ensure a watertight seal and a beautifully caulked bathtub that protects against water damage.
Supplies Needed
Before you begin caulking your bathtub, make sure you have all the necessary supplies on hand. Here’s what you’ll need:
- Caulk gun: A caulk gun is an essential tool for applying caulk to your bathtub. It provides a controlled and even flow of caulk, making the application process easier and more precise.
- Caulk: Choose a high-quality caulk that is specifically designed for use in bathrooms. Look for a caulk that is waterproof, mildew-resistant, and flexible to ensure a long-lasting seal.
- Caulk remover: If your bathtub has old caulk that needs to be replaced, a caulk remover will come in handy. This product helps soften and dissolve the old caulk, making it easier to remove with a putty knife.
- Putty knife: You’ll need a putty knife to remove any old caulk residue from the bathtub. This tool has a flat, thin blade that can scrape away the caulk without damaging the surface of the tub.
- Clean cloth: Have a clean cloth or rag nearby to wipe away excess caulk and keep the work area tidy. A damp cloth can also be used to clean the surface of the bathtub before applying the new caulk.
- Painter’s tape: Painter’s tape is useful for creating clean, straight lines when applying caulk. It can be applied along the edges of the bathtub to prevent any unintentional smearing or spreading of the caulk onto surrounding surfaces.
Having these supplies readily available will ensure a smooth and efficient caulk application process. Once you have gathered all the necessary items, you can move on to preparing the bathtub for the caulking process.
Preparing the Bathtub
Before you begin applying the new caulk, it’s important to properly prepare the bathtub surface. This involves cleaning the bathtub and removing any old caulk that may be present. Here are the steps to follow:
Cleaning the Bathtub Surface
Start by thoroughly cleaning the surface of the bathtub. Use a mild soap or bathroom cleaner and a non-abrasive sponge or cloth to remove any dirt, grime, and soap residue. Rinse the bathtub with clean water and dry it with a towel.
Ensuring a clean surface is essential for the caulk to adhere properly and create a strong seal. Make sure all areas are free from grease, oils, and other contaminants that may hinder the caulk’s effectiveness.
Removing Old Caulk
If there is old caulk present around the edges of the bathtub, it needs to be removed before applying the new caulk. Here’s how to do it:
- Use a caulk remover or a similar product to soften and dissolve the old caulk. Follow the instructions on the product for the best results.
- Once the old caulk is softened, use a putty knife or a caulk removal tool to scrape away the caulk from the bathtub. Be gentle to avoid damaging the tub’s surface.
- Continue scraping until all the old caulk is removed. It may take some time and effort, especially if the caulk is stubborn. Be patient and thorough to ensure a clean surface for the new caulk.
- After removing the old caulk, clean the area again to remove any remaining residue or debris. Wipe it with a clean cloth to ensure a smooth and clean surface.
Removing old caulk is crucial as applying new caulk on top of old, deteriorated caulk will not provide a proper seal and may lead to further issues. Taking the time to remove the old caulk will result in a better and longer-lasting caulk application.
Now that the bathtub is clean and free from old caulk, it’s time to move on to applying the new caulk.
Read more: How To Do Caulking In The Bathtub
Applying the New Caulk
With the bathtub cleaned and old caulk removed, it’s time to start applying the new caulk. Follow these steps for a successful caulk application:
Load the Caulk Gun
Begin by loading the caulk gun with the caulk of your choice. Cut the tip of the caulk tube at a 45-degree angle, making sure the opening is large enough to allow a controlled flow of caulk.
Insert the caulk tube into the caulk gun, with the nozzle facing out. Press the trigger of the gun to begin feeding the caulk into the nozzle.
If you’re new to using a caulk gun, practice squeezing the trigger gently to get a feel for the amount of caulk that comes out. It’s better to start with a small amount and add more as needed than to apply too much caulk at once.
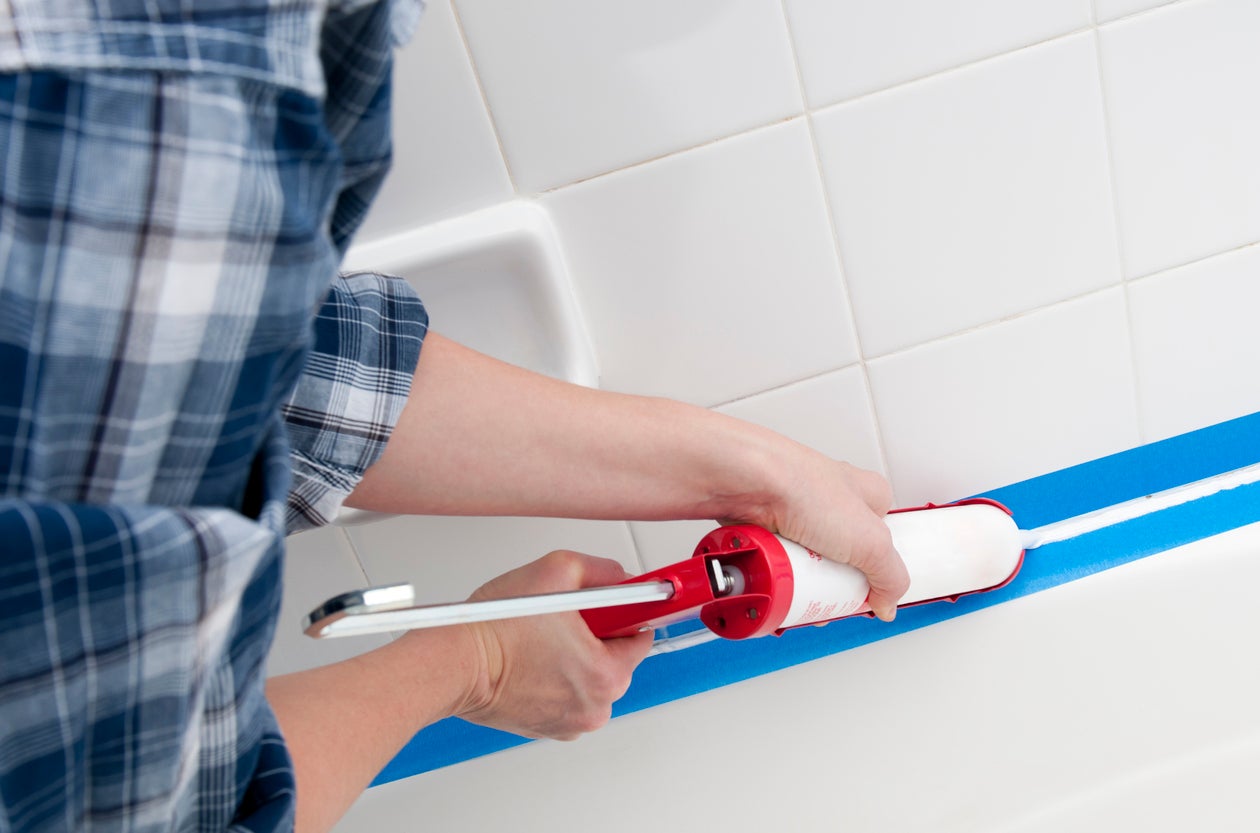
Apply Painter’s Tape
To achieve a clean, professional-looking finish, apply painter’s tape along the edges of the bathtub. This will serve as a guide and prevent any accidental smearing or spreading of the caulk onto surrounding surfaces.
Take your time to ensure the tape is applied straight and aligned with the edges of the tub. Press the tape firmly to secure it in place and create a barrier between the caulk and the bathtub’s surface.
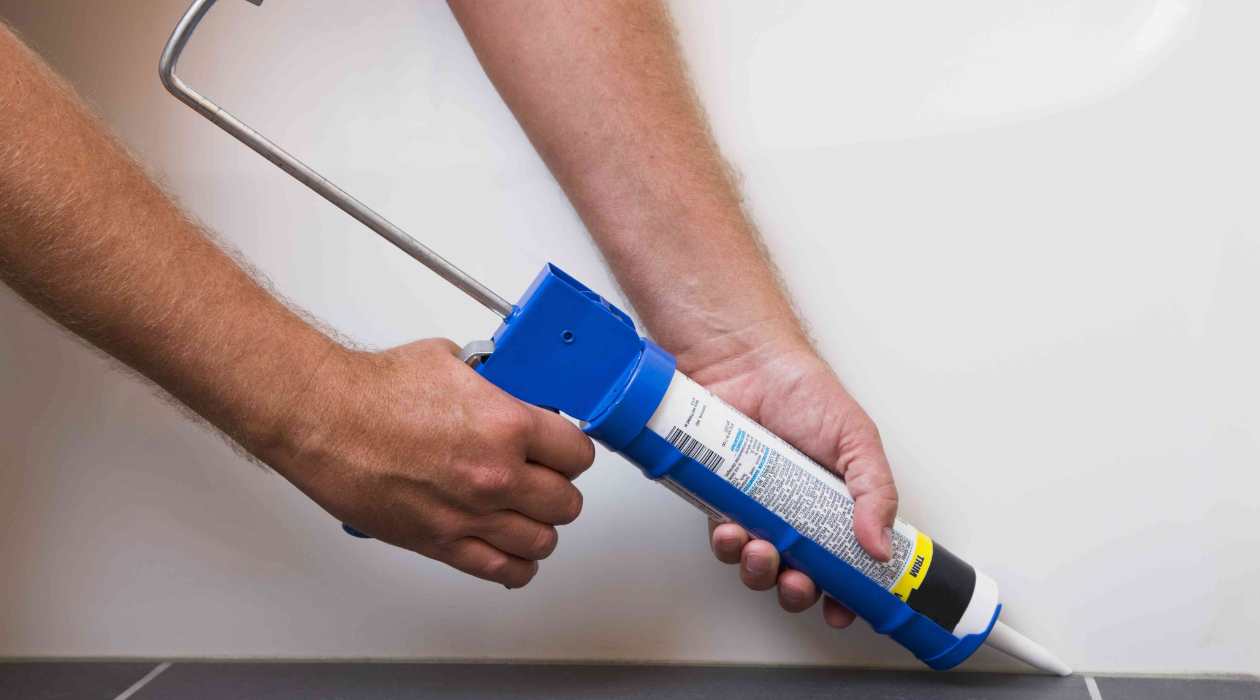
Apply the Caulk
Hold the caulk gun at a 45-degree angle and apply a steady, even bead of caulk along the joint between the bathtub and the wall or floor. Start at one end and work your way across, applying consistent pressure on the trigger to control the flow of caulk.
Move the caulk gun slowly and steadily to ensure a smooth application. If necessary, release the trigger and reposition your hand to maintain a steady grip on the gun.
Read more: How Long For Bathtub Caulk To Dry
Smooth and Shape the Caulk
After applying the caulk, use a caulk smoothing tool or a wet finger to smooth and shape the caulk. Start at one end and run the tool or your finger along the caulk in a continuous motion, pressing gently to create a neat, finished look.
Wipe away any excess caulk with a clean cloth, being careful not to disturb the taped edges. Keep a damp cloth nearby to wipe off any caulk that gets on your hands or the surrounding surfaces.
Continue applying and smoothing the caulk until all the necessary areas are covered. Remember to work in small sections at a time to ensure the caulk doesn’t dry out before you can shape it.
Now that the new caulk is applied, it’s time to move on to the finishing touches.
Finishing Touches
Now that you’ve successfully applied the new caulk to your bathtub, there are a few final steps to complete for a polished and professional finish. Let’s go over the finishing touches:
Removing the Painter’s Tape
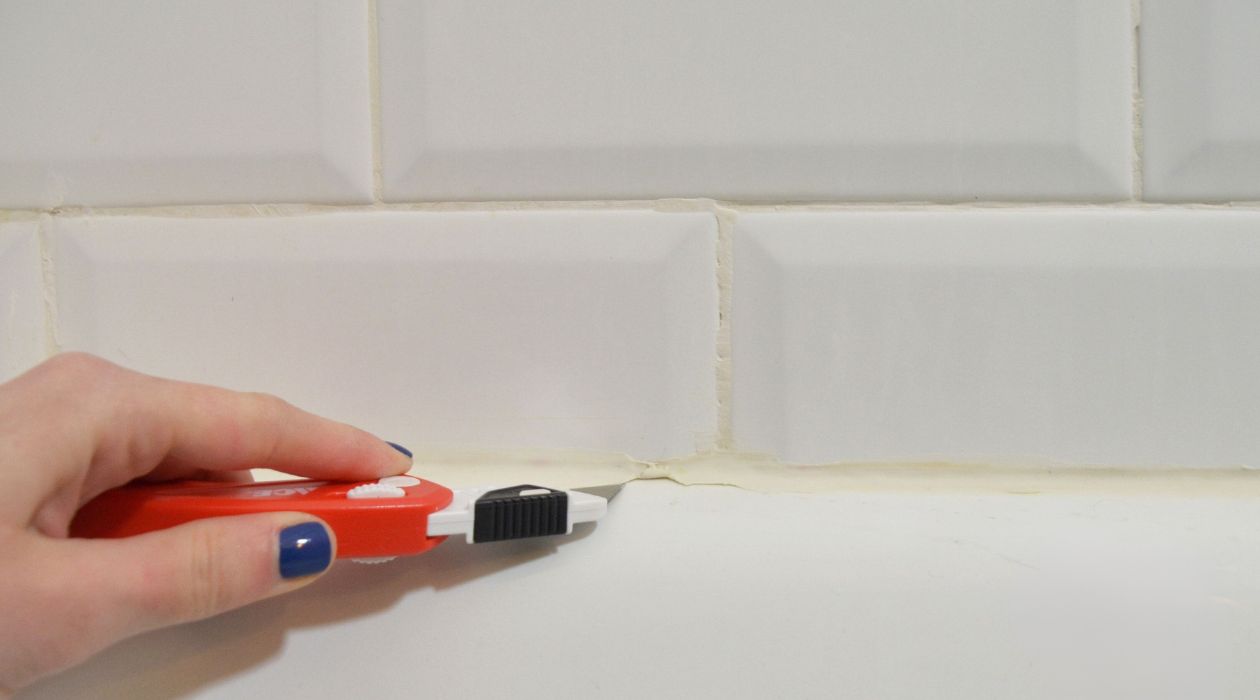
Once you’ve finished applying the caulk, carefully remove the painter’s tape while the caulk is still wet. Slowly peel off the tape at a 45-degree angle to prevent any unintended smudging or pulling of the caulk. Take your time to ensure a clean edge.
If the caulk has already started to dry, use a utility knife to gently score along the edge of the tape before removing it. This will help prevent any tearing or damage to the caulk line.
Cleaning up Excess Caulk
Take a clean cloth or rag and dampen it with water. Use the damp cloth to wipe off any excess caulk that may have smeared onto the bathtub or surrounding surfaces. Be careful not to disturb the freshly applied caulk as you clean.
It’s important to remove any excess caulk before it dries to ensure a clean and professional-looking finish. Pay close attention to any corners, edges, or seams where excess caulk may have accumulated.
If you come across stubborn caulk residue that has already dried, use a caulk remover or a plastic putty knife to scrape it away. Be gentle to avoid damaging the newly applied caulk or the surface of the bathtub.
Read more: How To Remove Old Caulking From Bathtub
Allowing the Caulk to Dry
After completing the necessary clean-up, it’s crucial to allow the caulk to dry fully before using the bathtub or exposing it to water. The drying time can vary depending on the type and brand of caulk used, as well as environmental conditions.
Refer to the caulk container for specific drying time instructions. In general, it’s best to avoid using the bathtub for at least 24 hours to ensure the caulk has completely cured and formed a strong seal.
During the drying period, keep the bathroom well-ventilated to facilitate the drying process and prevent any lingering moisture that may hinder the caulk’s effectiveness.
Once the caulk is completely dry, you can enjoy your newly caulked bathtub. Not only does the fresh caulk provide a clean and finished appearance, but it also helps protect the bathtub from water damage.
Remember, learning how to caulk a bathtub is a DIY project that requires a bit of time and patience. With the right tools, techniques, and attention to detail, you can achieve professional-grade results and extend the lifespan of your bathtub.
So go ahead and confidently tackle this project, and enjoy the satisfaction of a beautifully caulked bathtub!
Conclusion
Learning how to caulk a bathtub is a valuable skill that can save you time, money, and the hassle of dealing with water damage in the long run. With the right supplies and a careful approach, you can achieve professional-looking results and ensure a watertight seal around your bathtub.
Remember to gather all the necessary supplies, including a caulk gun, caulk, caulk remover, putty knife, clean cloth, and painter’s tape. Preparing the bathtub by cleaning the surface and removing old caulk is crucial for a successful caulk application.
When it’s time to apply the new caulk, load the caulk gun, apply painter’s tape along the edges of the bathtub, and create a steady and even bead of caulk. Use a caulk smoothing tool or a wet finger to shape and smooth the caulk for a professional finish.
Finish the project with some important final touches. Carefully remove the painter’s tape while the caulk is still wet to achieve clean edges. Clean up any excess caulk with a damp cloth, being careful not to disturb the newly applied caulk.
Allow the caulk to fully dry before using the bathtub or exposing it to water. This will ensure that the caulk has properly cured and formed a strong seal.
By taking the time to learn how to caulk a bathtub and following the steps outlined in this article, you can maintain the integrity of your bathroom and enjoy a beautifully sealed bathtub for years to come.
So don’t hesitate to dive into this DIY project and give your bathtub the attention it deserves. With a bit of patience and the right techniques, you can confidently tackle this task and achieve professional results that will enhance both the functionality and appearance of your bathroom.
Frequently Asked Questions about How To Caulk A Bathtub: Easy Steps To DIY Success
Was this page helpful?
At Storables.com, we guarantee accurate and reliable information. Our content, validated by Expert Board Contributors, is crafted following stringent Editorial Policies. We're committed to providing you with well-researched, expert-backed insights for all your informational needs.


0 thoughts on “How To Caulk A Bathtub: Easy Steps To DIY Success”