Home>Furniture & Design>Bathroom Accessories>How To Tighten Toilet Seat With No Access Underside
Bathroom Accessories
How To Tighten Toilet Seat With No Access Underside
Modified: October 20, 2024
Learn how to tighten a toilet seat without access to the underside. Discover easy DIY tips for securing bathroom accessories.
(Many of the links in this article redirect to a specific reviewed product. Your purchase of these products through affiliate links helps to generate commission for Storables.com, at no extra cost. Learn more)
Introduction
Tightening a loose toilet seat is a common household maintenance task that can be easily accomplished with the right tools and a bit of know-how. Over time, the constant opening and closing of the toilet seat can cause it to become loose, leading to an annoying wobble and potential discomfort for users. While tightening a conventional toilet seat with access to the underside is a straightforward process, addressing a loose toilet seat with no access underneath requires a different approach.
In this comprehensive guide, we will walk you through the step-by-step process of tightening a toilet seat with no access to the underside. Whether you're dealing with a traditional bolt and nut assembly or a quick-release toilet seat, we've got you covered. By following these instructions, you can restore stability to your toilet seat and ensure a more comfortable and secure experience for all users.
So, gather your tools and let's dive into the process of tightening a toilet seat with no access to the underside. Whether you're a seasoned DIY enthusiast or a novice homeowner looking to tackle your first home maintenance project, this guide will equip you with the knowledge and confidence to address this common issue effectively. Let's get started!
Key Takeaways:
- Don’t let a wobbly toilet seat ruin your day! With the right tools and know-how, you can easily tighten it, ensuring a stable and comfortable bathroom experience for everyone.
- Identifying your toilet seat type is key to success. Whether it’s traditional, quick-release, or hidden fastening, knowing the type will guide you in tightening it effectively.
Tools and Materials Needed
Before embarking on the task of tightening a toilet seat with no access to the underside, it's essential to gather the necessary tools and materials. Having the right equipment at hand will streamline the process and ensure that you can complete the task efficiently. Here's a comprehensive list of the tools and materials you'll need:
Tools:
- Adjustable Wrench: An adjustable wrench is a versatile tool that will allow you to tighten the bolts securing the toilet seat in place. Ensure that the wrench is appropriately sized to fit the nuts on the toilet seat's hinges.
- Screwdriver: Depending on the type of toilet seat fasteners, you may need a flathead or Phillips head screwdriver. This tool will be used to manipulate and tighten the screws or bolts holding the seat in position.
- Pliers: Pliers can be useful for providing additional grip and leverage when tightening the nuts and bolts of the toilet seat.
- Hex Key (Allen Wrench): If your toilet seat is equipped with hex head screws, a hex key will be necessary to tighten or loosen them.
- Rubber Gloves: It's advisable to wear rubber gloves to maintain hygiene and protect your hands during the maintenance process.
Materials:
- Cleaning Solution: Before tightening the toilet seat, it's a good idea to clean the area thoroughly. A mild cleaning solution and a clean cloth can be used to wipe down the toilet seat and surrounding areas.
- Replacement Parts (If Necessary): If you find that the toilet seat hinges or fasteners are damaged or worn, you may need to have replacement parts on hand. This could include new bolts, nuts, or hinges specific to your toilet seat model.
- Lubricant: In some cases, applying a small amount of lubricant to the bolts and hinges can facilitate the tightening process and prevent future loosening.
By ensuring that you have these tools and materials readily available, you'll be well-prepared to tackle the task of tightening a toilet seat with no access to the underside. With everything in place, you can proceed with confidence, knowing that you have everything you need to successfully complete the maintenance process.
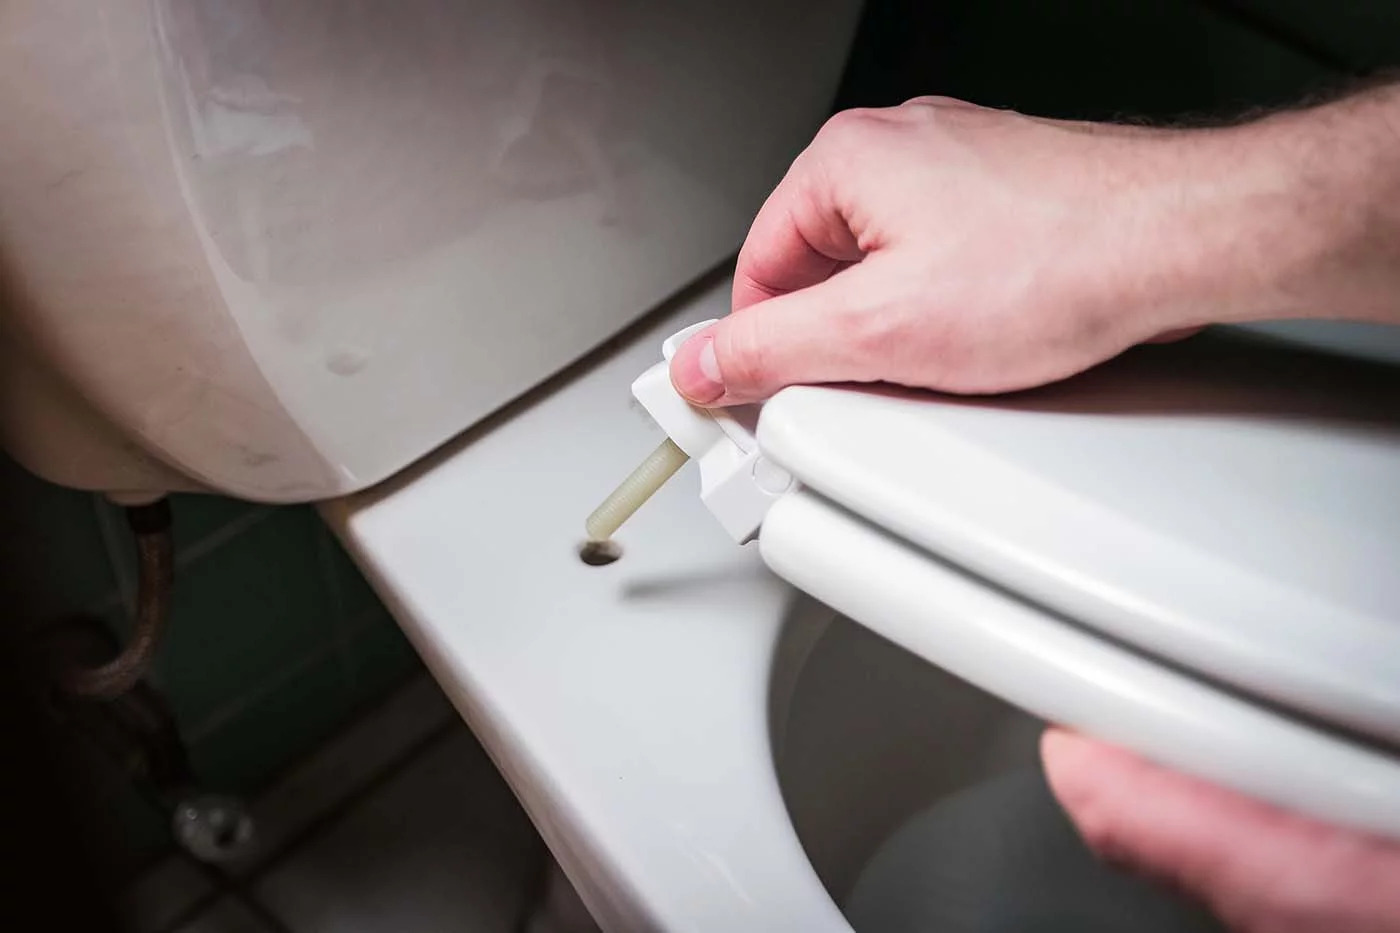
Step 1: Remove the Toilet Seat
Before you can begin the process of tightening a toilet seat with no access to the underside, it's essential to remove the seat from the toilet bowl. This step is crucial as it allows for better access to the fasteners and hinges, enabling you to effectively address the issue of a loose toilet seat. Here's a detailed guide on how to remove the toilet seat:
-
Prepare the Area: Start by ensuring that the area around the toilet is clean and free from any obstructions. This will provide you with ample space to work and maneuver as you remove the toilet seat.
-
Identify the Fasteners: Examine the underside of the toilet seat to identify the type of fasteners securing it in place. Depending on the model, you may find plastic caps covering the fasteners or exposed screws and nuts.
-
Access the Fasteners: If your toilet seat is equipped with plastic caps covering the fasteners, gently pry them open using a flathead screwdriver. This will reveal the screws or bolts holding the seat in position. For seats with exposed fasteners, proceed to the next step.
-
Loosen the Fasteners: Using the appropriate tool, whether it's a screwdriver or wrench, begin loosening the nuts or screws securing the toilet seat. Turn them counterclockwise to gradually release the tension and allow for the removal of the seat.
-
Lift and Remove the Seat: Once the fasteners are sufficiently loosened, carefully lift the toilet seat away from the toilet bowl. Be mindful of any remaining fasteners and ensure that the seat is lifted straight up to avoid damaging the toilet bowl or the seat itself.
By following these steps, you can safely and effectively remove the toilet seat, setting the stage for the subsequent process of tightening the seat with no access to the underside. With the seat successfully removed, you can proceed to the next steps with confidence, knowing that you have created the necessary space and access to address the issue at hand.
Read more: How To Tighten A Soft Close Toilet Seat
Step 2: Identify the Type of Toilet Seat
Once the toilet seat has been removed, the next crucial step in the process of tightening a toilet seat with no access to the underside is to identify the type of seat you are dealing with. This step is essential as it will determine the specific method and tools required to effectively tighten the seat. There are several common types of toilet seats, each with its unique fastening mechanisms and designs. By accurately identifying the type of toilet seat, you can proceed with confidence, knowing that you are equipped to address the issue effectively.
Traditional Bolt and Nut Assembly
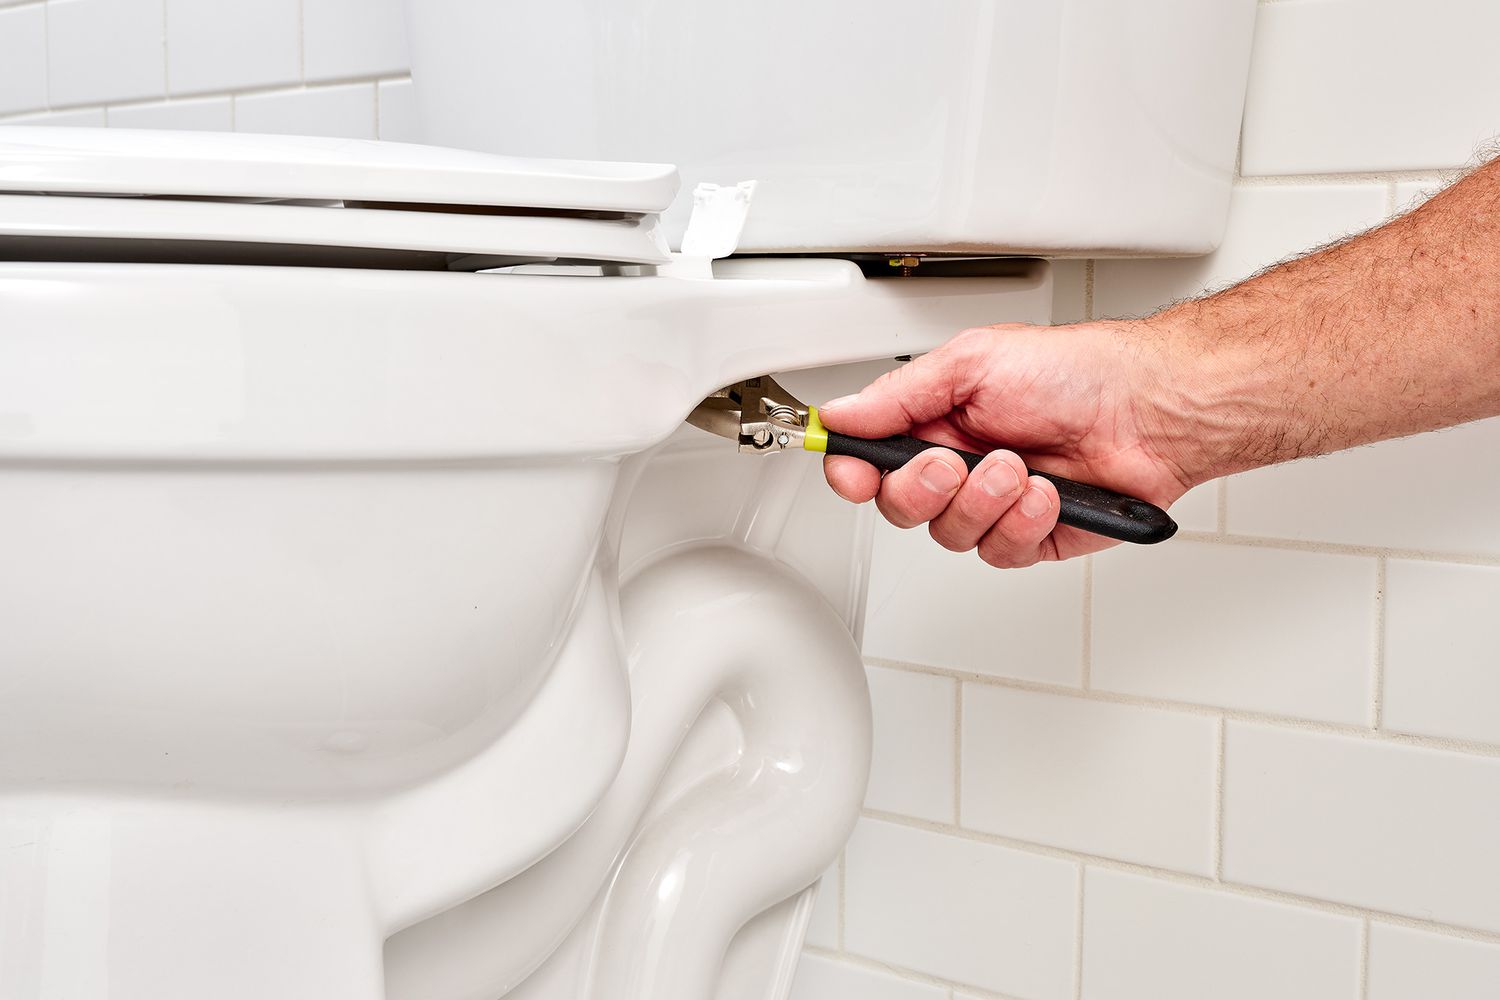
One of the most common types of toilet seats features a traditional bolt and nut assembly for securing the seat to the toilet bowl. These seats typically have exposed bolts and nuts at the rear of the seat, visible once the seat has been lifted. The bolts pass through openings in the hinges and are secured in place with nuts underneath the toilet bowl. Identifying this type of seat is relatively straightforward, as the exposed bolts and nuts are easily visible upon removal of the seat.
Quick-Release Toilet Seat
In contrast to the traditional bolt and nut assembly, quick-release toilet seats are designed for easy removal and cleaning. These seats feature a quick-release mechanism that allows the seat to be effortlessly detached from the toilet bowl for thorough cleaning. The fastening mechanism of a quick-release seat often involves buttons or levers located on the hinges, enabling the seat to be lifted away without the need for tools. Identifying a quick-release toilet seat is evident by the presence of release buttons or levers on the hinges, indicating that a different approach will be required to tighten the seat.
Hidden Fastening System
Some modern toilet seats are equipped with a hidden fastening system that conceals the bolts and nuts beneath a cover or cap. These seats are designed to provide a sleek and seamless appearance, with the fasteners hidden from view. To identify this type of seat, look for plastic caps or covers that may be located at the rear of the seat, concealing the fastening mechanism. Removing these caps will reveal the hidden bolts and nuts, signaling that a specific approach will be necessary to address the tightening of the seat.
By accurately identifying the type of toilet seat you are working with, whether it's a traditional bolt and nut assembly, a quick-release seat, or a hidden fastening system, you can proceed with confidence, knowing that you have the necessary information to select the appropriate method for tightening the seat. This understanding will guide the subsequent steps in the process, ensuring that you can effectively address the issue of a loose toilet seat with no access to the underside.
Step 3: Tighten the Toilet Seat with No Access Underside
Tightening a toilet seat with no access to the underside requires a strategic approach based on the type of seat you are dealing with. Depending on whether you have a traditional bolt and nut assembly, a quick-release seat, or a hidden fastening system, the tightening process will vary. Here's a detailed guide on how to tighten each type of toilet seat with no access to the underside:
Traditional Bolt and Nut Assembly:
If your toilet seat features a traditional bolt and nut assembly, the tightening process involves accessing the bolts and nuts from the top side of the seat. With the seat removed, locate the bolts that pass through the hinges and extend into the toilet bowl. Using an appropriate tool, such as a screwdriver or wrench, tighten the nuts on the bolts by turning them clockwise. It's essential to ensure that the bolts remain securely in place as you tighten the nuts to prevent any wobbling or instability. Once the nuts are tightened, carefully reinstall the seat by aligning the hinges with the bolt openings and lowering the seat onto the toilet bowl.
Quick-Release Toilet Seat:
For a quick-release toilet seat, the tightening process may involve adjusting the quick-release mechanism to ensure a secure fit. Start by examining the hinges and the quick-release buttons or levers. Depending on the design, you may need to manipulate the release mechanism to create a tighter connection between the seat and the toilet bowl. Once the adjustment is made, carefully reattach the seat by engaging the quick-release mechanism and ensuring that the seat is firmly secured in place.
Hidden Fastening System:
If your toilet seat utilizes a hidden fastening system, the tightening process will involve accessing the concealed bolts and nuts beneath the cover or cap. Remove the caps to reveal the fasteners and proceed to tighten the bolts using the appropriate tool. Once the bolts are securely tightened, replace the caps to restore the seamless appearance of the seat.
Regardless of the type of toilet seat you have, it's essential to test the seat for stability and wobbling after tightening the fasteners. Gently apply pressure to the seat from various angles to ensure that it remains securely in place. If the seat feels stable and secure, you have successfully tightened the toilet seat with no access to the underside.
By following these tailored approaches based on the type of toilet seat, you can effectively address the issue of a loose toilet seat without access to the underside. With the seat securely tightened, you can proceed to reinstall it and restore stability and comfort to your bathroom fixture.
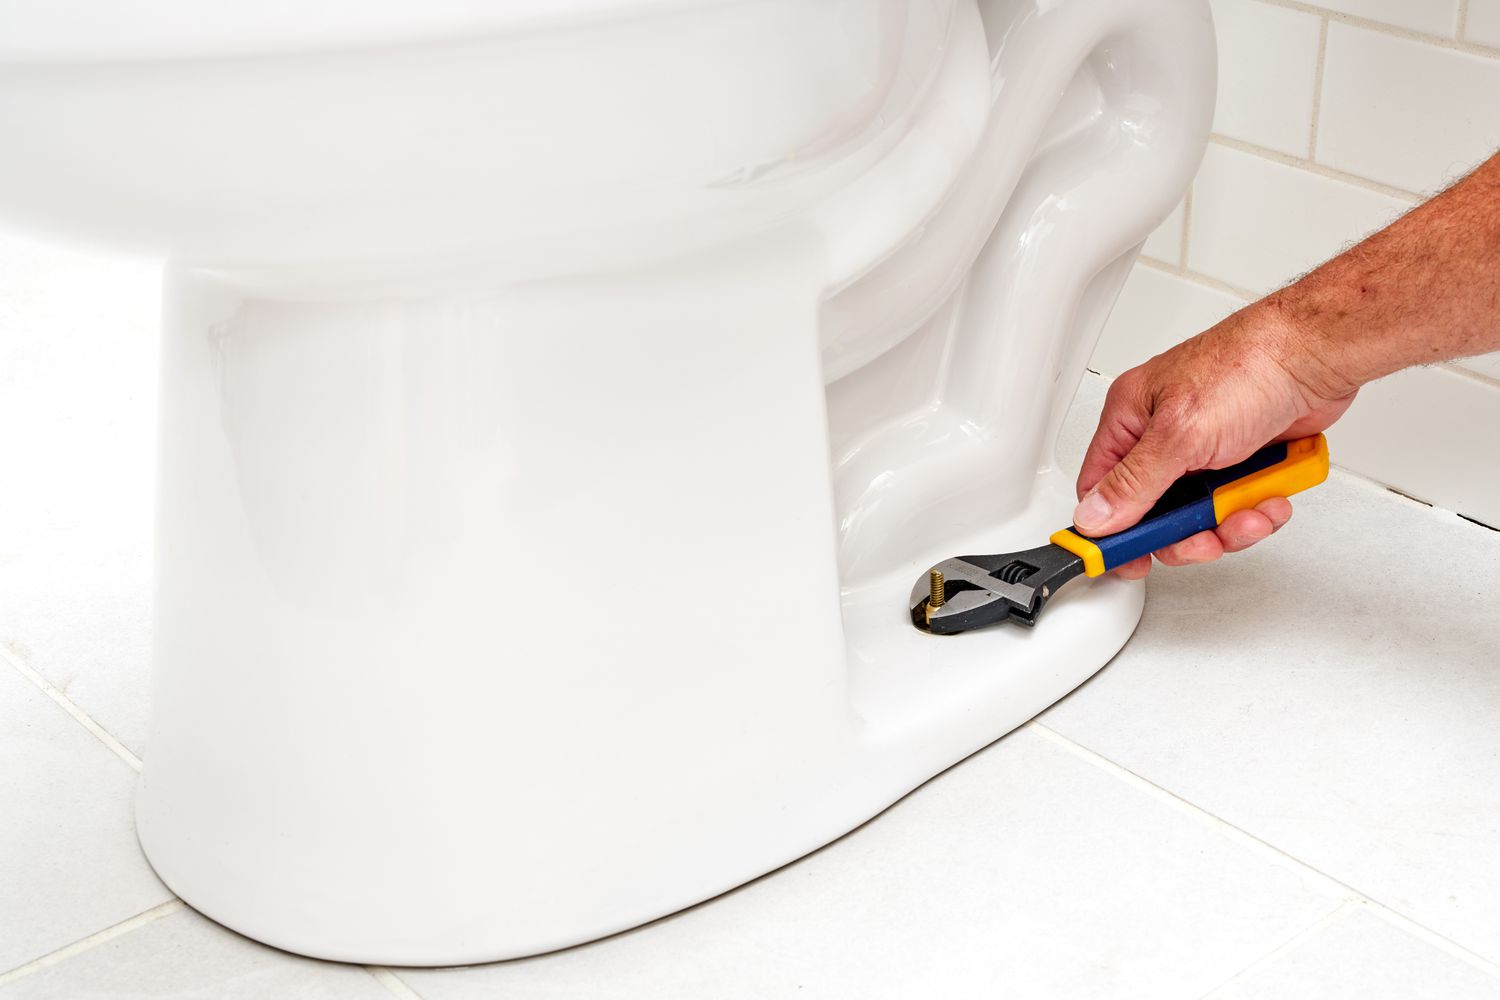
Step 4: Reinstall the Toilet Seat
After successfully tightening the toilet seat with no access to the underside, the final step involves reinstalling the seat onto the toilet bowl. This process ensures that the seat is securely positioned, providing stability and comfort for users. Here's a detailed guide on how to reinstall the toilet seat:
-
Prepare the Seat: Before reinstalling the seat, take a moment to inspect it for any signs of wear or damage. Ensure that the hinges and fasteners are in good condition and free from any debris or obstructions. If necessary, clean the seat and hinges using a mild cleaning solution and a clean cloth to remove any accumulated dirt or residue.
-
Align the Hinges: Position the seat above the toilet bowl, aligning the hinges with the openings on the bowl. Take care to center the seat and ensure that it is oriented correctly for a balanced fit. This step is crucial in establishing a stable and symmetrical placement of the seat.
-
Lower the Seat: With the hinges aligned, gently lower the seat onto the toilet bowl, guiding the bolts through the hinge openings. Exercise caution to avoid any abrupt or forceful movements that could potentially damage the seat or the toilet bowl. Ensure that the seat rests evenly on the bowl without any tilting or misalignment.
-
Secure the Fasteners: Once the seat is in position, proceed to secure the fasteners according to the specific type of toilet seat you have. For traditional bolt and nut assemblies, tighten the nuts on the bolts using the appropriate tool, ensuring a snug and secure fit. If you have a quick-release seat, engage the quick-release mechanism to lock the seat in place. For seats with a hidden fastening system, replace the caps to conceal the fasteners and restore the seamless appearance of the seat.
-
Test for Stability: After reinstalling the seat and securing the fasteners, test its stability by gently applying pressure from various angles. The seat should remain firmly in place without any wobbling or shifting. This step is essential in verifying that the seat is securely installed and ready for use.
By following these steps, you can effectively reinstall the toilet seat, completing the process of tightening a loose seat with no access to the underside. With the seat securely in place, you can enjoy the restored stability and comfort it provides, ensuring a more pleasant and reliable experience for all users.
Conclusion
Tackling the task of tightening a toilet seat with no access to the underside may initially seem daunting, but armed with the right tools and knowledge, it becomes a manageable and rewarding endeavor. By following the step-by-step process outlined in this guide, you have successfully addressed the common issue of a loose toilet seat, restoring stability and comfort to your bathroom fixture.
Throughout this comprehensive guide, you've learned the importance of identifying the type of toilet seat you are working with, whether it's a traditional bolt and nut assembly, a quick-release seat, or a hidden fastening system. This understanding has empowered you to tailor your approach, ensuring that you can effectively tighten the seat based on its specific design and fastening mechanism.
From removing the seat and identifying the fasteners to tightening the seat with precision and reinstalling it securely, each step has contributed to the overall success of the maintenance process. The careful attention to detail and the strategic use of tools have culminated in a stable and reliable toilet seat, ready to provide comfort and convenience for all users.
As you reflect on the journey of tightening a toilet seat with no access to the underside, you can take pride in your newfound DIY skills and the ability to address common household maintenance tasks with confidence. The knowledge and experience gained from this process will serve you well in future home maintenance endeavors, empowering you to maintain a comfortable and functional living environment.
With the toilet seat now securely tightened and reinstalled, you can enjoy the peace of mind that comes with a stable and reliable fixture in your bathroom. Whether it's for your own use or the comfort of guests and family members, the tightened toilet seat represents a successful accomplishment and a testament to your ability to tackle household maintenance challenges effectively.
By following this guide, you have not only tightened a loose toilet seat but also gained valuable insights and skills that will serve you well in your ongoing journey as a capable and resourceful homeowner. As you look ahead, remember that with the right tools, knowledge, and determination, you can confidently tackle a wide range of home maintenance tasks, ensuring that your living space remains comfortable, functional, and inviting for all.
Frequently Asked Questions about How To Tighten Toilet Seat With No Access Underside
Was this page helpful?
At Storables.com, we guarantee accurate and reliable information. Our content, validated by Expert Board Contributors, is crafted following stringent Editorial Policies. We're committed to providing you with well-researched, expert-backed insights for all your informational needs.


0 thoughts on “How To Tighten Toilet Seat With No Access Underside”