Home>Furniture & Design>Interior Design Trends>How To Drill A Hole In Glass

Interior Design Trends
How To Drill A Hole In Glass
Modified: October 19, 2024
Learn how to safely drill a hole in glass for your interior design projects. Discover the latest interior design trends for adding unique touches to your space.
(Many of the links in this article redirect to a specific reviewed product. Your purchase of these products through affiliate links helps to generate commission for Storables.com, at no extra cost. Learn more)
Introduction
Drilling a hole in glass may seem like a daunting task, but with the right tools, techniques, and a bit of know-how, it can be accomplished with precision and ease. Whether you're looking to create a custom piece of art, install a new fixture, or embark on a DIY project, understanding the process of drilling through glass is essential.
Glass, with its delicate and brittle nature, requires careful handling and specialized tools to avoid breakage and ensure a clean, smooth hole. By following the proper steps and safety precautions, you can successfully drill through glass without compromising its integrity.
In this comprehensive guide, we will walk you through the step-by-step process of drilling a hole in glass, from marking the spot to applying the finishing touches. You will learn about the essential tools and materials needed, as well as the best practices for preparing the glass and executing the drilling process with precision.
Whether you're a seasoned DIY enthusiast or a novice looking to expand your skill set, mastering the art of drilling through glass opens up a world of creative possibilities. So, roll up your sleeves, gather your tools, and let's delve into the fascinating world of glass drilling.
Key Takeaways:
- Mastering the art of drilling a hole in glass requires precision, patience, and attention to detail. By following safety precautions and meticulous steps, anyone can create clean, precise, and professional results while upholding the integrity of the glass.
- Equipping oneself with the right tools and materials, adhering to safety precautions, and following a step-by-step process empowers DIY enthusiasts to drill through glass with confidence. This opens up a world of creative possibilities for art, installations, and DIY projects.
Read more: How To Drill A Hole In Sea Glass
Safety Precautions
When it comes to working with glass, safety should always be the top priority. The fragile nature of glass and the potential hazards associated with drilling through it make it crucial to adhere to strict safety precautions. By following these guidelines, you can minimize the risk of accidents and ensure a safe and successful drilling process.
-
Protective Gear: Before embarking on the drilling process, it is essential to equip yourself with the appropriate protective gear. Safety goggles are a must to shield your eyes from any flying glass particles or debris that may result from the drilling. Additionally, wearing heavy-duty gloves will safeguard your hands against potential cuts or abrasions.
-
Work Area Preparation: Clear the work area of any unnecessary clutter or obstructions to create a safe and spacious environment for the drilling process. Ensure that the glass is placed on a stable and level surface to prevent it from slipping or shattering during drilling.
-
Stabilizing the Glass: To prevent the glass from shifting or vibrating during drilling, it is advisable to secure it in place using clamps or a non-slip mat. This will minimize the risk of the glass cracking or breaking due to movement.
-
Proper Tool Handling: Familiarize yourself with the proper handling of the drill and ensure that it is in good working condition. Use a drill bit specifically designed for glass to minimize the likelihood of breakage. Additionally, maintain a firm grip on the drill and exercise caution to avoid applying excessive pressure, which can lead to the glass fracturing unexpectedly.
-
Cooling Mechanism: When drilling through glass, the friction generated can cause heat to accumulate, increasing the risk of thermal stress and potential breakage. To counter this, it is advisable to use a continuous water flow or a lubricant specifically designed for glass drilling to keep the drill bit and glass surface cool throughout the process.
-
Drilling Speed and Pressure: Exercise patience and maintain a steady drilling speed to prevent the glass from cracking. Avoid exerting excessive pressure on the glass, as this can lead to structural damage. Instead, allow the drill bit to gradually penetrate the glass with minimal force.
By adhering to these safety precautions, you can create a secure and controlled environment for drilling through glass, mitigating the potential risks and ensuring a smooth and incident-free process. Remember, safety should always be the foundation of any DIY endeavor, especially when working with delicate materials such as glass.
Tools and Materials Needed
Drilling a hole in glass requires a specific set of tools and materials to ensure precision and safety throughout the process. Before embarking on the task, it is essential to gather the following items:
Tools:
-
Glass Drill Bit: A high-quality, carbide-tipped glass drill bit is the cornerstone of the drilling process. Unlike standard drill bits, glass drill bits are designed to minimize the risk of chipping or shattering the glass while creating a clean and precise hole. These specialized drill bits are available in various sizes to accommodate different hole diameters, allowing for versatility in your projects.
-
Power Drill: A variable-speed power drill with a reliable grip and adjustable settings is essential for drilling through glass. Opting for a corded drill provides consistent power, ensuring a smooth and controlled drilling experience. Variable speed settings allow for greater control over the drilling speed, minimizing the risk of overheating and breakage.
-
Masking Tape: High-quality masking tape serves as a crucial tool for marking the spot where the hole will be drilled. It not only helps to create a visible guide for precise drilling but also acts as a protective barrier, reducing the likelihood of the drill bit slipping or skidding across the glass surface.
-
Spray Bottle or Drip Coolant System: To counter the heat generated during the drilling process, a continuous water flow or a specialized drip coolant system is essential. This helps to maintain a cool temperature on the glass surface and the drill bit, reducing the risk of thermal stress and potential breakage.
-
Safety Gear: As mentioned in the safety precautions, safety goggles and heavy-duty gloves are indispensable for protecting your eyes and hands from potential hazards during the drilling process. Ensuring that you have the appropriate safety gear on hand is crucial before commencing the task.
Materials:
-
Glass Surface: The piece of glass on which the hole will be drilled should be clean, free from any debris, and placed on a stable and level surface. Whether it's a glass pane, bottle, or decorative item, ensuring the stability and cleanliness of the glass surface is vital for a successful drilling outcome.
-
Lubricant or Coolant: Using a lubricant specifically formulated for glass drilling or a continuous water flow system is essential to reduce friction and heat buildup during the drilling process. This helps to maintain the integrity of the glass and the sharpness of the drill bit, ensuring a smooth and controlled drilling experience.
By assembling these essential tools and materials, you can set the stage for a successful and seamless glass drilling process. Each item plays a critical role in safeguarding the integrity of the glass and facilitating precision and control throughout the drilling endeavor.
Read more: How To Drill Hole In Glass Bottle
Step 1: Marking the Spot
Before commencing the drilling process, precision and accuracy in marking the spot where the hole will be drilled are crucial. This initial step sets the foundation for a successful outcome, ensuring that the drill bit penetrates the glass at the desired location with precision. Here's a detailed guide on how to mark the spot effectively:
1.1 Selecting the Location
Carefully determine the exact placement of the hole on the glass surface. Whether you're creating a decorative piece, installing a fixture, or repurposing a glass item, the location of the hole should align with your intended purpose. Take into account the dimensions of the glass and the specific requirements of your project to pinpoint the ideal spot for drilling.
1.2 Using Masking Tape
Once the location is determined, use high-quality masking tape to mark the spot where the hole will be drilled. Place a small piece of masking tape directly on the glass surface, precisely indicating the center of the intended hole. The tape serves as a visible guide, allowing for accurate positioning and minimizing the risk of the drill bit slipping or skidding during the drilling process.
1.3 Double-Checking the Alignment
After applying the masking tape, double-check the alignment and ensure that the marked spot corresponds to your intended location for the hole. Verify that the tape is securely adhered to the glass surface and that the center point is clearly defined. This meticulous approach to marking the spot helps to prevent any misalignment or inaccuracies during the drilling process.
Read more: How To Drill A Hole In A Brick Wall
1.4 Measuring and Verifying
If the hole placement requires precise measurements, utilize a ruler or measuring tape to confirm the exact distance from the edges of the glass to the marked spot. This step is particularly important for projects that demand symmetrical hole placement or specific spatial arrangements. By measuring and verifying the position, you can guarantee that the drilling process aligns with your project's requirements.
1.5 Visual Inspection
Conduct a visual inspection of the marked spot to ensure that it meets your expectations in terms of placement and alignment. Take a moment to review the positioning from different angles and under adequate lighting to confirm that the marked spot accurately reflects your intended drilling location. This final inspection provides an opportunity to make any necessary adjustments before proceeding to the next step.
By meticulously following these steps, you can effectively mark the spot on the glass surface with precision and confidence, laying the groundwork for a successful drilling process. The attention to detail in this initial phase sets the stage for the subsequent steps, ensuring that the hole is positioned exactly where it is needed, without compromising the integrity of the glass.
Step 2: Preparing the Glass
Preparing the glass surface before drilling is a critical step that contributes to the overall success of the drilling process. Proper preparation not only ensures the structural integrity of the glass but also minimizes the risk of chipping, cracking, or shattering during drilling. Here's a detailed guide on how to prepare the glass effectively:
2.1 Cleaning the Glass Surface
Begin by thoroughly cleaning the area of the glass surface where the hole will be drilled. Use a gentle glass cleaner or a solution of mild dish soap and water to remove any dirt, dust, or debris that may compromise the drilling process. Ensure that the surface is completely dry before proceeding to the next step, as moisture can affect the adhesion of the masking tape and the performance of the drill bit.
Read more: How To Drill Hole In Stainless Steel Sink
2.2 Securing the Glass
Stabilize the glass by placing it on a flat and level surface, ensuring that it is securely positioned to prevent movement or slippage during drilling. If working with a larger glass pane or sheet, consider using clamps or a non-slip mat to secure it in place. This step is crucial for maintaining stability and minimizing the risk of the glass shifting during the drilling process.
2.3 Applying Masking Tape
Once the glass surface is clean and dry, carefully apply additional layers of masking tape over the marked spot where the hole will be drilled. The tape acts as a protective barrier, reducing the likelihood of the drill bit skidding or slipping across the glass surface. It also helps to minimize chipping and provides a visible guide for precise drilling.
2.4 Lubricating the Drilling Area
Apply a small amount of lubricant or coolant specifically designed for glass drilling to the marked spot on the glass surface. This lubrication serves to reduce friction and heat buildup during the drilling process, safeguarding the integrity of the glass and prolonging the sharpness of the drill bit. Ensure that the lubricant is evenly distributed over the drilling area for optimal effectiveness.
2.5 Double-Checking the Setup
Before proceeding to the drilling phase, perform a final inspection of the prepared glass surface. Verify that the glass is securely stabilized, the masking tape is firmly adhered, and the lubricant is applied evenly. This comprehensive check ensures that the glass is primed for the drilling process, setting the stage for a controlled and successful outcome.
By meticulously preparing the glass surface using these essential steps, you can create an optimal environment for the drilling process, minimizing the risk of damage and maximizing precision. The attention to detail in this phase sets the foundation for the subsequent drilling steps, ensuring a smooth and controlled experience from start to finish.
Read more: How To Drill Into Glass
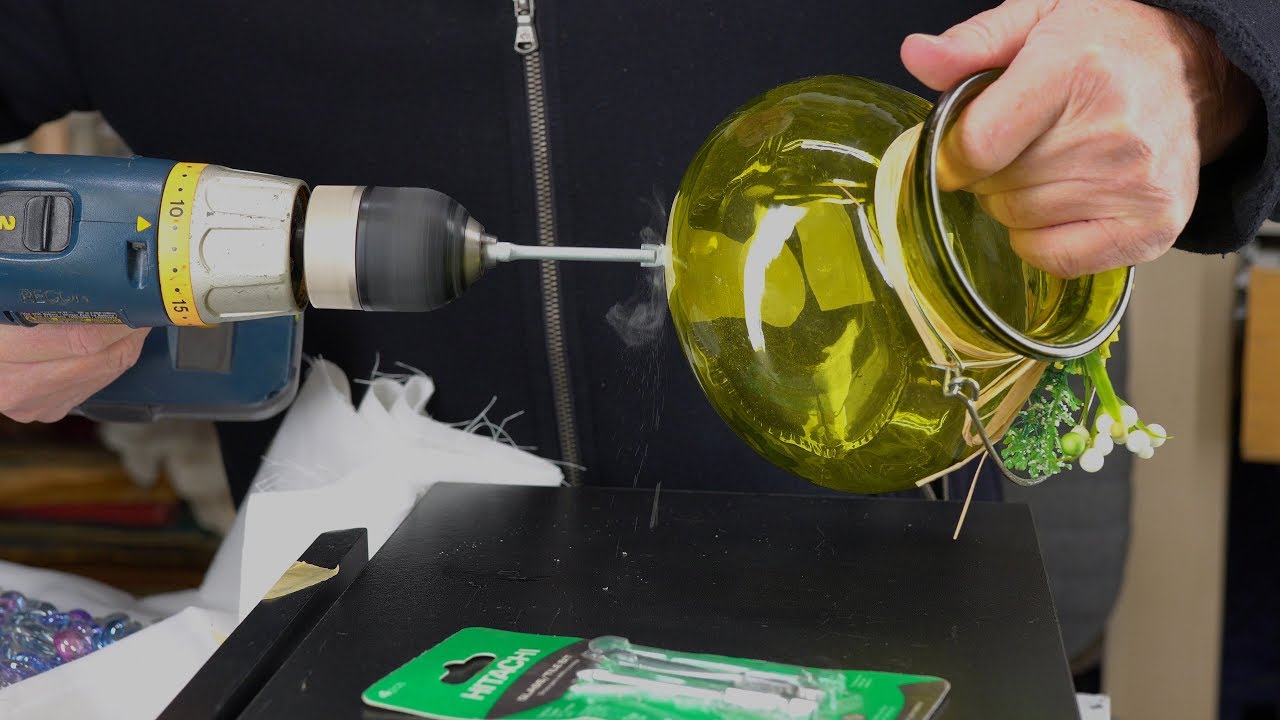
Step 3: Drilling the Hole
With the glass surface meticulously prepared and the drilling spot clearly marked, it's time to embark on the pivotal phase of drilling the hole. This step demands precision, patience, and a steady hand to ensure a clean and accurate outcome. Here's a detailed guide on how to execute the drilling process with finesse and control:
3.1 Setting Up the Power Drill
Before initiating the drilling process, ensure that the power drill is securely held with a firm grip. If using a corded drill, confirm that the power cord is positioned to allow unrestricted movement during drilling. Adjust the drill to the recommended speed setting for glass drilling, typically a low to medium speed to maintain control and minimize heat buildup.
3.2 Positioning the Glass
Carefully position the drill bit at the center of the marked spot on the glass surface. Maintain a steady hand and align the drill perpendicular to the glass to prevent angular drilling, which can lead to uneven hole formation or potential damage to the glass. Exercise caution and focus on maintaining a stable and controlled posture before initiating the drilling process.
3.3 Commencing the Drilling Process
With the drill bit positioned at the marked spot, initiate the drilling process with a gentle and consistent pressure. Avoid exerting excessive force, as this can lead to the glass fracturing unexpectedly. Allow the drill bit to penetrate the glass gradually, guiding it with a steady hand and maintaining a controlled drilling speed. The lubricant or coolant applied to the drilling area serves to reduce friction and heat, ensuring a smooth and controlled drilling experience.
Read more: How To Drill Holes In A Car With Hand Tools
3.4 Monitoring the Progress
As the drill bit penetrates the glass, maintain a vigilant eye on the drilling progress. Ensure that the drill remains perpendicular to the glass surface and that the pressure applied is consistent and controlled. Periodically pause the drilling process to allow the lubricant or coolant to effectively dissipate heat and maintain a cool temperature on the glass surface and the drill bit.
3.5 Completing the Drilling Process
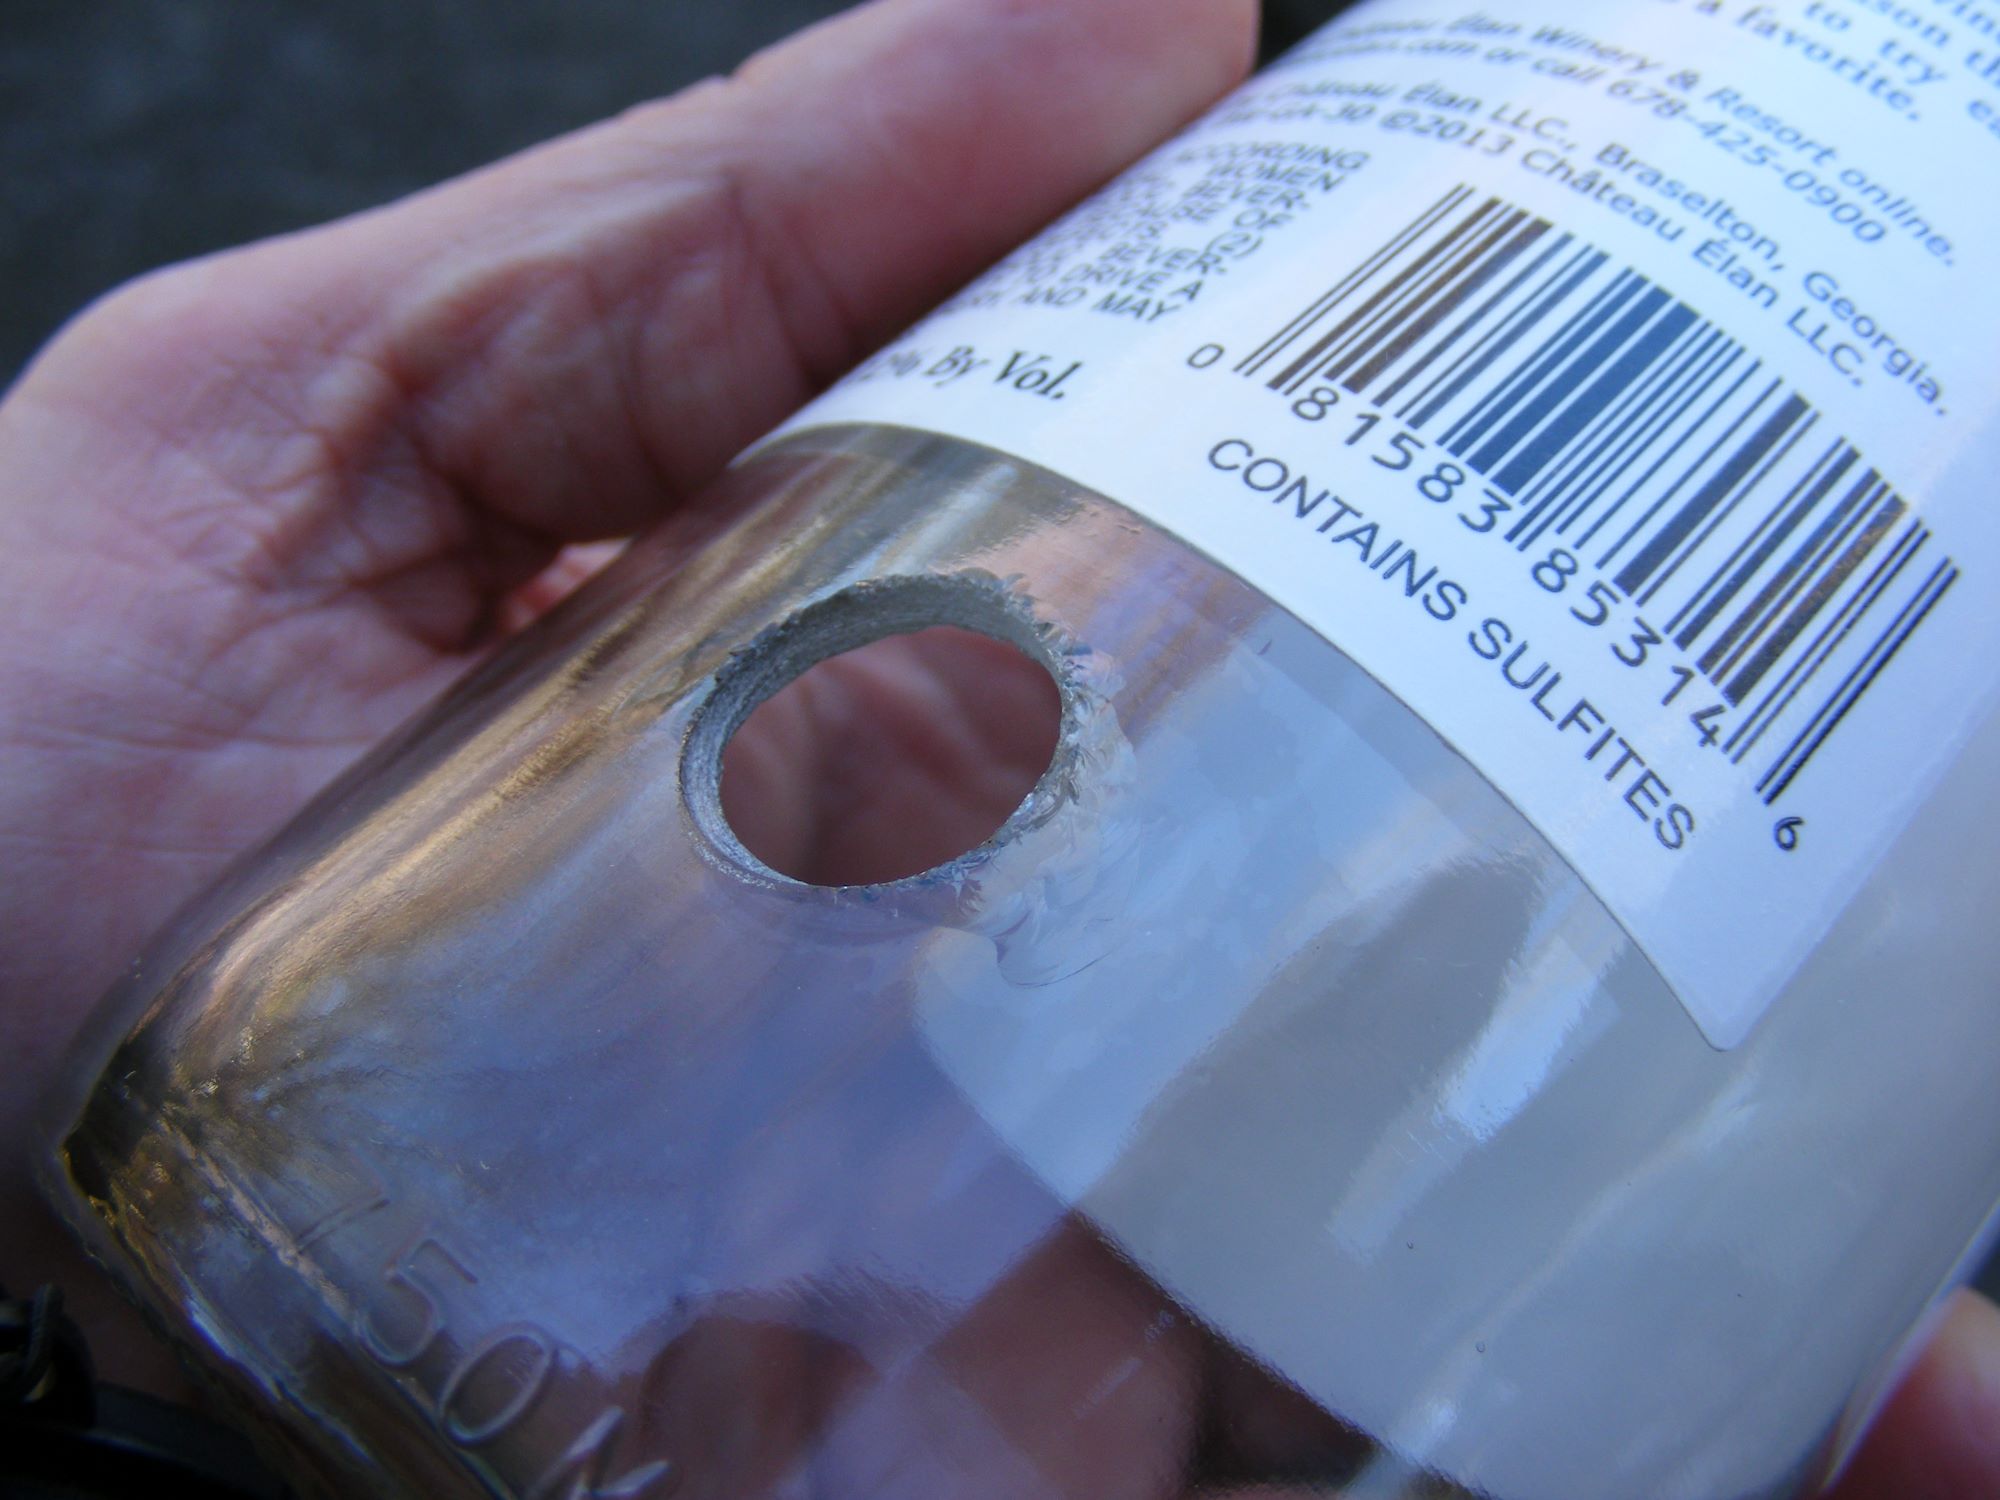
Continue drilling until the drill bit successfully penetrates through the glass, creating a clean and precise hole. Once the hole is formed, gradually withdraw the drill bit from the glass surface while maintaining a steady hand and controlled movement. Take care to avoid sudden jerking or lateral movements that may compromise the integrity of the hole or the surrounding glass area.
By meticulously following these steps, you can execute the drilling process with precision and finesse, creating a clean and accurate hole in the glass surface. The attention to detail and controlled approach throughout the drilling phase ensures a successful outcome, setting the stage for the final step of applying the finishing touches to the drilled hole.
Step 4: Finishing Touches
After successfully drilling the hole in the glass, the final step involves applying meticulous finishing touches to ensure the integrity and aesthetic appeal of the drilled area. This phase is essential for refining the edges of the hole, removing any residual debris, and safeguarding the glass against potential damage. Here's a detailed guide on how to complete the finishing touches with precision and care:
4.1 Removing Masking Tape
Carefully peel away the layers of masking tape from the surrounding area of the drilled hole. Take care to avoid sudden movements that may cause the tape to tear or leave adhesive residue on the glass surface. The removal of the masking tape reveals the freshly drilled hole and prepares the area for the subsequent refinements.
Read more: How To Hang Drapes Without Drilling Holes
4.2 Smoothing the Edges
Using a fine-grit sandpaper or a specialized glass file, gently smooth the edges of the drilled hole to remove any sharp or uneven surfaces. This step is crucial for ensuring the safety of the drilled area, as well as facilitating the insertion of fixtures or accessories into the hole without risk of damage. Exercise caution and maintain a gentle, consistent motion to achieve a smooth and uniform edge.
4.3 Cleaning the Drilled Area
Thoroughly clean the drilled area using a gentle glass cleaner or a solution of mild dish soap and water. This step removes any residual lubricant or coolant, as well as any debris generated during the drilling process. Ensure that the cleaned area is completely dry before proceeding to the final step of inspecting the drilled hole.
4.4 Inspecting the Drilled Hole
Conduct a meticulous inspection of the drilled hole, examining its edges and overall condition. Verify that the hole is clean, smooth, and free from any irregularities that may compromise its functionality or aesthetic appeal. This comprehensive inspection ensures that the drilled hole meets the desired standards of precision and quality.
4.5 Applying a Sealant (Optional)
For certain projects or applications, applying a specialized glass sealant around the edges of the drilled hole may be beneficial. This sealant provides an added layer of protection and stability, particularly in scenarios where the glass will be exposed to moisture or environmental elements. If deemed necessary, carefully apply the sealant according to the manufacturer's instructions, ensuring a uniform and secure application.
By meticulously completing these finishing touches, you can elevate the quality and functionality of the drilled hole, ensuring that it meets the highest standards of precision and safety. The attention to detail in this final phase of the drilling process culminates in a clean, refined, and professionally finished hole, ready to fulfill its intended purpose with confidence and durability.
Conclusion
In conclusion, mastering the art of drilling a hole in glass opens up a world of creative possibilities while requiring meticulous attention to detail and adherence to safety protocols. The process begins with marking the spot with precision, ensuring that the hole is positioned exactly where it is needed. This is followed by meticulous preparation of the glass surface, including cleaning, securing, and applying masking tape and lubricant to minimize the risk of damage during drilling.
The drilling phase demands patience, control, and a steady hand to guide the drill bit through the glass surface, ensuring a clean and accurate hole without compromising the structural integrity of the glass. The final step involves applying meticulous finishing touches, including smoothing the edges, cleaning the drilled area, and inspecting the hole to ensure it meets the desired standards of precision and quality.
Throughout the entire process, safety precautions play a pivotal role in safeguarding against potential hazards and ensuring a secure and incident-free drilling experience. Equipping oneself with the appropriate protective gear, stabilizing the glass, and using the correct tools and materials are essential elements for a successful outcome.
By following the comprehensive guide outlined in this article, individuals can confidently undertake the task of drilling a hole in glass, whether for DIY projects, artistic endeavors, or practical installations. The combination of precision, patience, and meticulous attention to detail ensures that the drilled hole meets the highest standards of functionality, safety, and aesthetic appeal.
Ultimately, mastering the art of drilling through glass empowers individuals to unleash their creativity and bring their unique visions to life. Whether it's crafting custom art pieces, installing fixtures, or repurposing glass items, the ability to drill through glass with precision opens up a world of possibilities for DIY enthusiasts, artists, and creative minds alike.
With the knowledge and skills gained from this comprehensive guide, individuals can embark on their glass drilling endeavors with confidence, knowing that they have the expertise to achieve clean, precise, and professional results while upholding the safety and integrity of the glass.
Frequently Asked Questions about How To Drill A Hole In Glass
Was this page helpful?
At Storables.com, we guarantee accurate and reliable information. Our content, validated by Expert Board Contributors, is crafted following stringent Editorial Policies. We're committed to providing you with well-researched, expert-backed insights for all your informational needs.


0 thoughts on “How To Drill A Hole In Glass”