Home>Furniture & Design>Interior Design Trends>How To Make Etched Glass Stand Out
Interior Design Trends
How To Make Etched Glass Stand Out
Modified: October 20, 2024
Learn how to make etched glass stand out in your interior design with the latest trends. Elevate your space with these interior design tips.
(Many of the links in this article redirect to a specific reviewed product. Your purchase of these products through affiliate links helps to generate commission for Storables.com, at no extra cost. Learn more)
Introduction
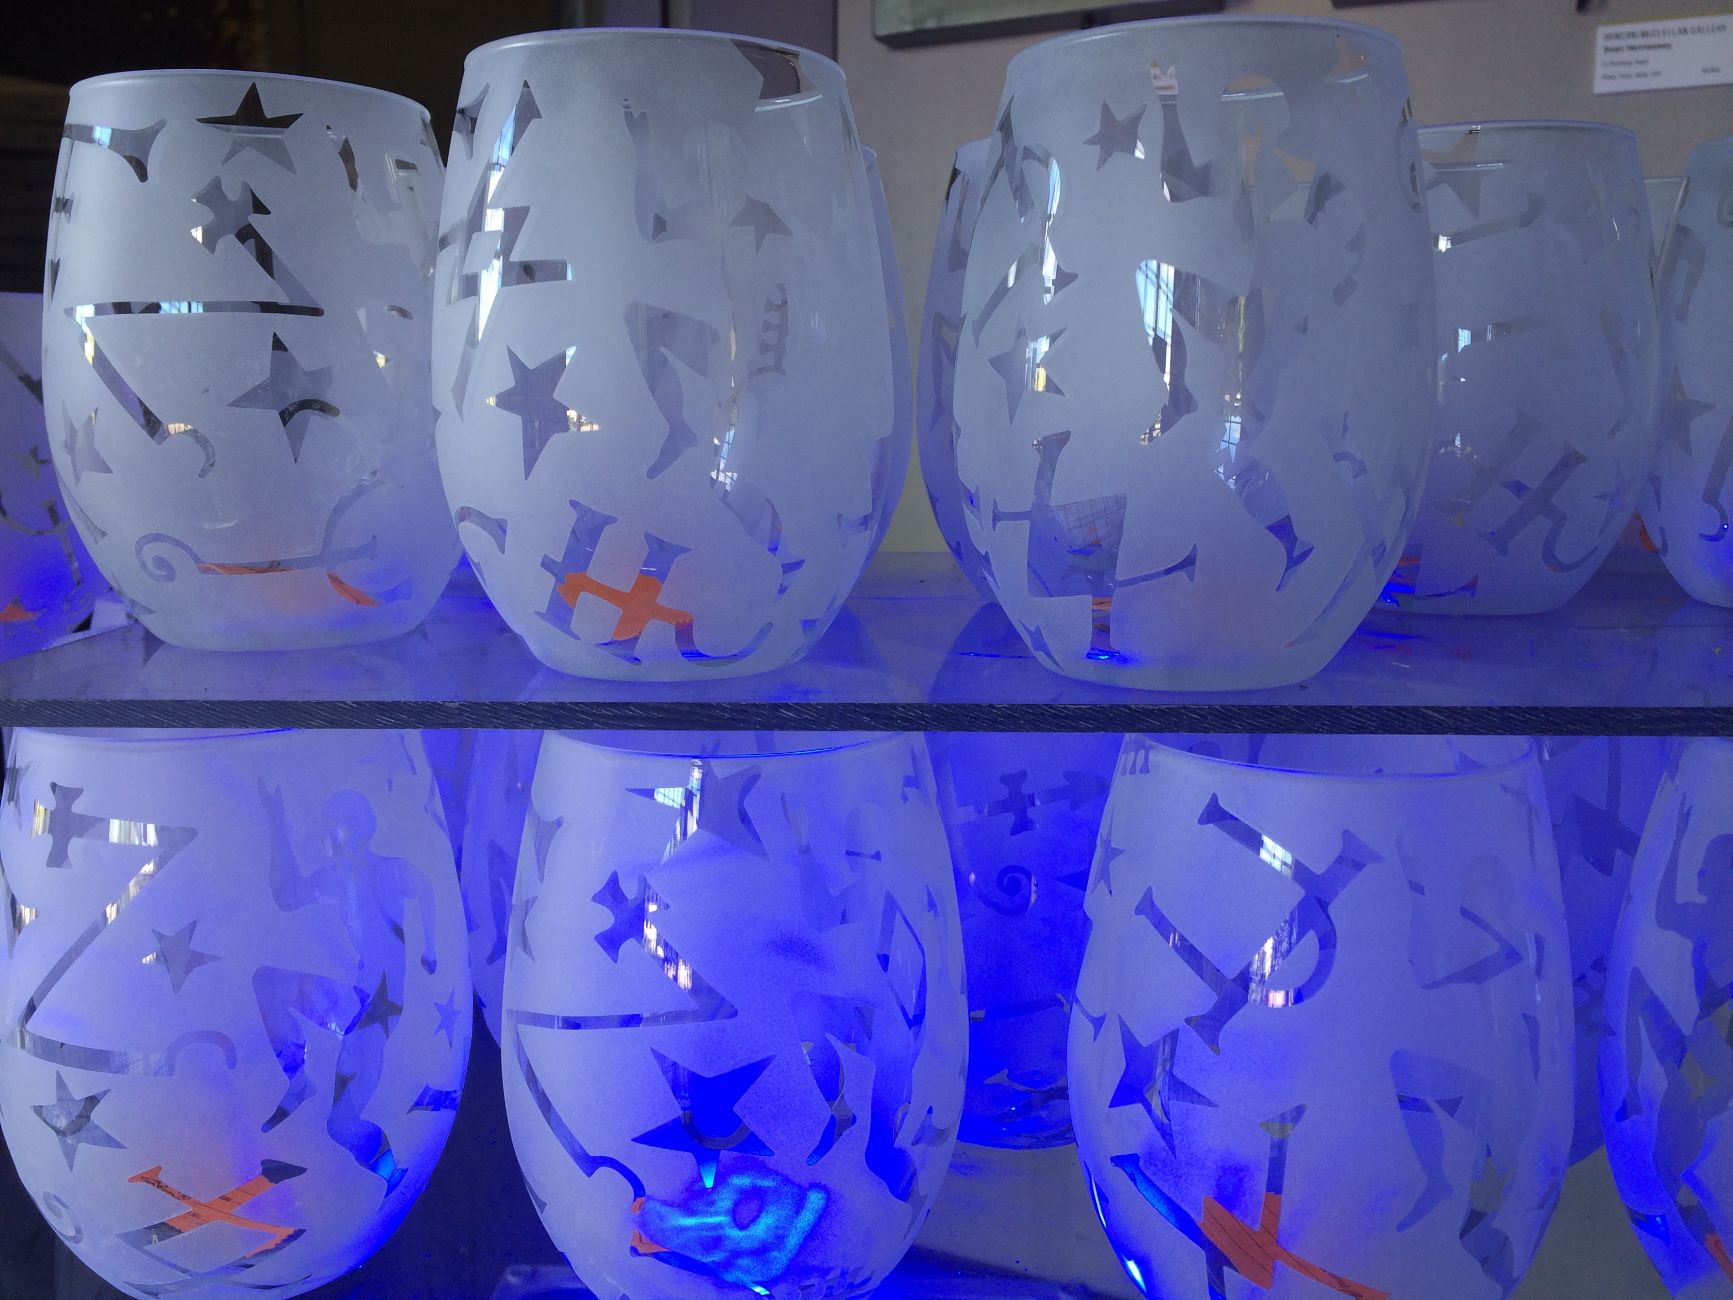
Etched glass is a timeless and elegant addition to any interior space. Whether adorning windows, doors, or decorative accents, etched glass can transform a mundane surface into a stunning work of art. The process of etching glass involves creating intricate designs by removing minute amounts of the glass surface, resulting in a frosted, translucent effect that exudes sophistication and charm.
In this comprehensive guide, we will delve into the art of etching glass, exploring the various steps involved in creating a captivating etched glass masterpiece. From selecting the right type of glass to applying the etching cream and adding the finishing touches, we will walk you through each stage of the process, providing valuable insights and expert tips along the way.
Whether you are a seasoned DIY enthusiast or a novice looking to embark on your first etching project, this guide is designed to equip you with the knowledge and inspiration needed to make your etched glass stand out. So, roll up your sleeves, unleash your creativity, and let's embark on this enchanting journey into the world of etched glass artistry.
Key Takeaways:
- Etched glass artistry begins with selecting the right glass, considering texture, thickness, and transparency. This sets the stage for creating captivating designs that stand out with sophistication and charm.
- The art of etching glass involves meticulous preparation, precise application of etching cream, and thoughtful finishing touches. Each step contributes to transforming glass into stunning, visually striking works of art.
Read more: How To Fix Etched Glass
Choosing the Right Glass
Selecting the appropriate type of glass is a crucial first step in the process of creating stunning etched glass designs. The characteristics of the glass, such as its texture, thickness, and transparency, play a pivotal role in determining the final outcome of the etching. Here's a detailed look at the key considerations when choosing the right glass for your etching project:
Glass Texture
The texture of the glass surface significantly influences the appearance of the etched design. Smooth glass surfaces are ideal for intricate, detailed designs, as the etching process yields crisp, precise results. On the other hand, textured or frosted glass can add depth and dimension to the etched design, creating a captivating interplay of light and shadow.
Glass Thickness
The thickness of the glass impacts the depth and durability of the etched design. Thicker glass allows for deeper etching, resulting in a more pronounced frosted effect. Additionally, thicker glass tends to be sturdier, making it suitable for applications where durability is a priority, such as glass doors or tabletops.
Transparency
Consider the level of transparency required for your project. Transparent glass is well-suited for designs that aim to maintain visibility through the etched areas, such as decorative windows or glass partitions. Alternatively, translucent or opaque glass can be used to create more private or obscured designs, adding an element of mystery and intrigue to the etched artwork.
Read more: How To Make A TV Stand Out Of Wood Pallets
Safety Glass
For functional applications, such as glass doors or panels, safety glass should be prioritized. Tempered or laminated glass is designed to enhance safety by minimizing the risk of breakage and reducing the potential for injury in the event of breakage. When etching safety glass, ensure that the chosen etching method and materials are compatible with the glass's safety features.
By carefully considering these factors and selecting the most suitable type of glass for your specific project, you can lay a solid foundation for the successful creation of captivating etched glass designs. The right glass sets the stage for the artistic expression that will unfold through the etching process, ultimately elevating the visual impact of the finished masterpiece.
Designing Your Etching
Designing the etching is a pivotal stage in the process, where creativity takes center stage, and the vision for the final artwork begins to take shape. Whether you are crafting a custom design or utilizing pre-made stencils, thoughtful planning and attention to detail are essential for achieving a captivating and visually striking etched glass piece.
Custom Designs
For those seeking a truly unique and personalized touch, creating a custom design offers boundless creative opportunities. Sketching the design on paper or using digital design software allows for precise visualization and refinement of the artwork. Consider elements such as intricate patterns, nature-inspired motifs, or personalized monograms to infuse the design with individuality and meaning.
Pre-Made Stencils
Alternatively, utilizing pre-made stencils can streamline the design process while still offering a diverse array of patterns and motifs. Stencils are available in an extensive range of themes, from classic floral patterns to contemporary geometric shapes, catering to various design preferences. Selecting the right stencil that resonates with the intended aesthetic can significantly simplify the design phase while ensuring professional-looking results.
Read more: How Do You Etch Glass
Composition and Placement
Regardless of the design approach chosen, careful consideration should be given to the composition and placement of the etched elements. Balancing negative space with intricate details can create a visually dynamic composition, while strategic placement of the design within the glass surface can enhance its overall impact. Whether aiming for a focal point or an all-over pattern, thoughtful composition elevates the aesthetic appeal of the etched glass artwork.
Reflecting Personal Style
Infusing the design with personal style and thematic relevance can imbue the etched glass with a sense of individuality and character. Drawing inspiration from personal interests, cultural influences, or architectural motifs can add depth and meaning to the design, transforming it into a captivating expression of artistic vision and personal narrative.
Iterative Refinement
Throughout the design process, embracing iterative refinement is key to achieving a design that resonates with the intended aesthetic and visual impact. Experimenting with different design elements, seeking feedback, and making adjustments as needed allows for the evolution of the design towards its full potential, ensuring that the final etched glass artwork is a true reflection of creative vision and artistic excellence.
By approaching the design phase with creativity, precision, and a keen eye for detail, the etching process unfolds as a captivating journey of artistic expression, culminating in a visually stunning and emotionally resonant piece of etched glass art.
Preparing the Glass Surface
Before embarking on the etching process, meticulous preparation of the glass surface is essential to ensure optimal adhesion of the etching cream and the successful realization of the intended design. The following steps outline the crucial preparatory measures for achieving a pristine and receptive glass surface:
-
Cleaning the Glass: Commence the preparation by thoroughly cleaning the glass surface with a gentle glass cleaner or a solution of mild dish soap and water. This step removes any dust, dirt, or residues that may hinder the etching process. Ensure that the glass is completely free of smudges, fingerprints, and other impurities that could compromise the quality of the etched design.
-
Degreasing the Surface: After cleaning, it is imperative to degrease the glass to eliminate any traces of oils or contaminants. Isopropyl alcohol or a specialized glass degreaser can be used to effectively remove stubborn grease and ensure a pristine, oil-free surface. This step is crucial for promoting strong adhesion of the etching cream and preventing potential imperfections in the final etched design.
-
Masking Off Areas: If the design requires specific areas of the glass to remain untouched by the etching cream, such as borders or defined shapes, applying masking tape or vinyl stencils to protect these areas is essential. Carefully outline and cover the designated areas to create a barrier that safeguards them from the etching process, ensuring precise and controlled results.
-
Ensuring Dryness: Once the glass has been cleaned, degreased, and masked as necessary, it is imperative to ensure that the surface is completely dry before proceeding with the application of the etching cream. Any residual moisture can interfere with the etching process and compromise the quality of the design. Allow the glass to air dry or use a lint-free cloth to remove any remaining moisture.
By meticulously preparing the glass surface through thorough cleaning, degreasing, and precise masking, you establish the ideal foundation for the successful execution of the etching process. This meticulous preparation sets the stage for the seamless application of the etching cream and the precise realization of the envisioned design, ensuring that the final etched glass artwork exudes impeccable craftsmanship and visual allure.
Read more: How To Remove Etching From Glass
Applying the Etching Cream
Once the glass surface is meticulously prepared, the application of the etching cream marks a pivotal stage in the transformation of the glass into a stunning work of art. Etching cream, typically composed of acidic compounds such as hydrofluoric acid or ammonium bifluoride, facilitates the controlled removal of minute amounts of glass, resulting in the desired frosted effect. Here's a detailed exploration of the process of applying the etching cream to achieve captivating etched glass designs:
Protective Measures
Before commencing the application of the etching cream, it is imperative to prioritize safety by donning protective gear, including gloves and safety goggles. Etching cream contains potent acidic compounds that can cause skin irritation and eye damage upon contact. By taking proactive measures to safeguard against direct exposure, you ensure a safe and secure working environment for the etching process.
Even Application
Using a soft bristle brush or a foam brush, apply a generous and even layer of the etching cream onto the designated areas of the glass surface. The thickness of the applied layer influences the depth and intensity of the etched effect, with thicker layers resulting in more pronounced frosted areas. Ensure that the etching cream covers the entire design area uniformly, avoiding uneven application that may lead to inconsistent etching results.
Time and Patience
The duration for which the etching cream is left on the glass surface significantly impacts the depth and clarity of the etched design. Refer to the manufacturer's instructions to determine the recommended etching time based on the type of etching cream used and the desired level of frosted effect. Exercise patience and vigilance during this phase, periodically inspecting the glass to monitor the progression of the etching process.
Read more: How To Use Rub ‘n Buff On Etched Glass
Rinse and Removal
Once the designated etching duration has elapsed, carefully rinse the glass under running water to remove the etching cream. Thoroughly wash the glass to ensure complete removal of the cream, and then remove the masking tape or stencils to reveal the intricately etched design. As the glass dries, the frosted areas become more pronounced, unveiling the captivating beauty of the etched artwork.
Post-Etching Care
After the etching process is complete, it is essential to clean the glass once again to remove any residual traces of the etching cream. Utilize a glass cleaner or a mild dish soap and water solution to ensure that the glass surface is pristine and free from any remnants of the etching compound. This final cleaning step enhances the clarity and brilliance of the etched design, allowing it to shine with captivating allure.
By meticulously following these steps and exercising precision and care throughout the application of the etching cream, you pave the way for the successful realization of a visually stunning and intricately etched glass masterpiece. The application of the etching cream marks a transformative phase where the design vision comes to life, culminating in a work of art that exudes timeless elegance and enchanting allure.
Removing the Etching Cream
After the designated etching duration has elapsed, the meticulous removal of the etching cream is a critical step in the process of creating captivating etched glass designs. This phase marks the transition from the application of the acidic compound to the revelation of the intricately frosted design, requiring precision and care to ensure the optimal outcome.
-
Rinsing the Glass:
Begin by carefully rinsing the glass under running water, allowing the water to flow over the entire surface to effectively remove the etching cream. The gentle force of the water stream aids in dislodging the cream from the glass, facilitating its thorough removal. Ensure that all areas of the glass, including intricate design elements and edges, are meticulously rinsed to eliminate any residual cream. -
Thorough Washing:
Following the initial rinsing, proceed to thoroughly wash the glass with a mild dish soap and water solution. Using a soft sponge or cloth, gently cleanse the glass surface, paying particular attention to the etched areas. This step serves to eradicate any lingering traces of the etching cream, promoting the clarity and brilliance of the frosted design. -
Revealing the Etched Design:
As the glass is cleansed and dried, the intricately etched design begins to emerge with captivating clarity. The frosted areas, once concealed beneath the application of the etching cream, now stand out with exquisite allure, showcasing the meticulous craftsmanship and artistic vision that have been brought to life through the etching process. -
Inspecting the Results:
Upon the complete removal of the etching cream and the unveiling of the etched design, take a moment to inspect the glass surface. Ensure that the frosted areas exhibit the desired depth and clarity, and that the overall design reflects the envisioned aesthetic. Any residual traces of the etching cream should be promptly addressed to uphold the pristine quality of the etched glass artwork. -
Final Cleaning and Drying:
Conclude the removal process by performing a final cleaning of the glass surface. Utilize a gentle glass cleaner or a fresh dish soap and water solution to eliminate any remaining residues and enhance the brilliance of the etched design. Once cleansed, allow the glass to air dry or use a lint-free cloth to gently dry the surface, revealing the captivating beauty of the completed etched glass artwork.
By meticulously adhering to these steps and exercising precision and diligence in removing the etching cream, you ensure that the final etched glass masterpiece exudes impeccable craftsmanship and visual allure. The removal of the etching cream marks a transformative phase in the etching process, where the intricate design is unveiled in all its captivating splendor, ready to adorn and enchant its intended space.
Finishing Touches
After the meticulous execution of the etching process, the application of finishing touches serves as the final flourish, elevating the etched glass artwork to a state of captivating allure and polished refinement. These concluding steps are essential for enhancing the visual impact, durability, and overall aesthetic appeal of the etched glass masterpiece. Here's a detailed exploration of the pivotal finishing touches that culminate in the transformation of the etched glass into a stunning work of art:
Read more: How To Make Cookies Without A Mixer
Sealing and Protection
Applying a protective sealant to the etched glass surface serves as a safeguard against environmental elements and daily wear, ensuring the longevity and resilience of the artwork. A specialized glass sealant or clear varnish can be carefully applied to the etched areas, forming a protective barrier that shields the design from potential damage and preserves its pristine beauty over time.
Frame and Mounting
For etched glass pieces intended for display, framing and mounting play a crucial role in enhancing their visual impact and facilitating their integration into the surrounding space. Selecting an elegant frame that complements the design aesthetic and securely mounting the glass within it elevates the artwork to a focal point of aesthetic admiration, accentuating its captivating allure.
Lighting Enhancement
Strategic lighting can accentuate the intricate details and frosted effects of the etched glass, infusing the artwork with a mesmerizing luminous quality. Positioning ambient or accent lighting to illuminate the etched glass from behind or above creates a captivating interplay of light and shadow, accentuating the design's depth and allure.
Maintenance Guidelines
Providing clear maintenance guidelines to the recipients of the etched glass artwork ensures that its beauty endures for years to come. Offering insights on gentle cleaning methods, recommended cleaning agents, and precautions to preserve the integrity of the etched design empowers the owners to uphold the artwork's pristine allure and visual brilliance.
Read more: How To Keep Dust Off Glass TV Stand
Artistic Presentation
Presenting the completed etched glass artwork with artistic flair and attention to detail enhances its overall impact. Whether unveiling it as a gift or showcasing it within a space, thoughtful presentation, such as incorporating decorative accents or personalized touches, adds an extra layer of significance and appreciation to the etched glass masterpiece.
By meticulously attending to these finishing touches, the etched glass artwork transcends from a mere creation to a captivating masterpiece that exudes timeless elegance and enchanting allure. Each detail contributes to the overall impact and longevity of the artwork, ensuring that it stands as a testament to the meticulous craftsmanship and artistic vision that have been brought to life through the transformative art of glass etching.
Conclusion
In conclusion, the art of etching glass is a captivating journey of creativity, precision, and artistic expression. From the careful selection of the right glass to the meticulous application of the etching cream and the final embellishments, each stage of the process contributes to the transformation of glass into a stunning work of art. The allure of etched glass lies not only in its visual appeal but also in the intricate craftsmanship and personal narrative that it embodies.
The journey begins with the thoughtful selection of the appropriate type of glass, considering factors such as texture, thickness, and transparency. This foundational step sets the stage for the successful realization of the etched design, ensuring that the glass surface serves as a receptive canvas for artistic expression.
The design phase unfolds as a canvas for boundless creativity, whether through the creation of custom designs or the utilization of pre-made stencils. Infusing the design with personal style, thematic relevance, and meticulous attention to composition and placement elevates the etched glass artwork to a realm of individuality and visual allure.
Meticulous preparation of the glass surface, including thorough cleaning, degreasing, and precise masking, ensures that the glass is primed for the seamless application of the etching cream. The application of the etching cream marks a transformative phase where the design vision comes to life, culminating in a visually stunning and emotionally resonant piece of etched glass art.
The meticulous removal of the etching cream and the application of finishing touches serve as the final acts in the creation of a captivating etched glass masterpiece. From protective sealing and framing to lighting enhancement and maintenance guidelines, each detail contributes to the enduring allure and visual brilliance of the artwork.
In essence, the art of etching glass transcends mere craftsmanship, evolving into a narrative of creativity, passion, and timeless elegance. Whether adorning windows, doors, or decorative accents, etched glass stands as a testament to the transformative power of artistic expression, captivating and enchanting all who behold its mesmerizing beauty.
Frequently Asked Questions about How To Make Etched Glass Stand Out
Was this page helpful?
At Storables.com, we guarantee accurate and reliable information. Our content, validated by Expert Board Contributors, is crafted following stringent Editorial Policies. We're committed to providing you with well-researched, expert-backed insights for all your informational needs.


0 thoughts on “How To Make Etched Glass Stand Out”