Home>Furniture>Bedroom Furniture>How To Make A Floating Bed Frame
Bedroom Furniture
How To Make A Floating Bed Frame
Modified: February 25, 2024
Learn how to make a stylish and functional floating bed frame for your bedroom. Upgrade your bedroom furniture with this DIY project.
(Many of the links in this article redirect to a specific reviewed product. Your purchase of these products through affiliate links helps to generate commission for Storables.com, at no extra cost. Learn more)
Introduction
When it comes to bedroom furniture, a truly eye-catching and unique addition is a floating bed frame. This innovative design gives the illusion of a bed suspended in mid-air, creating a modern and stylish centerpiece for your bedroom. Not only does a floating bed frame add a touch of elegance, but it also provides a sense of spaciousness to the room.
If you’re wondering how to make a floating bed frame, you’ve come to the right place. In this article, we will guide you through the step-by-step process of creating your own floating bed frame, allowing you to enjoy a truly extraordinary sleeping experience. So let’s gather our materials and tools and get started!
Key Takeaways:
- Create a captivating and modern bedroom centerpiece by building your own floating bed frame. Enjoy a sense of spaciousness and elegance while adding a touch of magic to your sleeping space.
- Tailor your floating bed frame to your exact specifications and style preferences. Embrace creativity, personalize the design, and enjoy the unique and stunning focal point it brings to your bedroom.
Read more: How To Make A Floor Bed Frame
Materials and Tools
Before diving into the construction process, it’s important to gather all the necessary materials and tools for building your floating bed frame. Here’s a list of what you’ll need:
- 2×6 or 2×8 lumber – This will serve as the main frame of the bed.
- Plywood or MDF board – You’ll need this for the mattress support and slats.
- L-brackets – These will help secure the frame pieces together.
- Screws and wood glue – For attaching and reinforcing the frame.
- Metal brackets – Required for the floating mechanism.
- Chains or cables – To create the floating effect.
- Drill with assorted drill bits.
- Saw – Circular saw or miter saw for cutting the lumber.
- Tape measure – Essential for accurate measurements.
- Sandpaper – Smoothing rough edges.
- Paint or stain – For finishing the bed frame.
It’s worth noting that the exact quantity and size of materials may vary depending on the dimensions of your bed frame and personal preferences. Ensure that you choose sturdy materials that can support the weight of the mattress and occupants.
Having the right tools is equally important. The drill will be used for creating holes and attaching the frame pieces, while the saw will come in handy for cutting the lumber to size. Sandpaper will help achieve a smooth finish, and paint or stain can be applied to match your bedroom decor.
Step 1: Measure and Cut the Frame Pieces
The first step in building a floating bed frame is to measure and cut the frame pieces. Start by determining the desired dimensions for your bed. Measure the length and width of your mattress, keeping in mind any additional space you want to allocate for the frame.
Once you have your measurements, mark the lumber accordingly and use a saw to cut the pieces to size. You will need two longer pieces for the sides of the frame and two shorter pieces for the headboard and footboard. Make sure to cut the ends at a 90-degree angle for a clean fit.
After cutting the frame pieces, use sandpaper to smooth any rough edges or splinters. This step will not only help avoid any potential injuries but also ensure a professional-looking finish.
Remember to double-check your measurements before cutting the lumber to ensure accuracy. Taking the time to measure and cut the frame pieces correctly will contribute to the stability and structural integrity of your floating bed frame.
Step 2: Assemble the Frame
With the frame pieces cut and smoothed, it’s time to assemble the bed frame. Lay out the pieces on a flat surface, arranging them according to their intended positions: the two longer pieces for the sides and the two shorter pieces for the headboard and footboard.
To ensure a sturdy construction, it’s best to reinforce the joints with L-brackets. Align the pieces at the corners and use a drill to attach the brackets with screws. Make sure to pre-drill holes to prevent the wood from splitting. Apply wood glue between the joints before securing them with the brackets for added strength.
Continue the assembly process by attaching the headboard and footboard to the side pieces. Again, use L-brackets and screws to secure the joints. Check for squareness and adjust if necessary to ensure the frame is aligned properly.
Once the frame is fully assembled, perform a thorough inspection to ensure all the joints are secure and the frame is square. Making any necessary adjustments at this stage will prevent issues further along in the construction process.
With the frame assembled, your floating bed is starting to take shape. It’s time to move on to the next step: attaching the support beams.
Step 3: Attach the Support Beams
Now that the frame is securely assembled, it’s time to add the support beams that will bear the weight of the mattress and sleepers. These beams will run horizontally across the frame and provide additional stability.
First, measure the distance between the side pieces of the frame to determine the length of the support beams. Cut the beams to size using a saw, ensuring they fit snugly across the frame without any overhang.
Next, position the support beams evenly along the length of the frame with equal spacing. Use a tape measure to ensure accuracy, and mark the positions for attaching the beams. Pre-drill holes on both the frame and the beams, and then secure them together using screws.
It’s important to attach the support beams securely to ensure the stability of the floating bed frame. Reinforce the joints by adding L-brackets or additional screws if desired.
Check the frame for any wobbling or instability after attaching the support beams. If necessary, adjust the position or tighten the screws to eliminate any movement.
With the support beams in place, your floating bed frame is one step closer to completion. The next step involves preparing the floating mechanism that will give your bed the illusion of being suspended in mid-air.
When building a floating bed frame, make sure to use sturdy and durable materials such as hardwood or metal for the frame to ensure it can support the weight of the mattress and sleepers.
Read more: How To Build Floating Bed
Step 4: Prepare the Floating Mechanism
Creating the floating effect for your bed requires a mechanism that will provide support while giving the illusion that the bed is floating in mid-air. In this step, we’ll guide you through preparing the floating mechanism.
Start by determining the number of chains or cables you’ll need to support the weight of the bed frame and mattress. Consider the size and weight of your bed frame and choose chains or cables that are strong enough to provide adequate support.
Measure and mark the locations on the headboard and footboard where the chains or cables will be attached. Make sure to space them evenly and account for the desired height of the floating bed.
Next, install metal brackets on the marked locations. These brackets will serve as anchor points for the chains or cables. Use a drill and screws to attach the brackets securely to the frame.
Once the brackets are in place, attach the chains or cables to them. Ensure that they are firmly connected and can support the weight of the bed frame and mattress without any risk of breaking or bending.
Prior to moving on to the next step, test the stability of the floating mechanism. Gently apply pressure to ensure that the chains or cables are holding the weight of the bed frame properly and that there are no signs of instability or sagging.
With the floating mechanism ready, your bed frame is starting to exhibit that unique floating effect. Now, it’s time to move on to the next step and install the mechanism in the frame to complete the overall look.
Step 5: Install the Floating Mechanism
Now that you’ve prepared the floating mechanism, it’s time to install it into your bed frame. This step will bring your floating bed to life, creating a visually stunning and captivating centerpiece for your bedroom.
Begin by placing the bed frame in its desired location, making sure there’s enough space for the chains or cables to hang freely without any obstructions. Position the frame securely, ensuring it’s level and stable.
Once the frame is in place, attach the chains or cables to the anchor points on the headboard and footboard. Make sure they are securely fastened, and adjust their length if needed to achieve the desired height and floating effect.
Now, gently lift each side of the bed frame while supporting the weight, allowing the chains or cables to suspend the bed in mid-air. Take caution and ensure that the weight is evenly distributed to prevent any imbalances.
Step back and assess the overall appearance of the floating bed. Make any necessary adjustments to the positioning or height of the chains or cables to achieve the desired floating effect. This step requires a bit of trial and error to find the perfect balance.
Once you’re satisfied with the floating effect, double-check the stability of the bed frame. Ensure that the chains or cables are securely fastened and that there are no signs of sagging or instability. Safety is paramount, so take the time to ensure every aspect is properly set up.
Congratulations! You’ve successfully installed the floating mechanism, turning your bed frame into a captivating floating focal point for your bedroom. Now, it’s time to add the slats and mattress support in the next step to complete your floating bed.
Step 6: Add the Slats and Mattress Support
With the floating mechanism in place, it’s time to add the slats and mattress support to ensure a comfortable and well-supported sleeping surface. The slats will provide a solid foundation for your mattress, distributing weight evenly and promoting airflow.
Start by measuring the distance between the sides of the bed frame to determine the length of the slats. Cut the slats to size from plywood or MDF board using a saw. Aim for approximately 2-3 inches between each slat to ensure proper support.
Once the slats are cut, position them evenly across the frame, ensuring they sit flush and provide complete coverage for the mattress. Start from the head of the bed and work your way towards the foot, aligning each slat with the one next to it.
Secure the slats in place by screwing them into the support beams of the bed frame. Place a screw on each end of the slat, ensuring it goes through the slat and into the support beam securely. This will prevent any shifting or movement of the slats during use.
After attaching all the slats, give them a test by gently applying pressure to ensure they are firmly in place and can support the weight of the mattress. Make any necessary adjustments or add additional screws if needed to ensure stability.
With the slats secured, it’s time to add the mattress onto the bed frame. Place the mattress on top of the slats, ensuring that it fits snugly within the frame and is centered properly.
Take a moment to admire your handiwork. Your floating bed frame is now complete, with the slats and mattress support providing both comfort and stability. Now, you can enjoy the unique floating experience every time you go to sleep or relax in your bedroom.
Step 7: Finishing Touches and Additional Features
Now that your floating bed frame is fully assembled and functioning, it’s time to add some finishing touches and consider any additional features that will enhance the overall look and functionality of your bed.
First, consider applying a finish to the bed frame to protect the wood and enhance its appearance. You can choose to paint the frame in a color that complements your bedroom decor or apply a clear coat to preserve the natural beauty of the wood. Sand any rough areas before applying the finish for a smooth and professional result.
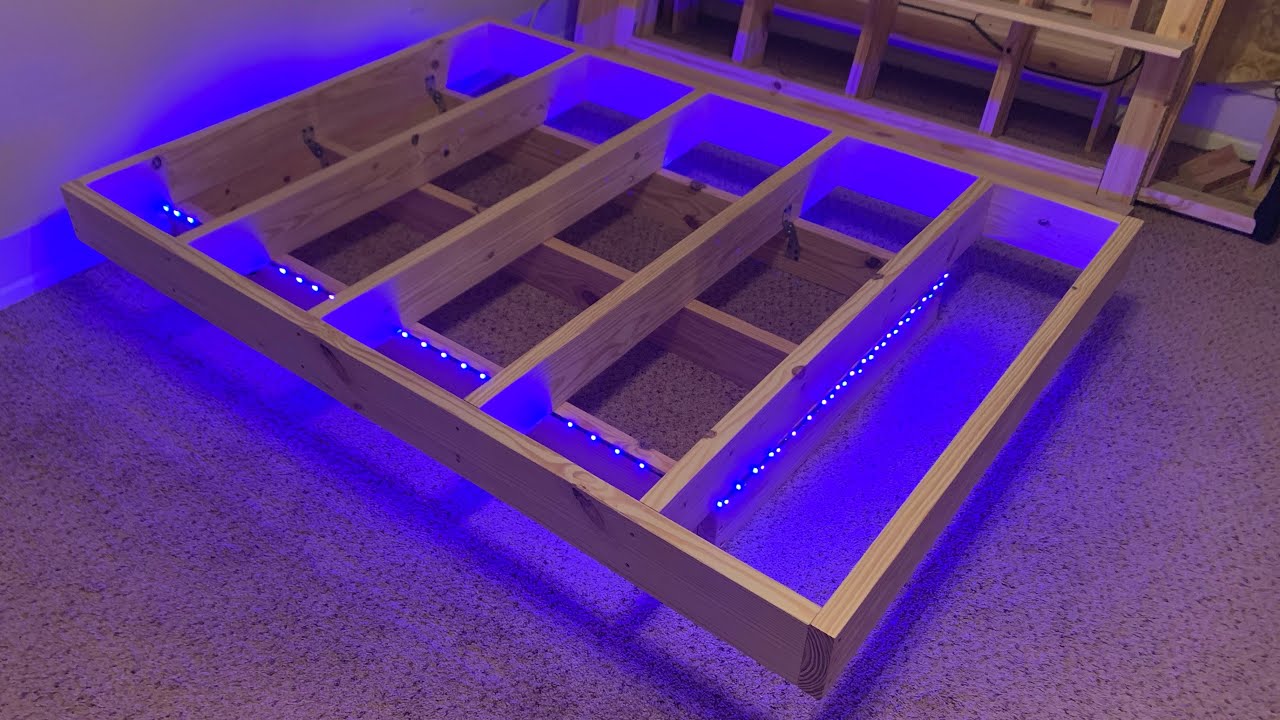
Additionally, you can add decorative elements or accents to further enhance the aesthetics of your floating bed frame. This could include upholstered panels on the headboard and footboard, decorative trim, or even LED lighting strips along the underside of the frame for a modern and stylish touch.
If you’re looking for additional storage space, consider incorporating drawers or shelves into the design of the bed frame. This will provide convenient storage for extra bedding, pillows, or other bedroom essentials, while keeping your space organized and clutter-free.
Don’t forget to test the stability and functionality of any additional features you incorporate into the bed frame. Ensure that drawers slide smoothly, hinges operate properly, and any added elements are securely attached.
Lastly, take the time to step back and admire your finished floating bed frame. It’s not just a piece of furniture, but a stunning and unique centerpiece in your bedroom that’s sure to impress. Enjoy the visual appeal, comfort, and sense of floating that your new bed provides.
Remember, building your own floating bed frame allows you to tailor it to your exact specifications and preferences. So, get creative, personalize it to your style, and enjoy the fruits of your labor!
Read more: How To Build Floating Picture Frames
Conclusion
Building a floating bed frame is a rewarding and creative project that can transform your bedroom into a unique and stylish space. By following the step-by-step guide provided in this article, you can create a stunning floating bed frame that will captivate anyone who enters your room.
Starting with measuring and cutting the frame pieces, assembling the frame, and attaching the support beams, you lay the foundation for a sturdy and stable structure. With the floating mechanism in place, your bed will appear to be floating effortlessly, adding an element of magic to your sleeping space.
By adding the slats and mattress support, you ensure a comfortable and well-supported sleeping surface, while additional finishing touches and features allow you to personalize your floating bed frame to suit your style and needs.
Whether you’re looking to incorporate a modern and unique touch to your bedroom or want to create a statement piece that sparks conversation, a floating bed frame is the perfect choice. Not only does it provide a stunning visual impact, but it also offers a sense of spaciousness and elegance to your bedroom.
So gather your materials and tools, embrace your creativity, and embark on this rewarding DIY project. Soon enough, you’ll have a one-of-a-kind floating bed frame that will make a lasting impression and provide you with a truly extraordinary sleeping experience.
Get ready to sleep in style and enjoy the enchantment of a floating bed!
Frequently Asked Questions about How To Make A Floating Bed Frame
Was this page helpful?
At Storables.com, we guarantee accurate and reliable information. Our content, validated by Expert Board Contributors, is crafted following stringent Editorial Policies. We're committed to providing you with well-researched, expert-backed insights for all your informational needs.


0 thoughts on “How To Make A Floating Bed Frame”