Furniture
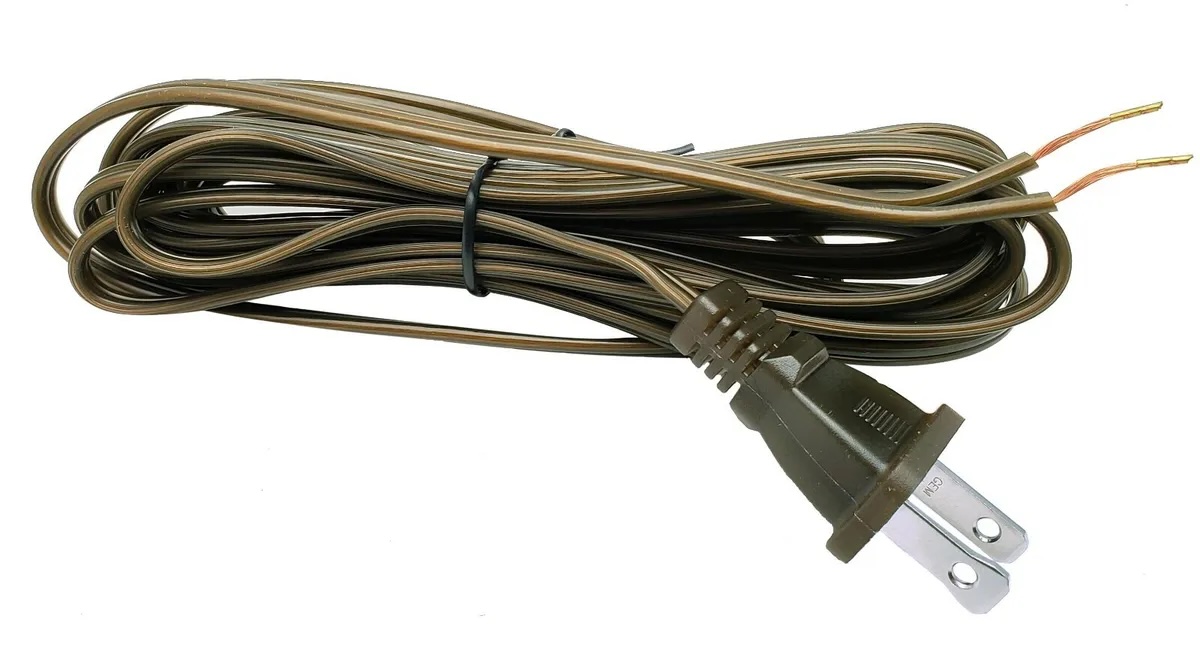
How To Shorten A Lamp Cord
Modified: October 20, 2024
Learn how to shorten a lamp cord easily and safely with this step-by-step guide. Update your furniture and eliminate excess cord length for a clean and organized look.
(Many of the links in this article redirect to a specific reviewed product. Your purchase of these products through affiliate links helps to generate commission for Storables.com, at no extra cost. Learn more)
Introduction
Welcome to our comprehensive guide on how to shorten a lamp cord! Whether you are dealing with a lamp that has a cord that is too long for your needs or you simply want to tidy up the cord for a clean and organized look, we have you covered. Shortening a lamp cord may seem like a daunting task, but with the right tools and some basic knowledge, it can be a straightforward process.
Before we dive into the steps, it’s important to note that working with electrical wiring should be done with caution. If you are not comfortable working with electricity or unsure about any step, it is always recommended to seek the assistance of a qualified electrician.
In this guide, we will walk you through each step of the process, from gathering the necessary tools and materials to testing the shortened lamp cord. So, let’s get started!
Key Takeaways:
- Shortening a lamp cord is a manageable DIY project with the right tools and caution. Ensure safety, assess length, strip and connect wires, and test functionality for a well-organized and functional lamp setup.
- Prioritize safety and gather necessary tools to safely and effectively shorten a lamp cord. Follow step-by-step instructions, test the cord, and enjoy a neater and more organized lamp setup.
Read more: How To Shorten An Electrical Cord
Step 1: Gather Necessary Tools and Materials
Before you begin shortening a lamp cord, it’s important to gather all the necessary tools and materials. Having everything on hand will make the process smoother and more efficient. Here’s a list of items you’ll need:
- Wire cutters
- Wire strippers
- Electrical tape
- Replacement plug (if needed)
- Marker or tape
- Electrical screwdriver
Wire cutters are essential for cutting the lamp cord to the desired length. Make sure you have a pair of quality wire cutters that can easily slice through the cord without fraying or damaging it.
Wire strippers are used to remove the insulation from the exposed ends of the wires. This allows for a proper connection between the wires when reattaching them.
Electrical tape is used to insulate the connections and ensure they are secure. It provides an extra layer of protection and helps prevent any potential electrical hazards.
If you need to replace the plug on the lamp cord, make sure you have a replacement plug that matches the cord’s specifications. It’s important to choose a plug that is rated for the correct voltage and amperage.
To keep track of which end of the cord you’re working with, use a marker or a piece of tape. This will help you identify the correct wires when reconnecting them.
An electrical screwdriver may be necessary if you need to loosen any screws or terminals on the lamp or plug.
Once you have gathered all the necessary tools and materials, you’re ready to move on to the next step.
Step 2: Assess the Length of the Lamp Cord
Now that you have the tools and materials ready, the next step is to assess the length of the lamp cord. Determine how much shorter you would like the cord to be based on your specific needs. Keep in mind any considerations, such as the location of the lamp and the desired distance from the power outlet.
Start by unplugging the lamp and extending the cord to its full length. Measure the excess length that you intend to remove. It’s always a good idea to leave some extra length in case you need to make adjustments in the future.
Use a marker or a piece of tape to mark the spot where you will cut the cord. This will help prevent any confusion later when reconnecting the wires.
Additionally, visually inspect the cord for any signs of damage or wear. If you notice any frayed or exposed wires, it may be a good idea to replace the entire cord instead of shortening it. Safety should always be a top priority when dealing with electrical components.
Once you have assessed the length and determined where to make the cut, move on to the next step. Remember to always exercise caution and work in a well-lit and safe area.
Step 3: Remove the Excess Cord Length
With the length of the lamp cord assessed and marked, it’s time to remove the excess length. Follow these steps to safely and accurately cut the cord:
- Unplug the lamp and make sure the cord is completely disconnected from any power source.
- Double-check that the marked spot on the cord is still visible and accurately represents where you want to make the cut.
- Using a pair of wire cutters, carefully cut the cord at the marked spot. Apply gentle pressure and ensure a clean and straight cut.
- Inspect the cut end of the cord to ensure that it’s clean and free from frayed or damaged wires. If you notice any fraying, trim the cut end methodically to remove any damaged sections.
Once you have removed the excess length and checked the integrity of the cut end, you’re ready to move on to the next step.
Keep in mind that the discarded piece of the cord should be properly disposed of according to local regulations. It’s important to handle and dispose of electrical components responsibly.
Now that the cord has been shortened, it’s time to prepare the wires for reconnection. In the next step, we will strip the exposed wires to ensure a secure and reliable connection.
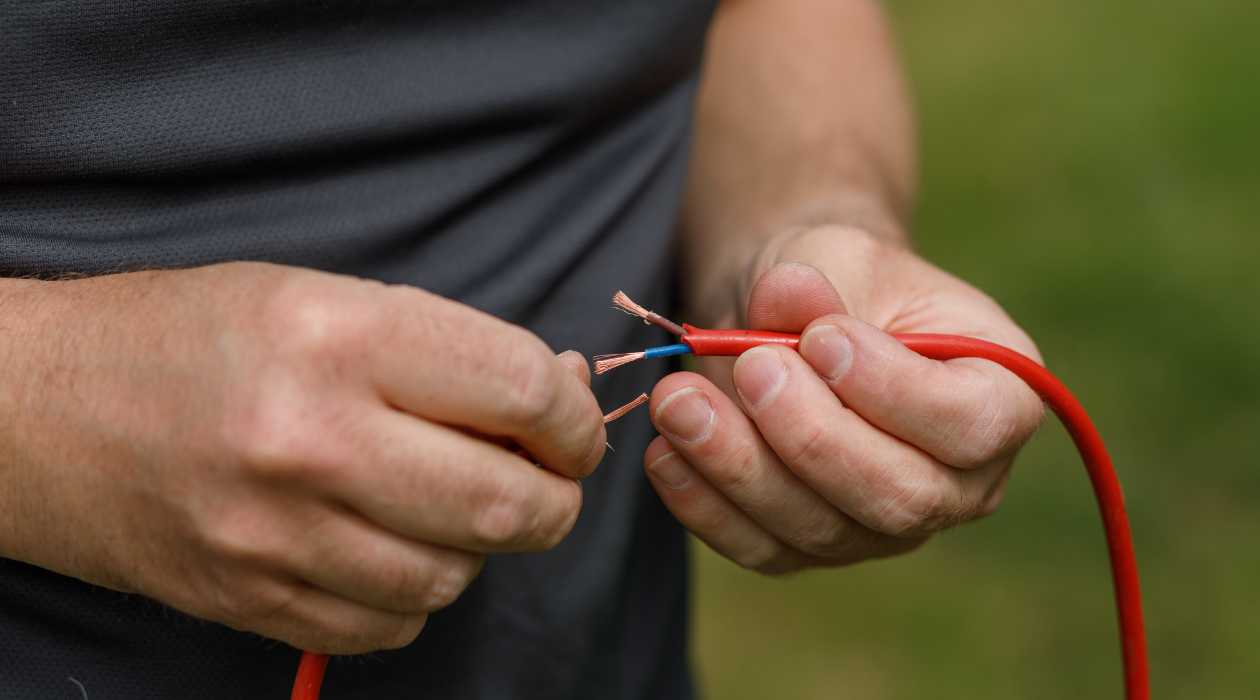
Step 4: Strip the Exposed Wires
In order to make a proper connection, the exposed ends of the lamp cord wires need to be stripped. Follow these steps to strip the wires safely:
- Using wire strippers, identify the appropriate gauge setting for your lamp cord. The gauge setting should match the thickness of the cord wires.
- Place the wire strippers over one end of the cut cord, positioning them approximately ½ inch from the end.
- Apply gentle pressure and rotate the wire strippers around the cord to cut through the insulation.
- Once the insulation has been scored, slightly pull the wire strippers away from the cord to remove the cut section of insulation.
- Repeat the process for the other wire end, ensuring that both exposed wire ends are approximately the same length.
After stripping the wires, visually inspect the exposed ends to ensure that the strands of wire are intact and not damaged. If necessary, trim any frayed ends to maintain clean and solid wire connections.
It’s important to note that when working with lamp cords, they typically consist of two wires: a hot wire and a neutral wire. The hot wire is usually black or red, while the neutral wire is typically white or green. Make sure to identify and keep track of the correct wires for proper reconnection in the next step.
Now that the wires are stripped and ready, let’s move on to step 5, where we will connect the stripped wires to create a secure connection.
When shortening a lamp cord, always make sure to disconnect the lamp from the power source before cutting or altering the cord. Use wire strippers to carefully remove the outer insulation and then trim the inner wires to the desired length before reattaching the plug. Always double-check your work and test the lamp before use.
Read more: How To Replace A Lamp Cord
Step 5: Connect the Stripped Wires
With the stripped wires ready, it’s time to connect them to ensure a secure and reliable connection. Follow these steps to properly connect the stripped wires:
- Start by identifying which wire is the hot wire and which is the neutral wire. Remember, the hot wire is typically black or red, while the neutral wire is usually white or green.
- Take the exposed end of the hot wire and twist the strands together to form a tight bundle. Repeat this process with the exposed end of the neutral wire.
- Hold the twisted ends of the hot and neutral wires parallel to each other, ensuring that there are no loose or frayed strands.
- With one hand, hold the exposed ends of the wires firmly together. With your other hand, twist a wire nut onto the connected ends, turning it clockwise until it is tight and secure.
- Give the wire nut a gentle tug to ensure that the connection is strong and secure.
If you are replacing the plug on the lamp cord, you will also need to connect the stripped wires to the appropriate terminals on the new plug. Refer to the manufacturer’s instructions for your specific plug model and follow the recommended wiring configuration.
Remember, safety should always be the top priority when working with electrical connections. Ensure that the wires are tightly twisted together and securely fastened with a wire nut.
Once the stripped wires are properly connected, we can move on to step 6, where we will secure the connections and ensure they are protected.
Step 6: Secure the Connections
After connecting the stripped wires, it’s crucial to secure the connections to ensure safety and reliability. Here are the steps to secure the connections:
- Start by wrapping each individual wire connection with electrical tape. This will provide an additional layer of insulation and protect against any potential short circuits.
- Wrap the electrical tape tightly around the connected wires, starting from a few inches above the wire nut and continuing down past the exposed wire ends. This will help anchor the tape securely in place.
- Continue wrapping the electrical tape until the entire exposed wire ends and wire nut are covered. Make sure to overlap the tape layers to create a tight and secure seal.
- Smooth out any wrinkles or creases in the electrical tape to ensure a clean and uniform appearance.
- Once the connections are properly wrapped and secured with electrical tape, visually inspect the area to ensure that there are no exposed wires or loose tape.
Securing the connections with electrical tape not only protects against accidental contact but also helps safeguard against moisture and other potential hazards. It’s essential to create a well-insulated and secure connection to maintain the safety and functionality of the lamp.
With the connections secured, we’re almost done! In the next step, we will test the shortened lamp cord to ensure everything is working correctly.
Step 7: Test the Shortened Lamp Cord
Once you have completed all the previous steps, it’s time to test the shortened lamp cord and ensure that everything is functioning properly. Follow these steps to test the cord safely:
- Plug the lamp into a working power outlet.
- Turn on the lamp switch or pull the lamp chain to activate the light.
- Observe the lamp to ensure that it is turning on and emitting light as expected.
- Check for any flickering or intermittent issues with the light. If you notice any problems, immediately unplug the lamp and double-check the connections.
- Test the lamp cord by gently moving or flexing it to ensure that there are no loose connections or intermittent power interruptions.
- If the lamp functions properly and there are no issues, carefully secure any excess cord length near the base of the lamp using cord clips or ties. This will help keep the cord organized and prevent it from becoming a tripping hazard.
If you experience any issues during the testing phase, it’s best to unplug the lamp and recheck the connections. Make sure all wire connections are secure and properly insulated with electrical tape. If the problem persists, it may be necessary to seek the assistance of a qualified electrician.
Congratulations! You have successfully shortened your lamp cord and ensured that it is in proper working condition. Enjoy your well-organized and functional lamp!
Remember, when working with electrical components, always prioritize safety and follow any manufacturer’s instructions or local electrical codes. If you are unsure about any step in the process, it’s best to consult a professional electrician.
We hope this guide has been helpful in teaching you how to shorten a lamp cord. Feel free to refer back to this guide anytime you need to tackle a similar project. Happy lamp cord shortening!
Conclusion
Shortening a lamp cord may seem like a daunting task, but with the right tools, knowledge, and caution, it can be a straightforward process. By following the steps outlined in this guide, you can safely and effectively shorten your lamp cord to meet your specific needs.
Throughout this guide, we discussed the importance of gathering the necessary tools and materials, assessing the length of the cord, removing the excess length, stripping the exposed wires, connecting the wires securely, and testing the shortened cord for functionality. Each step plays a vital role in ensuring a successful outcome.
Remember, safety should always be the top priority when working with electrical components. If you ever feel unsure or uncomfortable, it’s advisable to seek the assistance of a qualified electrician.
With your shortened lamp cord in place, you can enjoy a neater and more organized lamp setup. No more tripping hazards or unsightly excess cord length! Plus, having a properly functioning lamp will enhance the ambiance of any space.
We hope this comprehensive guide has provided you with the knowledge and confidence to tackle the task of shortening a lamp cord. With the right tools and a little patience, you can achieve impressive results.
Thank you for choosing our guide, and we wish you all the best in your lamp cord shortening endeavors!
Frequently Asked Questions about How To Shorten A Lamp Cord
Was this page helpful?
At Storables.com, we guarantee accurate and reliable information. Our content, validated by Expert Board Contributors, is crafted following stringent Editorial Policies. We're committed to providing you with well-researched, expert-backed insights for all your informational needs.