Home>Furniture>Outdoor Furniture>How Do You Finish The Edges Of Trex Decking
Outdoor Furniture
How Do You Finish The Edges Of Trex Decking
Modified: October 20, 2024
Looking to finish the edges of your Trex decking? Find expert tips and solutions for outdoor furniture installation to enhance your outdoor living space.
(Many of the links in this article redirect to a specific reviewed product. Your purchase of these products through affiliate links helps to generate commission for Storables.com, at no extra cost. Learn more)
Introduction
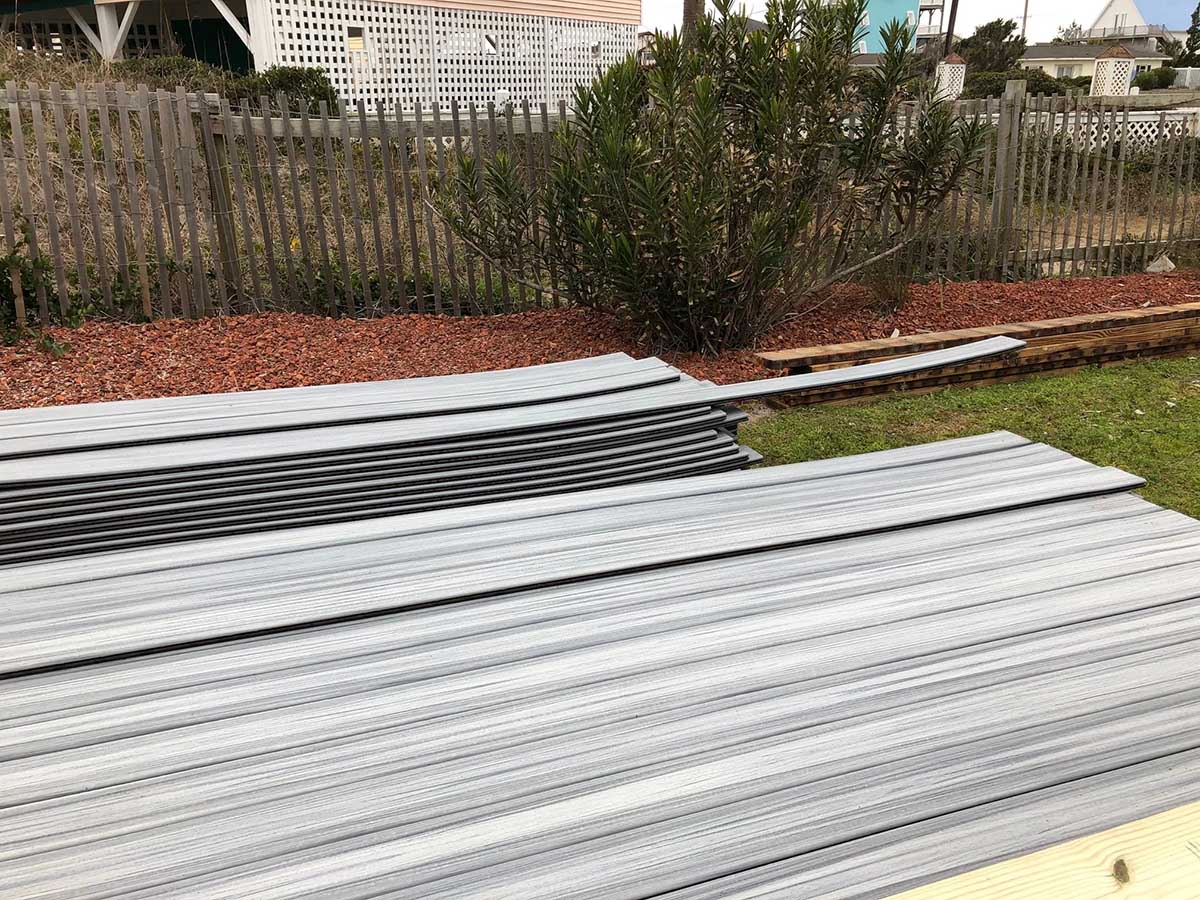
When it comes to enhancing the beauty and durability of your outdoor space, Trex decking is a popular choice among homeowners. Made from a combination of wood and recycled materials, Trex decking offers the look of real wood with the low-maintenance benefits of composite materials.
While Trex decking is designed to withstand the elements and provide years of enjoyment, properly finishing the edges is essential to achieving a polished and professional look. Edging not only adds a visually appealing touch, but it also helps protect the decking from moisture, debris, and potential damage.
In this article, we will explore the importance of edging for Trex decking and discuss the various options available to finish the edges effectively. Whether you’re a seasoned DIY enthusiast or hiring a professional, understanding the different edging techniques will help you make informed decisions for your outdoor space.
Key Takeaways:
- Properly finishing the edges of Trex decking is crucial for both aesthetics and protection. Edging methods like picture frame, butt joint, fascia, and stair tread edging offer unique benefits to enhance the look and durability of your outdoor space.
- When choosing an edging option for Trex decking, consider factors such as aesthetic appeal, durability, budget, compatibility, and safety. Each method has its pros and cons, so make an informed decision that aligns with your priorities and goals for your outdoor space.
Read more: What To Do With Leftover Trex Decking
Why Edging is Important for Trex Decking
Edging serves multiple purposes when it comes to Trex decking. Let’s explore why it is important to finish the edges of your Trex decking:
- Enhances Aesthetics: Edging gives a polished and finished look to your decking by providing clean, crisp lines. It creates a visual boundary, making your deck appear well-defined and professional. Without proper edging, the cut ends of the decking boards may be exposed, giving an unfinished and unattractive appearance to your outdoor space.
- Prevents Moisture Infiltration: Edging helps prevent moisture from infiltrating the ends of the decking boards. Moisture can lead to rot, decay, and damage over time, compromising the integrity of your deck. By sealing the edges with proper edging techniques, you can minimize the risk of moisture-related issues and prolong the lifespan of your Trex decking.
- Reduces the Risk of Accidents: Edging plays a crucial role in improving safety on your deck, especially if you have children or elderly individuals using the space. Finishing the edges properly helps prevent tripping and falling, as it creates a smooth transition between the decking boards and the surrounding surface, such as stairs or pathways.
- Protects Against Debris Accumulation: Edging acts as a barrier, preventing debris, dirt, and other small objects from getting trapped in the open ends of the decking boards. This reduces the amount of maintenance required and keeps your deck looking clean and well-maintained.
Overall, edging is a crucial step in completing your Trex decking project. By ensuring that the edges are properly finished, you not only enhance the aesthetic appeal of your outdoor space but also protect your investment from potential damage and increase its longevity.
Different Options for Edging Trex Decking
When it comes to edging your Trex decking, there are several options available to choose from. Each option offers a unique look and functionality. Let’s explore four common edging options for Trex decking:
- Picture Frame Edging: Picture frame edging involves using a contrasting color or material to create a border around the perimeter of your deck. This method creates a visually appealing frame-like effect, highlighting the deck’s shape and adding a touch of elegance. Picture frame edging can be achieved by installing deck boards perpendicular to the decking boards and adding a border with either a different color or material.
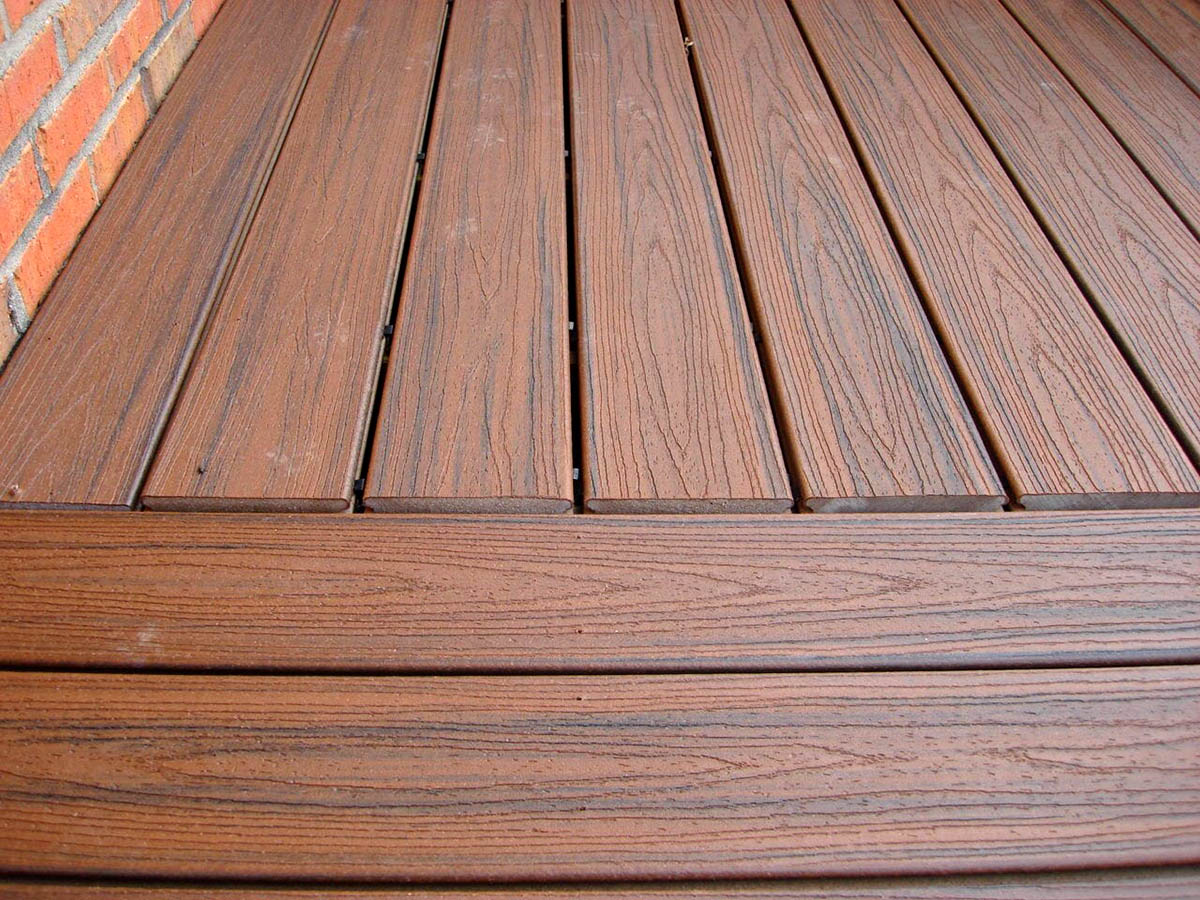
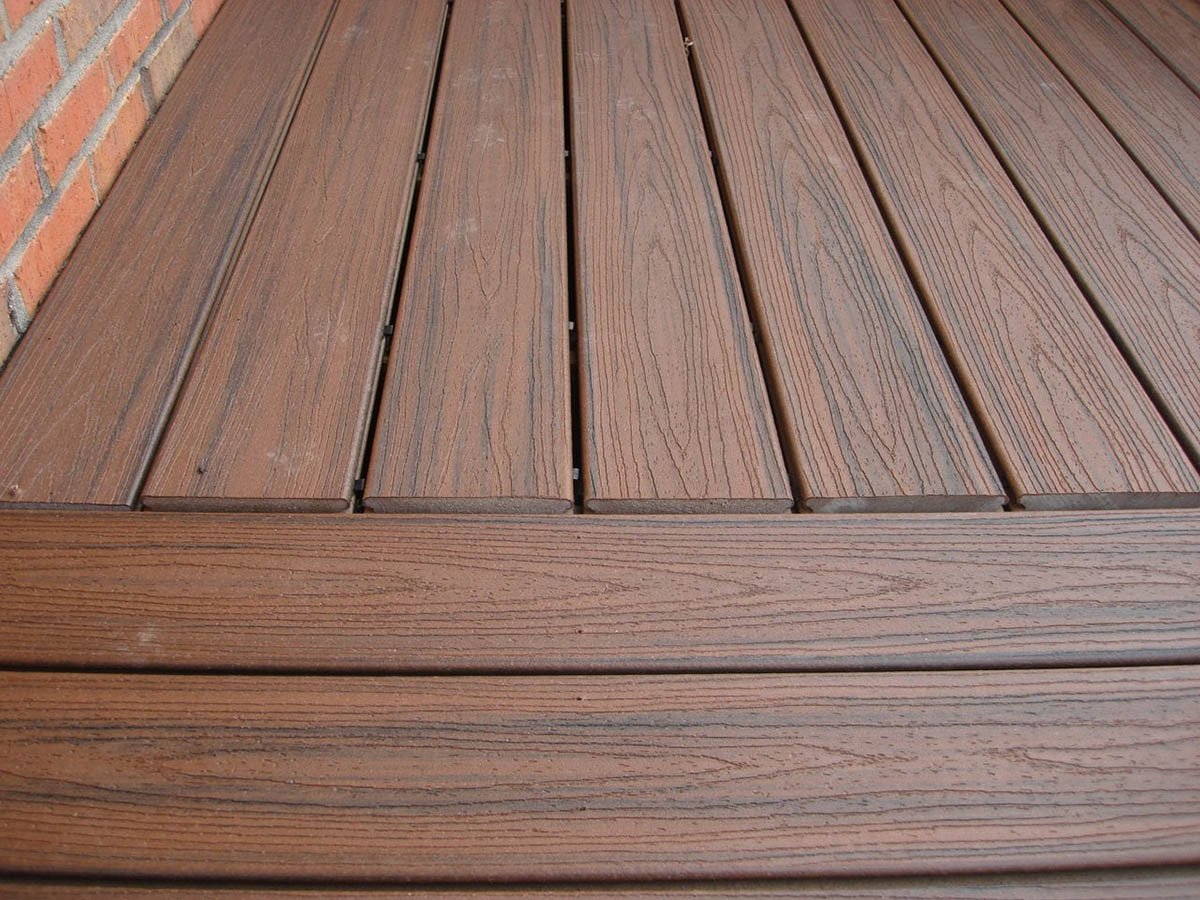
- Butt Joint Edging: Butt joint edging is the simplest and most cost-effective method of edging Trex decking. It involves cutting the decking boards to fit flush against each other at the corners and edges of the deck. This method creates a seamless and clean look, as the edges of the boards meet perfectly without any additional framing or borders.
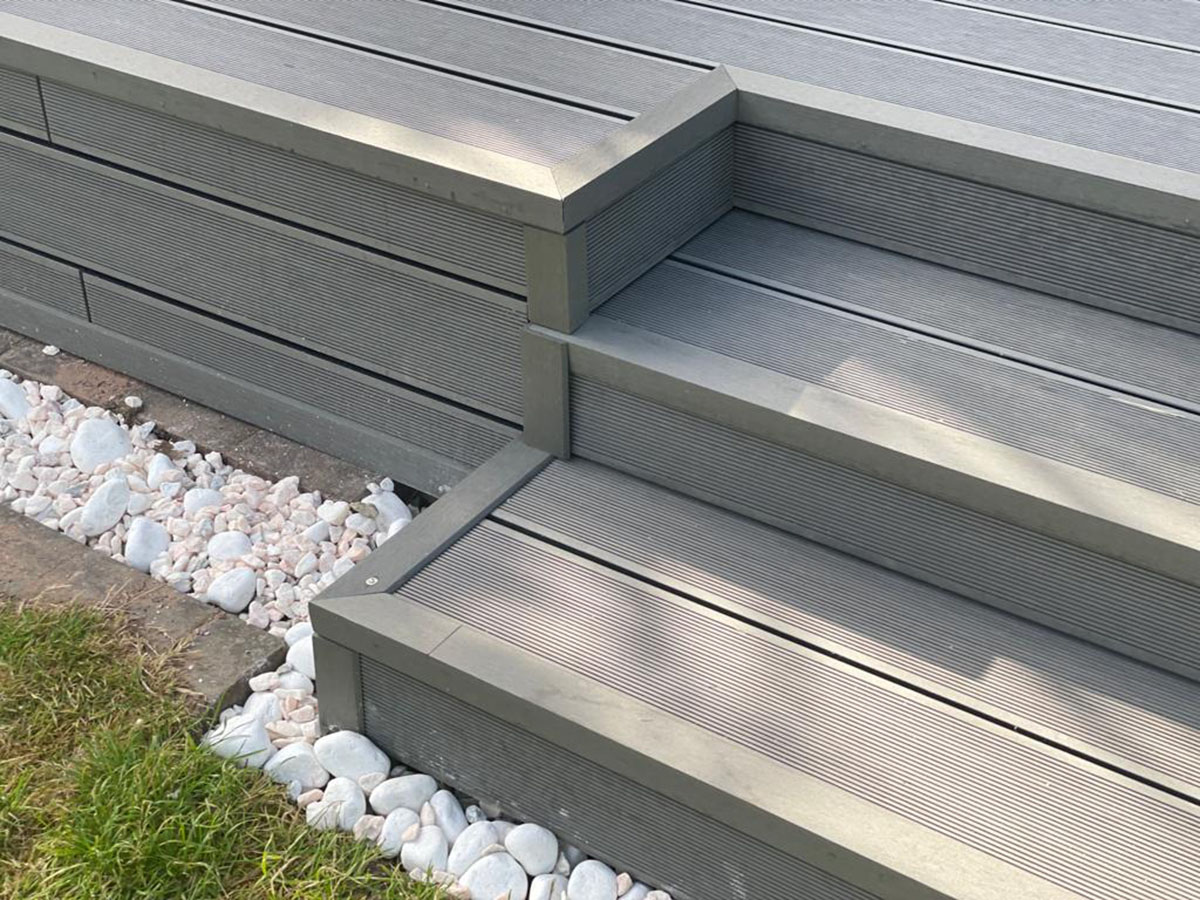
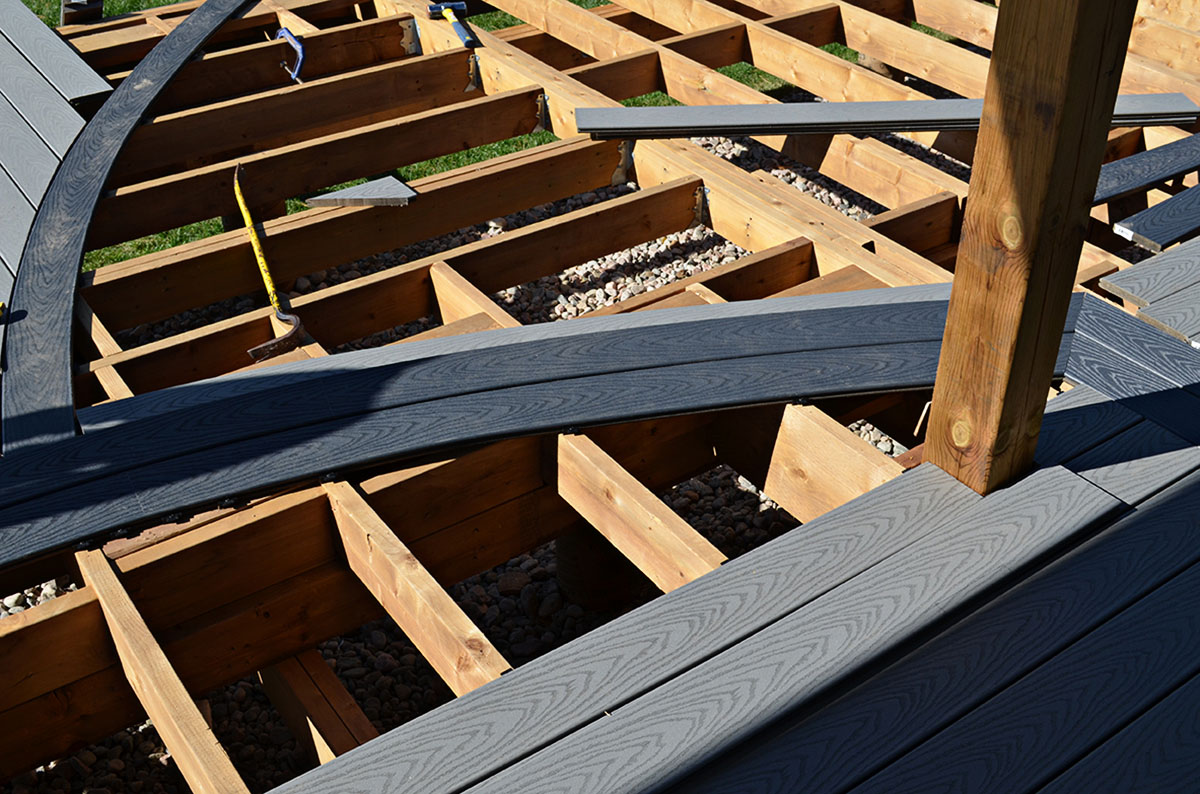
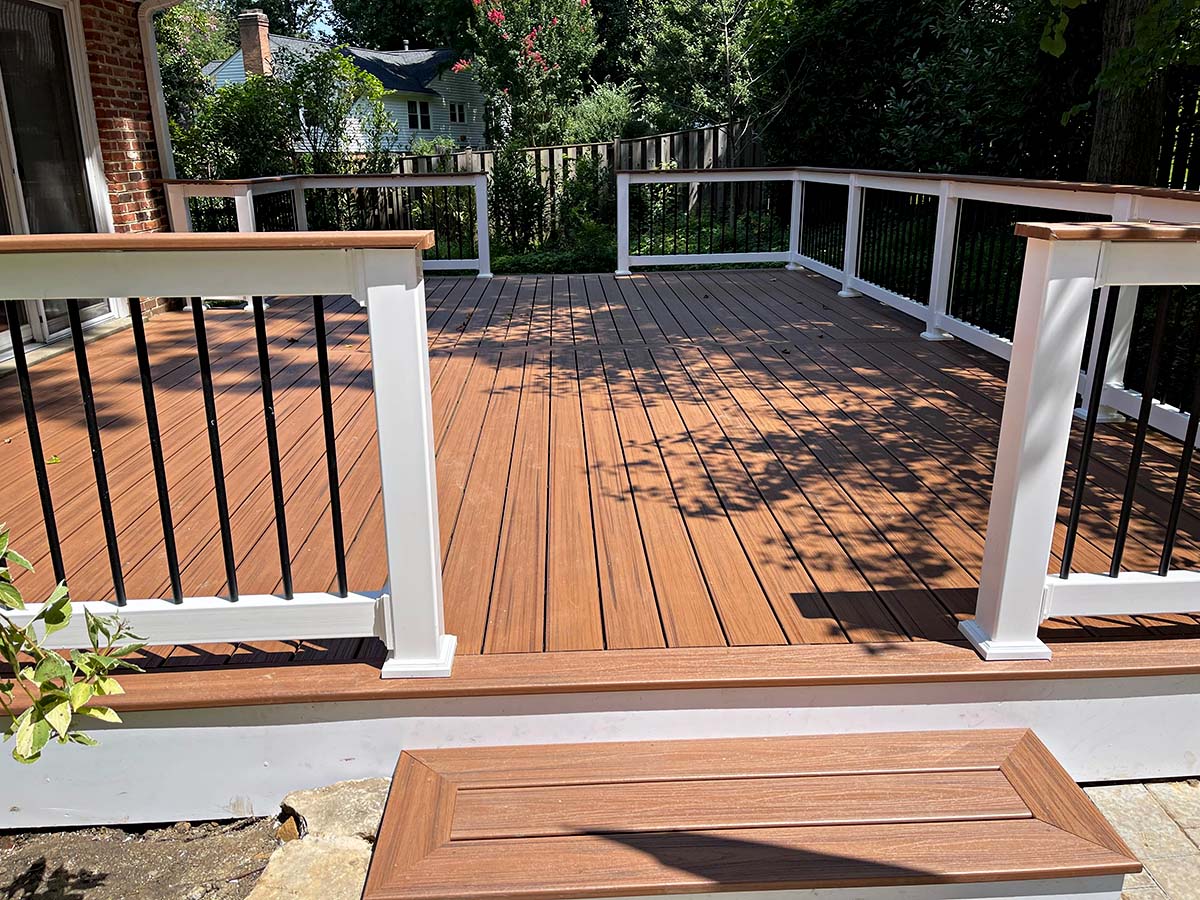
- Fascia Edging: Fascia edging involves using fascia boards to cover the ends of the decking boards. Fascia boards are typically made of the same material as the decking and are installed vertically along the edges of the deck. This method not only provides a finished look but also offers added protection against moisture and debris.
- Stair Tread Edging: If your Trex decking includes stairs, it is important to edge the stair treads for a cohesive look. Stair tread edging can be achieved by using the same edging method as the deck itself, such as picture frame edging or fascia edging. This ensures that the stairs blend seamlessly with the main deck, creating a visually appealing and safe transition between the two.
These are just a few of the options available for edging Trex decking. The choice ultimately depends on your personal preference, budget, and the overall design aesthetic you want to achieve for your outdoor space.
Before deciding on an edging option, consider factors such as maintenance requirements, durability, and compatibility with your existing Trex decking. Consulting with a professional or seeking advice from your local decking supplier can help you make an informed decision and ensure that the chosen edging method complements your Trex decking project.
Picture Frame Edging
Picture frame edging is a popular choice for finishing the edges of Trex decking. This method involves creating a border around the perimeter of your deck using a contrasting color or material to add visual interest and enhance the design aesthetic. Here’s how you can achieve picture frame edging:
- Select the Border Material: Choose a material that will create a striking contrast with the main decking boards. This can be a different color of Trex decking, such as a darker or lighter shade, or a different material altogether, such as stone or composite trim.
- Measure and Cut the Border Boards: Take precise measurements of the perimeters where you want to install the border boards. Cut the border boards to the required length, ensuring they fit snugly against the main decking boards.
- Install the Border Boards: Secure the border boards in place using screws or hidden fasteners. Make sure they are level and flush with the decking surface. It is recommended to leave a small gap between the border boards and the main decking boards to allow for expansion and contraction.
- Finish the Ends: Depending on the chosen material for the border boards, you may need to add finishing touches to the ends. For example, if you are using Trex decking as the border, you can cut the ends at a 45-degree angle for a clean and polished look.
- Optional: Add a Fascia Board: To further enhance the picture frame effect, you can add a fascia board along the outer edge of the border boards. The fascia board should match the color and material of the main decking boards, creating a seamless transition between the two.
Picture frame edging not only adds a decorative touch to your Trex decking but also helps protect the exposed ends of the decking boards. It creates a visually appealing frame-like effect, making your deck stand out and adding a touch of elegance to your outdoor space.
Remember to follow the manufacturer’s guidelines and recommendations for installing the border boards and ensure that all fasteners are properly secured. If you are unsure about the installation process, it is always best to consult with a professional or seek advice from your local Trex decking supplier.
Butt Joint Edging
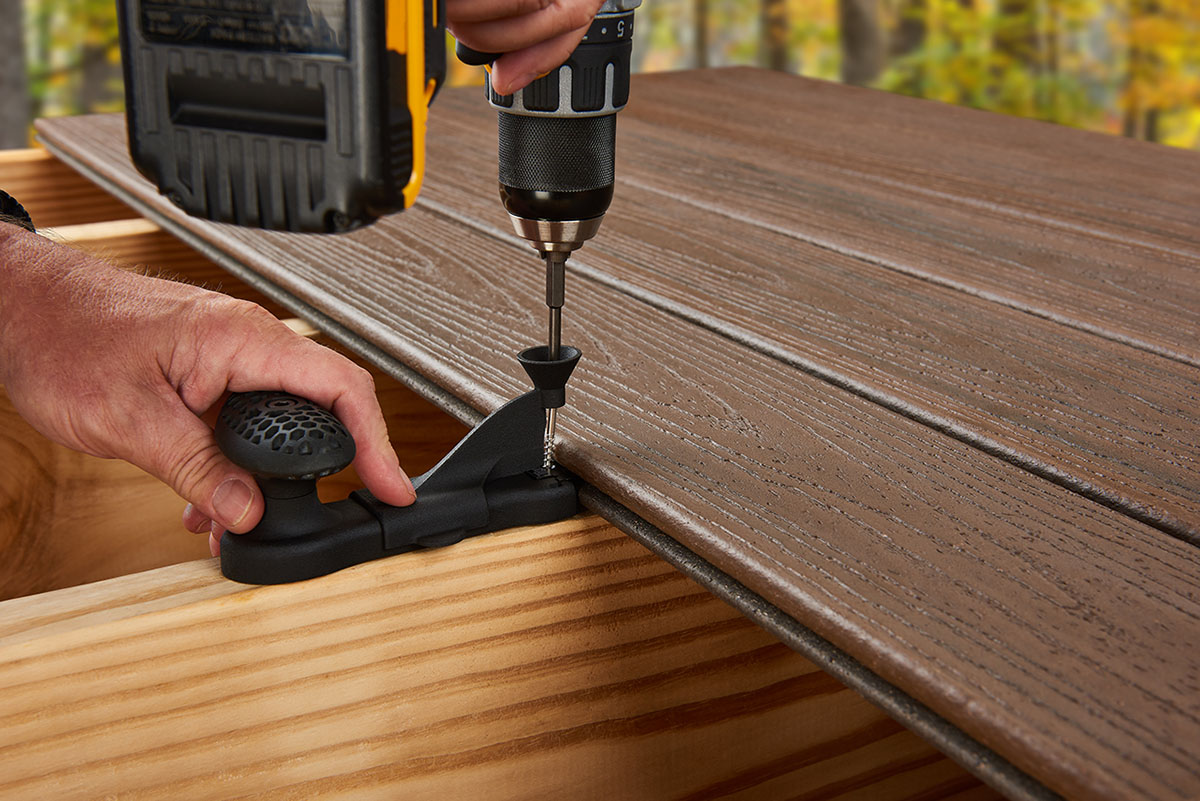
Butt joint edging is a simple and cost-effective method to finish the edges of Trex decking. This method involves cutting the decking boards to fit flush against each other at the corners and edges of the deck. Here’s how you can achieve butt joint edging:
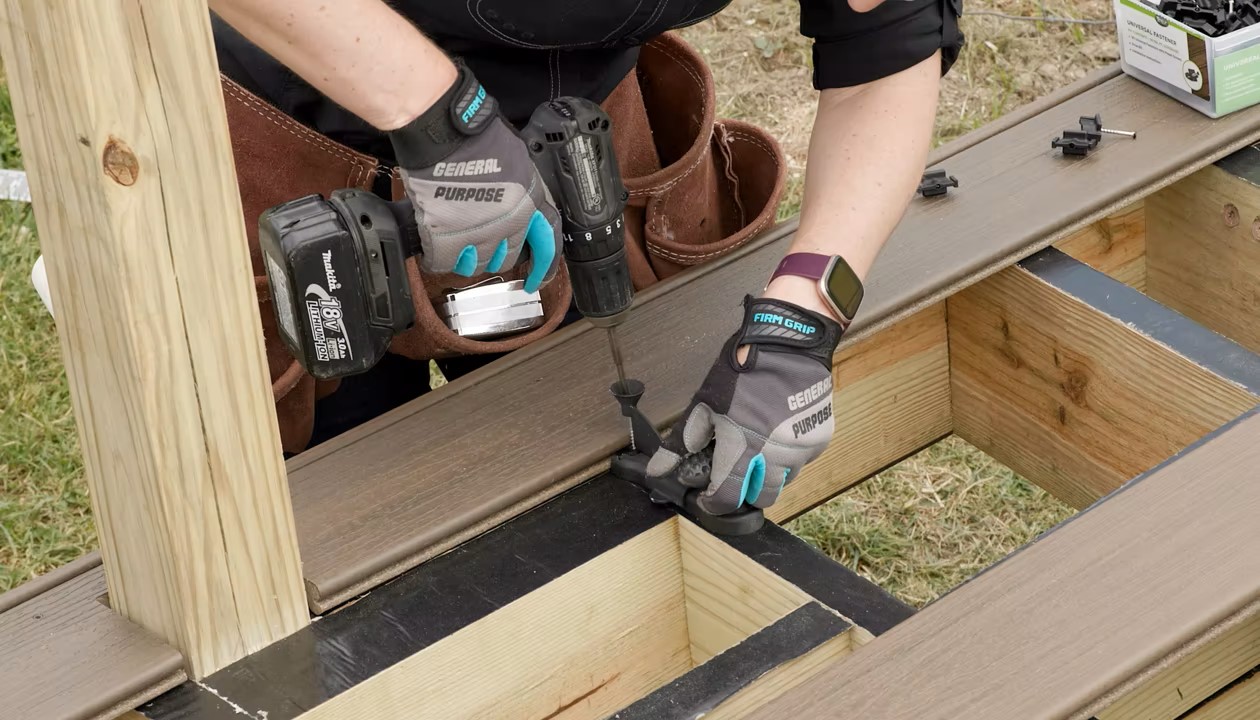
- Measure and Cut the Decking Boards: Take accurate measurements of the areas where you need to install the edging. Cut the decking boards to the required length, ensuring a precise fit against each other.
- Align and Secure the Boards: Place the cut decking boards against each other, making sure they are aligned properly. Use screws or hidden fasteners to secure the boards in place, ensuring a secure and snug fit. Make sure the decking boards are level and flush with the rest of the deck.
- Optional: Sand and Finish the Edges: If desired, you can sand and finish the cut edges of the decking boards to create a smooth and polished look. This step is particularly important if the cut edges are exposed and visible.
- Seal the Edges: To further protect the cut edges of the decking boards, consider applying a sealant or edge treatment. This will help prevent moisture infiltration and potential damage over time.
Butt joint edging provides a clean and seamless look to your Trex decking. By eliminating the need for additional framing or borders, this method creates a smooth transition between the decking boards and ensures a cohesive appearance of the deck surface.
It is important to ensure that the decking boards are properly secured and that the edges meet perfectly for a professional finish. Take the time to measure accurately and use proper installation techniques to achieve the desired result.
Keep in mind that butt joint edging may not be suitable for all decking projects, especially if you prefer a more decorative or distinct border. Consider your aesthetic preferences and the overall design of your outdoor space before choosing this edging method. If you are unsure about the installation process, consult with a professional or seek advice from your local Trex decking supplier.
To finish the edges of Trex decking, you can use Trex Fascia boards or picture frame the deck with a trim board. This will give your deck a polished and professional look.
Read more: How To Do Stairs With Trex Decking
Fascia Edging
Fascia edging is another popular option for finishing the edges of Trex decking. This method involves using fascia boards to cover the exposed ends of the decking boards, providing a clean and polished look. Here’s how you can achieve fascia edging:
- Select the Fascia Boards: Choose fascia boards that match the color and material of your Trex decking. Fascia boards are typically made from the same composite material and are available in a variety of colors to coordinate with your deck’s design.
- Measure and Cut the Fascia Boards: Take precise measurements of the areas where you need to install the fascia boards. Cut the boards to the required length, allowing for an overhang if desired. The overhang can add a decorative touch and further protect the edges of the decking boards.
- Attach the Fascia Boards: Secure the fascia boards in place using screws or hidden fasteners. Make sure the boards are level and flush with the decking surface. It is recommended to leave a small gap between the fascia boards and the decking boards to allow for expansion and contraction.
- Optional: Finish the Edges: If desired, you can add finishing touches to the edges of the fascia boards. This can be done by rounding the corners or adding decorative trim to create a more customized look.
- Maintain the Fascia Boards: Regularly clean and maintain the fascia boards to keep them looking their best. Depending on the material used, you may need to periodically clean, sand, or repaint the boards to ensure their longevity and aesthetic appeal.
Fascia edging not only provides a finished and polished appearance to your Trex decking but also offers added protection against moisture, debris, and potential damage to the exposed ends of the decking boards. It creates a seamless transition between the decking surface and the vertical edge, giving your deck a cohesive and aesthetically pleasing look.
Before installing fascia boards, carefully read the manufacturer’s guidelines and recommendations. Proper installation techniques and maintenance practices will help ensure the longevity and performance of the fascia boards. If you are unsure about the process, it is always best to consult with a professional or seek advice from your local Trex decking supplier.
Stair Tread Edging
When you have stairs as part of your Trex decking, it is important to also consider edging the stair treads for a cohesive and seamless look. Stair tread edging ensures a smooth transition between the main deck and the stairs. Here’s how you can achieve stair tread edging:
- Choose the Edging Method: Determine the edging method that you would like to use for the stair treads. You can either use the same method as the deck itself, such as picture frame edging or fascia edging, or opt for a simpler approach, such as a butt joint edging.
- Measure and Cut the Edging Material: Take accurate measurements of the stair treads, accounting for any overhang or desired gap. Cut the edging material to the required length, ensuring a precise fit against the stair treads.
- Attach the Edging Material: Secure the edging material in place using screws or hidden fasteners, depending on the chosen edging method. Make sure the material is level and flush with the stair treads, providing a seamless transition between the treads and the main deck.
- Optional: Add Finishing Touches: If desired, you can add finishing touches to the edging material, such as rounding the corners or adding decorative trim. This can further enhance the look and ensure a cohesive design throughout your Trex decking and stairs.
- Maintain the Edging: Regularly inspect and maintain the edging material for any signs of wear or damage. Depending on the chosen material, it may require occasional cleaning or touch-ups to keep it in optimal condition.
Stair tread edging plays a vital role in creating a safe and visually appealing stairway within your Trex decking. Properly edged stair treads provide a seamless and professional look, ensuring a smooth transition between the deck and the stairs while reducing the risk of accidents.
Consider the overall design of your deck and stairs when selecting the edging method for your stair treads. Ensure that the chosen method aligns with the aesthetic appeal of your outdoor space and complements the edging style used on the main deck.
If you are unsure about the installation process or edging options for the stair treads, consult with a professional or seek guidance from your local Trex decking supplier. They can provide valuable insights and recommendations based on your specific decking project and requirements.
Considerations for Choosing the Right Edging Option
When it comes to choosing the right edging option for your Trex decking, there are several factors to consider. Each edging method offers different benefits and aesthetics, and selecting the right one will depend on your personal preferences and the specific characteristics of your outdoor space. Here are some key considerations to keep in mind:
- Aesthetic Appeal: Consider the overall look and style you want to achieve for your outdoor space. Some edging options, such as picture frame edging, can add a decorative and elegant touch, while others, like butt joint edging, offer a more minimalistic and modern look. Choose an edging method that complements your deck’s design and enhances its visual appeal.
- Durability and Maintenance: Evaluate the durability and maintenance requirements of each edging option. Some edging methods may require more frequent maintenance, such as cleaning or refinishing, to keep them looking their best. Others may offer better resistance to moisture, UV rays, and other outdoor elements, making them more suitable for long-term use.
- Budget: Consider your budget when selecting an edging option. Some methods, such as butt joint edging, are more cost-effective as they require fewer additional materials. On the other hand, more elaborate options like picture frame edging or fascia edging may require additional materials and labor, potentially increasing the overall cost of your decking project.
- Compatibility: Ensure that the chosen edging option is compatible with your Trex decking. Check the manufacturer’s guidelines and recommendations to ensure that the edging method does not compromise the integrity or warranty of your decking boards. It is essential to follow the recommended installation techniques to maintain the structural integrity of your deck.
- Safety: Consider the safety aspect of your edging choice, especially if you have children, pets, or elderly individuals using the outdoor space. Ensure that the edging method creates a smooth and seamless transition between the different areas of your deck to reduce the risk of tripping or falling.
By considering these factors and weighing the pros and cons of each edging option, you can make an informed decision that aligns with your priorities and goals for your Trex decking. Remember to consult with professionals or reach out to your local Trex decking supplier for additional guidance and recommendations based on your specific project.
Conclusion
Finishing the edges of your Trex decking is an essential step in achieving a polished and professional look for your outdoor space. Whether you choose picture frame edging, butt joint edging, fascia edging, or stair tread edging, each method offers unique benefits that enhance the aesthetic appeal and durability of your deck.
Edging not only adds visual interest but also plays a crucial role in protecting your Trex decking from moisture, debris, and potential damage. By properly sealing and securing the edges, you can prolong the lifespan of your deck and ensure its long-term performance.
When selecting an edging option, consider factors such as the desired aesthetic appeal, durability, maintenance requirements, budget, and compatibility with your Trex decking. Choose an option that aligns with your preferences and compliments the design of your outdoor space.
Remember to follow the manufacturer’s guidelines and recommendations for installing the edging materials to ensure the structural integrity of your deck. If you are unsure about the installation process, it is always best to consult with a professional or seek advice from your local Trex decking supplier. They can provide valuable insights and ensure that your edging option is installed correctly.
By taking the time to choose the right edging option and properly finishing the edges of your Trex decking, you can transform your outdoor space into a stunning and inviting area where you can relax, entertain, and create lasting memories for years to come.
Frequently Asked Questions about How Do You Finish The Edges Of Trex Decking
Was this page helpful?
At Storables.com, we guarantee accurate and reliable information. Our content, validated by Expert Board Contributors, is crafted following stringent Editorial Policies. We're committed to providing you with well-researched, expert-backed insights for all your informational needs.


0 thoughts on “How Do You Finish The Edges Of Trex Decking”