Home>Furniture>Outdoor Furniture>How To Build Patio Furniture Out Of Wood
Outdoor Furniture
How To Build Patio Furniture Out Of Wood
Modified: October 20, 2024
Learn how to build outdoor furniture out of wood with our step-by-step guide. Transform your patio with beautiful DIY creations.
(Many of the links in this article redirect to a specific reviewed product. Your purchase of these products through affiliate links helps to generate commission for Storables.com, at no extra cost. Learn more)
How To Build Patio Furniture Out Of Wood
Introduction
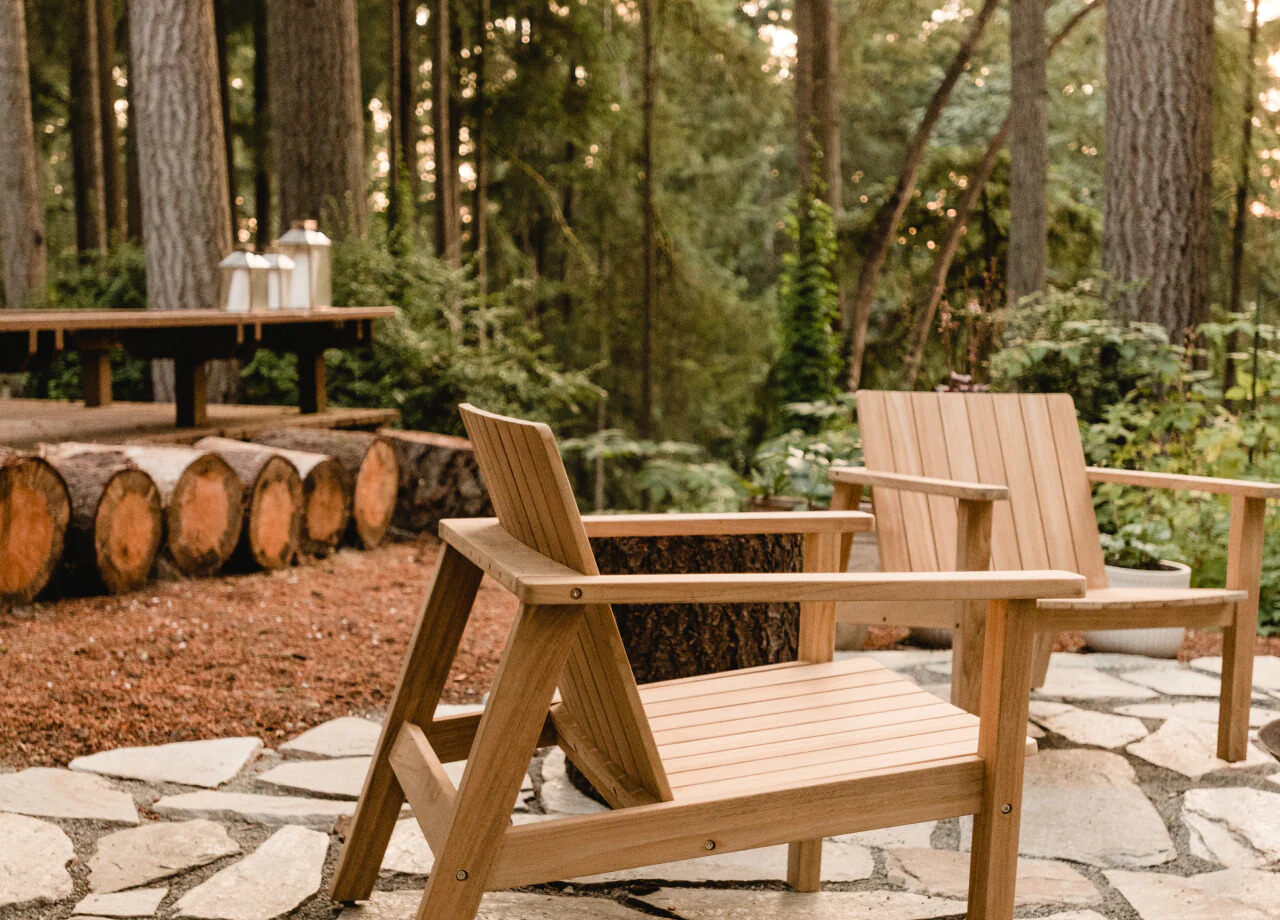
Transforming your outdoor space into a cozy and functional area can be a rewarding project. One of the great ways to enhance your patio is by adding wooden furniture that not only brings a touch of natural beauty but also provides a comfortable place to relax and entertain. Building patio furniture out of wood allows you to customize the design and dimensions to perfectly suit your needs and style.
Whether you are an experienced woodworking enthusiast or a beginner looking for a fun and fulfilling DIY project, this article will guide you through the steps of building your own wooden patio furniture.
Before you dive into the project, it’s important to gather all the necessary tools and materials. Having the right equipment will make the process smoother and ensure high-quality results.
Key Takeaways:
- Building your own wooden patio furniture allows you to customize the design and dimensions to suit your style and needs, creating a cozy and personalized outdoor space for relaxation and entertainment.
- Choosing the right type of wood, proper planning, and careful maintenance are essential for creating durable and beautiful wooden patio furniture that will withstand outdoor conditions and provide years of enjoyment.
Read more: How To Build Sectional Patio Furniture
Tools and Materials Needed
Building patio furniture out of wood requires a few essential tools and materials to ensure a successful project. Here’s a list of what you’ll need:
Tools:
- Saw (circular or table saw)
- Drill
- Sander or sandpaper
- Clamps
- Tape measure
- Square
- Screwdriver
- Wood chisel
- Woodworking vice
- Paintbrush or foam roller
- Hammer or mallet
Materials:
- Wood boards of your choice (cedar, teak, or pine)
- Screws
- Nails
- Wood glue
- Finishing products (varnish, paint, or stain)
- Protective coating (sealer or waterproofing agent)
- Sanding discs or sandpaper (various grits)
It’s important to choose high-quality materials that are suitable for outdoor use. Cedar and teak are popular choices due to their natural resistance to moisture and decay, but if budget is a concern, pine can also be a suitable option when properly treated and finished.
Additionally, make sure to have a well-ventilated work area and wear appropriate safety gear, including safety goggles, gloves, and a dust mask, to protect yourself during the construction process.
With these tools and materials at hand, you’re ready to begin building your wooden patio furniture.
Selecting the Right Type of Wood
Choosing the right type of wood is crucial for building patio furniture that is durable, weather-resistant, and visually appealing. Here are a few factors to consider when selecting your wood:
1. Weather Resistance: Since patio furniture will be exposed to the elements, it’s important to choose a wood species that can withstand outdoor conditions. Cedar and teak are excellent options as they naturally contain oils that make them resistant to rot, insects, and weather damage. They also have a beautiful grain pattern that adds aesthetic appeal to your furniture.
2. Durability: Look for woods that are known for their durability, ensuring that your patio furniture will stand the test of time. Teak, for example, is renowned for its exceptional strength and longevity. However, if you’re on a budget, pine can also be a viable option. Make sure to choose pressure-treated pine, which has been chemically treated to resist decay and insect damage.
3. Aesthetics: Consider the overall look you want to achieve for your outdoor space. Different wood species have distinct grain patterns, color variations, and textures. Cedar has a warm reddish hue, while teak tends to have a medium to dark brown color. Pine can be stained or painted to match your preferred style.
4. Sustainability: If environmental impact is important to you, opt for wood that is sustainably sourced or certified by organizations like the Forest Stewardship Council (FSC). This ensures that the wood comes from responsibly managed forests and promotes the conservation of natural resources.
Ultimately, the choice of wood will depend on your personal preferences, budget, and the specific requirements of your project. Research different wood types, visit local lumberyards, and consult with experts to make an informed decision.
Remember, regardless of the wood species you choose, it’s crucial to properly treat and finish your patio furniture to protect it from moisture, UV rays, and other outdoor factors. Regular maintenance, such as cleaning and reapplying finishes or protective coatings, will also help prolong the life of your wooden furniture.
Planning and Designing Your Patio Furniture
Before diving into the construction phase, taking the time to plan and design your patio furniture will ensure a cohesive and functional end result. Here are some steps to help you in this process:
1. Assess Your Space: Take measurements of your patio or outdoor area to determine how much space you have available for furniture. Consider any existing structures, such as a deck or pool, and plan accordingly to ensure that your furniture fits comfortably without overcrowding the space.
2. Determine the Function: Decide how you want to use your patio furniture. Do you need a dining table and chairs for outdoor meals, a lounge area with comfortable seating, or a combination of both? Knowing the purpose of your furniture will help you make design choices that meet your specific needs.
3. Sketch Your Design: Use pen and paper or digital design tools to sketch out your ideas. Start with a rough layout of the furniture pieces and their dimensions. Consider the overall style and look you want to achieve. You can also find inspiration from magazines, online resources, or existing furniture designs.
4. Consider Ergonomics: Pay attention to comfort and ergonomics when designing seating elements. Ensure that chair heights, seat depths, and backrest angles are appropriate for relaxation and proper posture. Incorporate cushions or padding for added comfort if desired.
5. Factor in Storage: If your patio furniture will not be in use year-round, consider storage options. Design furniture pieces that can be easily disassembled or folded to save space when not in use. Alternatively, incorporate built-in storage compartments or invest in outdoor furniture covers to protect your pieces from the elements.
6. Seek Inspiration: Look for inspiration in outdoor design trends, Pinterest boards, or home improvement websites. Take note of color schemes, materials, and unique design elements that appeal to you. Adapt these ideas to fit your own style and vision.
7. Test Your Design: Once you have a detailed sketch or visual representation of your patio furniture design, consider creating a prototype or mock-up. This can be done using cardboard or inexpensive materials to visualize the scale and functionality of your design before committing to building the final pieces.
Remember, the planning stage is your opportunity to refine your ideas and make adjustments as needed. Take your time to ensure that the design aligns with your preferences, functionality requirements, and available space.
With a well-thought-out plan in hand, you’re now ready to move on to the construction phase of building your wooden patio furniture.
Cutting and Shaping the Wood
With your design finalized, it’s time to start bringing your wooden patio furniture to life. Here are the steps for cutting and shaping the wood:
1. Gather your tools: Ensure you have the necessary tools for cutting and shaping wood, such as a saw (circular or table saw), tape measure, square, and clamps. Having sharp tools will result in cleaner and more precise cuts.
2. Measure and mark: Take accurate measurements of the wood according to your design plan. Use a tape measure and mark the dimensions on each piece of wood with a pencil or marker. Double-check your measurements before proceeding.
3. Safety first: Always prioritize safety when working with power tools. Wear safety goggles and protective gloves to protect yourself from any potential hazards. Follow proper safety guidelines for each tool, including securing the wood with clamps before cutting to prevent it from moving.
4. Cut straight lines: For straight cuts, use a circular saw or table saw. Align the marked lines with the saw blade and guide the wood through the saw, keeping a steady and controlled motion. Take your time and make smooth, deliberate cuts.
5. Smooth out rough edges: After cutting, you may notice rough edges or uneven surfaces. Use sandpaper or a sander to smooth out these areas. Start with coarse-grit sandpaper and gradually move to finer-grit sandpaper for a polished finish. Sand in the direction of the wood grain to prevent scratching or damaging the surface.
6. Shape curved or angled pieces: If your design involves curved or angled pieces, use a jigsaw or coping saw to cut along the marked lines. Take care to follow the lines accurately and maintain a steady hand throughout the cutting process.
7. Bevels and chamfers: If your design includes bevels or chamfers, use a chisel or a router to create these decorative edges. Mark the area to be beveled or chamfered, and carefully remove the wood using the appropriate tool. Take it slow and make small, precise cuts until you achieve the desired shape.
8. Test fittings: As you cut and shape each piece of wood, periodically test the fittings to ensure they align properly and fit together snugly. Make any necessary adjustments to the dimensions or shapes of the wood as needed.
Remember to work with caution and always prioritize safety. Double-check your measurements and take your time when cutting and shaping the wood to ensure accurate and precise results. With the wood pieces cut and shaped, you’re now ready to move on to the next step: sanding and preparing the surfaces.
Read more: How To Build Wood Outdoor Furniture
Sanding and Preparing the Surfaces
After cutting and shaping the wood, the next step in building your patio furniture is to sand and prepare the surfaces. This process is essential for creating smooth and polished finishes. Here’s how you can do it:
1. Gather the necessary materials: For sanding, you will need sandpaper or sanding discs in various grits. The grit number indicates the coarseness of the sandpaper, with lower numbers being more coarse and higher numbers being finer. Start with a coarser grit (around 80 or 120) and gradually move to finer grits (such as 180 or 220).
2. Sanding the wood: Start by sanding the entire surface of each wooden piece with the coarsest grit sandpaper. Sand in the direction of the wood grain using light to moderate pressure. This will help remove any rough spots, splinters, or imperfections caused during the cutting process. Repeat the process with progressively finer grits until the wood surface feels smooth and even.
3. Be thorough: Pay attention to all exposed surfaces, including the edges and corners of the wood. Make sure to remove any rough edges or sharp corners that could pose a safety risk or hinder the overall comfort of the furniture.
4. Fill in imperfections: If you come across any small cracks or gaps in the wood, use wood filler to fill them in. Follow the instructions on the wood filler product, and once it dries, sand it down to create a smooth, even surface.
5. Dust off the wood: After sanding, clean off any dust or debris from the wood surface. Use a soft brush or a tack cloth to gently remove all the sanding residue. This ensures a clean surface for the next steps of finishing and assembling the furniture.
6. Consider rounding edges: If desired, you can use sandpaper to round over sharp edges or corners of the wood. This not only enhances the appearance but also makes the furniture more comfortable and safe to use. Be consistent in your approach to maintain a uniform look.
7. Smooth out curves: If your design includes curved elements, such as armrests or table edges, use sanding blocks or flexible sanding pads to achieve smooth and even curves. Take your time and sand gently to avoid flattening the curves or creating uneven surfaces.
By carefully sanding and preparing the surfaces, you ensure a professional and polished look for your wooden patio furniture. The next step is to join the wood pieces together using appropriate methods and techniques.
When building patio furniture out of wood, make sure to use weather-resistant wood such as cedar or teak to ensure durability. Additionally, apply a protective sealant to the wood to prevent damage from the elements.
Joining the Wood Pieces Together
Joining the wood pieces together is a crucial step in constructing strong and stable patio furniture. There are various methods and techniques to consider, depending on the design and functionality of your furniture. Here are some commonly used methods:
1. Screws and Nails: One of the most common and straightforward ways to join wood pieces is by using screws and nails. Pre-drilling pilot holes helps prevent splitting and ensures a secure connection. Use appropriate-sized screws or nails for your project, considering the thickness of the wood and the weight-bearing requirements.
2. Pocket-hole Joinery: Pocket-hole joinery is a popular method that involves drilling angled holes, called pocket holes, into one piece of wood, and then using screws to attach it to another. This method provides a strong and discreet joint and is often used in furniture construction.
3. Mortise and Tenon Joints: Mortise and tenon joints are known for their strength and durability. The tenon is a projecting piece of wood that fits into a corresponding hole, called the mortise, on the other piece of wood. This method requires careful cutting and fitting, but results in a long-lasting and sturdy joint.
4. Dowels and Wood Glue: Using dowels along with wood glue is an effective method for joining wood pieces. Dowels are cylindrical pegs inserted into corresponding holes in the wood. Apply wood glue on the dowels and in the holes, then join the pieces together. The glue bonding and dowels strengthen the joint and provide stability.
5. Biscuit Joinery: Biscuit joinery involves using an oval-shaped wooden biscuit inserted into slots cut into the wood pieces. Biscuits are typically made of compressed wood fibers. Apply glue to the biscuits and the slots, insert the biscuits, and join the pieces together. This method creates a strong bond, particularly for edge-to-edge connections.
6. Dovetail Joints: Dovetail joints are often used in fine woodworking and cabinetry. They have interlocking wedge-shaped fingers that fit together tightly, providing both strength and an aesthetically pleasing appearance. However, creating dovetail joints requires skill and precision using specialized tools.
7. Wood Joinery Hardware: Another option is to use wood joinery hardware, such as corner brackets, brackets with braces, or furniture connectors. These hardware pieces provide additional reinforcement to the joints, particularly for furniture that will undergo frequent movement or heavy use.
When choosing the joining method, consider the design, functionality, and overall aesthetic of your patio furniture. Ensure that the joints are secure, stable, and able to withstand the intended use.
Before applying any joining method, it’s a good idea to do a dry fit first. This involves assembling the pieces without glue or fasteners to check for proper alignment and fit. Once you are satisfied with the fit, disassemble the pieces, apply glue or fasteners, and join them together permanently.
Remember to follow the manufacturer’s instructions for any hardware or adhesive products you use. Allow sufficient drying or curing time before moving on to the next steps of finishing and assembling your wooden patio furniture.
Adding Finishes and Protective Coatings
Adding finishes and protective coatings to your wooden patio furniture is essential to enhance its appearance, protect the wood from outdoor elements, and extend its lifespan. Here are the steps to follow for this crucial stage:
1. Choose the Right Finish: There are various finish options available, including varnish, paint, and stain. Consider the natural beauty of the wood and the desired look for your furniture. Varnish and stain allow the wood’s grain to show through, while paint provides a more opaque and colorful finish. Research different finishes and select one that suits your preferences and meets the specific requirements of your project.
2. Prepare the Wood Surface: Before applying any finish, ensure that the wood surface is clean and smooth. Sand the wood with a fine-grit sandpaper to remove any remaining imperfections and provide a smooth base for the finish. Remove all dust and debris from the wood using a soft brush or tack cloth.
3. Apply the Finish: Follow the manufacturer’s instructions for your chosen finish product. Use a paintbrush or foam roller to apply an even coat of the finish to all exposed surfaces of the furniture. Pay attention to corners, edges, and tight spaces to ensure complete coverage. Apply additional coats as necessary, allowing sufficient drying time between each coat.
4. Consider Waterproofing and UV Protection: If your patio furniture will be exposed to rain or direct sunlight, consider using a protective coating specifically designed for outdoor use. Waterproofing agents, sealers, or exterior-grade paints can help protect the wood from moisture and UV damage. Apply these products after the initial finish, following the manufacturer’s instructions to ensure proper protection.
5. Follow Maintenance Guidelines: Properly maintaining your wooden patio furniture can significantly extend its life. Regularly clean it with a mild soap and water solution to remove dirt and grime. Avoid using harsh chemicals or abrasive cleaners that can damage the finish. Inspect the furniture periodically for any signs of wear or damage and reapply finishes or protective coatings as needed.
6. Consider Outdoor Furniture Covers: To further protect your patio furniture from harsh weather conditions, consider investing in outdoor furniture covers. These covers can shield your furniture from rain, snow, and excessive sun exposure, helping to prevent damage and extend its lifespan even further.
Remember, each type of finish and protective coating may have specific application instructions and drying times, so be sure to read and follow the manufacturer’s guidelines. Taking the time to properly finish and protect your wooden patio furniture will ensure its longevity and keep it looking beautiful for years to come.
Assembling the Patio Furniture
After preparing the wood and adding finishes, it’s time to assemble your patio furniture. Follow these steps to ensure a successful and sturdy assembly:
1. Lay out the pieces: Start by organizing all the wooden pieces according to your design. Place them in the correct orientation and order, making it easier to identify which piece goes where during the assembly process.
2. Follow the design plan: Refer to your design plan or instructions to determine the proper order of assembly. Make sure you understand how each piece fits together and any specific requirements for attaching them.
3. Use appropriate fasteners: Depending on your joining method, choose the appropriate screws, nails, dowels, or other fasteners for each connection. Ensure they are the correct length and size to securely hold the pieces together without damaging the wood.
4. Start with the base or frame: Begin by assembling the base or frame of your furniture. This provides a solid foundation for adding other components. Use clamps or an extra set of hands to hold pieces in place while you secure them together.
5. Secure connections tightly: As you join the wood pieces together, make sure to tighten screws, nails, or other fasteners properly. Use a screwdriver, drill, or other appropriate tools to achieve a secure and sturdy connection. However, be careful not to overtighten and risk damaging the wood.
6. Check for stability: Periodically check the stability of the furniture as you assemble it. Ensure that all connections are secure and that the structure is solid. Make any necessary adjustments or reinforcements as needed to ensure stability and durability.
7. Install additional components: Once the base or frame is assembled, proceed to add any additional components, such as tabletops, arms, seat supports, or backrests. Follow the design plan and secure them securely according to the specific joining method for each piece.
8. Double-check alignment and measurements: Throughout the assembly process, double-check the alignment of the wood pieces and measurements to ensure accuracy. Use a tape measure or square to confirm that everything is straight and properly aligned according to your design plan.
9. Tighten all fasteners: Once the entire furniture piece is assembled, go back and double-check all the fasteners. Make sure they are tight and secure to prevent any wobbling or movement of the furniture during use.
10. Allow sufficient drying time: If you applied any glue or finishes that require drying time, make sure to allow the furniture to fully dry and cure before using it. Follow the manufacturer’s instructions for drying time to ensure the best results.
By following these steps, you can ensure a successful and sturdy assembly of your patio furniture. Once assembled, take a moment to admire your finished creation and get ready to enjoy your new outdoor oasis.
Read more: How To Build A Wood Patio Cover
Maintenance and Care Tips
Proper maintenance and care are essential to keep your wooden patio furniture looking its best and ensure its longevity. Follow these tips to maintain and preserve your furniture for years of enjoyment:
1. Regular cleaning: Regularly clean your patio furniture to remove dirt, debris, and stains. Use a mild soap and water solution, and gently scrub the wood with a soft brush or cloth. Rinse thoroughly with water and allow it to dry completely before using or applying any protective coatings.
2. Apply protective coatings: Regularly inspect the protective coatings such as varnish, paint, or stain, and reapply them as necessary. The frequency of reapplication will depend on factors such as exposure to sunlight and weather conditions. Follow the manufacturer’s instructions for the specific product you are using.
3. Seal or waterproof the wood: If your furniture is made of wood that is not naturally resistant to moisture, consider applying a sealant or waterproofing agent. This will help protect the wood from rot, decay, and damage caused by exposure to rain or excessive moisture.
4. Protect from direct sunlight: Prolonged exposure to direct sunlight can fade the color and damage the finish of your wooden furniture. Consider moving your furniture to a shaded area, using umbrellas or shade sails, or applying UV-resistant coatings to protect the wood from the sun’s harmful rays.
5. Use furniture covers: When not in use, cover your patio furniture with weather-resistant covers. This will protect it from dust, dirt, and the elements, minimizing the need for frequent cleaning and maintenance. Ensure that the covers fit properly and are secure to prevent water or pests from getting inside.
6. Avoid extreme weather conditions: If possible, move your wooden furniture to a covered area during extreme weather conditions such as heavy rain, snow, or strong winds. This will help prevent moisture damage and extend the life of the furniture.
7. Avoid dragging: Avoid dragging or sliding your furniture across hard surfaces as it can cause scratches, dents, and damage to both the wood and the surface below. Instead, lift and carry the furniture or use sliders to reduce friction.
8. Inspect and repair: Regularly inspect your patio furniture for any signs of wear, damage, or loose connections. Tighten any screws or fasteners, repair any cracks or splinters, and replace any damaged or worn-out components to maintain the structural integrity of the furniture.
9. Store during winter months: If you live in an area with harsh winters, consider storing your wooden patio furniture indoors or in a dry, sheltered area during the winter months. This will protect it from freezing temperatures, moisture, and potential damage from ice or snow accumulation.
10. Follow manufacturer’s guidelines: Always refer to the manufacturer’s guidelines and recommendations for specific maintenance instructions and product compatibility. Different types of wood and finishes may have unique care requirements.
By following these maintenance and care tips, you can keep your wooden patio furniture looking beautiful and ensure its durability for many seasons of enjoyment.
Conclusion
Building patio furniture out of wood allows you to create a beautiful and personalized outdoor space that reflects your style and enhances your enjoyment of the outdoors. By carefully selecting the right type of wood, planning the design, and following proper construction techniques, you can create durable and functional furniture that will withstand the test of time.
Throughout the process, it’s important to prioritize safety, use the appropriate tools and materials, and pay attention to detail. From cutting and shaping the wood to joining the pieces together and adding finishes, each step contributes to the overall quality and longevity of your patio furniture.
Once your furniture is assembled and in place, the maintenance and care you provide will determine its lifespan and continued beauty. Regular cleaning, applying protective coatings, and practicing proper storage during harsh weather conditions are essential for preserving the wood and keeping your furniture looking its best.
Remember, building patio furniture out of wood is not only a practical and enjoyable project, but it also allows you to create a space that reflects your personal taste and provides a comfortable retreat for outdoor relaxation and entertainment.
So, roll up your sleeves, gather your tools, and embark on the journey of building your own wooden patio furniture. Enjoy the process, take pride in your creations, and savor the countless moments of joy and relaxation that your beautifully crafted furniture will provide in the years to come.