Home>Gardening & Outdoor>Outdoor Entertaining>How To Make A Picnic Table With Detached Benches
Outdoor Entertaining
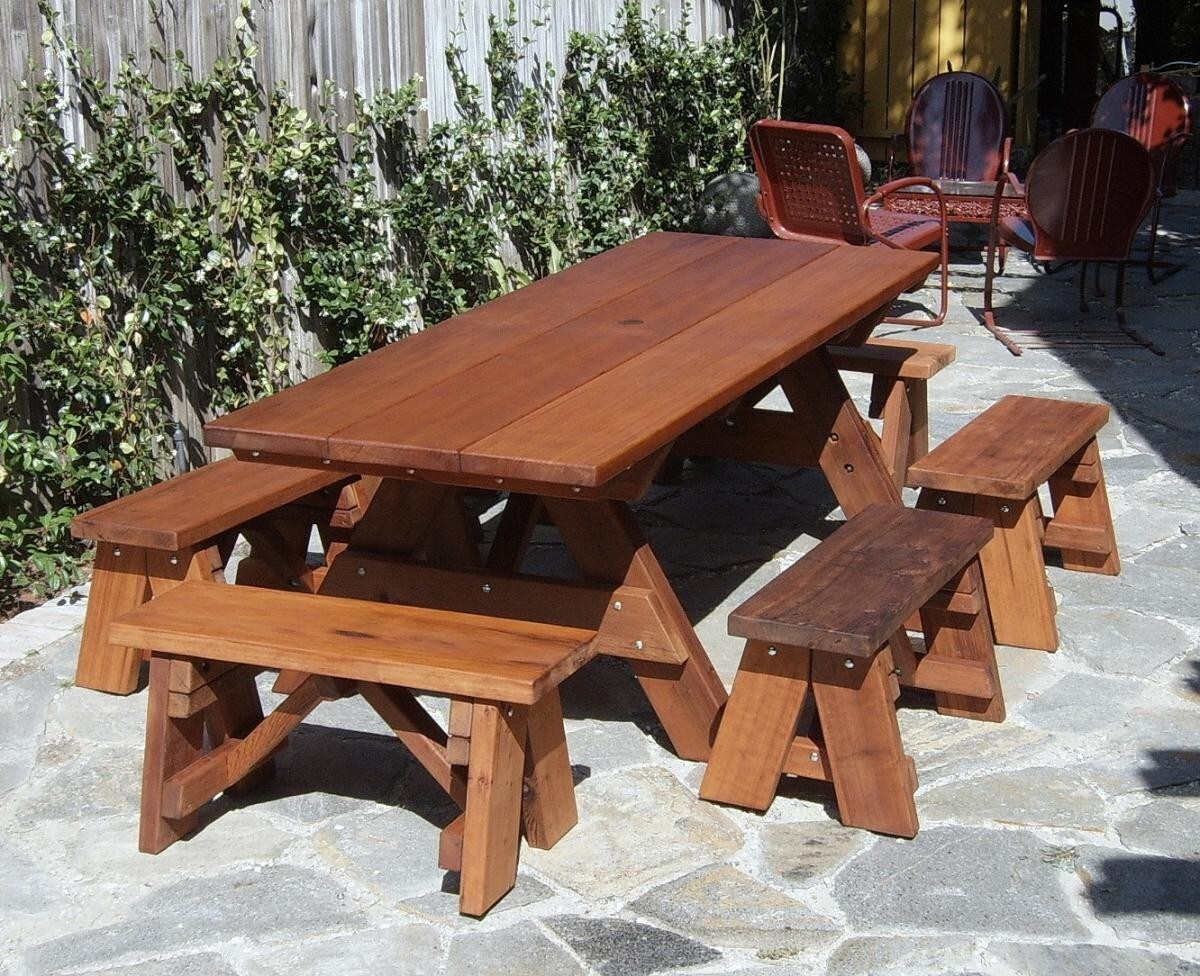
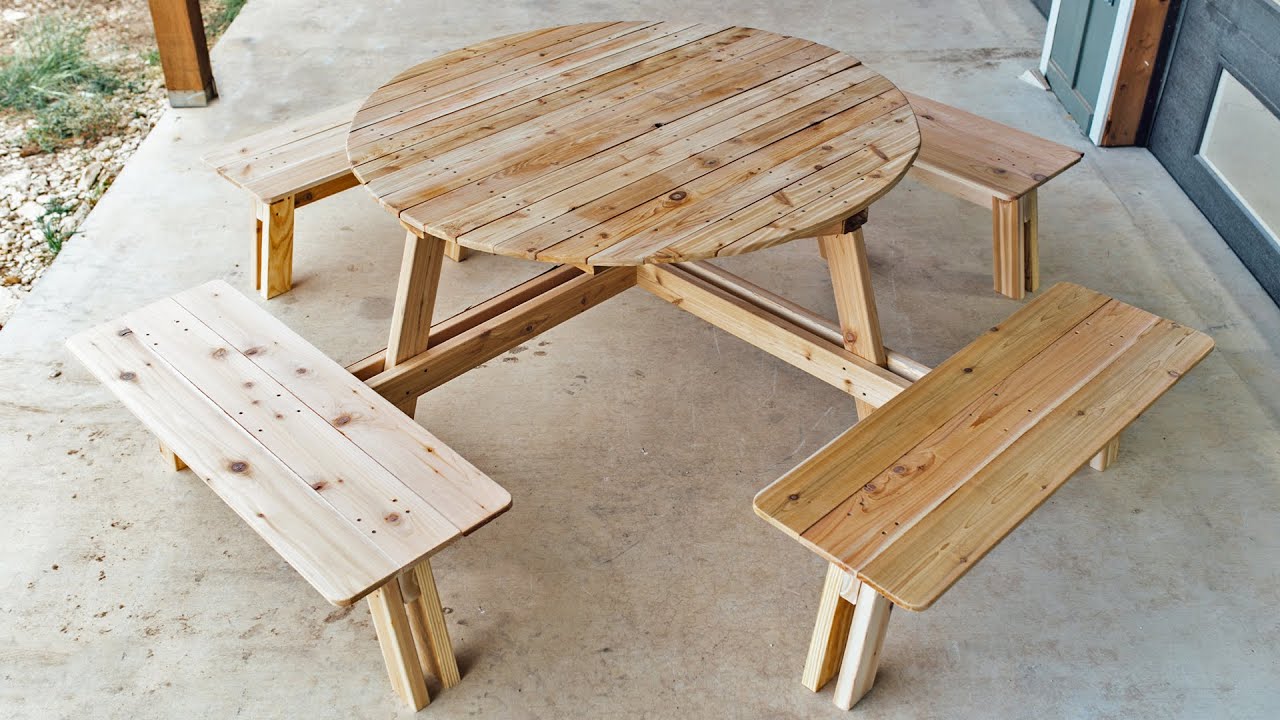
How To Make A Picnic Table With Detached Benches
Modified: August 17, 2024
Learn how to build a picnic table with detached benches for your outdoor entertaining needs. Step-by-step guide for a perfect outdoor dining experience.
(Many of the links in this article redirect to a specific reviewed product. Your purchase of these products through affiliate links helps to generate commission for Storables.com, at no extra cost. Learn more)
Introduction
Are you ready to elevate your outdoor entertaining game? Building a picnic table with detached benches is a fantastic way to enhance your outdoor space, creating a functional and inviting area for dining, socializing, and enjoying the great outdoors. Whether you're hosting a family gathering, a barbecue with friends, or simply seeking a peaceful spot to savor a meal al fresco, a well-crafted picnic table with detached benches can become the centerpiece of your outdoor living space.
In this comprehensive guide, we'll walk through the step-by-step process of constructing a picnic table with detached benches, providing detailed instructions and valuable insights to make the project both manageable and rewarding. From selecting the right materials to mastering the art of assembly, you'll gain the knowledge and confidence to embark on this fulfilling DIY endeavor.
By following these instructions, you'll not only create a practical and stylish addition to your outdoor area, but you'll also have the satisfaction of knowing that you built it with your own hands. So, gather your tools, roll up your sleeves, and let's dive into the exciting world of crafting a picnic table with detached benches.
Key Takeaways:
- Building a picnic table with detached benches is a fun DIY project that requires careful measuring, cutting, and assembling. With the right materials and tools, you can create a sturdy and stylish outdoor dining area.
- Adding finishing touches like sanding, applying wood finish, and attaching protective feet enhances the durability and appearance of the picnic table with detached benches. It’s a rewarding project that brings creativity and functionality to your outdoor space.
Read more: How To Build A Picnic Table Bench
Materials and Tools
Before diving into the construction process, it’s crucial to gather all the necessary materials and tools. Here’s what you’ll need:
Materials:
- Pressure-treated lumber: Look for high-quality, weather-resistant wood to ensure the longevity of your picnic table and benches.
- Wood screws: Opt for durable, corrosion-resistant screws that are suitable for outdoor use.
- Wood glue: Choose a reliable outdoor-grade wood glue to reinforce the joints and enhance the sturdiness of the furniture.
- Wood finish or paint: Select a finish or paint that provides protection against the elements, adding aesthetic appeal while safeguarding the wood from moisture and UV rays.
Tools:
- Tape measure and pencil: Essential for marking and measuring the wood accurately.
- Circular saw or miter saw: To cut the lumber to the required dimensions with precision.
- Drill and bits: For creating pilot holes and driving screws into the wood.
- Screwdriver: In case you need to tighten screws manually.
- Sanding block or sander: To smooth the edges and surfaces of the wood for a professional finish.
- Paintbrushes or applicators: If you plan to apply a wood finish or paint.
By ensuring that you have all the necessary materials and tools at your disposal, you’ll be well-prepared to commence the construction of your picnic table with detached benches. With everything in place, you can proceed with confidence, knowing that you’re equipped to tackle each step of the project effectively.
Step 1: Cutting the Wood
Accurate and precise cuts are essential for creating a sturdy and visually appealing picnic table with detached benches. Follow these steps to ensure that your wood is cut to the correct dimensions:
Read more: How To Make A Brick Bench
1.1 Measuring and Marking:
Begin by measuring and marking the pressure-treated lumber according to the dimensions specified in your chosen picnic table and bench plans. Use a tape measure and a pencil to make clear and accurate markings, ensuring that each piece is sized correctly for the tabletop, seats, legs, and supports.
1.2 Cutting the Lumber:
Once the lumber is marked, use a circular saw or miter saw to make precise cuts along the marked lines. Take your time to ensure that each cut is straight and clean, as accuracy at this stage will contribute to the overall stability and professional appearance of the final product.
1.3 Sanding the Edges:
After cutting the wood, use a sanding block or sander to smooth the edges of each piece. Pay special attention to any rough or uneven areas, as well-sanded edges not only enhance the visual appeal but also reduce the risk of splinters and ensure a comfortable seating experience for anyone using the picnic table and benches.
By carefully measuring, cutting, and sanding the wood, you’ll lay a solid foundation for the construction process, setting the stage for seamless assembly and a polished final result. With the wood prepared to the correct specifications, you’re ready to move on to the next steps and bring your picnic table with detached benches to life.
Step 2: Assembling the Tabletop
Creating a sturdy and well-constructed tabletop is a critical component of building a picnic table with detached benches. Follow these steps to assemble the tabletop with precision and care:
Read more: How To Build A Dining Table Bench
2.1 Arranging the Boards:
Lay out the cut lumber for the tabletop, ensuring that the pieces fit together seamlessly. Arrange the boards side by side, taking care to align them evenly and create a smooth, flat surface.
2.2 Joining the Boards:
Apply wood glue along the edges of the tabletop boards to create a strong bond between the pieces. Once the glue is applied, carefully join the boards together, ensuring that they are aligned correctly. Use clamps to hold the boards in place as the glue sets, promoting a secure and uniform connection.
2.3 Reinforcing with Screws:
Once the wood glue has dried, reinforce the tabletop by driving wood screws through the underside of the boards. Position the screws at regular intervals to provide robust support and prevent the boards from shifting over time. Be sure to select screws that are suitable for outdoor use to withstand exposure to the elements.
2.4 Sanding and Finishing:
After the tabletop is assembled, use a sander or sanding block to smooth the surface and eliminate any rough patches. This step not only enhances the visual appeal of the tabletop but also ensures a comfortable and safe dining surface for your outdoor gatherings. Once sanded, consider applying a protective wood finish to shield the tabletop from moisture, UV rays, and other environmental factors.
By following these steps, you’ll construct a durable and attractive tabletop that forms the centerpiece of your picnic table. With the tabletop assembled, you’re ready to move on to the next phase of the project, bringing you one step closer to completing your picnic table with detached benches.
Read more: How To Detach Blinds
Step 3: Building the Benches
Building sturdy and comfortable benches is essential for creating a welcoming and functional picnic table. Follow these steps to construct the benches with precision and attention to detail:
3.1 Cutting the Bench Components:
Begin by cutting the pressure-treated lumber into the necessary components for the benches, including the seat boards, legs, and supports. Ensure that each piece is accurately measured and cut to the specified dimensions, as this will contribute to the stability and visual appeal of the benches.
3.2 Assembling the Bench Seats:
Lay out the seat boards for each bench, arranging them side by side to form a solid seating surface. Apply wood glue along the edges of the seat boards and join them together securely. Once the glue is applied, reinforce the seat boards by driving wood screws through the underside, creating a stable and durable bench seat.
3.3 Attaching the Bench Legs and Supports:
Secure the legs and supports to the underside of the bench seats using wood screws and wood glue. Position the legs and supports evenly to ensure that the benches are well-balanced and capable of supporting the weight of those seated. Take care to align the components accurately and use clamps to hold them in place while the glue sets.
Read also: 12 Best Picnic Benches For Outdoors For 2025
3.4 Sanding and Finishing:
After assembling the benches, use a sander or sanding block to smooth the edges and surfaces of the wood. Focus on eliminating any rough areas to create a comfortable seating experience for anyone using the benches. Consider applying a protective wood finish to safeguard the benches from the elements and enhance their longevity.
By following these steps, you’ll create robust and inviting benches that complement the picnic table, providing comfortable seating for outdoor gatherings and dining experiences. With the benches constructed, you’re ready to move on to the next phase of the project and bring your picnic table with detached benches one step closer to completion.
Step 4: Attaching the Benches
Attaching the benches to the picnic table requires careful consideration and precision to ensure a secure and functional setup. Follow these steps to attach the benches to the table with confidence and expertise:
4.1 Positioning the Benches:
Place the benches in their intended positions alongside the picnic table, ensuring that they are evenly aligned and spaced appropriately. Take measurements to confirm that the benches are positioned symmetrically and centered with respect to the table.
4.2 Marking the Attachment Points:
Use a pencil to mark the points on the underside of the tabletop where the benches will be attached. Ensure that the marks are clear and accurately positioned to guide the attachment process.
Read more: How To Make A Wooden Outdoor Bench
4.3 Attaching the Benches to the Table:
Secure the benches to the picnic table by driving wood screws through the marked attachment points on the underside of the tabletop. Position the screws strategically to provide robust support and stability, ensuring that the benches are firmly anchored to the table.
4.4 Reinforcing the Connection:
To further reinforce the attachment, consider applying wood glue along the contact points between the benches and the table. This additional measure can enhance the strength of the connection and contribute to the overall stability of the picnic table with detached benches.
By following these steps, you’ll establish a secure and reliable attachment between the benches and the picnic table, creating a unified and functional outdoor furniture ensemble. With the benches successfully attached, you’re ready to proceed to the final phase of the project, bringing your picnic table with detached benches to completion.
Step 5: Finishing Touches
As you near the completion of your picnic table with detached benches, it’s time to add the finishing touches that will enhance the appearance, durability, and overall appeal of the outdoor furniture ensemble. Follow these steps to apply the finishing touches with care and attention to detail:
5.1 Sanding and Smoothing:
Prior to applying any finishes, thoroughly sand all exposed surfaces of the picnic table and benches. This step ensures that the wood is smooth to the touch and free from any rough spots or sharp edges, enhancing both the aesthetics and comfort of the furniture.
Read more: How To Make A Vanity Bench
5.2 Applying Wood Finish or Paint:
Consider applying a protective wood finish or paint to the picnic table and benches. A high-quality finish not only enriches the natural beauty of the wood but also provides essential protection against the elements, including moisture, UV rays, and general wear and tear. Whether you prefer a clear sealant to showcase the wood’s grain or a vibrant paint to complement your outdoor decor, the finish serves as a crucial shield that preserves the furniture’s integrity and appearance.
5.3 Adding Protective Feet:
To safeguard your outdoor surfaces and prevent the picnic table and benches from scratching or damaging the ground, attach protective feet to the bottom of each leg. These simple additions help to preserve both the furniture and the underlying surfaces, ensuring long-term functionality and aesthetics.
5.4 Final Inspection and Touch-Ups:
Once the finishing touches are complete, conduct a thorough inspection of the picnic table and benches. Look for any areas that may require additional attention, such as minor imperfections, uneven finishes, or loose hardware. Address these details promptly, making any necessary touch-ups or adjustments to ensure that the furniture meets your standards of quality and craftsmanship.
By completing these finishing touches, you’ll elevate the picnic table with detached benches to its full potential, creating a stunning and resilient outdoor furniture set that’s ready to take center stage in your outdoor entertaining space. With the finishing touches applied, you’ve reached the culmination of your DIY journey, and your picnic table with detached benches is now prepared to enrich your outdoor experiences for years to come.
Conclusion
Congratulations! By embarking on the journey of crafting a picnic table with detached benches, you’ve not only expanded your DIY skills but also created a versatile and inviting focal point for your outdoor gatherings. Throughout this process, you’ve harnessed your creativity and determination to transform basic materials into a functional and aesthetically pleasing piece of furniture.
As you admire the finished picnic table with detached benches in your outdoor space, take pride in the craftsmanship and care that went into every step of the construction. From selecting the finest materials to meticulously assembling each component, your dedication has yielded a tangible and enduring asset that will enrich your outdoor lifestyle for years to come.
Moreover, the satisfaction of having built this outdoor furniture ensemble with your own hands extends beyond the tangible result. You’ve cultivated a deeper connection to your outdoor living space, infusing it with personal touches and a sense of accomplishment that will resonate with every gathering, meal, or moment of relaxation enjoyed around the picnic table.
Remember, the journey doesn’t end here. As you revel in the joy of your completed project, continue to maintain and care for your picnic table and benches, ensuring that they remain resilient and visually captivating. Whether it’s applying a fresh coat of protective finish or making minor adjustments as needed, your ongoing attention will preserve the beauty and functionality of your outdoor creation.
Furthermore, your experience in building a picnic table with detached benches has equipped you with valuable knowledge and skills that can be applied to future DIY endeavors. Whether you’re inspired to tackle more outdoor furniture projects or explore other areas of home improvement, the lessons learned and confidence gained from this undertaking will serve as a solid foundation for future ventures.
As you bask in the satisfaction of completing this project, take a moment to appreciate the transformative power of your efforts. Your picnic table with detached benches stands as a testament to your ingenuity, perseverance, and commitment to enhancing your outdoor living space. Now, go ahead and create unforgettable memories around your beautifully crafted picnic table with detached benches.
Frequently Asked Questions about How To Make A Picnic Table With Detached Benches
Was this page helpful?
At Storables.com, we guarantee accurate and reliable information. Our content, validated by Expert Board Contributors, is crafted following stringent Editorial Policies. We're committed to providing you with well-researched, expert-backed insights for all your informational needs.

0 thoughts on “How To Make A Picnic Table With Detached Benches”