Home>Gardening & Outdoor>Outdoor Structures>How Do I Build A Shed Foundation
Outdoor Structures
How Do I Build A Shed Foundation
Modified: March 2, 2024
Learn how to build a solid foundation for your outdoor structures with our step-by-step guide. Find expert tips and advice for constructing a durable shed base.
(Many of the links in this article redirect to a specific reviewed product. Your purchase of these products through affiliate links helps to generate commission for Storables.com, at no extra cost. Learn more)
Introduction
Building a shed can be an exciting and rewarding project, providing you with valuable storage space and a sense of accomplishment. However, before you can start assembling the walls and roof, it’s crucial to lay a strong and stable foundation. A well-built shed foundation not only supports the structure but also helps protect it from moisture and shifting ground. In this comprehensive guide, we’ll explore the essential steps to building a shed foundation, from planning and preparation to the various types of foundations and the construction process. Whether you’re a seasoned DIY enthusiast or a beginner looking to tackle your first outdoor project, this article will equip you with the knowledge and confidence to create a solid and durable foundation for your shed.
Key Takeaways:
- Building a shed foundation requires thorough planning, precise construction, and attention to detail. Whether it’s a concrete slab, gravel pad, or wooden skids, a level and stable foundation is crucial for a durable shed.
- Effective drainage solutions, such as grading, French drains, and gutter diversion, are essential for preventing water accumulation around the shed foundation. Proper drainage safeguards the structure from moisture-related issues and ensures its longevity.
Read more: How To Build A Wood Foundation For A Shed
Planning and Preparation
Before embarking on the construction of a shed foundation, it’s crucial to engage in thorough planning and preparation. This initial phase sets the stage for a successful project and ensures that the foundation meets your specific needs and local building codes.
One of the first steps in the planning process is to determine the size and layout of your shed. Consider the intended use of the shed and the items it will store. Whether it’s lawn equipment, gardening supplies, or outdoor furniture, having a clear understanding of your storage requirements will help you select an appropriate foundation design.
Additionally, check with your local building department to obtain any necessary permits or guidelines for constructing a shed. Understanding the zoning regulations, property setbacks, and any utility easements will prevent potential issues down the line and ensure compliance with local regulations.
Another vital aspect of planning is assessing the ground slope and soil composition where the shed will be located. A level foundation is essential for the stability and longevity of the structure. If the ground is uneven, you may need to consider leveling the area or implementing a foundation design that accommodates sloping terrain.
Moreover, it’s essential to take into account the environmental factors that may impact the shed’s foundation, such as drainage and water runoff. Proper drainage is critical for preventing water accumulation around the shed, which can lead to moisture-related issues and structural damage over time.
Lastly, create a detailed materials list and gather the necessary tools for the foundation construction. Depending on the chosen foundation type, you may need materials such as concrete, gravel, pressure-treated lumber, and various construction tools. Having a comprehensive list and the required tools on hand will streamline the construction process and minimize delays.
By dedicating time to thorough planning and preparation, you’ll lay a solid foundation for the shed and set the stage for a successful and durable outdoor structure.
Choosing the Right Location
When it comes to building a shed, selecting the right location is a critical decision that significantly impacts the functionality and longevity of the structure. The ideal location for your shed should not only accommodate the size of the building but also consider factors such as accessibility, aesthetics, and practicality.
Accessibility is a key consideration when choosing the shed’s location. If the shed will be used to store tools, equipment, or other items that require frequent access, placing it within a convenient distance from your home or work area is essential. Additionally, consider pathways and clearances to ensure easy navigation around the shed.
Furthermore, the aesthetic integration of the shed within your property should be taken into account. Consider how the shed will complement the overall landscape and whether its placement enhances the visual appeal of your outdoor space. Strategic placement can contribute to a harmonious and cohesive look, while also maximizing the shed’s utility.
Practicality is another vital aspect to consider. Assess the environmental factors such as sunlight exposure, prevailing wind direction, and proximity to trees or other structures. Maximizing natural light and ventilation can enhance the usability of the shed, while minimizing exposure to harsh elements can prolong its lifespan.
Moreover, consider the ground conditions and terrain of the chosen location. Select a level area that can support the foundation without the need for extensive excavation or leveling. If the ground is uneven, you may need to factor in additional preparations to ensure a stable and even foundation.
Additionally, it’s crucial to verify any local regulations or restrictions regarding shed placement. Some municipalities have specific guidelines on setback distances from property lines, easements, or neighboring structures. Adhering to these regulations will prevent potential conflicts and ensure compliance with local building codes.
By carefully evaluating accessibility, aesthetics, practicality, and regulatory considerations, you can confidently choose the right location for your shed. This thoughtful approach sets the stage for a functional, visually appealing, and structurally sound outdoor storage solution.
Clearing the Area
Before commencing the construction of a shed foundation, it’s essential to thoroughly clear and prepare the designated area. Clearing the area not only ensures a clean and level surface for the foundation but also minimizes potential obstructions and environmental impacts on the shed.
The first step in clearing the area involves removing any vegetation, debris, or obstacles that may impede the foundation construction. This includes grass, weeds, rocks, tree roots, and any other organic or inorganic materials that could interfere with the foundation’s stability.
Next, assess the soil composition and make any necessary adjustments to ensure a level and stable foundation. If the ground is uneven or contains soft spots, consider grading the area or adding compacted fill to create a solid base for the foundation. Additionally, remove any excess soil or debris to achieve the desired elevation for the shed’s location.
Clearing the area also involves addressing drainage considerations. Ensure that the shed’s location allows for proper water runoff and does not create areas of standing water. If necessary, implement drainage solutions such as swales or French drains to redirect water away from the shed and prevent moisture-related issues.
Furthermore, if the shed will be situated near trees or shrubs, take into account their root systems and potential impact on the foundation. Clearing the area may involve trimming or removing nearby vegetation to prevent root encroachment and minimize the risk of damage to the shed over time.
It’s important to approach the clearing process with attention to detail and thoroughness, as a well-prepared foundation site sets the stage for a successful and long-lasting shed. By addressing vegetation, soil composition, drainage, and potential obstructions, you’ll create an optimal environment for constructing a sturdy and durable shed foundation.
Materials and Tools
Equipping yourself with the right materials and tools is essential for effectively constructing a shed foundation. The selection of materials and tools will largely depend on the chosen foundation type and the specific requirements of your project. Here’s a comprehensive overview of the essential materials and tools you may need:
Read more: How To Build A Gravel Foundation For A Shed
Materials
1. Pressure-Treated Lumber: For wooden skid or block foundations, pressure-treated lumber provides durability and resistance to decay, making it suitable for ground contact.
2. Concrete: If opting for a concrete slab or using concrete blocks, you’ll need quality concrete mix to create a solid and stable foundation.
3. Gravel: Essential for creating a stable base and promoting drainage, gravel is commonly used in gravel pad foundations.
4. Landscape Fabric: Utilized to prevent weed growth and promote drainage in gravel pad foundations.
5. Rebar or Wire Mesh: For reinforcing concrete slabs and enhancing their strength and durability.
6. Fasteners: Nails, screws, and anchor bolts are essential for securing the foundation components and connecting the shed structure.
Tools
1. Shovel: Essential for excavating the foundation area, clearing debris, and shaping the ground surface.
2. Level: To ensure the foundation is even and properly aligned during construction.
3. Tape Measure: For taking accurate measurements and ensuring the foundation dimensions meet the shed’s requirements.
4. Concrete Mixer or Wheelbarrow: If working with concrete, a mixer or wheelbarrow facilitates the mixing and transportation of concrete mix.
5. Hammer, Nailer, or Screwdriver: Depending on the construction method, these tools are essential for assembling the foundation components and connecting the shed structure.
6. Hand Tamper or Plate Compactor: For compacting the soil or gravel base to create a stable foundation.
7. Utility Knife: Useful for cutting landscape fabric and other materials to size.
8. Protective Gear: Safety glasses, work gloves, and appropriate footwear to ensure safety during construction.
By ensuring you have the necessary materials and tools on hand, you’ll be well-prepared to tackle the construction of a sturdy and reliable shed foundation. This comprehensive inventory sets the stage for a smooth and efficient building process, ultimately leading to a durable and functional outdoor structure.
Types of Shed Foundations
When it comes to building a shed foundation, several options are available, each suited to different terrain, shed sizes, and personal preferences. Understanding the characteristics and construction requirements of each foundation type will help you select the most suitable option for your project. Here are the key types of shed foundations to consider:
Concrete Slab
A concrete slab foundation offers a durable and permanent base for your shed. It involves pouring a thick layer of concrete directly onto a level and compacted surface. This type of foundation is ideal for larger sheds and provides excellent stability and protection against moisture. Reinforcing the slab with rebar or wire mesh enhances its strength and longevity.
Read more: How To Build A Foundation For A Tool Shed
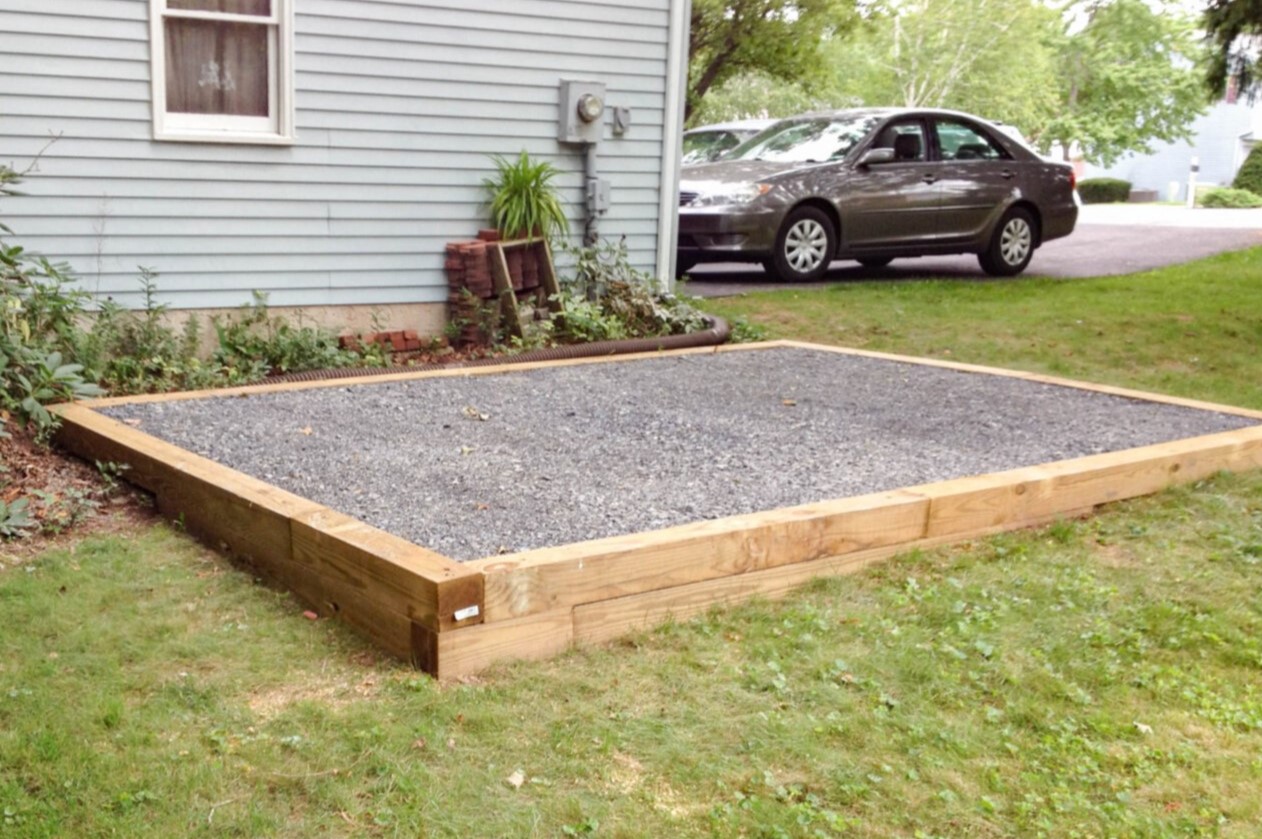
Gravel Pad
For a more cost-effective and versatile option, a gravel pad foundation is a popular choice. It involves creating a level bed of compacted gravel, typically enclosed by pressure-treated lumber or metal edging. The gravel pad provides a stable and well-drained foundation, making it suitable for various shed sizes and terrains. Adding a layer of landscape fabric beneath the gravel helps prevent weed growth and maintain a clean foundation surface.
Concrete Blocks
Concrete blocks, also known as cinder blocks, offer a practical and straightforward foundation solution. By placing the shed on a series of leveled concrete blocks, you create a stable and elevated platform that helps protect the shed from ground moisture and shifting. This foundation type is particularly well-suited for smaller sheds and provides ample ventilation and airflow beneath the structure.
Wooden Skids
Wooden skids, constructed from pressure-treated lumber, offer a flexible and portable foundation option. Skids are placed directly on the ground and provide a stable base for the shed. This foundation type is well-suited for temporary or small-scale shed installations and allows for easy relocation if necessary. Wooden skids can be augmented with gravel or concrete pavers to enhance stability and minimize ground contact.
Each type of shed foundation offers distinct advantages and considerations, allowing you to tailor the choice to your specific needs and preferences. By carefully evaluating factors such as shed size, local climate, and budget, you can select the most suitable foundation type for your project, ensuring a sturdy and long-lasting outdoor structure.
Concrete Slab
A concrete slab foundation is a robust and permanent option for supporting a shed. Constructing a concrete slab involves careful planning, site preparation, and precise execution to ensure a level and durable foundation. Here’s a detailed overview of the steps involved in building a concrete slab for your shed:
Read more: What Kind Of Foundation Do I Need For A Shed
Site Preparation
The first step in creating a concrete slab is to prepare the site. This involves clearing the area of vegetation, debris, and any obstructions. The ground must then be leveled and compacted to provide a stable base for the concrete. It’s essential to ensure proper drainage and address any slope or elevation issues at this stage.
Formwork Installation
Once the site is prepared, the next step is to construct the formwork that will contain the concrete. Formwork, typically made of wood or metal, outlines the perimeter of the slab and holds the concrete in place during pouring. Careful attention to detail is crucial to ensure that the formwork is level, square, and properly aligned with the shed’s dimensions.
Reinforcement and Insulation
Depending on the shed’s size and local building codes, reinforcing the concrete slab with rebar or wire mesh may be necessary to enhance its strength and prevent cracking. Additionally, if the shed will be used for activities that require insulation, such as a workshop or studio, this is the stage to install any necessary insulation materials within the slab.
Concrete Pouring and Finishing
With the formwork in place and the necessary reinforcement and insulation installed, the concrete can be poured into the designated area. The concrete must be spread and leveled using screeds and floats to achieve a smooth and even surface. Proper curing and finishing techniques are essential to ensure the strength and durability of the slab. This may involve applying a curing compound or keeping the surface moist as the concrete sets.
Curing and Drying
After the concrete is poured and finished, it undergoes a curing process to attain its full strength. This typically involves keeping the slab moist and protected from rapid drying for a specified period. It’s crucial to follow the recommended curing practices to prevent cracking and ensure the longevity of the concrete slab.
Final Considerations
Upon completion of the concrete slab, it’s important to assess the surface for any imperfections or irregularities. Any necessary touch-ups or repairs should be addressed promptly to achieve a high-quality and level foundation for the shed. Additionally, consider sealing the concrete to enhance its resistance to moisture and prolong its lifespan.
Building a concrete slab foundation for your shed requires careful attention to detail and adherence to best practices for concrete construction. A well-executed concrete slab provides a solid and long-lasting base for your shed, ensuring stability and protection for years to come.
Gravel Pad
A gravel pad foundation offers a versatile and cost-effective option for supporting a shed, providing a stable and well-drained base that accommodates various shed sizes and terrains. Constructing a gravel pad involves careful site preparation and the strategic placement of gravel to create a solid foundation. Here’s an in-depth look at the steps involved in building a gravel pad for your shed:
Read more: What Kind Of Foundation Do I Need For A Shed
Site Preparation
The initial step in creating a gravel pad is to prepare the site. Clear the area of vegetation, debris, and any obstructions, ensuring a clean and level surface for the foundation. Addressing any slope or elevation issues and ensuring proper drainage are essential aspects of site preparation.
Read more: How To Make A Foundation For A Shed
Formwork and Edging
While formwork is not typically required for a gravel pad, defining the perimeter of the foundation area with pressure-treated lumber or metal edging helps contain the gravel and maintain a clean boundary for the shed. This step also involves addressing any potential weed growth by installing landscape fabric beneath the gravel.
Gravel Placement
Once the site is prepared, the next step is to distribute and compact the gravel to create the pad. Choose a suitable type of gravel, such as crushed stone, that provides excellent drainage and compacts well. Layer the gravel evenly, periodically compacting it with a hand tamper or plate compactor to achieve a stable and level surface.
Drainage Considerations
Proper drainage is integral to the functionality of a gravel pad foundation. Ensure that the pad is sloped away from the shed to facilitate water runoff and prevent pooling. Additionally, consider incorporating drainage solutions, such as French drains or swales, to redirect water away from the foundation area and minimize moisture-related issues.
Final Compaction and Inspection
After the gravel is evenly distributed and compacted, perform a final inspection to ensure that the pad is level and free of any irregularities. Address any areas that require additional compaction or leveling to achieve a uniform and stable foundation for the shed.
Read more: What Is The Best Foundation For A Shed
Surface Maintenance
Regular maintenance of the gravel pad, such as periodic re-leveling and weed control, is essential to preserve its stability and drainage properties. Additionally, adding a fresh layer of gravel as needed helps maintain the integrity of the foundation over time, ensuring a reliable and long-lasting base for the shed.
Constructing a gravel pad foundation for your shed offers a practical and adaptable solution that accommodates various shed sizes and terrains. By carefully preparing the site and strategically placing the gravel, you’ll create a stable and well-drained foundation that supports the longevity and functionality of your shed.
Concrete Blocks
Using concrete blocks as a foundation for a shed offers a practical and straightforward solution, providing a stable and elevated platform that helps protect the shed from ground moisture and shifting. Constructing a foundation with concrete blocks involves careful preparation and precise placement to ensure a level and durable base for the shed. Here’s an in-depth look at the steps involved in building a shed foundation using concrete blocks:
Read more: What Kind Of Foundation Do I Need For A Shed
Site Preparation
The initial step in creating a foundation with concrete blocks is to prepare the site. Clear the area of vegetation, debris, and any obstructions, ensuring a clean and level surface for the foundation. Addressing any slope or elevation issues and ensuring proper drainage are essential aspects of site preparation.
Block Placement and Leveling
Once the site is prepared, the next step is to position the concrete blocks at strategic intervals to support the shed. Carefully level and align the blocks to create a uniform and stable platform. It’s crucial to ensure that the blocks are securely positioned and provide adequate support for the shed’s structure.
Read more: How Big Can I Build A Shed
Additional Support and Ventilation
Depending on the shed’s size and local building codes, additional support elements, such as pressure-treated lumber or metal joist hangers, may be installed to enhance the stability and load-bearing capacity of the foundation. Additionally, the use of concrete blocks allows for ample ventilation and airflow beneath the shed, minimizing moisture-related issues and promoting the longevity of the structure.
Drainage Considerations
Proper drainage is integral to the functionality of a concrete block foundation. Ensure that the blocks are placed on a well-drained surface and that the foundation design allows for adequate water runoff. Addressing drainage considerations at this stage helps prevent moisture accumulation around the shed and minimizes the risk of structural damage over time.
Final Inspection and Adjustments
After the blocks are positioned and leveled, perform a final inspection to ensure that the foundation is stable and free of any irregularities. Address any areas that require additional leveling or adjustments to achieve a uniform and reliable platform for the shed.
Constructing a shed foundation using concrete blocks offers a practical and durable solution, providing a stable and well-ventilated base for the shed. By carefully preparing the site and positioning the blocks, you’ll create a reliable and long-lasting foundation that supports the structural integrity and functionality of your shed.
Wooden Skids
Constructing a shed foundation using wooden skids offers a flexible and portable solution, particularly suitable for temporary or small-scale shed installations. Wooden skids, constructed from pressure-treated lumber, provide a stable base for the shed and allow for easy relocation if necessary. Here’s an in-depth look at the steps involved in building a shed foundation using wooden skids:
Read more: What Kind Of Foundation Do I Need For A Shed
Site Preparation
The initial step in creating a foundation with wooden skids is to prepare the site. Clear the area of vegetation, debris, and any obstructions, ensuring a clean and level surface for the foundation. Addressing any slope or elevation issues and ensuring proper drainage are essential aspects of site preparation.
Skid Placement and Leveling
Once the site is prepared, the next step is to position the wooden skids at strategic intervals to support the shed. Carefully level and align the skids to create a stable and uniform platform. It’s crucial to ensure that the skids are securely positioned and provide adequate support for the shed’s structure.
Ground Contact Considerations
Given that wooden skids directly contact the ground, it’s important to address potential moisture-related issues and decay. Elevating the skids on concrete pavers or gravel helps minimize ground contact and enhances the longevity of the foundation. Additionally, periodic inspection and maintenance of the skids, such as treating them with wood preservatives, are essential to protect against decay and ensure their durability.
Relocation and Maintenance
One of the key advantages of a foundation using wooden skids is its portability. If the shed needs to be relocated, the skids facilitate easy movement to a new site. Regular maintenance, such as re-leveling the skids and addressing any decay or damage, is crucial to preserve the stability and functionality of the foundation over time.
Final Inspection and Adjustments
After the skids are positioned and leveled, perform a final inspection to ensure that the foundation is stable and free of any irregularities. Address any areas that require additional leveling or adjustments to achieve a uniform and reliable platform for the shed.
Constructing a shed foundation using wooden skids offers a flexible and practical solution, providing a stable and portable base for the shed. By carefully preparing the site and positioning the skids, you’ll create a reliable and adaptable foundation that supports the functionality and longevity of your shed.
Building the Foundation
Building a solid foundation for your shed is a crucial step that sets the stage for the structure’s stability and longevity. Whether you opt for a concrete slab, gravel pad, concrete blocks, or wooden skids, the construction process involves careful planning, precise execution, and attention to detail. Here’s a comprehensive guide to the essential steps involved in building a sturdy and reliable foundation for your shed:
1. Site Preparation
The first step is to prepare the site by clearing the area of vegetation, debris, and any obstructions. Ensure that the ground is level and well-drained, addressing any slope or elevation issues to create a stable base for the foundation.
2. Formwork or Placement
Depending on the chosen foundation type, construct formwork for concrete foundations or position the foundation components, such as gravel for a gravel pad or concrete blocks for block foundations. Carefully align and level the formwork or components to create a uniform and stable base for the shed.
Read more: How To Build A Cabin Foundation
3. Reinforcement and Insulation
If applicable, install reinforcement such as rebar or wire mesh for concrete foundations to enhance their strength and durability. Additionally, address any insulation requirements for the shed, ensuring that the foundation accommodates these considerations.
4. Material Placement and Compaction
For concrete foundations, pour and spread the concrete mix, ensuring a smooth and even surface. For gravel pads, distribute and compact the gravel to create a stable and well-drained foundation. Position and align the concrete blocks or wooden skids to provide a secure base for the shed.
5. Leveling and Alignment
Throughout the construction process, maintain a focus on leveling and aligning the foundation components. A level and uniform foundation are essential for the stability and structural integrity of the shed. Use a level and appropriate tools to ensure precise alignment and positioning.
6. Drainage Considerations
Address drainage considerations to prevent water accumulation around the shed. Ensure that the foundation design allows for proper water runoff and consider implementing drainage solutions such as swales or French drains if necessary.
Read more: How Do I Know If I Need Foundation Repair
7. Final Inspection and Adjustments
After the foundation components are in place, perform a final inspection to ensure that the foundation is stable and free of any irregularities. Address any areas that require additional leveling, compaction, or adjustments to achieve a reliable and durable base for the shed.
By following these essential steps, you’ll build a sturdy and reliable foundation for your shed, setting the stage for a successful and long-lasting outdoor structure. Whether you choose a concrete slab, gravel pad, concrete blocks, or wooden skids, careful planning and precise execution are key to creating a foundation that supports the functionality and durability of your shed.
Leveling the Foundation
Ensuring that the shed foundation is level is a critical aspect of the construction process, as it directly impacts the stability and structural integrity of the entire shed. Whether you’re working with a concrete slab, gravel pad, concrete blocks, or wooden skids, achieving a level foundation is essential. Here’s a detailed guide to the key steps involved in leveling the foundation for your shed:
1. Initial Assessment
Before proceeding with leveling, carefully assess the foundation to identify any areas of unevenness or irregularities. Use a long, straight board or a laser level to gauge the current levelness of the foundation surface. Identify high and low points that require adjustment.
2. Adjusting Concrete Foundations
If you’re working with a concrete foundation, such as a slab, address any unevenness by adding or removing concrete as needed. Use a screed or trowel to level the surface, ensuring that it is smooth and even. Pay close attention to the edges and corners to achieve uniformity throughout the foundation.
Read more: How To Build A Pier Foundation
3. Gravel Pad and Block Foundations
For gravel pad foundations or those utilizing concrete blocks, adjust the levelness by adding or removing gravel beneath the foundation components. Use a hand tamper or plate compactor to compact the gravel and create a stable base. Ensure that the blocks or skids are aligned and positioned uniformly to achieve a level foundation.
4. Wooden Skids Considerations
If you’re using wooden skids, assess their levelness and make adjustments by adding shims or additional support as necessary. Elevating the skids on concrete pavers or gravel helps minimize ground contact and facilitates precise leveling of the foundation.
5. Rechecking and Fine-Tuning
After making initial adjustments, recheck the levelness of the foundation using a level or laser level. Fine-tune the leveling as needed, ensuring that the entire foundation surface, including the perimeter, is uniformly level. Pay attention to transitions between different foundation components to achieve seamless alignment.
6. Drainage Considerations
Throughout the leveling process, consider the impact on the foundation’s drainage. Ensure that the foundation design allows for proper water runoff and that any adjustments made do not impede drainage or create areas of standing water around the shed.
Read more: How To Build A Deck Foundation
7. Final Inspection and Confirmation
Perform a final inspection to confirm that the foundation is level and free of any irregularities. Take the time to walk across the entire foundation surface, verifying its stability and uniformity. Address any remaining areas that require adjustment to achieve a reliable and level base for the shed.
By diligently following these steps, you’ll ensure that the foundation for your shed is level, stable, and capable of supporting the shed’s structure. Whether you’re working with concrete, gravel, blocks, or skids, meticulous attention to leveling is crucial for the long-term functionality and durability of your shed.
Adding Drainage
Proper drainage is a critical consideration when constructing a shed foundation, as it helps prevent water accumulation and potential moisture-related issues that could compromise the structure’s integrity. Whether you’ve opted for a concrete slab, gravel pad, concrete blocks, or wooden skids, implementing effective drainage solutions is essential. Here’s a comprehensive guide to adding drainage to your shed foundation:
1. Site Assessment
Begin by assessing the site to identify natural water flow patterns, low-lying areas, and potential sources of water runoff. Understanding the site’s drainage characteristics is instrumental in devising an effective drainage strategy for the shed foundation.
2. Grading and Sloping
Ensure that the foundation area is properly graded and sloped to facilitate water runoff away from the shed. The ground should slope away from the foundation, directing water toward appropriate drainage outlets such as swales or catch basins.
Read more: How To Build A Concrete Foundation
3. French Drains
If the site has a history of water accumulation or poor drainage, consider installing French drains around the perimeter of the foundation. French drains consist of a perforated pipe surrounded by gravel, which helps collect and redirect excess water away from the foundation, preventing moisture buildup.
4. Swales and Berms
Strategic placement of swales or berms can effectively manage water runoff around the shed. Swales are shallow ditches that redirect water flow, while berms are raised mounds that help channel water away from the foundation. Properly designed swales and berms contribute to efficient water management and prevent water from pooling near the shed.
5. Gutter and Downspout Diversion
If the shed has a roof with gutters and downspouts, ensure that they are positioned to divert water away from the foundation. Downspout extensions can be utilized to direct water at least several feet away from the shed, preventing water from accumulating near the foundation.
6. Permeable Surfacing
Consider utilizing permeable surfacing materials around the shed, such as gravel or permeable pavers. These materials allow water to infiltrate the ground, reducing surface runoff and minimizing the risk of water pooling around the foundation.
Read more: How To Build A Raised Foundation
7. Regular Maintenance
After implementing drainage solutions, it’s essential to conduct regular maintenance to ensure their effectiveness. Clear debris from gutters and downspouts, inspect and clean French drains and swales, and address any signs of water accumulation promptly to maintain optimal drainage around the shed.
By incorporating these drainage considerations into the construction of your shed foundation, you’ll effectively manage water runoff and mitigate the risk of moisture-related issues. Whether through grading, swales, French drains, or gutter diversion, strategic drainage solutions contribute to the long-term stability and durability of your shed.
Conclusion
Building a sturdy and reliable foundation for your shed is a fundamental aspect of creating a durable and functional outdoor structure. Whether you’ve chosen a concrete slab, gravel pad, concrete blocks, or wooden skids, the construction process involves careful planning, precise execution, and attention to detail. By following the essential steps outlined in this guide, you’ll lay the groundwork for a successful shed foundation that meets your storage needs and withstands the test of time.
Thorough planning and site preparation set the stage for a successful foundation construction, allowing you to address factors such as size, location, and environmental considerations. By carefully selecting the appropriate foundation type and materials, you create a base that accommodates the shed’s requirements and local building codes.
Whether you’re pouring a concrete slab, distributing gravel for a pad, positioning concrete blocks, or aligning wooden skids, achieving a level foundation is paramount. Precise leveling and alignment ensure the stability and structural integrity of the shed, contributing to its long-term functionality.
Implementing effective drainage solutions around the foundation safeguards the structure from water accumulation and moisture-related issues. By managing water runoff through grading, swales, French drains, and gutter diversion, you protect the foundation and preserve the shed’s longevity.
As you embark on the construction of your shed foundation, consider the unique characteristics of your property, the shed’s intended use, and the local climate. By tailoring the foundation construction to these specific factors, you’ll create a stable and durable base that supports the shed’s functionality and longevity.
Whether you’re a seasoned DIY enthusiast or embarking on your first outdoor project, the knowledge and insights gained from this guide empower you to construct a shed foundation with confidence and precision. By combining careful planning, meticulous execution, and a focus on long-term durability, you’ll lay the groundwork for a reliable and resilient outdoor structure that enhances your property for years to come.
Frequently Asked Questions about How Do I Build A Shed Foundation
Was this page helpful?
At Storables.com, we guarantee accurate and reliable information. Our content, validated by Expert Board Contributors, is crafted following stringent Editorial Policies. We're committed to providing you with well-researched, expert-backed insights for all your informational needs.
0 thoughts on “How Do I Build A Shed Foundation”