Home>Gardening & Outdoor>Outdoor Structures>How To Build A Gravel Pad For A Shed
Outdoor Structures
How To Build A Gravel Pad For A Shed
Modified: August 27, 2024
Learn how to create a sturdy gravel pad for your shed with our step-by-step guide. Perfect for outdoor structures like sheds and storage units.
(Many of the links in this article redirect to a specific reviewed product. Your purchase of these products through affiliate links helps to generate commission for Storables.com, at no extra cost. Learn more)
Introduction
When it comes to creating a sturdy and durable foundation for your shed, a gravel pad is an excellent choice. Not only does it provide a stable base for your shed, but it also offers proper drainage and helps prevent moisture buildup, ultimately extending the life of your outdoor structure. Building a gravel pad may seem like a daunting task, but with the right guidance and a bit of elbow grease, it can be a rewarding and achievable project for any DIY enthusiast.
In this comprehensive guide, we will walk you through the step-by-step process of building a gravel pad for your shed. From selecting the ideal location to the final touches, we will cover everything you need to know to ensure that your shed has a solid and long-lasting foundation. So, roll up your sleeves, gather your tools, and let's embark on this fulfilling journey of creating a robust gravel pad for your shed.
Key Takeaways:
- Building a gravel pad for your shed involves carefully selecting the location, excavating the area, creating a level base, and adding gravel to ensure a stable and enduring foundation.
- The construction process includes installing landscape fabric to prevent weed growth and compacting the gravel for a solid and resilient foundation that supports your shed for years to come.
Read more: How To Build A Pea Gravel Patio
Step 1: Choose the Location
Before you start building your gravel pad, it’s crucial to carefully select the location where your shed will be situated. The chosen area should be relatively flat and well-drained to prevent water from pooling around the shed. Additionally, consider the accessibility of the location, ensuring that it allows for easy entry and exit.
Take into account the natural slope of the land, as this will influence the amount of groundwork needed to create a level base. Ideally, you want to pick a spot that requires minimal excavation and grading to streamline the construction process. Moreover, assess the proximity to trees and large shrubs, as their roots can potentially interfere with the stability of the gravel pad over time.
Furthermore, check local building codes and regulations to ensure compliance with any specific requirements regarding shed placement. Some areas may have restrictions on how close a shed can be to property lines or other structures, so it’s essential to be aware of these guidelines from the outset.
By thoughtfully considering the location for your gravel pad, you can set the stage for a successful and enduring foundation that will support your shed for years to come.
Step 2: Gather Materials and Tools
Before diving into the construction of your gravel pad, it’s essential to gather all the necessary materials and tools. Ensuring that you have everything on hand will streamline the building process and prevent unnecessary delays.
The materials required for building a gravel pad typically include:
- Pressure-treated lumber or timber for the frame
- Landscape fabric to prevent weed growth
- Crushed stone or gravel for the base
- Stakes and string for layout and leveling
- Wood or metal stakes for securing the frame
- Landscaping pins or staples to secure the fabric
- Additional gravel for compacting
As for the tools, you will likely need:
- Shovel or excavator for digging
- Rake for leveling the base
- Hand tamper or plate compactor for compacting the gravel
- Tape measure and level for precision
- Work gloves and safety goggles for protection
By ensuring that you have all the required materials and tools at your disposal, you can proceed with confidence, knowing that you are well-equipped to tackle each phase of the construction process efficiently and effectively.
Step 3: Excavate the Area
With your materials and tools assembled, it’s time to begin the physical work of preparing the site for the gravel pad. The first crucial step is to excavate the area where the pad will be located. This process involves removing the topsoil and creating a level surface to accommodate the foundation.
Start by marking the boundaries of the pad using stakes and string, ensuring that the dimensions align with the size of your shed. Use a shovel or excavator to remove the top layer of grass, vegetation, and soil within the marked area. The depth of excavation will depend on the desired thickness of the gravel pad and the need to achieve a level base.
As you excavate, periodically check the depth and use a level to ensure uniformity across the entire area. It’s essential to strive for a consistent depth, as this will contribute to the stability and evenness of the gravel pad. Remove any rocks, roots, or debris that may impede the proper placement of the base materials.
During the excavation process, take into account the slope of the land and make adjustments to create a level surface. This may involve redistributing soil or digging deeper in certain areas to achieve the desired elevation. Paying close attention to the levelness of the base during excavation will lay the groundwork for a solid and well-balanced gravel pad.
Once the area has been excavated and leveled to your satisfaction, you are ready to proceed to the next phase of constructing the gravel pad, bringing you one step closer to providing a secure foundation for your shed.
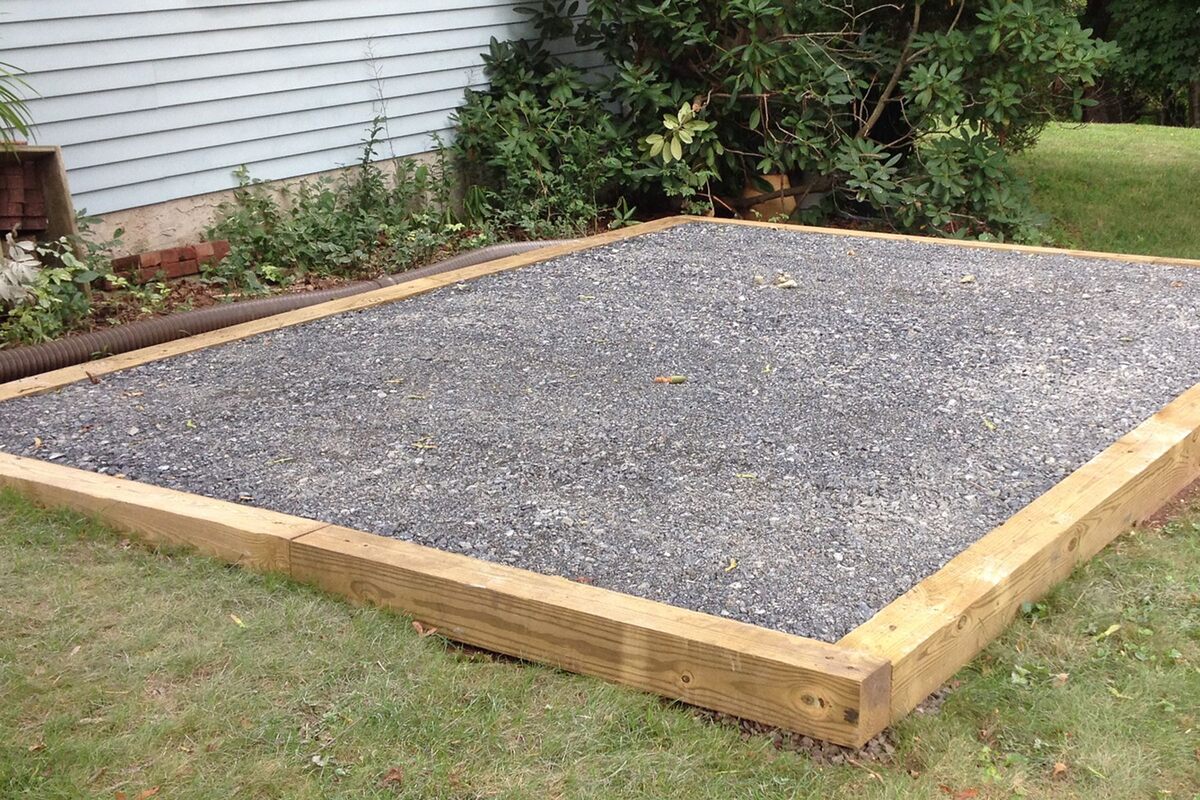
Step 4: Create a Level Base
With the area excavated, the next pivotal task in building your gravel pad is to establish a level base. This step is crucial in ensuring that your shed sits securely and that the weight is evenly distributed across the pad.
Begin by placing pressure-treated lumber or timber along the perimeter of the excavated area to create a frame that will contain the gravel. Use a tape measure to confirm that the frame dimensions align with the intended size of the pad, and adjust as necessary. The frame will not only define the boundaries of the pad but also help maintain the integrity of the gravel once it’s added.
Once the frame is in place, use a level to ensure that the top of the frame is even and that it follows the desired slope for proper drainage. This step is critical in establishing a uniform base that will support the shed without any uneven stress points. Adjust the frame as needed to achieve the desired levelness and slope.
With the frame set and leveled, fill the interior with a layer of crushed stone or gravel, spreading it evenly across the entire area. The depth of the base layer will depend on the specific requirements for your shed and the recommendations for load-bearing capacity in your region. Compact the gravel using a hand tamper or a plate compactor to create a firm and stable base.
Throughout this process, periodically check the levelness of the base and make adjustments as needed to ensure uniformity. A precisely leveled base will provide a solid and reliable foundation for your shed, minimizing the risk of settling or structural issues in the future.
By creating a level base within the frame, you are setting the stage for the successful installation of the gravel pad, bringing you closer to completing this essential groundwork for your shed.
Before building a gravel pad for a shed, make sure to level the ground and remove any vegetation. Use a geotextile fabric to prevent weeds from growing through the gravel. Compact the gravel in layers to create a stable base for the shed.
Read more: How Build A Shed
Step 5: Install Landscape Fabric
Once the base of your gravel pad is established, the next step involves the installation of landscape fabric. This crucial layer serves as a barrier that prevents weed growth and helps maintain the integrity of the gravel pad over time.
Begin by unrolling the landscape fabric and carefully laying it over the compacted gravel base. Ensure that the fabric extends beyond the boundaries of the gravel pad, providing ample coverage to inhibit weed penetration from the surrounding areas. Overlapping seams of the fabric will further enhance its effectiveness in preventing weed growth.
Secure the landscape fabric in place using landscaping pins or staples, anchoring it firmly to the ground. This will prevent the fabric from shifting or being displaced during the subsequent steps of the construction process. Additionally, the secured fabric will provide a stable foundation for the layer of gravel that will be added on top.
As you work with the landscape fabric, take care to avoid tears or punctures that could compromise its functionality. A properly installed and intact fabric layer will effectively deter weed growth and contribute to the long-term stability of your gravel pad.
The landscape fabric not only acts as a weed barrier but also aids in maintaining the separation between the gravel and the underlying soil. This separation helps prevent the gravel from sinking into the soil over time, preserving the integrity and load-bearing capacity of the pad.
By installing landscape fabric over the prepared gravel base, you are fortifying the foundation of your shed while safeguarding it against potential weed encroachment, bringing you one step closer to completing this essential construction process.
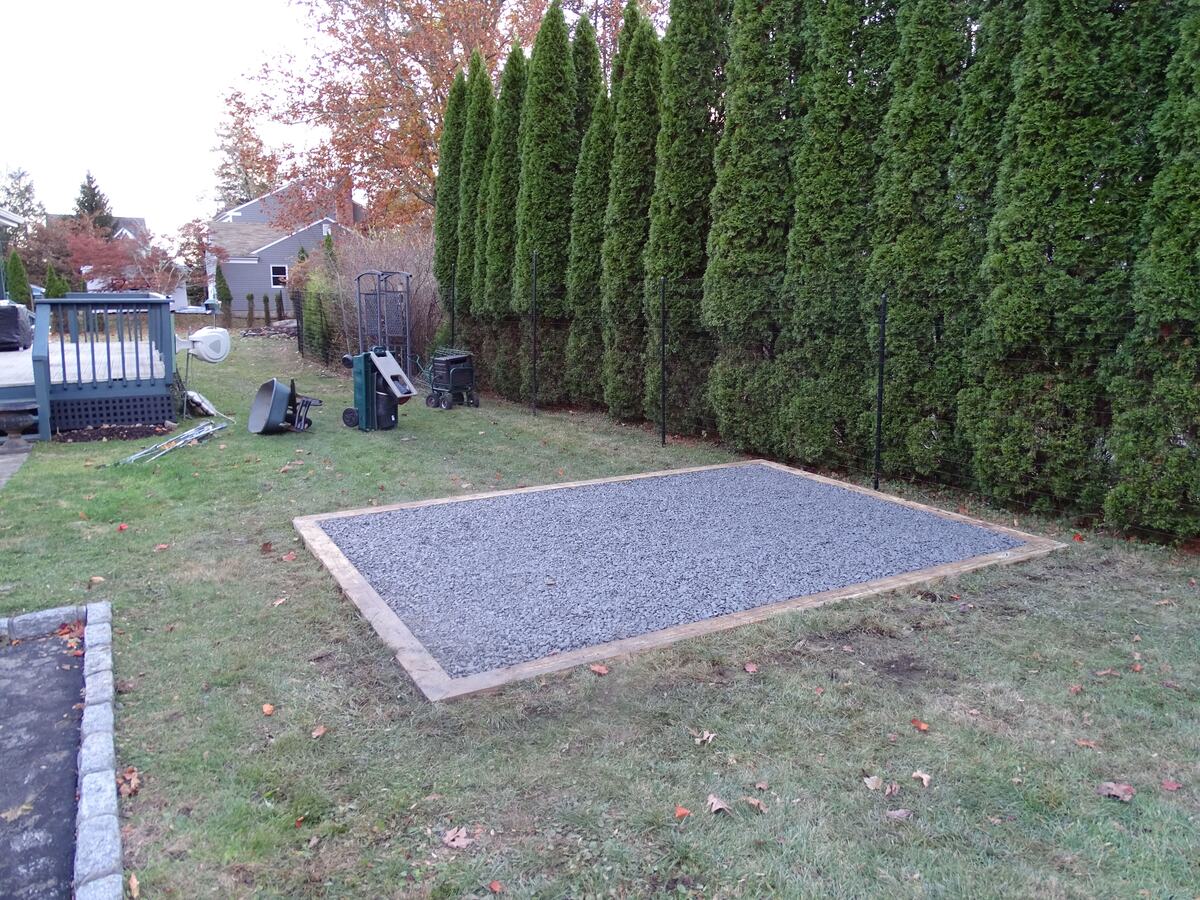
Step 6: Add Gravel
With the landscape fabric securely in place, the next pivotal phase in constructing your gravel pad is the addition of the gravel layer. The gravel serves as the primary material that forms the solid and supportive foundation for your shed, offering excellent drainage and load-bearing capabilities.
Begin by evenly distributing a layer of crushed stone or gravel over the landscape fabric, ensuring consistent coverage across the entire area of the pad. The depth of the gravel layer will depend on the specific requirements for your shed and the recommended thickness for a stable and durable foundation.
As you add the gravel, use a rake to spread and level it, paying close attention to achieving a uniform thickness. This meticulous approach will result in a well-balanced and supportive layer that will effectively uphold the weight of your shed and resist settling over time.
It’s essential to select high-quality gravel that is well-suited for constructing a stable foundation. Consider factors such as the size and composition of the gravel to ensure optimal performance in providing a solid and enduring base for your shed.
Once the gravel layer is evenly distributed and leveled, take a moment to assess the depth and uniformity, making any necessary adjustments to achieve the desired specifications. A meticulously laid gravel layer will form the cornerstone of a robust and reliable foundation for your shed.
By adding a carefully measured and expertly distributed layer of gravel to the prepared base, you are fortifying the groundwork for your shed, bringing you closer to the completion of this essential construction process.
Step 7: Compact the Gravel
As the final step in constructing your gravel pad, compacting the gravel is a critical process that ensures the stability and load-bearing capacity of the foundation. Proper compaction will create a solid and resilient base that will support your shed and withstand the test of time.
Utilize a hand tamper or a plate compactor to firmly compact the layer of gravel. Begin by systematically working across the entire area, applying consistent pressure to achieve thorough compaction. This process will help eliminate air gaps and settle the gravel into a dense and cohesive foundation.
As you compact the gravel, pay close attention to achieving a uniform density throughout the entire pad. Focus on areas that may require additional compaction, such as the edges and corners, to ensure that the entire surface is uniformly firm and stable.
Periodically check the levelness of the compacted gravel and make any necessary adjustments to maintain a smooth and even surface. A precisely compacted gravel layer will provide a solid and reliable foundation for your shed, minimizing the risk of settling or uneven weight distribution.
Proper compaction is essential in enhancing the load-bearing capacity of the gravel pad, enabling it to effectively support the weight of your shed and its contents. This meticulous process will contribute to the long-term durability and structural integrity of the foundation.
By thoroughly compacting the layer of gravel, you are completing the essential construction of your gravel pad, ensuring that it is well-prepared to provide a stable and enduring foundation for your shed, setting the stage for the successful installation of your outdoor structure.
Conclusion
Congratulations on completing the construction of a robust and reliable gravel pad for your shed. By following the step-by-step process outlined in this guide, you have laid the groundwork for a stable foundation that will support your shed for years to come. The thorough preparation and attention to detail will ensure that your outdoor structure is safeguarded against settling, moisture buildup, and weed encroachment, providing a secure and enduring home for your belongings.
Building a gravel pad for your shed is a rewarding endeavor that offers numerous benefits, including proper drainage, stability, and longevity. The careful selection of the location, meticulous excavation and leveling, and the strategic addition of materials have all contributed to the creation of a solid and durable foundation.
As you move forward with the installation of your shed, you can do so with confidence, knowing that it is resting upon a well-constructed gravel pad that will provide the necessary support and protection. The thoroughness and precision applied to each step of the construction process will undoubtedly yield a foundation that meets and exceeds your expectations.
With the completion of the gravel pad, you are now well-equipped to proceed with the assembly and placement of your shed, confident in the knowledge that it is resting upon a secure and steadfast base. As you embark on this next phase, may your shed become a cherished space that fulfills your needs and brings joy to your outdoor environment.
Thank you for entrusting us with the guidance and expertise to assist you in creating a durable and resilient foundation for your shed. We wish you success and satisfaction as you continue to enhance your outdoor living space with this valuable addition.
Happy building!
Now that you've mastered building a gravel pad, why not tackle more projects that put your skills to the test? Find out why tackling DIY projects can be so rewarding, offering personal satisfaction and customized solutions. For those who love enhancing their outdoor space, our guide on unique outdoor structures provides creative ideas to elevate any garden or backyard. And if you're keen on adding a touch of personality and security, don't miss our collection of innovative garden fence designs. Each guide is packed with tips and ideas to inspire your next home improvement project!
Frequently Asked Questions about How To Build A Gravel Pad For A Shed
Was this page helpful?
At Storables.com, we guarantee accurate and reliable information. Our content, validated by Expert Board Contributors, is crafted following stringent Editorial Policies. We're committed to providing you with well-researched, expert-backed insights for all your informational needs.


0 thoughts on “How To Build A Gravel Pad For A Shed”