Home>Home Security and Surveillance>How To Connect Wired Door Sensors To GSM Alarm Systems
Home Security and Surveillance
How To Connect Wired Door Sensors To GSM Alarm Systems
Modified: March 6, 2024
Learn how to easily connect wired door sensors to GSM alarm systems for enhanced home security and surveillance. Step-by-step guide for effective installation.
(Many of the links in this article redirect to a specific reviewed product. Your purchase of these products through affiliate links helps to generate commission for Storables.com, at no extra cost. Learn more)
Introduction
Welcome to the world of home security and surveillance! In today’s uncertain times, it is crucial to prioritize the safety and protection of our homes and loved ones. Fortunately, advancements in technology have made it easier than ever to implement reliable security measures.
One essential aspect of any home security system is the use of door sensors. These sensors play a vital role in detecting and alerting homeowners to unauthorized entry. By connecting wired door sensors to GSM alarm systems, you can ensure that your home is constantly monitored, even when you’re away.
In this comprehensive guide, we will walk you through the process of connecting wired door sensors to GSM alarm systems, providing you with the knowledge and confidence to enhance the security of your home. So let’s dive in and explore the world of wired door sensors and GSM alarm systems!
Key Takeaways:
- Enhance Home Security
Connect wired door sensors to a GSM alarm system for reliable home security. Follow step-by-step instructions to ensure proper installation and testing for optimal protection. - Prioritize Safety
In an uncertain world, prioritize safety by connecting wired door sensors to a GSM alarm system. Follow the comprehensive guide for peace of mind and protection.
Read more: How To Wire Window Sensors For Alarm Systems
Understanding Wired Door Sensors
Before we delve into the process of connecting wired door sensors to GSM alarm systems, let’s first understand what these sensors are and how they work.
Wired door sensors, also known as magnetic reed switches, are composed of two main components: a magnet and a magnetic switch. The magnet is typically placed on the door or window frame, while the magnetic switch is placed on the corresponding part that opens and closes (such as the door or window itself).
When the door or window is closed, the magnet and the magnetic switch are in close proximity, creating a closed circuit. This means that the electrical current can flow without interruption. However, when the door or window is opened, the magnet and the magnetic switch move apart, breaking the circuit. This interruption in the electrical current triggers an alert within the wired door sensor.
The wired door sensor is then connected to the GSM alarm system, which is responsible for sending notifications or activating an alarm when the door or window is opened. The GSM alarm system is connected to your mobile phone or a dedicated monitoring center, enabling you to receive real-time alerts and take appropriate action if necessary.
It is worth noting that wired door sensors provide a more reliable and secure connection compared to wireless sensors. While wireless sensors are convenient and easy to install, they can be subject to interference or jamming. Wired door sensors, on the other hand, offer a direct and stable connection between the sensor and the alarm system, ensuring accurate detection of unauthorized entry.
Now that we have a basic understanding of how wired door sensors work, let’s move on to the components required for connecting them to GSM alarm systems.
Components Required for Connecting Wired Door Sensors to GSM Alarm Systems
Now that we understand the concept of wired door sensors, let’s explore the components you will need to successfully connect them to GSM alarm systems.
- Wired Door Sensors: The first and most crucial component is, of course, the wired door sensors themselves. You will need one sensor for each door or window you wish to monitor. These sensors typically come with a magnet and a magnetic switch, as discussed earlier.
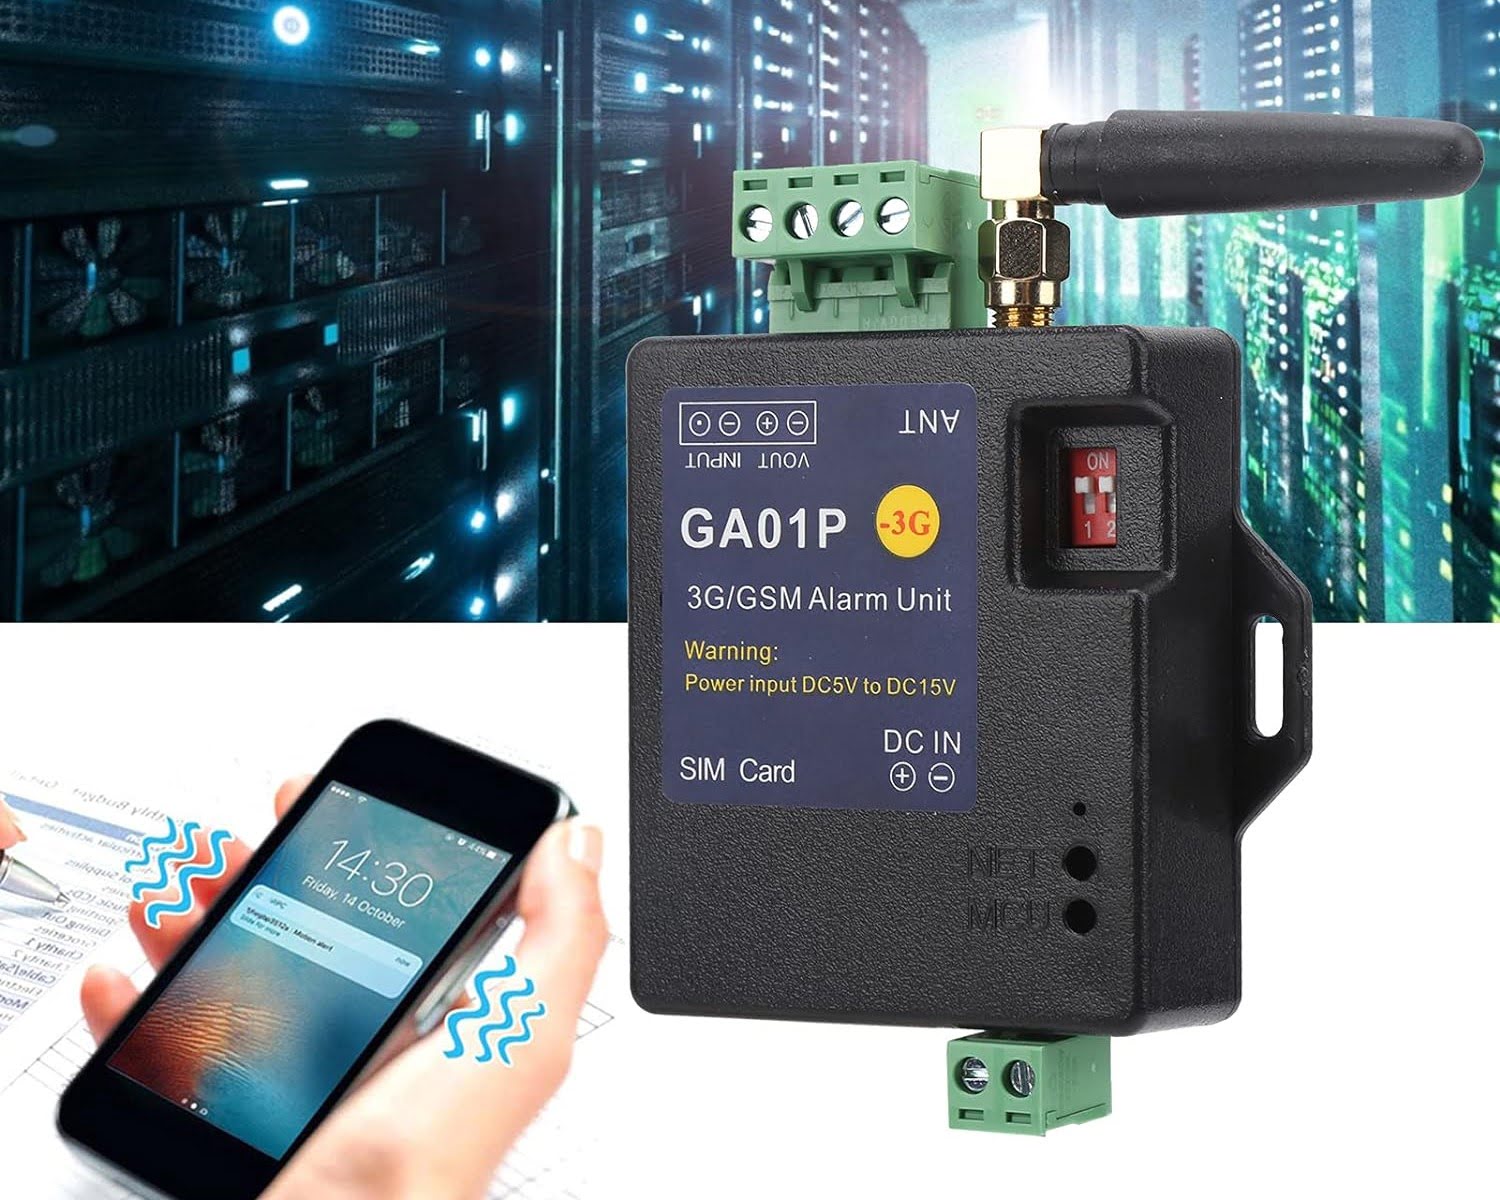
- GSM Alarm System: Next, you will need a GSM alarm system. This system acts as the central hub for your home security and surveillance. It receives signals from the wired door sensors and sends alerts to your mobile phone or a monitoring center. Make sure to choose a reliable GSM alarm system that meets your specific needs and provides the features you require.
- Control Panel: The control panel acts as the interface between the wired door sensors and the GSM alarm system. It allows you to configure and manage your security settings. The control panel should be compatible with the GSM alarm system you have chosen.
- Wiring and Connectors: To connect the wired door sensors to the control panel, you will need appropriate wiring and connectors. The wiring should be durable and capable of carrying the electrical current without interruption. The connectors should ensure a secure and reliable connection between the sensors and the control panel.
- Power Supply: The GSM alarm system and the control panel will require a power supply to operate. This can be in the form of batteries or a direct electrical connection. Make sure to choose a power supply option that suits your preferences and the availability of electricity in your home.
By gathering these components, you will have everything you need to begin the process of connecting wired door sensors to GSM alarm systems. In the next section, we will guide you through the step-by-step process of completing the installation and configuration.
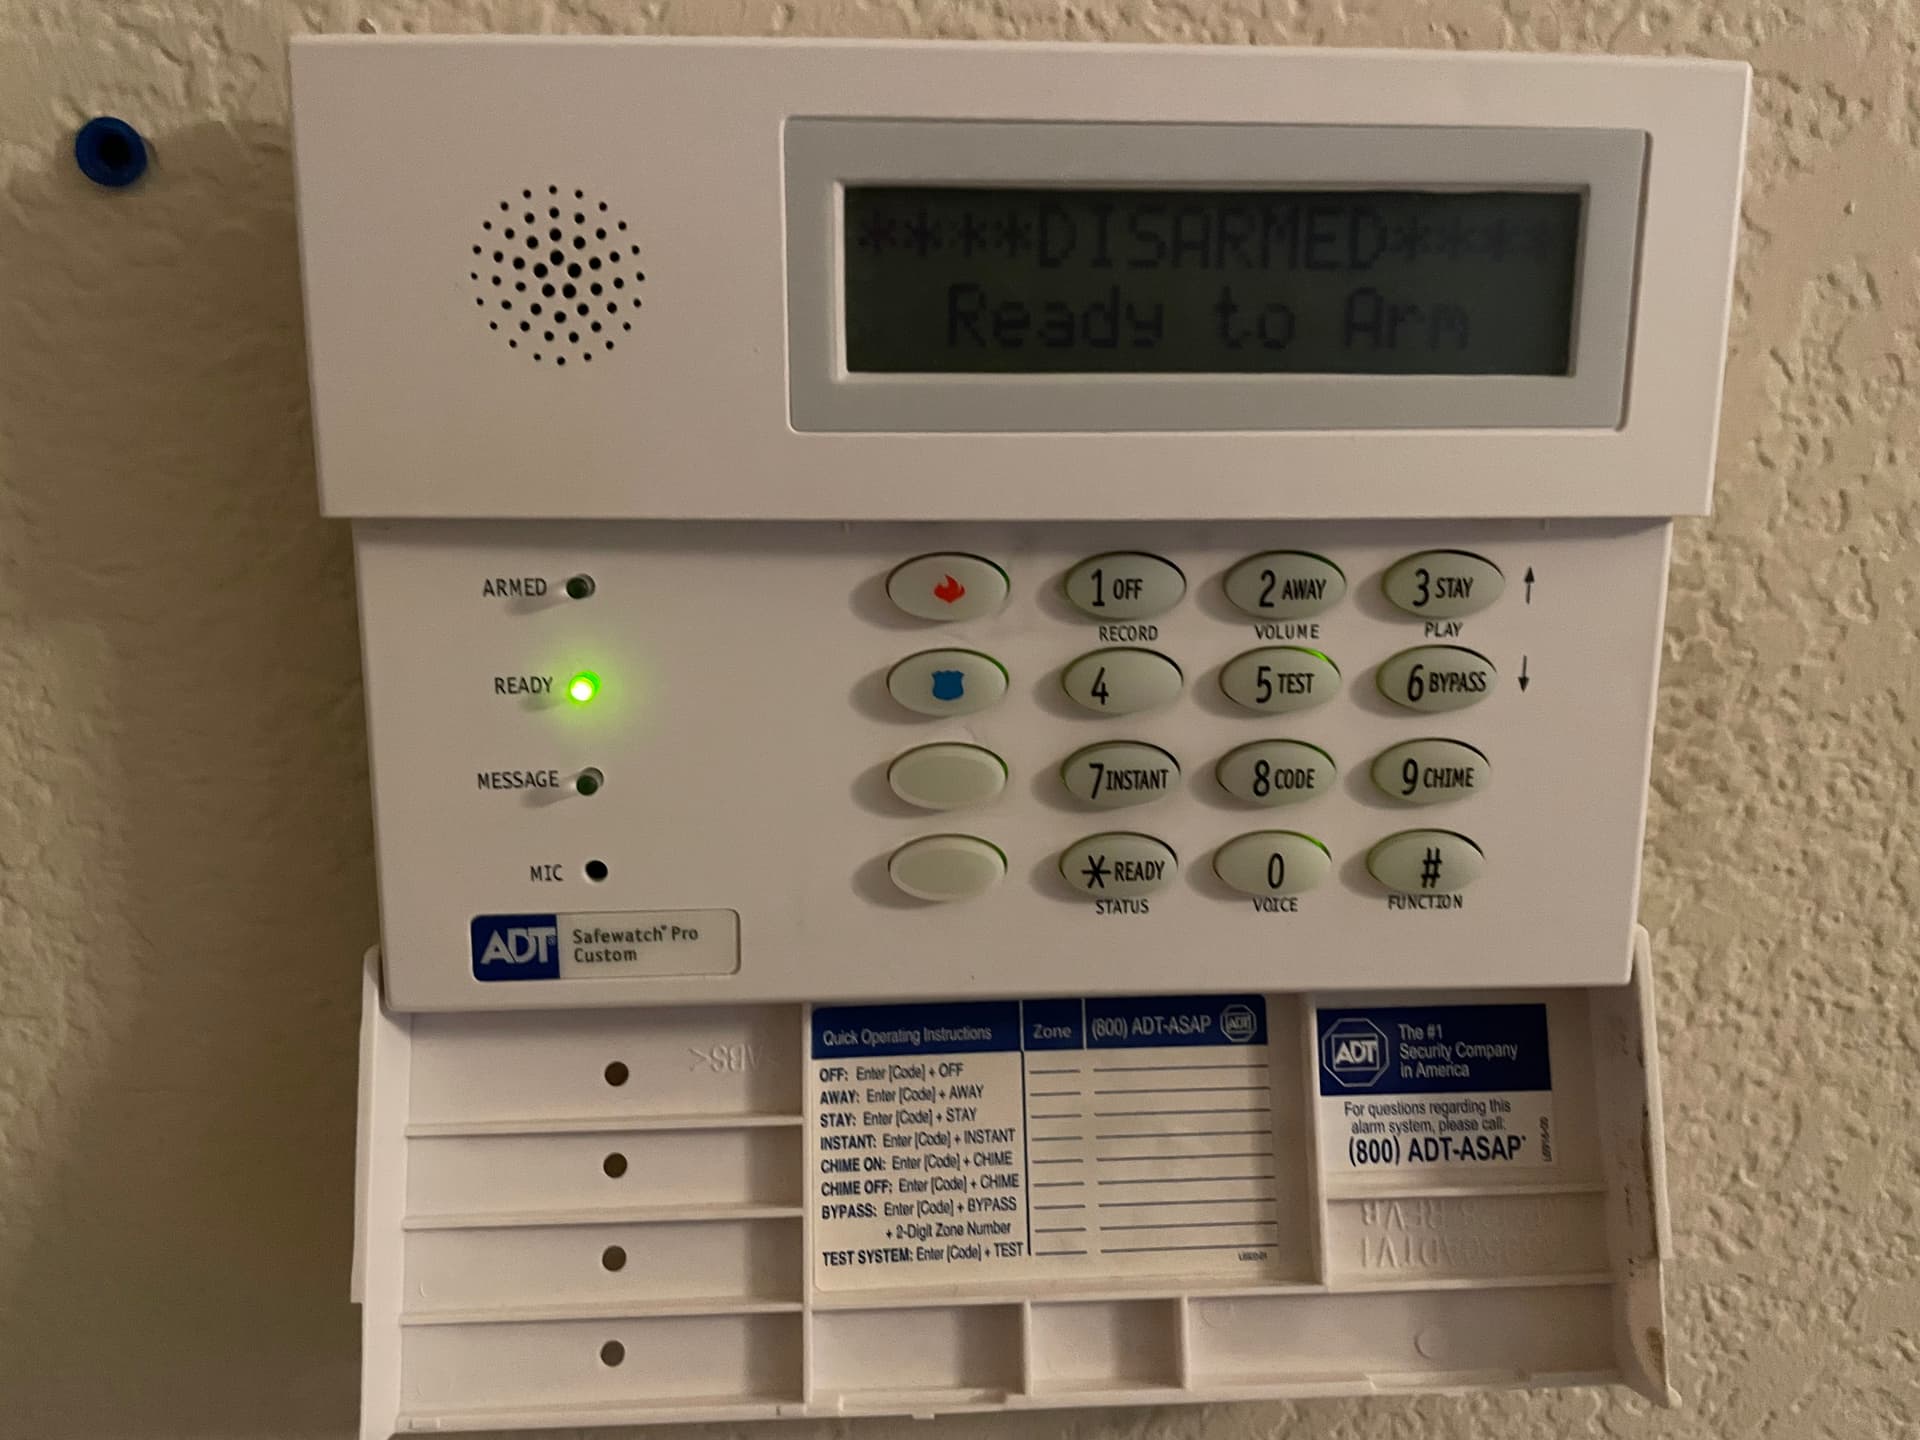
Step 1: Identify the Control Panel
The control panel is a crucial component of your home security system as it acts as the central command center for all connected devices, including the wired door sensors. Before you can proceed with connecting the sensors, you must first identify the control panel and its location.
In most cases, the control panel is a separate unit that is installed in a central area of your home, such as the living room or hallway. It is often placed in an easily accessible location for quick and convenient access to configure and manage the security settings.
To locate the control panel, start by checking common areas where home security systems are typically installed. Look for a small metal or plastic box mounted on the wall or tucked away in a designated security closet.
If you are unsure of the control panel’s location, try consulting the user manual or contacting the manufacturer or provider of your home security system. They should be able to provide specific guidance on finding the control panel within your particular system.
Once you have identified the control panel, ensure that it is powered on and ready for configuration. Make sure to have any necessary access codes or credentials on hand to log into the control panel’s interface.
It is crucial to familiarize yourself with the control panel’s layout and functions before moving on to the next steps. Take the time to read through the user manual and understand how to navigate through the control panel’s menus and settings.
By successfully identifying and preparing the control panel, you are now ready to proceed with the next steps of connecting the wired door sensors to the GSM alarm system. In the following sections, we will guide you through the process of locating the appropriate wiring terminations and connecting the sensors.
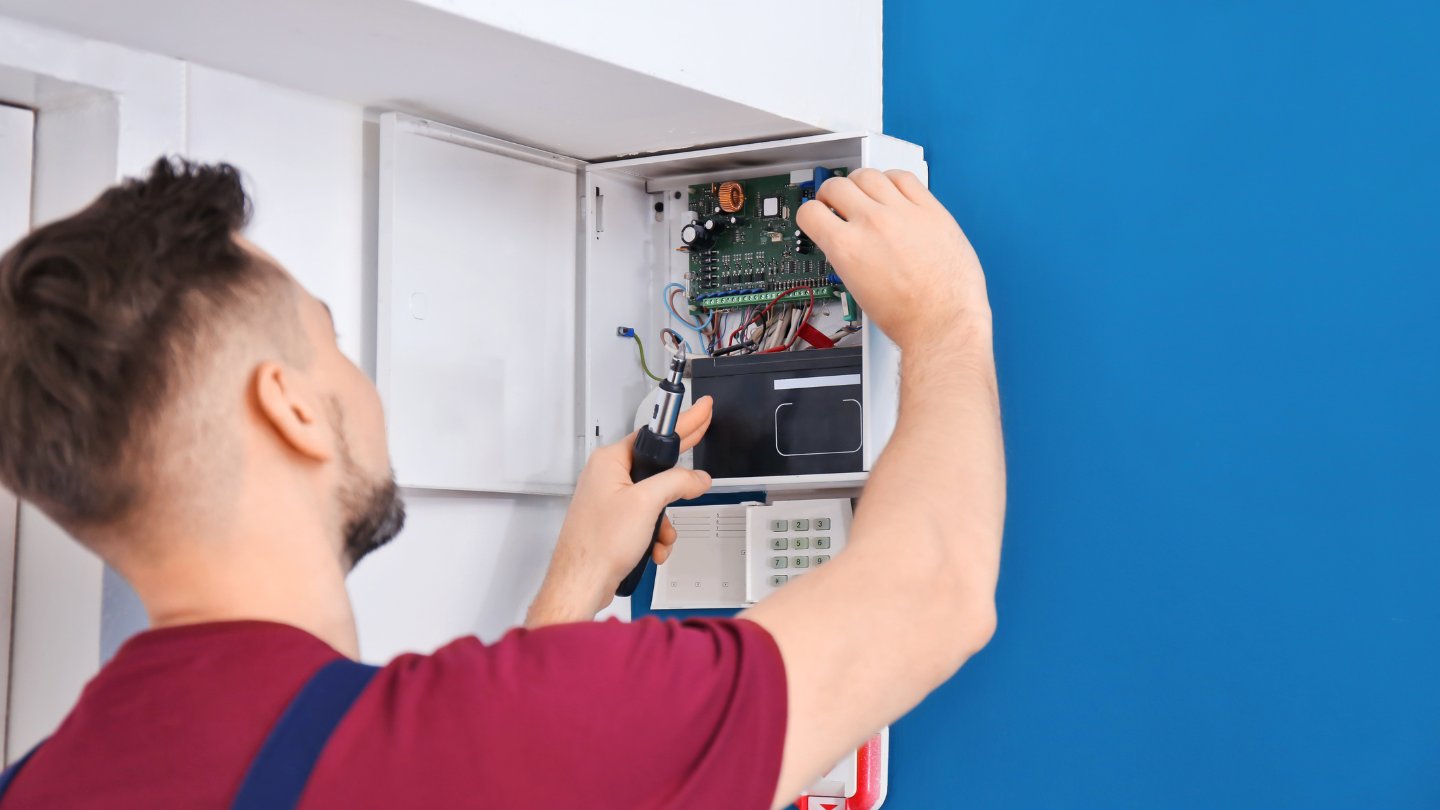
Step 2: Locate the Appropriate Wiring Terminations
Now that you have identified the control panel, the next step is to locate the appropriate wiring terminations. These terminations serve as connection points for the wired door sensors, allowing them to transmit signals to the control panel and the GSM alarm system.
Start by examining the control panel. Look for labeled terminals or ports specifically designated for connecting wired sensors. These terminals are typically labeled with identifiers such as “Sensor In” or “Zone Inputs.” Consult the user manual or manufacturer’s guidelines to identify the exact locations of these wiring terminations.
Once you have identified the wiring terminations on the control panel, you need to locate the corresponding terminations on the wired door sensors. The sensors will also have wiring terminations, usually labeled “Sensor Out” or “Zone Outputs.”
Make sure to inspect each wired door sensor and match its wiring terminations with the appropriate ones on the control panel. This ensures that the signals from the sensors can be properly transmitted to the control panel and the GSM alarm system.
If you encounter any difficulties in locating the wiring terminations or identifying the appropriate connections, refer to the user manual or seek guidance from the manufacturer or provider of your home security system. They can provide you with specific instructions and support based on your system’s configuration.
It is essential to handle the wiring terminations with care to avoid any damage or improper connections. Follow the guidelines provided by the manufacturer to ensure safe and accurate installation.
Once you have located the appropriate wiring terminations on both the control panel and the wired door sensors, you are now ready to proceed with connecting the sensors. In the next step, we will guide you through the process of connecting the wired door sensors to the control panel.
When connecting wired door sensors to a GSM alarm system, make sure to use the correct wiring diagram provided by the alarm system manufacturer. Double-check the connections to ensure they are secure and test the sensors to make sure they are functioning properly before activating the system.
Read more: How To Wire A Garage Door Sensor
Step 3: Connect the Wired Door Sensor
With the wiring terminations identified on both the control panel and the wired door sensors, it’s time to begin connecting the sensors to the control panel. Follow these step-by-step instructions to ensure a proper and secure connection:
- Gather the necessary tools: Before you begin, gather the necessary tools for the installation. This may include a screwdriver, wire strippers, and connectors specific to your system.
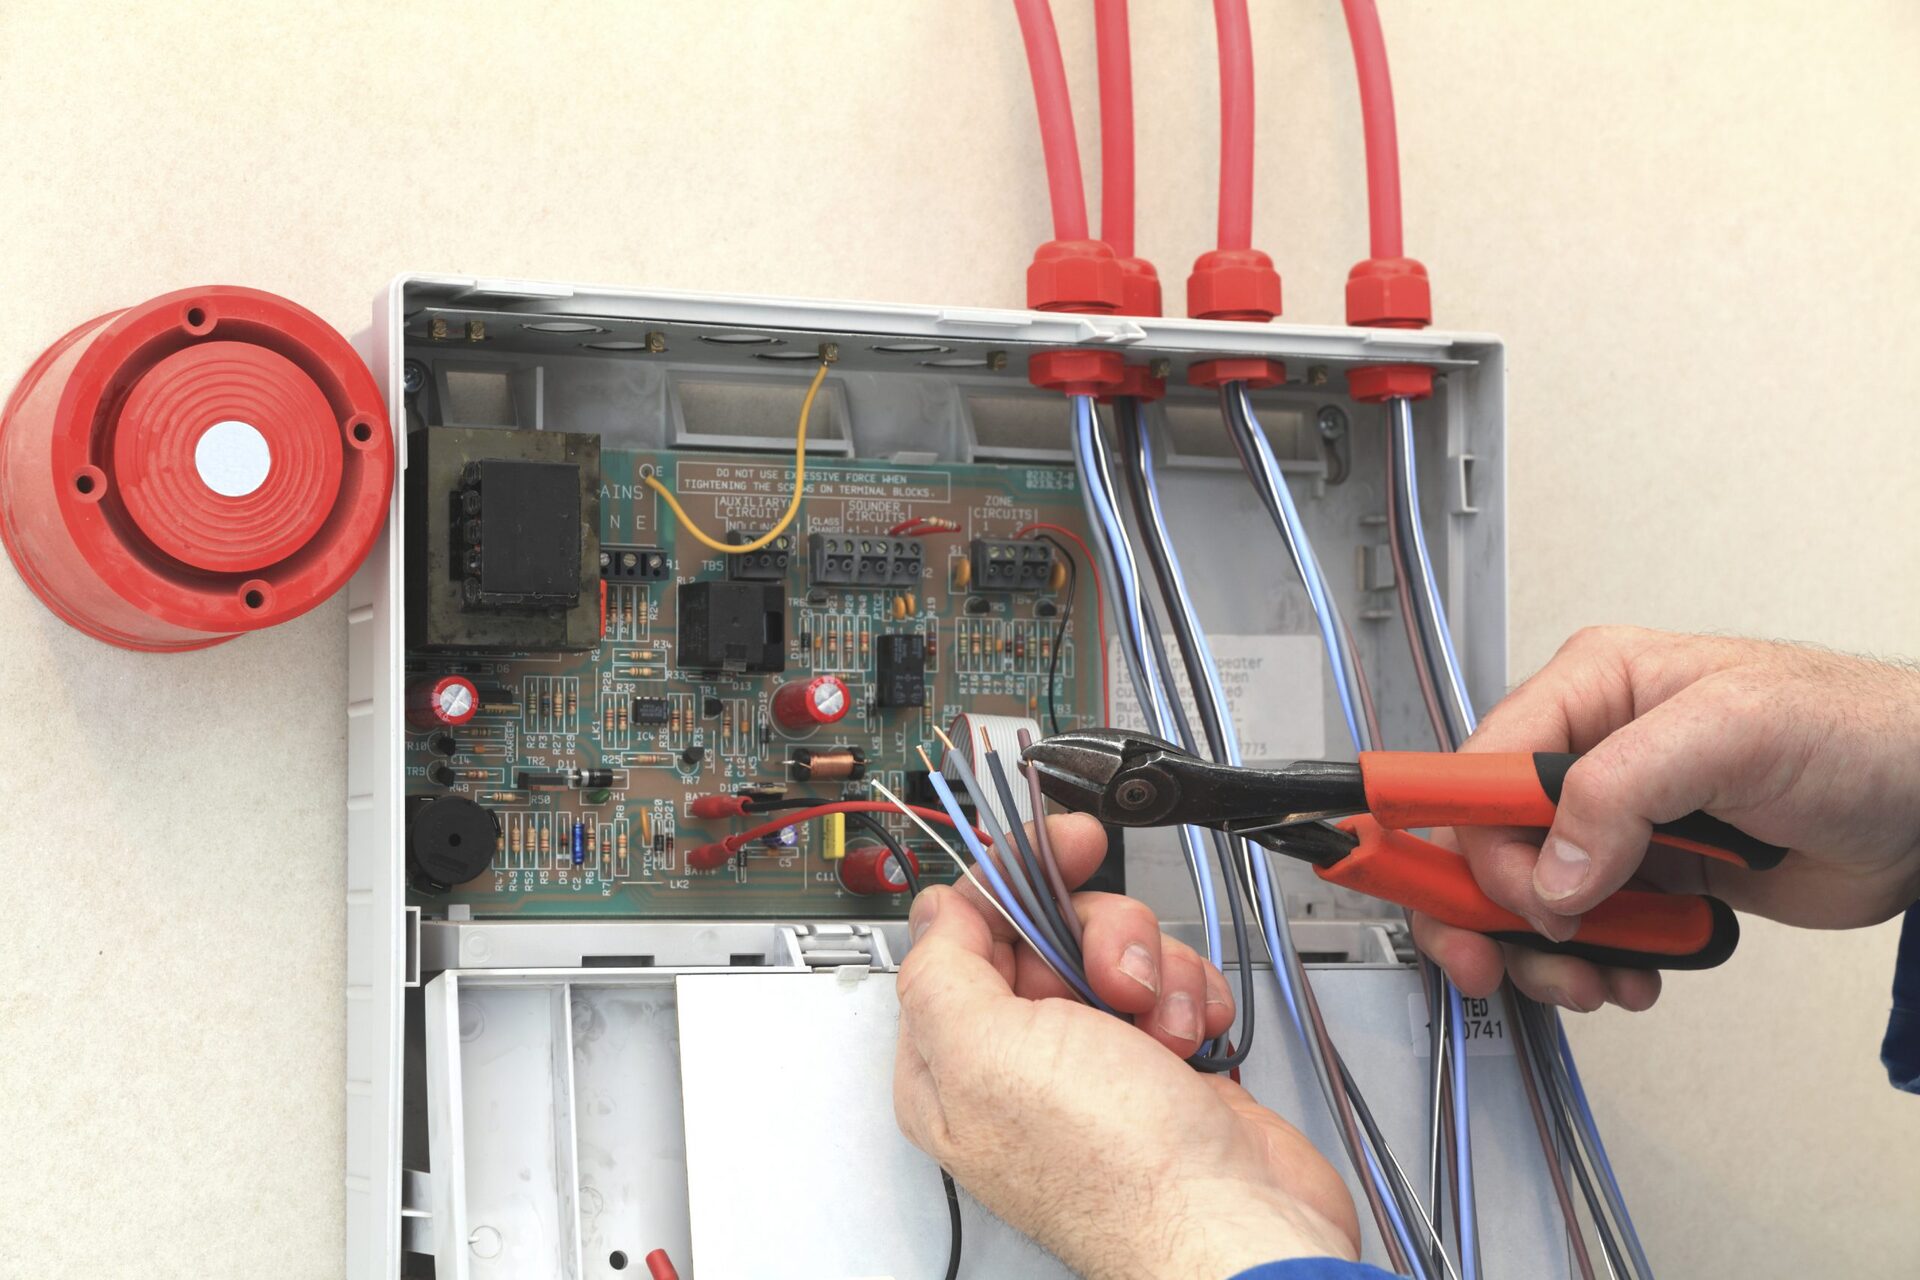
- Prepare the wires: Cut the wiring to the appropriate length for each sensor. Use the wire strippers to remove a small portion of insulation from the ends of the wires. Ensure that the exposed wire ends are clean and free from any additional insulation.
- Connect the wires to the control panel: Take one end of the wire and connect it to the corresponding wiring termination on the control panel. This may involve securing the wire under a screw terminal or using a connector specifically designed for your system. Repeat this process for each wired door sensor, ensuring that each wire is connected securely and tightly.
- Connect the wires to the wired door sensors: Moving to the wired door sensors, connect the other end of each wire to the appropriate wiring termination on the sensors. Again, make sure that the connection is secure and tightly fastened.
- Perform a visual inspection: Once all the wires are properly connected, perform a visual inspection to ensure that no wires are crossed or touching each other, as this could cause interference or malfunction. Moreover, check that there are no loose connections that could potentially disrupt the signal transmission.
- Secure any loose wiring: If you notice any loose wiring, use zip ties or other securing mechanisms to keep the wires organized and tidy. This will minimize the risk of accidental disconnection or damage to the wiring.
It is crucial to follow the specific instructions provided by the manufacturer of your wired door sensors and control panel. Different systems may have varying requirements and connection methods, so it’s important to consult the user manual or seek guidance from the manufacturer if you have any doubts.
With the wired door sensors now properly connected to the control panel, it’s time to move on to the next step: configuring the GSM alarm system. This will allow you to set up the necessary settings and parameters for the optimal functionality of your home security system.
Step 4: Configure the GSM Alarm System
With the wired door sensors successfully connected to the control panel, it’s time to configure the GSM alarm system. This step involves setting up the necessary settings and parameters to ensure the optimal functionality of your home security system.
Follow these step-by-step instructions to configure your GSM alarm system:
- Access the control panel’s interface: Use the provided access codes or credentials to log into the control panel’s interface. Refer to the user manual or manufacturer’s guidelines for specific instructions on accessing the interface.
- Navigate to the sensor configuration menu: Once you are logged into the control panel’s interface, navigate to the sensor configuration menu. This is where you can customize the settings for each wired door sensor connected to the control panel.
- Assign zones or labels: Assign unique zones or labels to each wired door sensor. This will help you easily identify which sensor is triggered in the event of a breach. For example, you can assign labels such as “Front Door,” “Back Door,” or “Living Room Window.”
- Set alarm parameters: Configure the desired alarm parameters for each wired door sensor. This includes settings such as entry delay, exit delay, and alarm sensitivity. Determine the appropriate settings based on your security preferences and the layout of your home.
- Set up notifications: Configure the system to send notifications to your mobile phone or a designated monitoring center in the event of a breach. Set up the appropriate contact details for receiving these notifications and ensure that they are functioning correctly.
- Perform a system test: Once all the settings are configured, perform a system test to ensure that the GSM alarm system is functioning as expected. Open and close each wired door sensor to verify that the control panel accurately detects and responds to the changes in the circuit.
- Make any necessary adjustments: If any issues or discrepancies are identified during the system test, make the necessary adjustments to the settings or wiring connections. Double-check that all wired door sensors are properly connected and that the control panel accurately communicates with each sensor.
It’s important to refer to the user manual or contact the manufacturer or provider of your GSM alarm system for specific instructions on configuring the system. They can provide you with detailed guidance and support to ensure the proper setup and optimal functionality of your home security system.
Once you have successfully configured the GSM alarm system, it’s time to move on to the final step: testing the connectivity of the wired door sensors. This step will allow you to ensure that the sensors are properly communicating with the control panel and that your home is effectively secured.
Step 5: Test the Connectivity of the Door Sensors
Now that you have connected and configured the wired door sensors to the GSM alarm system, it’s important to test the connectivity to ensure that everything is functioning correctly. Testing the sensors will help verify that they are properly detecting and transmitting signals to the control panel.
Follow these steps to test the connectivity of the door sensors:
- Arm the alarm system: Activate the alarm system by arming it using the control panel or the designated mobile application. This will put the system in a monitoring state, ready to detect any breaches or unauthorized entry.
- Open each door or window: One by one, open each door or window that is connected to a wired door sensor. This will trigger the sensor and simulate a breach. Leave each door or window open for a few seconds to ensure the control panel detects the change in the circuit.
- Verify the response: Observe the control panel and monitor the system’s response. It should promptly register the breach and activate the appropriate notifications or alarms based on your configured settings. Check your mobile phone or monitoring center to ensure that you receive the alerts.
- Close the doors/windows: After testing each door or window, close them to restore the circuit to its normal state. The control panel should recognize that the breach has been resolved and update its status accordingly.
- Perform a system test: Repeat the testing process for each wired door sensor to ensure that all sensors are functioning correctly. Test each sensor multiple times to confirm the reliability and accuracy of their detection capabilities.
- Make necessary adjustments: If any issues or discrepancies are identified during the testing process, make the necessary adjustments to the settings or wiring connections. Double-check that all wired door sensors are properly connected and that the control panel accurately communicates with each sensor.
Testing the connectivity of the door sensors is a crucial step to ensure the effectiveness of your home security system. By simulating real-world scenarios and verifying the response of the system, you can have peace of mind knowing that your home is protected.
If any issues persist or if you encounter any difficulties during the testing process, it is recommended to consult the user manual or contact the manufacturer or provider of your home security system. They can provide additional guidance and support to resolve any issues and ensure the proper functioning of your wired door sensors and GSM alarm system.
Congratulations! By completing these five steps, you have successfully connected and tested your wired door sensors with a GSM alarm system. Your home’s security and surveillance have been enhanced, providing you with peace of mind and protection for you and your loved ones.
Remember to periodically test and maintain your home security system to ensure its optimal performance. Stay vigilant and proactive in safeguarding your home against potential threats.
Thank you for following this comprehensive guide, and we hope it has been helpful in your journey towards a secure home!
Conclusion
In an unpredictable world, prioritizing home security and surveillance is essential. By connecting wired door sensors to a GSM alarm system, you can enhance the safety and protection of your home and loved ones. This comprehensive guide has walked you through the process of connecting and testing the connectivity of wired door sensors to a GSM alarm system, empowering you to take control of your home’s security.
Understanding the components involved, such as wired door sensors, the GSM alarm system, control panels, wiring, and power supplies, is essential for a successful installation. By following the step-by-step instructions provided in this guide, you can ensure a proper and secure connection of the sensors to the control panel.
Configuring the GSM alarm system with settings such as zones, alarm parameters, and notifications is crucial for the optimal functionality of your home security system. Paying close attention to the details during this stage will allow you to customize the system according to your specific needs and preferences.
Testing the connectivity of the wired door sensors is the final step in this process. By simulating breaches and monitoring the response of the system, you can ensure that the sensors are accurately detecting and transmitting signals to the control panel. Any necessary adjustments can be made to resolve any issues identified during the testing process.
Remember, maintaining and periodically testing your home security system is crucial for its ongoing performance. Stay proactive in ensuring that your system is functioning optimally and be vigilant in safeguarding your home against potential threats.
With the completion of this guide, you now possess the knowledge and confidence to connect and test wired door sensors with a GSM alarm system. By implementing these security measures, you are heightening the protection of your home and providing yourself and your loved ones with peace of mind.
Thank you for embarking on this journey towards a secure home. Stay safe!
Frequently Asked Questions about How To Connect Wired Door Sensors To GSM Alarm Systems
Was this page helpful?
At Storables.com, we guarantee accurate and reliable information. Our content, validated by Expert Board Contributors, is crafted following stringent Editorial Policies. We're committed to providing you with well-researched, expert-backed insights for all your informational needs.