
Furniture
How To Connect Chandelier Wires
Modified: January 5, 2024
Learn how to connect chandelier wires safely and efficiently with our expert furniture tips. Upgrade your space with ease and confidence.
(Many of the links in this article redirect to a specific reviewed product. Your purchase of these products through affiliate links helps to generate commission for Storables.com, at no extra cost. Learn more)
Introduction
Adding a chandelier to your space can instantly elevate its style and create a focal point in the room. However, installing a chandelier requires more than just finding the perfect fixture and hanging it up. One crucial step in the installation process is connecting the chandelier wires properly.
Connecting chandelier wires may seem intimidating at first, especially if you have limited experience with electrical work. However, with the right tools, materials, and safety precautions, you can successfully connect the wires and have your stunning chandelier illuminating your space in no time.
In this guide, we will take you through a step-by-step process to help you connect chandelier wires safely and correctly. Whether you are replacing an old chandelier or installing a new one, this article will provide you with the necessary information to complete the task with confidence.
Before we jump into the installation process, it is essential to understand the importance of taking safety precautions when working with electrical connections. Remember, electricity can be dangerous, so it’s crucial to prioritize safety to prevent any accidents or injuries.
Key Takeaways:
- Prioritize safety by turning off power, using PPE, and securing connections when connecting chandelier wires. Gather tools and follow steps carefully for a successful and elegant installation.
- Take the time to properly identify, strip, and connect chandelier wires, ensuring secure and reliable electrical connections. Restore power and test the chandelier for a beautiful and functional addition to your space.
Read more: How To Wire A Chandelier With A Ground Wire
Safety Precautions
When working with electrical connections, it is crucial to prioritize safety to prevent any accidents or injuries. Here are some essential safety precautions to follow when connecting chandelier wires:
- Turn off the power: Before you begin any work, make sure to turn off the power to the area where you will be working. This can be done by switching off the circuit breaker or removing the fuse that controls the chandelier’s electrical supply. Use a voltage tester to ensure the power is indeed off before proceeding.
- Use personal protective equipment (PPE): Wear safety goggles and gloves to protect your eyes and hands from any potential hazards. This will help prevent injuries from sparks, electrical shocks, or accidental contact with sharp objects.
- Work on a stable surface: Ensure that you are working on a stable and secure surface. Use a sturdy ladder or platform to access the chandelier safely. Avoid working in wet or damp areas to reduce the risk of accidents.
- Read the manufacturer’s instructions: Familiarize yourself with the manufacturer’s instructions specific to your chandelier. Different models may have specific guidelines or precautions that you need to be aware of before starting the installation process.
- Avoid overloading circuits: Make sure not to overload your electrical circuits. Check the maximum wattage rating for your chandelier and ensure that your electrical wiring can handle it. If you’re unsure, consult a professional electrician for guidance.
- Do not touch live wires: Never touch live wires or connectors with your bare hands. Always use insulated tools when working with electrical connections to prevent electrical shocks.
- Secure loose wires: Ensure that all wires are properly secured and protected. Use proper wire connectors, electrical tape, or wire nuts to prevent loose connections and potential electrical hazards.
- Seek professional assistance if needed: If you are unsure about any aspect of the chandelier wiring process, it’s best to seek professional assistance from a licensed electrician. They have the expertise and knowledge to handle complex electrical work safely.
By following these safety precautions, you can minimize the risk of accidents and ensure a safe installation process. Remember, it’s always better to prioritize safety over speed when it comes to electrical work.
Tools and Materials Needed
Before you begin connecting chandelier wires, it’s important to gather all the necessary tools and materials. Having everything ready will make the installation process smoother and more efficient. Here are the tools and materials you will need:
Tools:
- Screwdriver set: A set of screwdrivers with various sizes and types will be handy for removing and installing screws.
- Wire strippers: These tools are essential for safely removing the insulation from the chandelier wires.
- Needle-nose pliers: These pliers with long, slender jaws can help with gripping and manipulating wires.
- Wire connectors: These are used to connect wires together securely. Make sure to choose the right size and type for your specific wiring needs.
- Voltage tester: This tool is essential for verifying that the power is turned off before working on the chandelier wires.
- Wire nuts: These plastic caps with built-in threads are used to secure and insulate wire connections.
- Electrical tape: This tape is used to further secure and insulate wire connections. Choose high-quality electrical tape for better durability.
- Ladder or platform: Depending on the height and positioning of your chandelier, you may need a sturdy ladder or platform to safely access and work on the fixture.
Materials:
- Chandelier: Choose a chandelier that fits your desired style and the specifications of your space. Ensure it includes all necessary installation hardware.
- Chandelier mounting bracket: This metal bracket is used to securely attach the chandelier to the ceiling.
- Wire connectors: These connectors, available in various sizes and types, are used to join the chandelier wires with the electrical supply wires.
- Electrician’s tape: This specialized tape is used to secure and insulate wire connections.
- Lamp cord: If the chandelier requires a separate lamp cord to connect to the electrical supply, make sure to have the appropriate length and type.
By gathering all the necessary tools and materials before you start, you’ll save time and minimize disruptions during the installation process. Ensure that all tools and materials are of good quality to ensure a successful and safe installation.
Read more: How To Hide Chandelier Wires
Step 1: Turn Off the Power
Before you begin working on connecting chandelier wires, it is crucial to turn off the power to the area where the chandelier will be installed. This step is essential to prevent any electrical shocks or accidents while handling the wires. Follow these steps to safely turn off the power:
- Locate the circuit breaker or fuse box: The circuit breaker or fuse box is typically located in the basement, utility room, or near the main electrical panel of your home. Open the panel door to access the breakers or fuses.
- Identify the circuit: Look for the switch or fuse that controls the power to the chandelier. This may be labeled or identified as the corresponding room or area where the chandelier is located.
- Switch off the breaker: If you have a circuit breaker panel, simply switch off the breaker that controls the chandelier’s electrical supply. Some breakers may be labeled, while others may require trial and error to determine the correct one. Switch the breaker to the “Off” position.
- Remove the fuse: If you have a fuse box, locate the fuse that controls the chandelier’s electrical supply. Use a fuse puller or a pair of pliers to carefully remove the fuse. Keep the fuse in a safe place to reinstall it later.
- Validate the power is off: Even after switching off the breaker or removing the fuse, it is important to verify that the power is indeed off. Use a voltage tester to ensure that there is no live electrical current flowing to the chandelier or its wiring.
By turning off the power to the chandelier, you create a safe working environment for connecting the wires. Always double-check with a voltage tester to ensure there is no residual electrical current before proceeding with the installation process.
Step 2: Remove the Old Chandelier
If you are replacing an existing chandelier, you will need to remove it before you can connect the new chandelier wires. Follow these steps to safely remove the old chandelier:
- Ensure the power is still off: Before you proceed, double-check that the power to the chandelier is still turned off to avoid any electrical accidents.
- Remove the decorative elements: If your old chandelier has any decorative elements such as crystals or shades, carefully remove them and set them aside in a safe place. These pieces are often delicate and prone to damage, so handle them with care.
- Unscrew the mounting hardware: Use a screwdriver to remove the mounting screws or nuts that secure the chandelier to the ceiling. Hold the chandelier securely with one hand while unscrewing the hardware to prevent it from falling.
- Lower the chandelier: Once the mounting hardware is removed, carefully lower the old chandelier down. If it is heavy or cumbersome, consider having someone assist you to ensure its safe removal.
- Disconnect the electrical wires: At this point, you will see the electrical wires that were connected to the old chandelier. There should be three wires – a black (hot) wire, a white (neutral) wire, and a green or bare copper (ground) wire. Use wire nuts or connectors to separate and secure the wires to prevent accidental contact.
- Cap or tape the wires: After disconnecting the wires, it is important to cap or tape the ends to prevent any accidental contact that could pose a safety hazard. Use wire nuts or electrical tape to cover the exposed ends of the wires.
By following these steps, you can safely remove the old chandelier and prepare the wiring for connecting the new chandelier. Remember to take your time and handle all components with care to avoid any damage or injuries during the removal process.
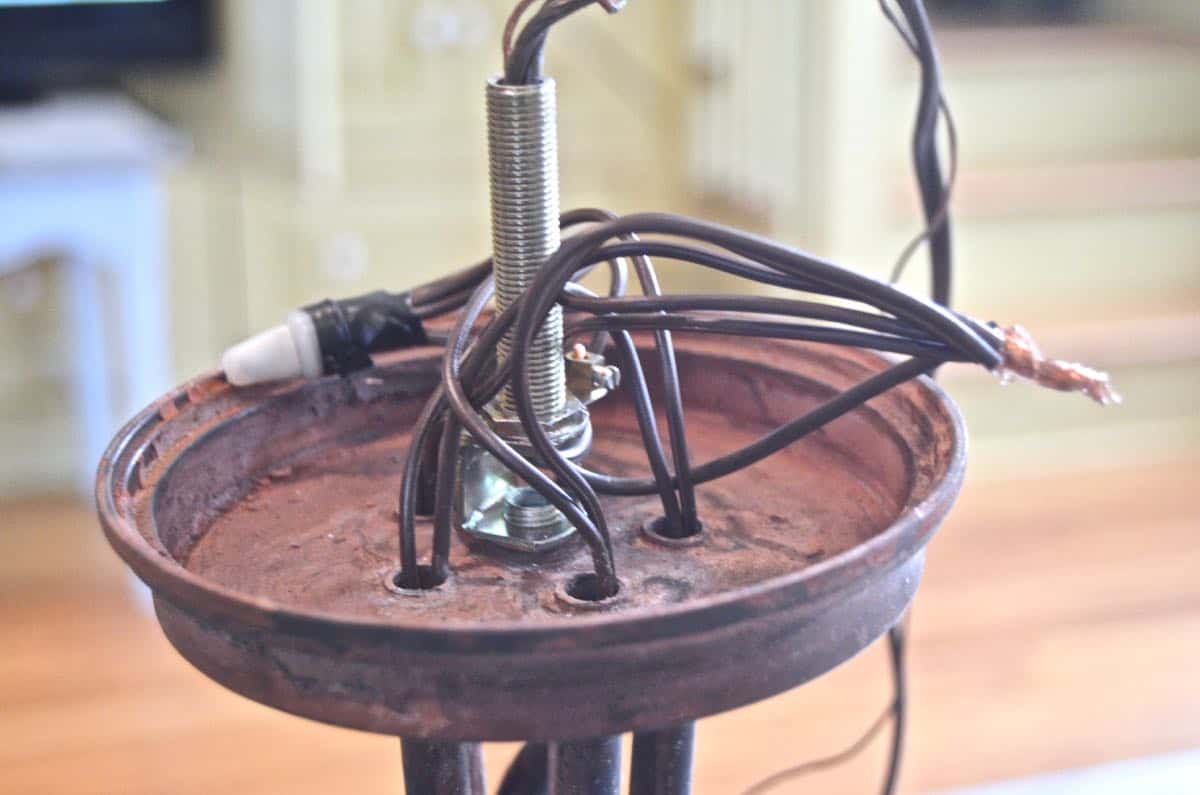
Step 3: Examine the Wiring
Once you have removed the old chandelier, it is essential to examine the wiring to ensure it is in good condition before connecting the new chandelier. Follow these steps to examine the wiring:
- Inspect the condition of the wires: Carefully examine the electrical wires connected to the ceiling. Look for any signs of damage, fraying, or discoloration. If you notice any issues, such as exposed wires or damaged insulation, it is advisable to consult a professional electrician to evaluate and repair the wiring.
- Check the wire connections: Verify that the wire connections are secure and properly insulated. Ensure that the wire nuts or connectors are tight and that no bare wires are exposed. If you notice any loose connections or exposed wires, fix them before proceeding.
- Confirm the wire gauge: Check the wire gauge of the existing electrical wiring. It is important to match the gauge of the new chandelier’s wiring to avoid any potential overload or safety hazards. Most residential chandeliers use 14 or 16-gauge wires, but it is best to consult the manufacturer’s instructions to determine the appropriate gauge for your specific chandelier.
- Ensure proper grounding: Confirm that the green or bare copper wire is securely connected to the grounding system of your electrical supply. The grounding wire provides a safe path for electrical currents in case of faults or electrical surges. If the grounding wire is not properly connected, consult a professional electrician to rectify the issue.
- Measure the wire length: Measure the length of the existing wiring to determine if it is sufficient to reach the new chandelier’s location. If needed, you may have to extend the wiring or adjust the position of the chandelier accordingly.
Examining and ensuring the condition and compatibility of the wiring is crucial for the safe and successful installation of the new chandelier. If you encounter any issues or are uncertain about the quality of the existing wiring, it is recommended to seek professional assistance from a licensed electrician.
Step 4: Identify the Chandelier Wires
Before you can connect the new chandelier, it’s important to identify the different wires that come with the fixture. Each wire has a specific purpose and needs to be connected correctly. Follow these steps to identify the chandelier wires:
- Refer to the manufacturer’s instructions: Consult the manufacturer’s instructions or documentation that came with the chandelier. They usually provide a wiring diagram or color-coded guide to help you identify the different wires.
- Identify the black (hot) wire: Look for a wire that is black or marked with a black tape or label. This wire carries the electrical current from the power supply to the chandelier and is often connected to the black or red wire in your electrical box.
- Identify the white (neutral) wire: Find a wire that is white or marked with a white tape or label. This wire provides the return path for the electrical current and is typically connected to the white wire in your electrical box.
- Identify the green or bare copper (ground) wire: Locate a wire that is either green or bare copper. This wire is meant for grounding purposes and helps protect against electrical shocks. It should be connected to the grounding system in your electrical box.
- Inspect for additional wires: Some chandeliers may have additional wires for specific features such as dimming or multiple switches. Refer to the manufacturer’s instructions to identify any additional wires and their functions.
- Note the wire ends: Pay attention to the wire ends of the chandelier wires. Some may have exposed copper or tinned ends, while others may have tags indicating their purpose or connection points.
By correctly identifying the chandelier wires, you can ensure that they are connected in the right way during the installation process. Take your time to study the manufacturer’s instructions and double-check the wire identification before proceeding to the next steps.
Read more: How To Extend Chandelier Wire
Step 5: Strip the Wires
Before you can connect the chandelier wires, you’ll need to strip the insulation from the ends of the wires to expose the conductive copper. This will allow for a proper and secure connection. Follow these steps to strip the wires:
- Gather the necessary tools: You will need a pair of wire strippers specifically designed for the gauge of wire you are working with. Ensure that the wire strippers are appropriate for the size of the chandelier wires.
- Measure the correct strip length: Look for the recommended strip length in the manufacturer’s instructions. Alternatively, strip approximately ¾ inch (1.9 cm) of insulation from the ends of each wire. Note: Pay careful attention to avoid stripping too much insulation, as it can expose too much copper and increase the risk of short-circuiting.
- Prepare the wire strippers: Choose the appropriate slot on the wire strippers that matches the size of the wire. Open the strippers and position the wire in the corresponding slot, ensuring the insulation reaches the desired strip length mark.
- Strip the wire: Apply gentle pressure on the wire strippers and rotate them around the wire to cut through the insulation. Be careful not to cut through the conductor or overstrip the wire. Continue rotating until the insulation is cut all the way around the wire.
- Remove the insulation: Once the cut is complete, grasp the insulation with one hand and the wire with the other hand. Move your hands in opposite directions to pull the insulation off, exposing the bare copper conductor.
- Inspect the stripped wires: After stripping, visually inspect the exposed wires to ensure that the copper conductor is clean, straight, and free of any nicks or damage. If needed, use wire cutters to trim any uneven or damaged ends.
Properly stripping the wires ensures a clean and reliable connection when connecting the chandelier wires. Take your time and be careful not to overstrip or damage the wire conductor. Double-check the recommended strip length to ensure it aligns with the manufacturer’s instructions or your wiring needs.
When connecting chandelier wires, always make sure to turn off the power at the circuit breaker before starting. Use wire nuts to securely connect the corresponding wires, and then carefully tuck them into the electrical box before mounting the chandelier.
Step 6: Connect the Wires
Now that you have stripped the chandelier wires, it’s time to connect them to the corresponding wires from the electrical supply in your ceiling. Follow these steps to connect the wires properly:
- Identify the matching wires: Identify the corresponding wires from the chandelier and the electrical supply. Match the colors and functions of the wires (black to black, white to white, green to green/bare copper).
- Twist the wires together: Take the exposed end of the chandelier’s black wire and the exposed end of the black wire from the electrical supply. Hold them parallel to each other and twist the strands together in a clockwise direction. Repeat this process for the white and green/bare copper wires.
- Secure the connections: Once the wires are twisted together, use wire nuts or wire connectors to secure the connections. Place the wire nut or connector over the twisted wires and twist it clockwise until it is tight and secure. Ensure that no bare wires are showing outside of the wire nuts or connectors.
- Wrap with electrical tape: After securing the connections, wrap electrical tape around the wire nuts or connectors to provide additional insulation and to keep them in place. Wrap the tape tightly but without stretching it too much to avoid tearing.
Remember to follow the manufacturer’s instructions for connecting the wires if they provide specific guidelines. It’s important to ensure that all connections are secure, properly insulated, and free from any loose or exposed wires. Double-check each connection before proceeding to the next step.
Step 7: Secure the Connections
After connecting the chandelier wires to the electrical supply, it’s crucial to secure the connections properly to ensure they remain stable and safe. Follow these steps to secure the wire connections:
- Arrange the wires neatly: Arrange the connected wires in a neat and organized manner. Avoid any tangled or loose wires that could interfere with the installation or cause any hazards.
- Position the wire connections inside the electrical box: Push the connected wires carefully inside the electrical box in the ceiling. Ensure that the wire connections do not touch each other or any other components in the box.
- Check the stability of the connections: Gently tug on each wire connection to verify that they are securely fastened. The connections should not come apart or feel loose. If any connections are unstable, recheck and tighten them using wire connectors or wire nuts.
- Tuck the wire connections: If excessive wire length remains, carefully fold or tuck the wire connections into the electrical box. Avoid overcrowding or pinching the wires, as this can lead to poor connections or potential electrical hazards.
- Attach a junction box cover: If the electrical box in the ceiling has an opening, such as a knockout hole, cover it with a junction box cover. This will protect the wire connections and provide a finished look to the installation.
- Test the stability of the chandelier: Give the chandelier a gentle shake or tug to ensure that it is securely in place. Verify that there is no movement or looseness in the connections and that the chandelier is well-anchored to the ceiling.
Ensuring that the wire connections are secure is essential for the safe installation and operation of the chandelier. Take your time to arrange, position, and test the connections to prevent any issues or hazards. If you have any doubts about the stability of the connections, consult a professional electrician for assistance.
Step 8: Attach the Chandelier to the Ceiling
Now that the wire connections are secure, it’s time to attach the chandelier to the ceiling. Follow these steps to safely and securely install the chandelier:
- Refer to the manufacturer’s instructions: Consult the manufacturer’s instructions for specific guidance on attaching the chandelier to the ceiling. They may provide specific hardware or mounting instructions for your particular chandelier model.
- Attach the mounting bracket: Start by attaching the chandelier’s mounting bracket to the electrical box in the ceiling. Use the provided screws or hardware to secure the bracket firmly in place. Make sure that the bracket is level and aligned properly.
- Prepare the chandelier: Before you hoist the chandelier, install any necessary components such as decorative elements or shades that were removed earlier. Ensure that all components are securely attached.
- Hang the chandelier: Carefully lift the chandelier up to the mounting bracket, aligning the holes or hooks on the chandelier with those on the bracket. Gently slide or hook the chandelier onto the bracket, making sure it is seated properly.
- Secure the chandelier: Once the chandelier is in place, use the provided hardware to fasten it securely to the mounting bracket. This may involve tightening screws or nuts, depending on your specific chandelier model.
- Double-check stability: Give the chandelier a gentle shake to ensure that it is stable and well-supported. Verify that there is no wobbling or movement that could indicate an insecure installation.
- Adjust the position: If necessary, adjust the position of the chandelier slightly to ensure it is centered and hanging at the desired height. Make sure to follow any height recommendations provided by the manufacturer.
Attaching the chandelier to the ceiling requires careful attention to detail and proper positioning. Take your time and follow the manufacturer’s instructions to ensure a secure and aesthetically pleasing installation. Remember, if you are unsure about any step, it is best to consult a professional electrician for assistance.
Read more: How To Connect A Wired Smoke Detector
Step 9: Restore Power and Test the Chandelier
The final step in connecting and installing a chandelier is to restore power and test its functionality. Follow these steps to safely restore power and test the chandelier:
- Double-check the connections: Before restoring power, ensure that all connections are secure, properly insulated, and free from any loose or exposed wires. Take a moment to review each connection one last time for peace of mind.
- Turn on the power: Return to the circuit breaker panel or fuse box and switch on the breaker or reinstall the fuse that controls the chandelier’s electrical supply. Confirm that the chandelier’s circuit is energized by testing other lights or electrical devices in the same area.
- Switch on the chandelier: Locate the chandelier’s switch or control mechanism. Turn it on and observe if the chandelier illuminates properly. Pay attention to any flickering, dimming, or other anomalies that may suggest a wiring issue.
- Test all functions: If your chandelier has any additional features or functions, such as dimming capabilities or multiple lighting settings, test each one to ensure they work as intended.
- Check for proper leveling: Take a step back and visually inspect the chandelier to ensure it is hanging straight and level. Make any necessary adjustments to achieve the desired appearance.
- Inspect for any issues: Once the chandelier is powered on, closely examine it for any signs of loose components, abnormal noises, or other potential problems. If you notice any issues, refer to the manufacturer’s instructions or consider consulting a professional electrician for further assistance.
By restoring power and testing the chandelier, you can verify that both the electrical connections and the chandelier itself are functioning correctly. This final step ensures that the installation process is complete and that you can enjoy the beauty and illumination of your new chandelier.
Conclusion
Connecting chandelier wires may seem like a daunting task, but with proper guidance and the right tools, you can successfully install a new chandelier or replace an old one. By following the step-by-step process outlined in this guide, you can ensure a safe and seamless installation that adds elegance and functionality to your space.
Prioritizing safety is essential throughout the installation process. Remember to turn off the power, use personal protective equipment, work on stable surfaces, and seek professional assistance if needed. Taking these precautions will minimize the risk of accidents and ensure a smooth installation experience.
Gathering the right tools and materials will streamline the process and ensure that you have everything you need at hand. From screwdrivers and wire strippers to wire connectors and electrical tape, having the necessary tools readily available will make the installation more efficient and enjoyable.
Each step in the process plays a crucial role in connecting chandelier wires. From turning off the power and removing the old chandelier to examining the wiring, stripping the wires, and securing the connections, attention to detail is key. By carefully following each step, you can ensure a secure and reliable electrical connection for your chandelier.
The final steps of attaching the chandelier to the ceiling, restoring power, and testing the functionality of the chandelier are the exciting parts. These steps bring your vision to life as you see your new chandelier illuminate your space. Take the time to properly level and position the chandelier and troubleshoot any issues to ensure a perfect end result.
Remember, if at any point you feel unsure or uncomfortable with the installation process, it is always best to consult a professional electrician. They have the expertise and experience to handle complex electrical work and ensure a safe and successful installation.
By following the steps outlined in this guide and prioritizing safety, you can confidently connect chandelier wires and enjoy the beauty and ambiance that a chandelier brings to your home or space.
Frequently Asked Questions about How To Connect Chandelier Wires
Was this page helpful?
At Storables.com, we guarantee accurate and reliable information. Our content, validated by Expert Board Contributors, is crafted following stringent Editorial Policies. We're committed to providing you with well-researched, expert-backed insights for all your informational needs.


0 thoughts on “How To Connect Chandelier Wires”