Home>Home Security and Surveillance>How To Reset Motion Detector Lights
Home Security and Surveillance
How To Reset Motion Detector Lights
Modified: October 20, 2024
Learn how to reset motion detector lights for your home security and surveillance system. Step-by-step guide to troubleshooting and restoring functionality.
(Many of the links in this article redirect to a specific reviewed product. Your purchase of these products through affiliate links helps to generate commission for Storables.com, at no extra cost. Learn more)
Introduction
Welcome to our comprehensive guide on how to reset motion detector lights. Motion detector lights are an essential part of home security systems, providing an added level of protection by automatically detecting movement and triggering the lights to turn on. These lights not only increase visibility but also act as a deterrent to potential intruders.
While motion detector lights are designed to function efficiently for extended periods, there may be times when they require resetting. This could be due to various reasons, such as a power surge, a glitch in the system, or the need to adjust the sensitivity or duration of the lights.
In this article, we will walk you through the step-by-step process of resetting motion detector lights, ensuring that they are functioning optimally to provide the security and peace of mind you deserve.
Key Takeaways:
- Motion detector lights enhance home security by automatically illuminating when they detect movement. Resetting them is essential after power outages, glitches, or when adjusting settings to ensure they function optimally.
- Before resetting motion detector lights, gather tools, turn off power, and inspect the area. Follow step-by-step instructions to remove the cover, locate the reset mechanism, execute the reset, test the lights, and replace the cover for proper functionality.
Read more: How To Replace A Motion Detector Light
Understanding Motion Detector Lights
Before we dive into the process of resetting motion detector lights, let’s first understand how they work. Motion detector lights are equipped with sensors that detect changes in infrared radiation or heat patterns in their vicinity. These sensors can detect motion within a specified range and trigger the lights to turn on.
Most motion detector lights incorporate a Passive Infrared (PIR) sensor, which is the most common type used in residential security systems. The PIR sensor consists of several individual sensors that detect changes in heat patterns caused by moving objects.
When a person, animal, or other moving object enters the detection range of the motion detector light, the sensors detect the change in heat pattern and send a signal to the light fixture, triggering it to illuminate. The lights remain on for a predetermined duration, typically ranging from a few seconds to a few minutes, before automatically turning off.
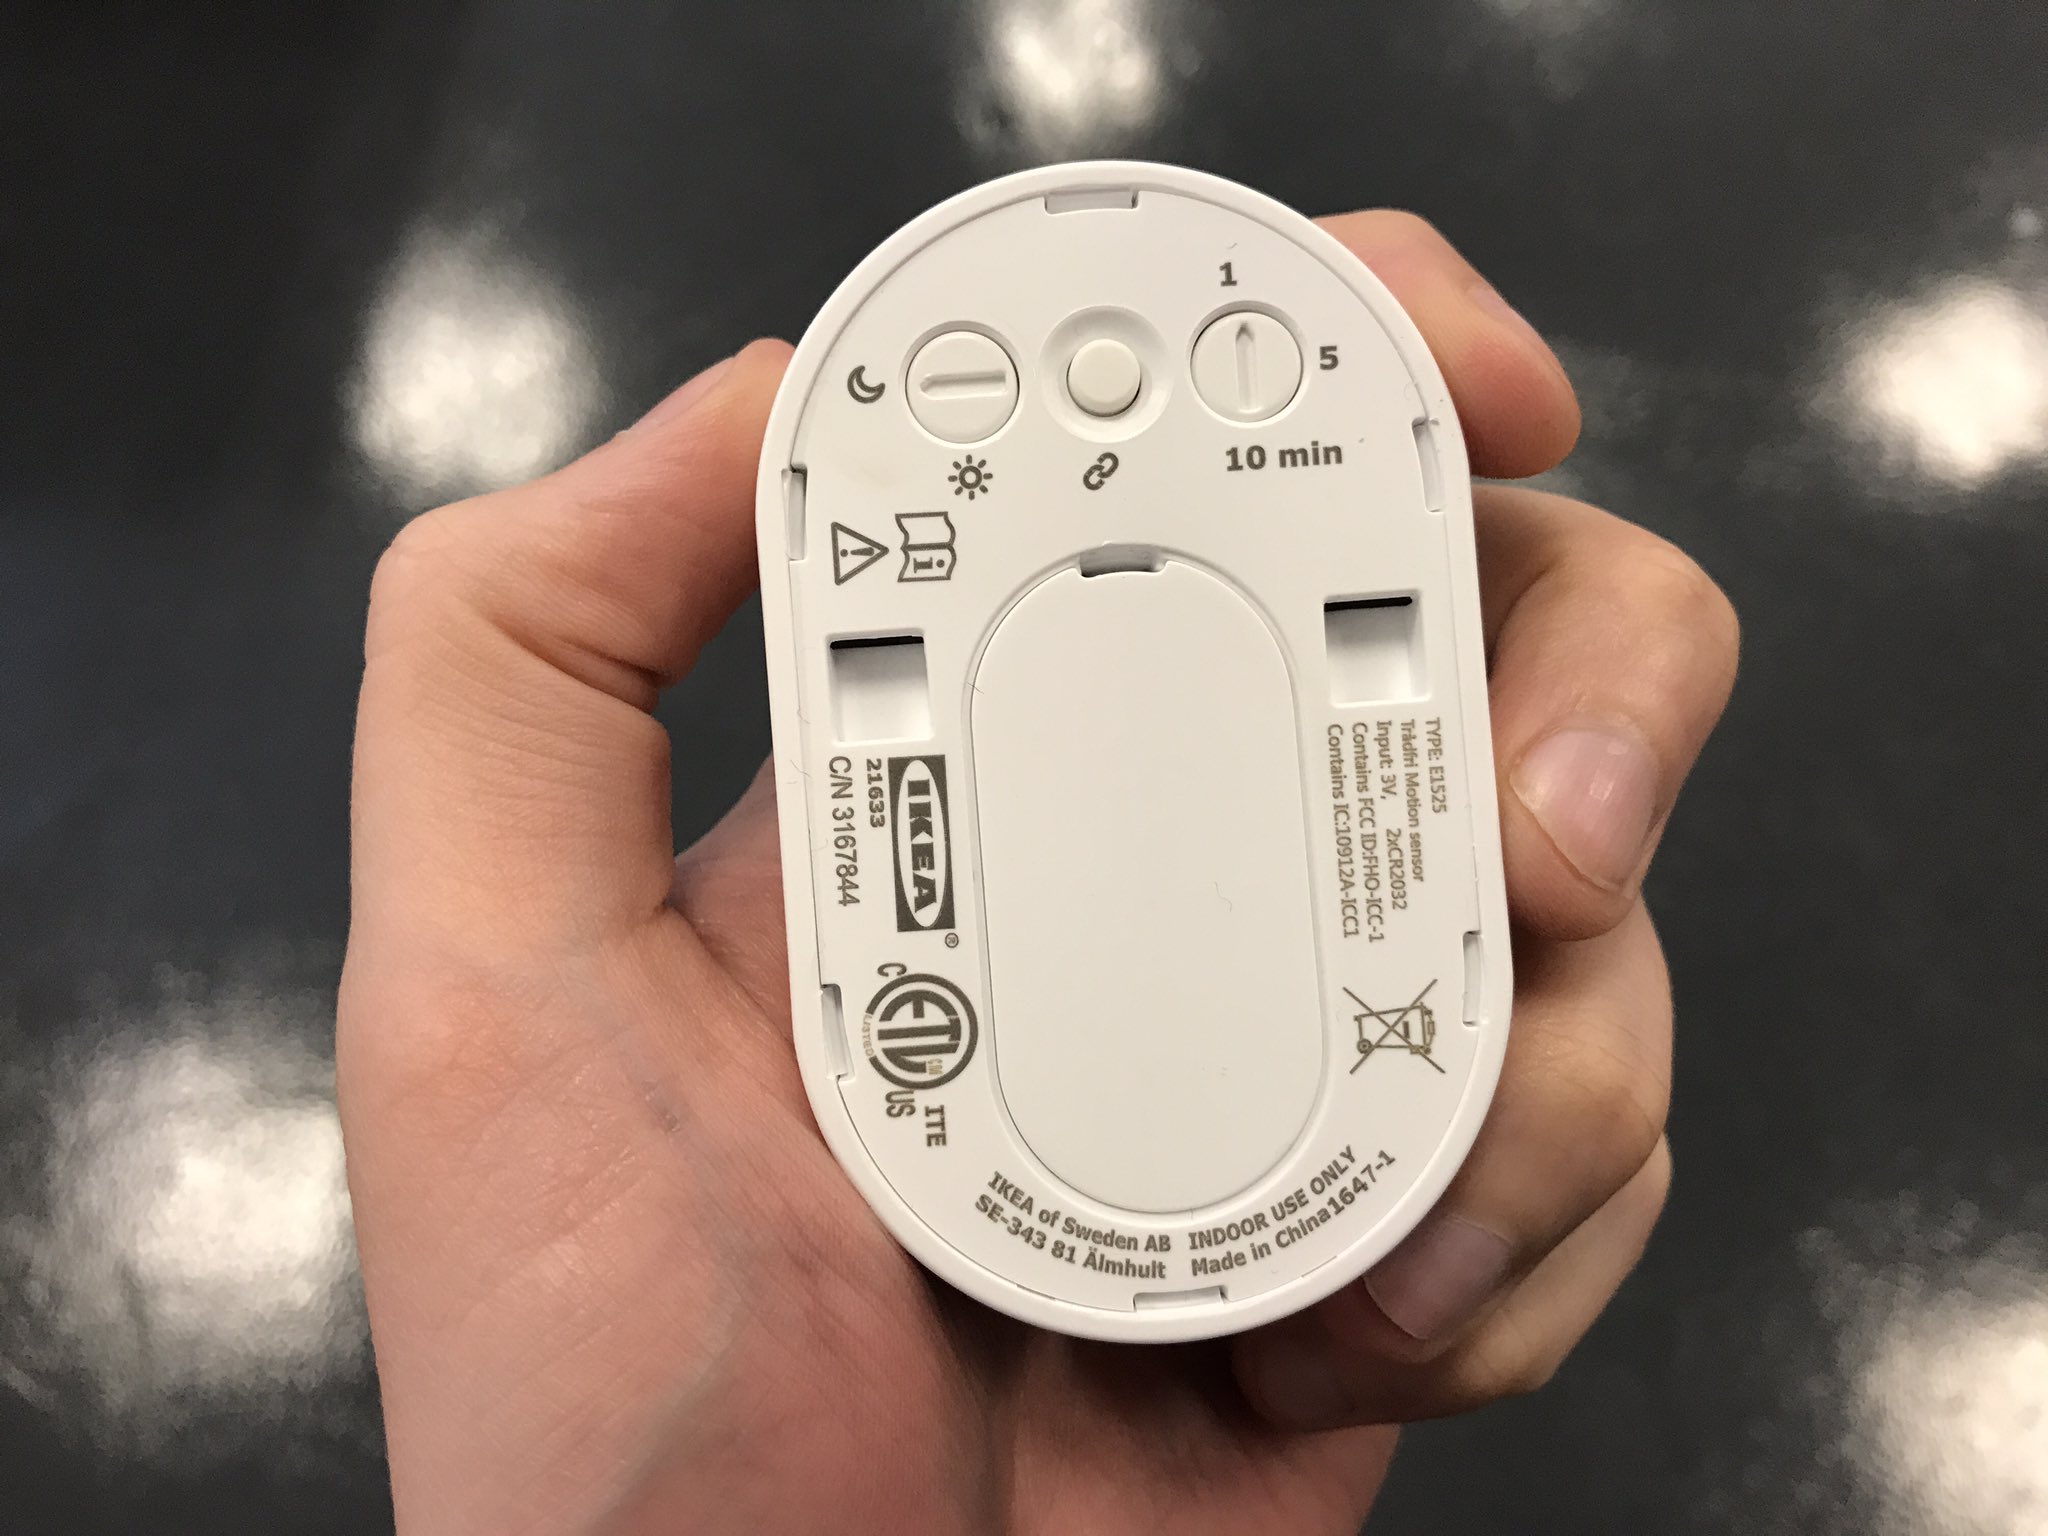
It is important to note that motion detector lights can be customized to adjust the sensitivity and duration of the lights. This allows you to fine-tune the settings according to your preferences and the specific needs of your home security system.
Now that we have a basic understanding of how motion detector lights operate, let’s explore the reasons why you may need to reset them.
Reasons for Resetting Motion Detector Lights
There are several reasons why you may need to reset your motion detector lights. Understanding these reasons will help you identify when it is necessary to perform a reset and troubleshoot any issues effectively. Here are some common scenarios that may require resetting:
- Power outage: In the event of a power outage, the motion detector lights may not automatically reset once the power is restored. Resetting the lights will ensure that they resume their normal functionality.
- Glitch in the system: Like any electronic device, motion detector lights can occasionally experience glitches. Resetting the lights can help resolve any temporary issues and restore their proper functioning.
- Adjusting settings: If you want to modify the sensitivity of the motion detector or the duration for which the lights stay on, you will need to reset the lights to apply the new settings.
- False triggers: Sometimes, motion detector lights may be triggered by non-threatening factors such as small animals, tree branches, or passing cars. Resetting the lights can help recalibrate the sensors and minimize false triggers.
- Maintenance: Resetting the motion detector lights can be part of regular maintenance to ensure optimal performance. By resetting, you can clear any accumulated glitches or errors, keeping the lights in top-notch condition.
Regardless of the reason for resetting, it is important to follow the correct procedure to avoid damaging the lights or compromising their functionality. In the next section, we will outline the steps you need to take to properly reset motion detector lights.
Preparing for the Reset
Before you begin the process of resetting your motion detector lights, it is important to take some necessary precautions and gather the required tools. Here are the steps to prepare for the reset:
- Gather the necessary tools: To ensure a smooth reset process, you will need a few basic tools such as a screwdriver (either Phillips or flat-head, depending on the type of screws holding the cover in place), and possibly a ladder or step stool if your motion detector lights are installed at a height that requires assistance to reach.
- Turn off the power: Before you begin working on the motion detector lights, it is vital to turn off the power supply. Locate the switch on your circuit breaker that controls the power to the specific light fixture and switch it off. This will minimize the risk of electric shock and prevent damage while resetting the lights.
- Check the user manual: It is always a good idea to consult the user manual provided by the manufacturer. The manual will provide specific instructions and precautions for resetting your particular model of motion detector lights. Keep it handy throughout the reset process.
- Inspect the surroundings: Take a moment to inspect the area around the motion detector lights. Remove any objects or debris that might interfere with the reset process or hinder your access to the light fixture. This will ensure a safe and unobstructed workspace.
- Prepare a safe working environment: If you are resetting outdoor motion detector lights, ensure that the weather conditions are suitable for working safely. If there is rain or inclement weather, it may be best to postpone the reset until conditions improve. Working in dry and well-lit conditions will make the process easier and safer.
By taking these preparatory steps, you will set yourself up for a successful reset of your motion detector lights. With all the necessary tools on hand and the power turned off, you can proceed confidently to the next steps. In the following sections, we will guide you through the step-by-step process of resetting your motion detector lights.
Step 1: Turn Off the Power
Before you begin the process of resetting your motion detector lights, the first and most critical step is to turn off the power. This step is crucial to ensure your safety and prevent any electrical mishaps. Follow these guidelines to turn off the power:
- Locate the circuit breaker: Identify the circuit breaker that controls the power supply to the specific motion detector light you want to reset. The circuit breaker panel is usually located in the basement, utility room, or garage of your home.
- Identify the correct breaker: Look for the breaker that corresponds to the area or room where the motion detector light is installed. It may be labeled as “Outdoor Lights,” “Security Lights,” or something similar. If the breakers are not labeled, you may need to trial and error method by turning off individual breakers and checking for power interruption.
- Turn off the breaker: Once you have identified the correct breaker, switch it off by flipping the corresponding switch to the “off” position. This will cut off the power supply to the motion detector light, ensuring that there is no electrical current flowing to the fixture.
- Confirm the power is off: As an extra precaution, briefly test the motion detector light by turning it on using the switch or sensor. This will verify that the power is indeed switched off and that the light does not turn on.
By turning off the power, you eliminate the risk of electrical shocks or short circuits while manipulating the motion detector lights. It is essential to double-check the power supply to ensure a safe working environment. Once you have confirmed that the power is off, you can proceed to the next step of resetting your motion detector lights.
Read more: How To Activate Motion Detector On A Light
Step 2: Remove the Cover
Now that you have turned off the power, you can safely proceed to remove the cover of the motion detector lights. Removing the cover will provide you access to the internal components of the fixture, allowing you to reset the lights. Follow these steps to remove the cover:
- Locate the screws: Examine the motion detector light fixture and identify the screws that hold the cover in place. These screws are typically located on the sides, top, or bottom of the fixture. The exact number and placement of the screws may vary depending on the specific model of your motion detector lights.
- Use the appropriate tool: Select the appropriate screwdriver based on the type of screws used. If the screws have a “+” shape on the head, you will need a Phillips screwdriver. If the screws have a straight line or “-” shape, you will need a flat-head screwdriver.
- Loosen and remove the screws: Insert the screwdriver into the screw heads and turn counterclockwise to loosen them. Once all the screws are loosened, carefully remove them and place them in a safe location. Set aside the screws as you will need them later to secure the cover back in place after resetting the lights.
- Remove the cover: With the screws removed, gently pull or slide the cover off the motion detector light fixture. Be cautious, as the cover may still be connected to the fixture by wiring or hooks. Carefully disconnect any wiring connections or release any hooks to completely detach the cover.
- Set aside the cover: Place the cover in a secure location where it won’t get damaged or misplaced. It is essential to keep the cover safe throughout the reset process to ensure that it can be reattached correctly once the reset is complete.
By following these steps, you will successfully remove the cover of your motion detector lights, providing you access to the internal components. With the cover removed, you are now ready to locate the reset button or switch, which we will discuss in the next step.
If your motion detector light is not working properly, try turning off the power to the light at the circuit breaker for a few minutes, then turn it back on. This can reset the light and fix any issues.
Step 3: Locate the Reset Button or Switch
After removing the cover of the motion detector lights, the next step is to locate the reset button or switch. The location of the reset mechanism may vary depending on the specific model and manufacturer of your motion detector lights. Follow these guidelines to locate the reset button or switch:
- Inspect the internal components: With the cover off, carefully examine the internal components of the motion detector light fixture. Look for any visible buttons, switches, or labeled reset indicators. These are typically located near the sensor or wiring area.
- Refer to the user manual: If you are having trouble locating the reset button or switch, refer to the user manual provided by the manufacturer. The manual will have specific instructions and diagrams illustrating the location of the reset mechanism for your particular model of motion detector lights.
- Assess the design: Consider the design and functionality of your motion detector lights. Some models may have a dedicated reset button that needs to be pressed, while others may feature a reset switch that needs to be toggled. Look for any noticeable markings or indicators that indicate the presence of a reset mechanism.
- Be mindful of precautions: While locating the reset button or switch, be cautious not to interfere with other sensitive components or wiring. Avoid touching or tampering with any other parts of the motion detector light fixture unless necessary for the reset process.
- Take note of the reset mechanism: Once you have located the reset button or switch, take note of its location and how it operates. This will help guide you in the next step when you actually reset the motion detector lights.
By following these steps, you will successfully locate the reset button or switch for your motion detector lights. Understanding the location and functionality of the reset mechanism is crucial for the proper execution of the reset process. In the next step, we will guide you through resetting the motion detector lights.
Step 4: Reset the Motion Detector Lights
Now that you have located the reset button or switch, you are ready to proceed with resetting your motion detector lights. This step involves activating the reset mechanism to restore the lights to their default settings. Follow these steps to reset the motion detector lights:
- Refer to the user manual: Consult the user manual provided by the manufacturer for specific instructions on how to reset your particular model of motion detector lights. The manual will outline the precise steps for resetting and any precautions you need to take.
- Activate the reset mechanism: Depending on the design of your motion detector lights, you may need to press and hold the reset button for a certain duration or toggle the reset switch to the designated position. Follow the instructions provided in the user manual or based on the markings and indicators near the reset mechanism.
- Wait for the reset to complete: After activating the reset mechanism, wait for a few seconds or as instructed in the user manual. This allows the motion detector lights to reset and restore their default settings. You may notice a brief flickering or dimming of the lights during this process.
- Observe the reset confirmation: Once the reset is complete, observe any visual indicators or changes in the motion detector lights. They may blink briefly or turn off completely before turning back on. This is an indication that the reset has been successful.
- Keep the reset mechanism in its default state: Once the motion detector lights have been reset, it is important to leave the reset button or switch in its default position unless you need to adjust the settings again in the future. Changing the position of the reset mechanism could alter the default settings and may require you to repeat the reset process.
By following these steps, you will successfully reset your motion detector lights and restore them to their default settings. The reset process may vary slightly based on the model and manufacturer, so always refer to the user manual for accurate instructions. In the next step, we will cover how to test the lights to ensure they are functioning properly.
Step 5: Test the Lights
After resetting your motion detector lights, it is crucial to test them to ensure they are functioning properly. Testing the lights will verify that the reset process was successful and that they are detecting motion and illuminating as intended. Follow these steps to test the lights:
- Turn on the power: Go back to the circuit breaker panel and switch on the power supply to the motion detector lights by flipping the corresponding breaker switch to the “on” position.
- Wait for darkness: If you are testing outdoor motion detector lights, wait until nighttime or create a simulated dark environment by covering the sensor with a cloth or paper. This will ensure that the lights are triggered when motion is detected.
- Trigger the motion detector: Walk or move in front of the motion detector to trigger the lights. Ensure that you are within the specified detection range and that the motion is detected by the sensors.
- Observe the light activation: Watch for the motion detector lights to turn on immediately after detecting the motion. The lights should stay illuminated for the predetermined duration before automatically turning off.
- Check for proper sensitivity and duration: While the lights are on, assess whether the sensitivity and duration settings are to your liking. If adjustments are needed, consult the user manual for instructions on how to modify these settings.
- Repeat the test: Conduct multiple tests to ensure consistent and accurate functioning of the motion detector lights. Walk or move in different areas within the detection range to ensure that the lights respond accordingly.
By following these steps, you will be able to effectively test your motion detector lights and confirm that they are working as expected. If the lights do not activate or if you encounter any issues during the test, you may need to consult the troubleshooting section in the user manual or seek professional assistance.
Now that you have tested the lights and confirmed their proper functionality, you can proceed to the final step of the reset process: replacing the cover.
Step 6: Replace the Cover
With the motion detector lights successfully reset and tested, the final step is to replace the cover. Reattaching the cover will protect the internal components of the lights from dust, debris, and weather elements. Follow these steps to properly replace the cover:
- Align the cover: Position the cover over the motion detector light fixture, aligning it with the screw holes or hooks on the fixture. Ensure that the cover is properly oriented and fits snugly.
- Reconnect any wiring: If you had to disconnect any wiring connections when removing the cover, carefully reconnect them following the appropriate instructions. Ensure that the wiring is secure and properly attached to the corresponding terminals.
- Insert and tighten the screws: Take the screws that were removed earlier and insert them back into the screw holes on the fixture. Use the appropriate screwdriver to tighten the screws securely but avoid overtightening, as this can damage the cover or the fixture.
- Double-check the alignment: After tightening the screws, check the alignment of the cover to ensure that it is level and properly seated on the light fixture. Make any necessary adjustments if needed.
- Test the cover’s stability: Gently wiggle or press on the cover to confirm that it is securely in place. The cover should not move or come loose with light pressure. If it feels unstable, check the screw tightness and alignment again.
- Confirm functionality: Once the cover is securely replaced, test the motion detector lights one final time to ensure that they turn on and off as expected. This will verify that the cover replacement did not affect the functionality of the lights.
By following these steps, you will successfully replace the cover of your motion detector lights, ensuring that the internal components are protected and secure. With the cover back in place, your motion detector lights are ready to continue providing enhanced security and peace of mind for your home.
Congratulations! You have now completed the process of resetting and restoring your motion detector lights.
Conclusion
Resetting motion detector lights is a crucial step in maintaining the optimal functioning of your home security system. By following the step-by-step process outlined in this guide, you can effectively reset your motion detector lights and restore them to their default settings.
We started by understanding how motion detector lights work, emphasizing their ability to detect movement and provide added security. We then explored the various reasons why you may need to reset them, such as power outages, glitches, or adjustments to settings.
We discussed the importance of preparing for the reset by gathering the necessary tools, turning off the power supply, and inspecting the surrounding area. We then walked through each step of the reset process, including removing the cover, locating the reset button or switch, executing the reset, and testing the lights for proper functionality.
Lastly, we covered the final step of replacing the cover, highlighting the importance of proper alignment, screw tightness, and stability. By following these steps, you can efficiently reset your motion detector lights and ensure their continued reliability in detecting motion and providing illumination when needed.
Remember to consult the user manual provided by the manufacturer for specific instructions and precautions for your particular model of motion detector lights.
By dedicating time to properly reset and maintain your motion detector lights, you can enhance the overall security of your home and enjoy peace of mind knowing that your property is well-protected. Stay vigilant and proactive in ensuring the safety and security of your household.
Frequently Asked Questions about How To Reset Motion Detector Lights
Was this page helpful?
At Storables.com, we guarantee accurate and reliable information. Our content, validated by Expert Board Contributors, is crafted following stringent Editorial Policies. We're committed to providing you with well-researched, expert-backed insights for all your informational needs.