Home>Renovation & DIY>Home Renovation Guides>How To Caulk Bathroom Vanity Backsplash
Home Renovation Guides
How To Caulk Bathroom Vanity Backsplash
Modified: August 28, 2024
Learn how to caulk your bathroom vanity backsplash with our comprehensive home renovation guide. Get expert tips and step-by-step instructions for a professional finish.
(Many of the links in this article redirect to a specific reviewed product. Your purchase of these products through affiliate links helps to generate commission for Storables.com, at no extra cost. Learn more)
Introduction
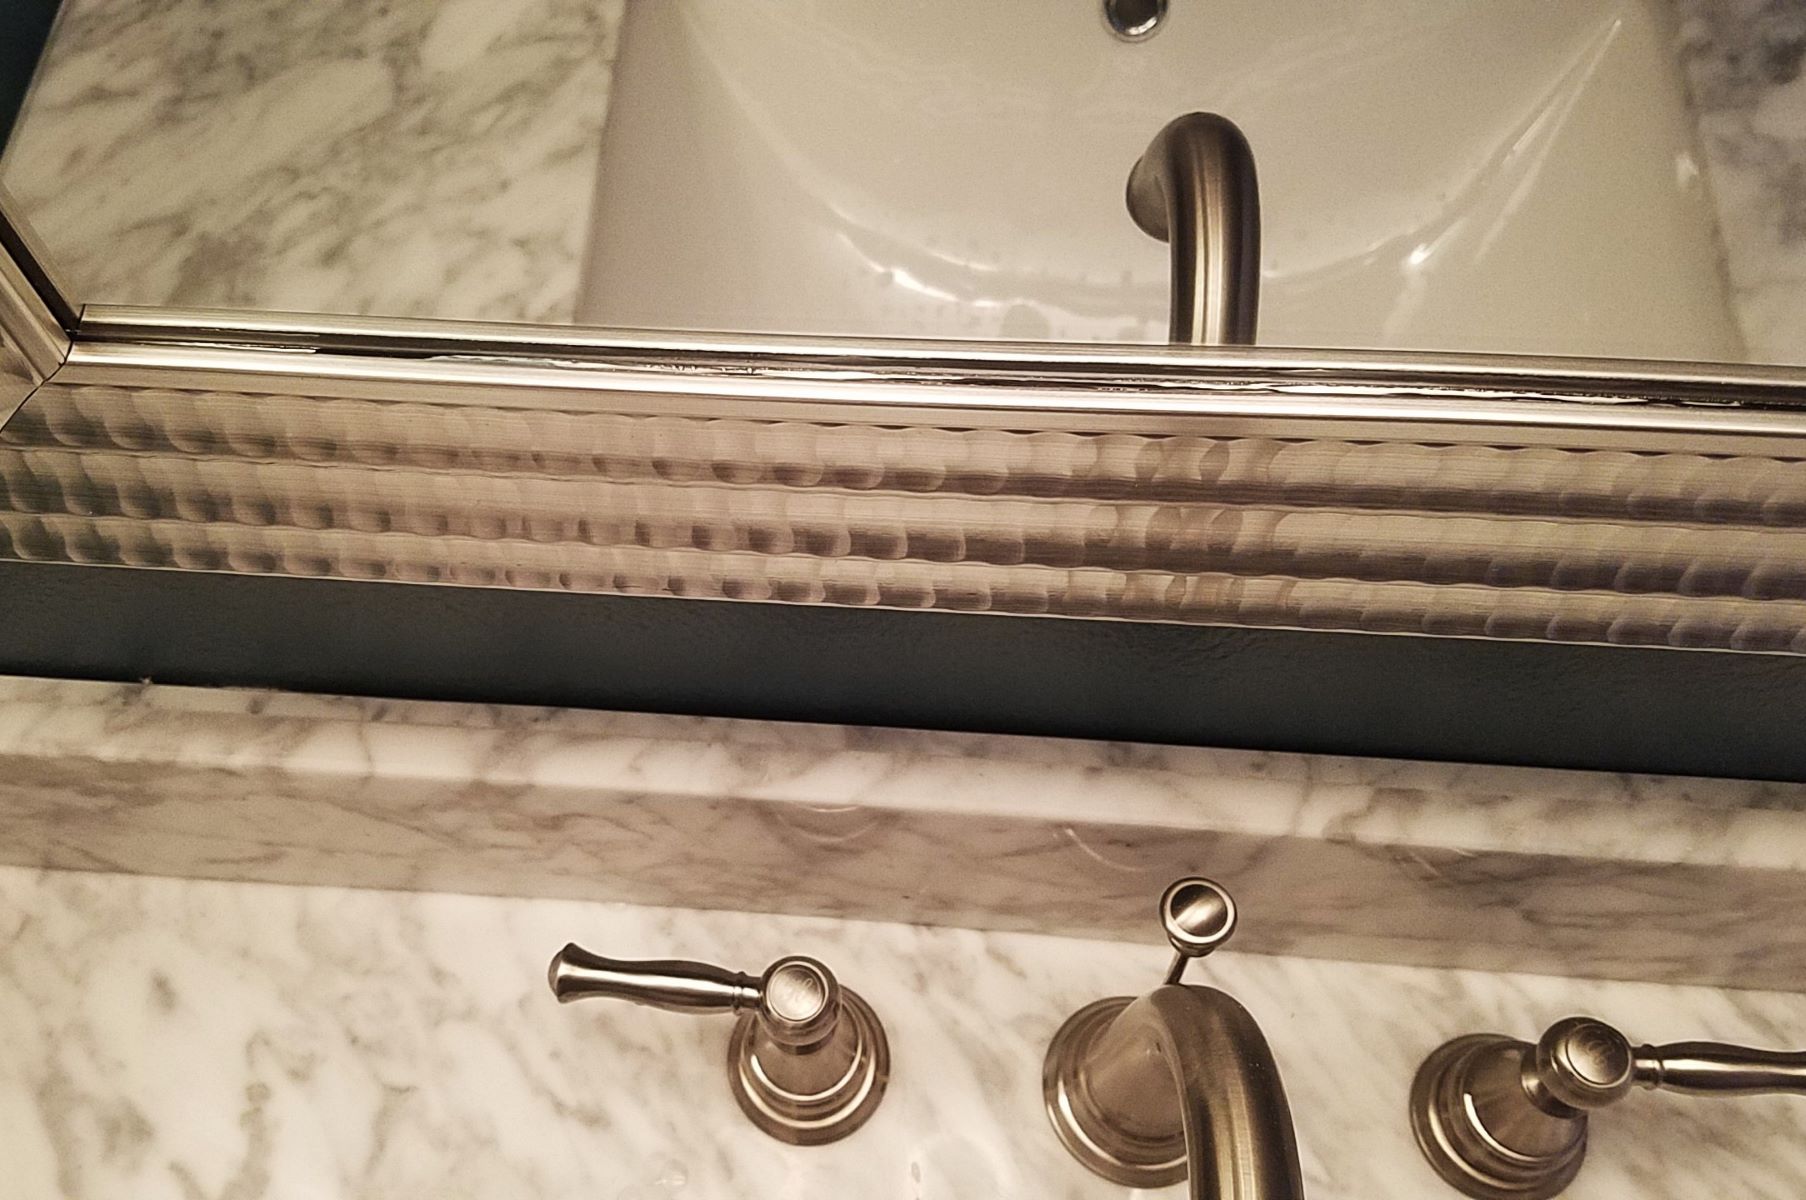
Caulking the backsplash of your bathroom vanity is a crucial step in maintaining the integrity and aesthetics of your bathroom. Over time, the backsplash can be subjected to moisture, which can lead to water damage and mold growth if not properly sealed. By applying a fresh bead of caulk, you can prevent water from seeping behind the vanity and protect the surrounding walls from potential damage.
In this comprehensive guide, you will learn the step-by-step process of caulking your bathroom vanity backsplash. Whether you're a seasoned DIY enthusiast or a novice looking to tackle your first home improvement project, this guide will equip you with the knowledge and confidence to achieve professional-looking results.
Caulking may seem like a daunting task, but with the right materials, preparation, and technique, you can transform your bathroom vanity into a polished and water-resistant feature. From gathering the necessary supplies to choosing the right type of caulk and mastering the application process, each step is essential in ensuring a durable and visually appealing finish.
By following this guide, you'll not only enhance the longevity of your bathroom vanity but also elevate the overall look and feel of your bathroom. So, roll up your sleeves, gather your materials, and let's dive into the art of caulking the backsplash of your bathroom vanity.
Key Takeaways:
- Properly caulking your bathroom vanity backsplash with the right materials and technique can prevent water damage and mold growth, ensuring a durable and visually appealing finish for your bathroom.
- Choosing a high-quality, waterproof, and mold-resistant caulk, and applying it with precision and care, can elevate the longevity and aesthetics of your bathroom vanity backsplash, creating a clean and polished space.
Read more: How To Attach Backsplash To Vanity
Step 1: Gather Materials
Before embarking on the caulking process, it's essential to gather the necessary materials to ensure a smooth and efficient application. Here's a comprehensive list of items you'll need:
-
Caulk: Select a high-quality caulk that is specifically designed for bathroom use. Look for a waterproof and mold-resistant formula to provide long-lasting protection against moisture.
-
Caulk Gun: A caulk gun is essential for dispensing the caulk evenly and with precision. Opt for a sturdy caulk gun that allows for smooth application without causing hand fatigue.
-
Utility Knife: A sharp utility knife will come in handy for removing any old or damaged caulk from the backsplash. Ensure that the blade is sharp to facilitate clean and precise removal.
-
Painter's Tape: Use painter's tape to mask off the areas adjacent to the backsplash. This will create clean lines and prevent excess caulk from spreading onto the vanity or wall surfaces.
-
Cleaning Supplies: Prepare a damp cloth or sponge, along with a mild detergent, to thoroughly clean the backsplash before applying the new caulk. Removing any dirt, grime, or residue will ensure proper adhesion of the new caulk.
-
Protective Gear: It's important to prioritize safety during the caulking process. Wear protective gloves to shield your hands from the caulk and any cleaning agents. Additionally, consider wearing safety goggles to protect your eyes from debris while removing old caulk.
-
Ventilation: Adequate ventilation is crucial when working with caulk and cleaning agents. Ensure that the bathroom is well-ventilated by opening windows or using a fan to prevent inhaling fumes and to expedite the drying process of the new caulk.
-
Caulk Smoother/Tool: A caulk smoother or tool can be used to create a neat and professional finish. This tool helps to shape and smooth the caulk line, resulting in a seamless and visually appealing outcome.
By gathering these materials, you'll be well-prepared to tackle the caulking process with confidence and precision. With the right tools at your disposal, you can proceed to the next steps of preparing the area and selecting the appropriate caulk for your bathroom vanity backsplash.
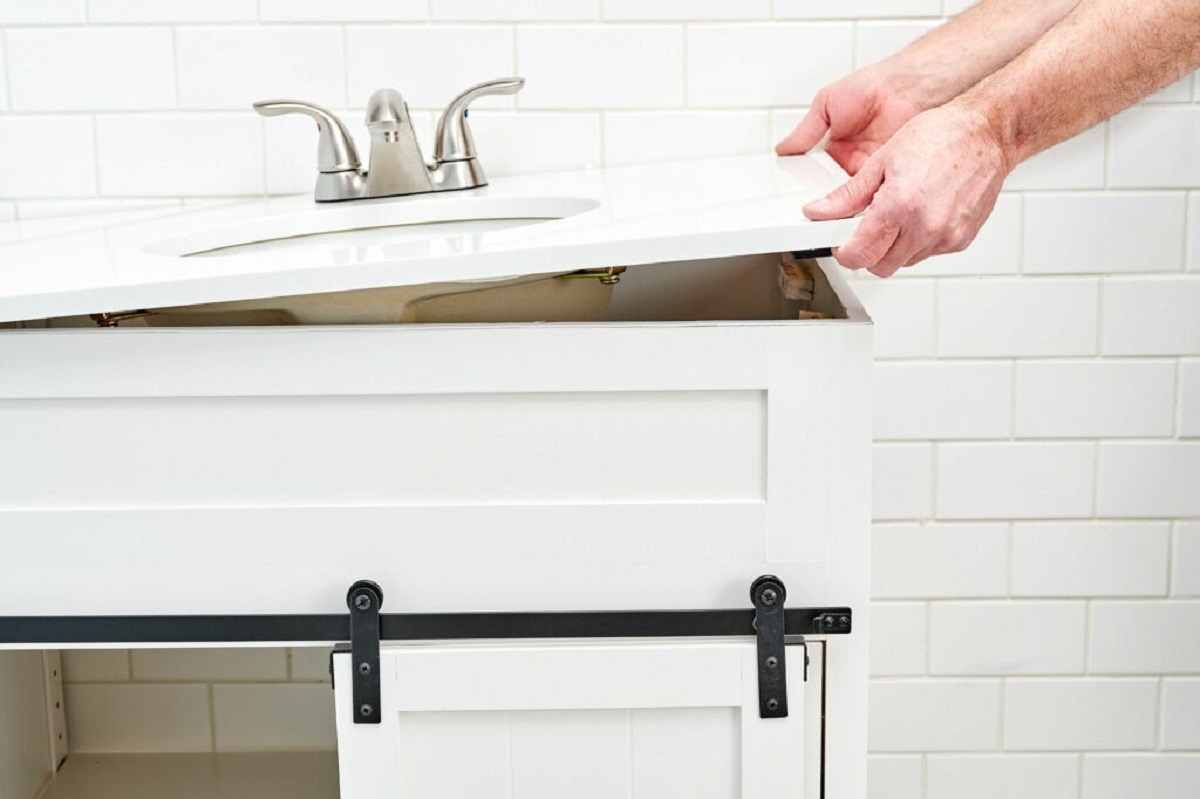
Step 2: Prepare the Area
Before diving into the caulking process, it's crucial to prepare the area to ensure optimal adhesion and a seamless application. Proper preparation sets the foundation for a professional-looking finish and enhances the longevity of the caulk. Here's a detailed breakdown of the essential steps to prepare the area for caulking your bathroom vanity backsplash:
Clean the Surface:
Begin by thoroughly cleaning the backsplash area where the new caulk will be applied. Use a damp cloth or sponge and a mild detergent to remove any dirt, grime, or residue. Ensure that the surface is completely clean and free from any debris that could hinder the caulk's adhesion. Pay close attention to the areas where old caulk has been removed, as any remaining residue can affect the new caulk's ability to bond effectively.
Remove Old Caulk:
Inspect the existing caulk along the edges of the backsplash and carefully remove any old or damaged caulk using a sharp utility knife. Take your time to gently scrape away the old caulk, ensuring that the edges are clean and smooth. Thoroughly remove any remnants of the old caulk to create a clean and even surface for the new application. This step is crucial in preventing the new caulk from adhering to old, ineffective caulk, which could compromise its durability.
Read more: How To Install A Backsplash On A Vanity
Mask Off Surrounding Areas:
To maintain clean lines and prevent excess caulk from spreading onto the vanity or wall surfaces, use painter's tape to mask off the areas adjacent to the backsplash. Apply the painter's tape carefully along the edges, ensuring that it creates a barrier between the backsplash and the surrounding surfaces. This step is particularly important for achieving a professional-looking finish and minimizing the need for extensive clean-up after the caulk is applied.
Ensure Adequate Ventilation:
Proper ventilation is essential during the preparation process. Open windows or use a fan to ensure that the bathroom is well-ventilated. This not only expedites the drying process of the new caulk but also helps to disperse any fumes from cleaning agents. Adequate ventilation creates a more comfortable and safe environment for the caulking process.
By meticulously preparing the area before applying the new caulk, you'll create an optimal foundation for a successful and long-lasting application. These preparatory steps set the stage for a seamless and professional finish, ensuring that your bathroom vanity backsplash remains well-protected and visually appealing for years to come.
Step 3: Choose the Right Caulk
Selecting the appropriate caulk for your bathroom vanity backsplash is a critical decision that directly impacts the longevity and effectiveness of the sealing process. With a myriad of caulk options available, it's essential to make an informed choice based on the specific requirements of the application. Here's a detailed exploration of the factors to consider when choosing the right caulk for your bathroom vanity backsplash:
Waterproof and Mold-Resistant Formulation
Given the high moisture environment of bathrooms, it's imperative to choose a caulk that offers superior waterproofing properties. Look for a caulk specifically designed for wet areas, such as bathrooms and kitchens. These formulations are engineered to withstand prolonged exposure to moisture, preventing water from seeping behind the vanity and causing damage to the walls. Additionally, opt for a caulk that is mold-resistant to inhibit the growth of mold and mildew, ensuring a hygienic and visually appealing backsplash.
Read more: What Type Of Caulk For A Vanity Top
Flexibility and Durability
The caulk selected for the bathroom vanity backsplash should possess excellent flexibility and durability to accommodate the natural movements of the building materials. As the house settles and experiences temperature fluctuations, the caulk should be able to expand and contract without cracking or losing its seal. A flexible caulk ensures long-term effectiveness, preventing water infiltration and maintaining a tight seal along the edges of the backsplash.
Color and Finish
When choosing the caulk color, consider selecting a shade that seamlessly blends with the existing backsplash or complements the vanity's aesthetic. Many manufacturers offer a range of color options to match common grout and tile colors, allowing for a cohesive and polished appearance. Additionally, some caulk formulations feature a smooth or textured finish, providing versatility in achieving the desired visual effect for the backsplash.
Application Method
Evaluate the application method of the caulk to ensure compatibility with your skill level and the project's requirements. Some caulks are designed for easy application with a caulk gun, while others may come in squeeze tubes for convenient hand application. Consider the accessibility of the application area and your proficiency in using the chosen caulk to achieve precise and clean results.
By considering these crucial factors, you can confidently select a high-quality caulk that meets the specific demands of caulking your bathroom vanity backsplash. The right caulk not only ensures effective sealing but also contributes to the overall aesthetics and longevity of the backsplash, elevating the visual appeal and functionality of your bathroom space.
Step 4: Apply the Caulk
With the area prepared and the appropriate caulk selected, it's time to embark on the crucial step of applying the caulk to the bathroom vanity backsplash. This process requires precision and attention to detail to ensure a seamless and effective seal. Here's a comprehensive guide on how to apply the caulk with finesse and achieve professional-looking results:
Read more: How To Caulk Countertop And Backsplash
Load the Caulk Gun
Begin by loading the caulk tube into the caulk gun, ensuring a secure fit. Use a utility knife to cut the tip of the caulk tube at a 45-degree angle, allowing for a controlled and even flow of caulk. Start with a small opening at the tip, as you can always increase the size if necessary. Insert the caulk tube into the gun and gently squeeze the trigger to test the flow and familiarize yourself with the pressure required for dispensing the caulk.
Apply the Caulk
Position the caulk gun at a 45-degree angle to the joint between the backsplash and the wall, ensuring a consistent and steady application. Slowly squeeze the trigger while guiding the caulk gun along the entire length of the backsplash. Maintain a consistent pressure to achieve an even bead of caulk, taking care to fill any gaps or voids along the edges. Aim for a uniform application, minimizing stops and starts to create a seamless seal.
Smooth the Caulk
Once the caulk is applied along the entire backsplash, use a caulk smoother or a wet finger to gently smooth the bead of caulk. This step helps to create a clean and professional finish, ensuring that the caulk adheres tightly to the surface and presents a visually appealing appearance. Work methodically along the caulk line, smoothing out any uneven areas and shaping the caulk to achieve a neat and uniform seal.
Remove Excess Caulk
After smoothing the caulk, use a damp cloth or sponge to carefully remove any excess caulk from the surrounding surfaces. Wipe along the edges of the backsplash and the adjacent areas to create clean lines and eliminate any stray caulk. Pay close attention to detail, ensuring that the excess caulk is thoroughly removed to achieve a polished and tidy result.
By following these steps with precision and care, you can effectively apply the caulk to your bathroom vanity backsplash, creating a durable and visually appealing seal. The meticulous application process contributes to the overall aesthetics and functionality of the backsplash, ensuring long-lasting protection against moisture and enhancing the overall appeal of your bathroom space.
Read more: What Type Of Caulk To Use For Backsplash
Step 5: Smooth and Clean Up
After applying the caulk to the bathroom vanity backsplash, the final step involves smoothing the caulk line and performing a thorough clean-up to achieve a polished and professional finish. This critical stage ensures that the caulk adheres seamlessly, presents a visually appealing appearance, and eliminates any excess residue. Here's a detailed breakdown of the essential tasks involved in smoothing and cleaning up the caulk application:
Smooth the Caulk Line
Using a caulk smoother or a wet finger, carefully run along the bead of caulk to smooth and shape it. This step is crucial in creating a clean and uniform seal along the edges of the backsplash. By methodically smoothing the caulk line, any uneven areas can be addressed, resulting in a neat and visually appealing finish. Pay close attention to detail, ensuring that the caulk adheres tightly to the surface and presents a seamless appearance.
Inspect for Imperfections
After smoothing the caulk, take a moment to inspect the entire caulk line for any imperfections or irregularities. Address any areas where the caulk may appear uneven or require additional smoothing. This meticulous inspection ensures that the caulk presents a consistent and professional finish, enhancing the overall aesthetics of the backsplash.
Remove Excess Caulk
Using a damp cloth or sponge, carefully remove any excess caulk from the surrounding surfaces. Wipe along the edges of the backsplash and the adjacent areas to eliminate any stray caulk and create clean lines. Thoroughly removing excess caulk contributes to achieving a polished and tidy result, enhancing the overall visual appeal of the bathroom vanity backsplash.
Read more: How To Caulk A Bathroom Sink
Dispose of Materials
Dispose of any used caulk tubes, gloves, and other disposable materials in a responsible manner. Proper disposal ensures a clean and organized workspace, reflecting a commitment to environmental consciousness and safety.
By meticulously smoothing the caulk line and performing a thorough clean-up, you can achieve a professional and visually appealing finish for your bathroom vanity backsplash. These final touches contribute to the overall durability and aesthetics of the caulk application, ensuring long-lasting protection against moisture and elevating the visual appeal of your bathroom space.
Conclusion
Caulking the backsplash of your bathroom vanity is a rewarding endeavor that not only enhances the aesthetics of your bathroom but also provides essential protection against moisture and water damage. By following the comprehensive steps outlined in this guide, you've gained valuable insights into the art of caulking and acquired the knowledge and confidence to undertake this essential home improvement task.
From gathering the necessary materials to meticulously preparing the area, choosing the right caulk, and executing the application with finesse, each step plays a pivotal role in ensuring a durable and visually appealing finish. The attention to detail and precision involved in the caulking process contribute to the overall functionality and aesthetics of your bathroom vanity backsplash.
By prioritizing the selection of a high-quality, waterproof, and mold-resistant caulk, you've taken a proactive step in safeguarding your bathroom against the detrimental effects of moisture. The flexibility and durability of the chosen caulk ensure long-term effectiveness, accommodating the natural movements of the building materials and maintaining a tight seal along the edges of the backsplash.
The meticulous application and smoothing of the caulk, coupled with a thorough clean-up, result in a polished and professional finish that elevates the visual appeal of your bathroom space. The seamless caulk line not only provides effective sealing but also contributes to the overall cleanliness and aesthetics of the backsplash.
As you conclude this caulking project, take a moment to admire the transformation of your bathroom vanity backsplash. The newly applied caulk not only enhances the longevity of the backsplash but also elevates the overall ambiance of your bathroom, creating a space that exudes cleanliness, functionality, and visual appeal.
By mastering the art of caulking, you've empowered yourself to proactively maintain and enhance your living environment. Whether you're a seasoned DIY enthusiast or a novice embarking on your first home improvement project, the skills and knowledge gained from this guide will serve you well in future endeavors.
So, as you step back and admire your handiwork, take pride in the fact that you've not only sealed the backsplash of your bathroom vanity but also added a touch of craftsmanship and care to your home. Embrace the satisfaction of a job well done, knowing that your bathroom vanity backsplash is now equipped to withstand the test of time while exuding a polished and professional appearance.
Frequently Asked Questions about How To Caulk Bathroom Vanity Backsplash
Was this page helpful?
At Storables.com, we guarantee accurate and reliable information. Our content, validated by Expert Board Contributors, is crafted following stringent Editorial Policies. We're committed to providing you with well-researched, expert-backed insights for all your informational needs.


0 thoughts on “How To Caulk Bathroom Vanity Backsplash”