Articles
How To Caulk A Bathroom Sink
Modified: December 7, 2023
Learn how to properly caulk a bathroom sink with this informative article. Find step-by-step instructions and tips for a successful caulking job.
(Many of the links in this article redirect to a specific reviewed product. Your purchase of these products through affiliate links helps to generate commission for Storables.com, at no extra cost. Learn more)
Introduction
Welcome to this comprehensive guide on how to caulk a bathroom sink. Caulking is an essential maintenance task that helps to seal gaps and prevent water damage in your bathroom. Whether you’re dealing with an old caulking job that needs to be replaced or you want to learn how to properly caulk a new sink, this article will walk you through each step of the process.
Properly caulking your bathroom sink not only improves its appearance but also helps to prevent water leaks and potential mold growth. By following the steps outlined in this article, you can ensure a professional-looking result and protect your bathroom from water damage.
In this guide, we will discuss the materials needed for the project and take you through each step, from preparing the area to applying and smoothing the caulk. We will also cover important tips and techniques to help you achieve a long-lasting and effective caulk job.
So, grab your caulking gun and let’s get started with transforming your bathroom sink into a watertight oasis!
Key Takeaways:
- Properly caulking your bathroom sink not only improves its appearance but also prevents water leaks and potential mold growth, ensuring a professional-looking result and protecting your bathroom from water damage.
- Regular maintenance and inspection of your caulked sink will help maintain its effectiveness. If you notice any signs of wear or deterioration, recaulk as needed to retain a watertight seal.
Read more: How To Caulk Around A Sink
Materials Needed
Before you begin caulking your bathroom sink, it’s important to gather all the necessary materials. Having everything on hand will ensure a smooth and efficient process. Here are the materials you’ll need:
- Caulk gun
- Caulk (choose a suitable type for use in bathrooms, such as silicone caulk)
- Caulk scraper or utility knife
- Plastic drop cloth or old newspapers
- Painter’s tape
- Denatured alcohol or caulk remover
- Cleaning cloth
- Latex gloves
- Seam sealer or caulk smoothing tool
- Lint-free cloth or sponge
Make sure to gather these materials before you begin the caulking process. Having everything readily available will save you time and make the task much more efficient.
Step 1: Preparation
Before you start caulking your bathroom sink, it’s essential to prepare the area properly. This involves cleaning the surface, removing any old caulk, and ensuring that the area is dry and free from debris. Here’s what you need to do:
- Clear the sink area: Remove any items from the sink and clear the surrounding area to give yourself ample space to work.
- Turn off the water supply: Before you begin, turn off the water supply to the sink. This will prevent any accidental leaks or water damage during the caulking process.
- Protect the surrounding surfaces: Use painter’s tape to protect any adjacent surfaces, such as the countertop or tiles, from accidental caulk smears.
- Prep the caulk gun: Load the caulk tube into the caulk gun according to the manufacturer’s instructions. Cut the nozzle at a 45-degree angle to create a small opening.
With these preparations in place, you’re now ready to move on to the next step, which involves removing the old caulk.
Step 2: Removing Old Caulk
Removing old caulk is an important step in the caulking process, as it ensures proper adhesion of the new caulk. Here’s how to remove the old caulk from your bathroom sink:
- Softening the old caulk: Apply a caulk remover or denatured alcohol to the old caulk. Let it sit for a few minutes to soften the caulk and make it easier to remove.
- Scraping the caulk: Using a caulk scraper or a utility knife, gently scrape away the softened caulk. Be careful not to scratch or damage the sink or surrounding surfaces. Move the scraper in a back-and-forth motion, applying gentle pressure to remove the caulk completely.
- Cleaning the area: Once you’ve removed the bulk of the old caulk, use a cleaning cloth or sponge to wipe away any remaining residue. You can also use denatured alcohol to clean the area and ensure it’s free from any caulk remnants or debris.
- Allow the area to dry: Before moving on to the next step, make sure the sink and the surrounding area are completely dry. This will ensure proper adhesion of the new caulk.
By taking the time to remove the old caulk properly, you’ll create a clean surface for the new caulk to adhere to. This will help to achieve a professional and long-lasting caulking job.
Step 3: Cleaning the Area
Once you have removed the old caulk, it’s important to thoroughly clean the area to ensure proper adhesion of the new caulk. Here’s how to clean the area around your bathroom sink:
- Dampen a lint-free cloth or sponge: Moisten a lint-free cloth or sponge with warm water. Make sure it’s not dripping wet, as excess water can affect the caulk’s adhesion.
- Wipe down the sink and surrounding surface: Gently wipe down the sink and the surrounding surface to remove any dirt, dust, or debris. Pay special attention to corners and crevices where residue may accumulate.
- Use a mild detergent if necessary: For stubborn stains or residue, you can mix a mild detergent with warm water and use it to clean the area. Ensure that you rinse thoroughly to remove any detergent residue.
- Dry the area: After cleaning, use a dry lint-free cloth or allow the area to air dry completely. It’s crucial that the surface is dry before applying the new caulk, as moisture can affect the caulk’s performance.
By thoroughly cleaning the area, you’re ensuring that the new caulk will adhere properly and provide a tight seal. This step is crucial in achieving a professional and long-lasting caulk job for your bathroom sink.
Make sure to thoroughly clean and dry the area around the sink before applying the caulk. This will ensure a better bond and longer-lasting seal.
Read more: How To Caulk A Kitchen Sink
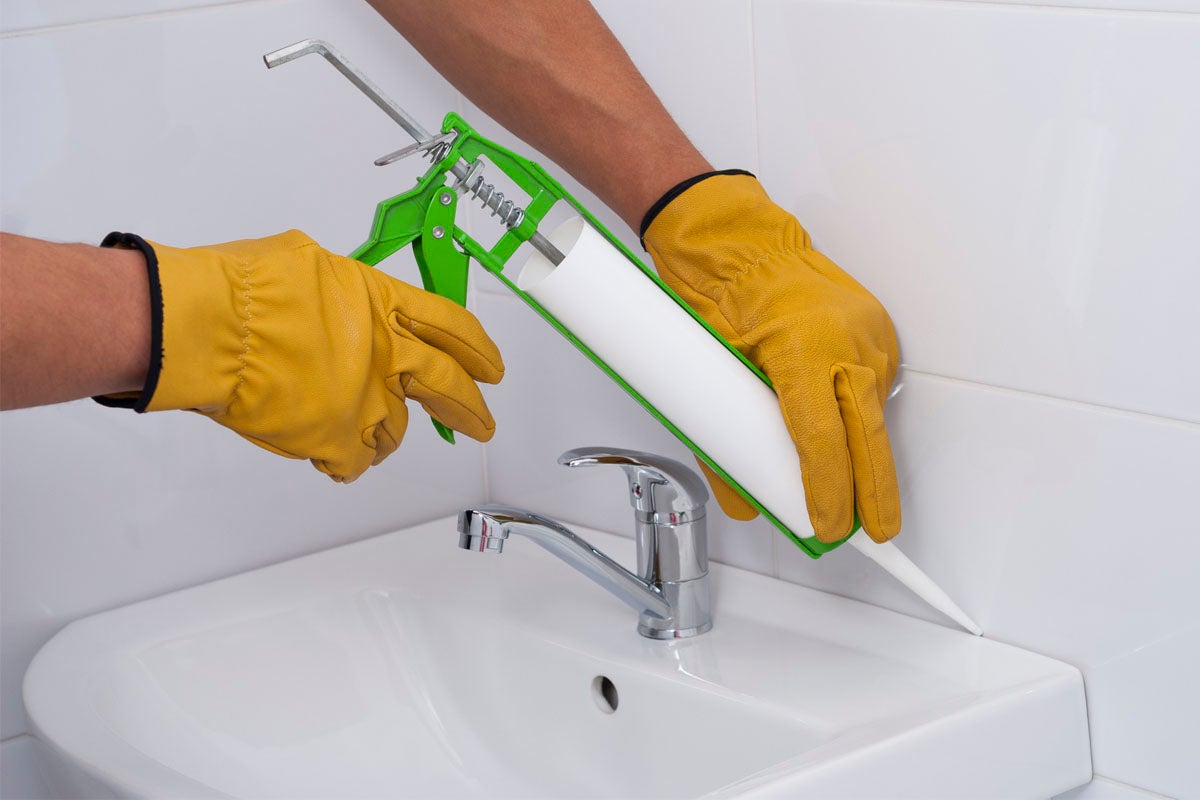
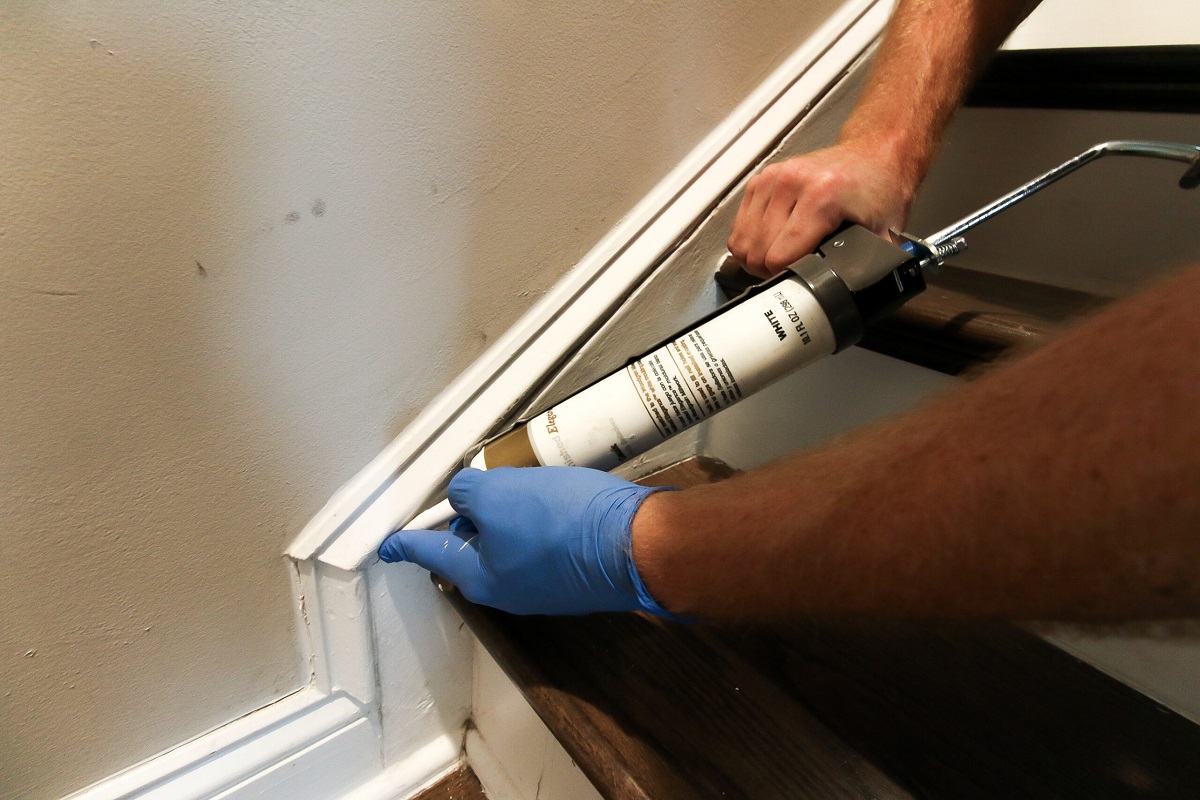
Step 4: Applying New Caulk
With the preparation and cleaning steps done, it’s time to apply the new caulk to your bathroom sink. Follow these instructions to ensure a smooth and precise application:
- Load the caulk tube into the caulk gun: Insert the caulk tube into the caulk gun and push it firmly until it is securely in place. Make sure the nozzle is facing outward.
- Cut the caulk nozzle: Using a utility knife, cut the caulk nozzle at a 45-degree angle. Aim for a small opening to control the flow of the caulk.
- Start caulking: Place the caulk gun at a 45-degree angle to the joint between the sink and the surrounding surface. Squeeze the trigger to start applying a thin, even bead of caulk. Apply continuous pressure to create a smooth flow.
- Maintain a steady pace: As you move along the joint, apply a consistent amount of caulk. Keep a steady pace to ensure uniform coverage. Avoid stopping and starting, as this can create uneven lines and excess caulk build-up.
- Fill the entire joint: Continue caulking until you have filled the entire joint between the sink and the surrounding surface. Be thorough in your application to ensure a watertight seal.
Remember, it’s better to start with a small amount of caulk and add more if needed rather than applying too much at once. This will help you maintain better control over the caulk and achieve a neat and professional finish.
Once you have applied the caulk, move on to the next step: smoothing the caulk for a seamless look.
Step 5: Smoothing the Caulk
After applying the caulk, it’s important to smooth it out for a clean and professional appearance. Follow these steps to achieve a smooth finish:
- Dampen your finger or a caulk smoothing tool: Dip your finger in water or use a caulk smoothing tool to wet it slightly. This will help prevent the caulk from sticking to your finger or tool.
- Hold your finger or tool at a 45-degree angle: Place your finger or caulk smoothing tool at a 45-degree angle to the caulk line. Gently run your finger or tool along the caulk line, pressing down slightly to flatten and smooth the caulk.
- Wipe away excess caulk: As you smooth the caulk, use a damp cloth or sponge to wipe away any excess caulk that may accumulate on the surface. This will give the caulk a tidy and seamless appearance.
- Keep a steady hand: Maintain a steady hand and apply consistent pressure as you smooth the caulk. This will help you achieve a professional finish.
Remember to clean your finger or caulk smoothing tool frequently to prevent the caulk from smearing or sticking. Continually dampening your finger or tool will also aid in achieving a smoother and more even finish.
Once you have smoothed out the caulk, allow it to dry and cure before moving on to the final steps.
Step 6: Drying and Curing
After applying and smoothing the caulk, it’s important to allow it to dry and cure properly. Follow these steps to ensure the caulk sets and forms a strong bond:
- Check the drying time: Read the manufacturer’s instructions on the caulk tube to determine the recommended drying time. This can vary depending on the type of caulk used.
- Avoid using the sink: To allow the caulk to dry properly, avoid using the sink or getting it wet for the recommended drying time. This will ensure that the caulk doesn’t get disturbed or washed away before it has fully cured.
- Provide proper ventilation: Ensure that the bathroom is well-ventilated during the drying process. Good airflow will help the caulk dry faster and promote proper curing.
- Be patient: Give the caulk ample time to dry and cure. Rushing the process can result in an uneven finish or compromised adhesion.
It’s important to note that complete drying and curing times can vary depending on the type and brand of caulk used, as well as the environmental conditions in your bathroom. Follow the manufacturer’s guidelines for the best results.
Once the caulk has dried and cured, you can move on to the final step: adding the finishing touches to your caulked sink.
Step 7: Finishing Touches
With the caulk dried and cured, you’re almost finished! The final step involves adding some finishing touches to complete the caulking process for your bathroom sink:
- Inspect the caulk line: Carefully examine the caulk line to ensure that it is even and free of any gaps or imperfections. If you notice any areas that need improvement, you can touch them up using small amounts of caulk.
- Remove painter’s tape: If you used painter’s tape to protect adjacent surfaces, gently remove it at a 45-degree angle. This will help create a clean line without pulling away any of the caulk.
- Clean up any mess: Use a damp cloth or sponge to clean up any caulk smears or residue that may have been left behind. It’s important to remove any excess caulk promptly to maintain a neat and professional appearance.
- Allow the caulk to fully cure: Even though the caulk may feel dry, it’s best to allow it to fully cure before subjecting it to water or regular use. Follow the manufacturer’s recommendations for the complete curing time.
By paying attention to these finishing touches, you can ensure that your freshly caulked bathroom sink looks clean, professional, and ready for use.
Congratulations! You have successfully completed the process of caulking your bathroom sink. A well-caulked sink not only enhances the aesthetics of your bathroom but also protects it from water damage and potential mold growth.
Remember, regular maintenance and inspection of your caulking will help to maintain its effectiveness. If you notice any signs of wear or deterioration, such as cracks or gaps, it’s important to recaulk as needed to retain a watertight seal.
Thank you for following this comprehensive guide on how to caulk a bathroom sink. May your caulked sink provide you with years of functionality and beauty!
Read more: What Type Of Caulk For A Vanity Top
Conclusion
Caulking your bathroom sink is a crucial task that not only enhances its appearance but also protects it from water damage. By following the steps outlined in this guide, you can achieve a professional and long-lasting caulk job.
Starting with proper preparation and gathering all the necessary materials, you can remove the old caulk and clean the area to create a clean surface. Applying the new caulk requires precision and a steady hand, followed by smoothing out the caulk for a seamless finish.
Allowing the caulk to dry and cure completely is essential for optimal performance. Finally, adding the finishing touches, such as inspecting the caulk line and cleaning up any mess, ensures a neat and professional-looking result.
Regular maintenance and periodic inspection of your caulked sink will help to keep it in top condition. If you notice any signs of wear or deterioration, be sure to recaulk as needed to maintain a watertight seal.
Now that you have the knowledge and confidence to caulk your bathroom sink, embark on this DIY project and transform your bathroom into a pristine and functional space. Enjoy the benefits of a well-caulked sink that not only looks great but also protects against water damage for years to come.
Thank you for reading this comprehensive guide on how to caulk a bathroom sink. Happy caulking!
Frequently Asked Questions about How To Caulk A Bathroom Sink
Was this page helpful?
At Storables.com, we guarantee accurate and reliable information. Our content, validated by Expert Board Contributors, is crafted following stringent Editorial Policies. We're committed to providing you with well-researched, expert-backed insights for all your informational needs.


0 thoughts on “How To Caulk A Bathroom Sink”