Home>Technology>Smart Home Devices>How To Add A Printer On Windows 7
Smart Home Devices
How To Add A Printer On Windows 7
Modified: January 18, 2024
Learn how to easily add a printer on Windows 7 and improve your smart home devices setup. Follow our step-by-step guide for seamless integration.
(Many of the links in this article redirect to a specific reviewed product. Your purchase of these products through affiliate links helps to generate commission for Storables.com, at no extra cost. Learn more)
Introduction
Welcome to the world of smart home devices, where convenience and innovation intersect to transform the way we interact with our living spaces. In this article, we will explore the process of adding a printer on a Windows 7 operating system, allowing you to seamlessly integrate this essential device into your home network.
In today's digital age, the ability to print documents and images directly from your computer is a fundamental aspect of both productivity and creativity. Whether you need to produce hard copies of important reports, school assignments, or cherished photographs, having a printer readily accessible on your Windows 7 system can streamline your workflow and enhance your overall computing experience.
By following the step-by-step guide outlined in this article, you will gain the knowledge and confidence to successfully connect and configure a printer on your Windows 7 device. From establishing the physical connection to installing the necessary drivers and adding the printer to your system, each phase of the process will be thoroughly explained to ensure a smooth and efficient setup.
As we delve into the intricacies of integrating a printer into your Windows 7 environment, you will discover the underlying principles that govern device connectivity and software installation. Moreover, you will gain practical insights that can be applied to a wide range of smart home devices, fostering a deeper understanding of how these technologies operate within your home network.
So, without further ado, let's embark on this enlightening journey and unlock the potential of your Windows 7 system by seamlessly adding a printer to enrich your home computing experience.
Key Takeaways:
- Adding a printer to your Windows 7 system is like connecting a new friend to your computer. You need to physically connect the printer, install the right software, and then introduce it to your computer so you can start printing!
- Smart home devices, like printers, make life easier by connecting to your computer and making tasks, like printing, more convenient. By following the steps, you can bring these devices into your home and make your life more efficient.
Read more: How To Add A Printer On Windows 10
Step 1: Connect the Printer
Before you can begin using your printer with your Windows 7 system, it is crucial to establish a physical connection between the two devices. This typically involves connecting the printer to your computer using a USB cable or configuring it to communicate with your home network wirelessly. Follow these steps to ensure a seamless connection:
- Locate a Suitable Connection Port: If you are using a wired connection, identify an available USB port on your computer and connect one end of the USB cable to the printer and the other end to the selected port on your computer. For wireless connectivity, refer to your printer’s manual to determine the appropriate wireless setup process.
- Power On the Printer: Ensure that the printer is powered on and ready to initiate the connection process. Most modern printers feature a power button that can be easily accessed on the device’s control panel.
- Configure Wireless Settings (If Applicable): If you are opting for wireless connectivity, access the printer’s settings menu to configure the wireless connection. This may involve selecting your home network from a list of available networks and entering the network’s password to establish a secure connection.
- Install Ink Cartridges and Paper: If you are setting up a new printer, ensure that the ink cartridges are correctly installed and that the paper tray is loaded with the appropriate paper size and type. This will prepare the printer for any test prints or alignment procedures that may be required during the setup process.
By successfully completing these steps, you will have effectively connected your printer to your Windows 7 system, laying the groundwork for the subsequent installation and configuration processes. With the physical connection established, you are now ready to proceed to the next phase of the setup, which involves installing the necessary printer drivers to enable seamless communication between the printer and your Windows 7 system.
Step 2: Install the Printer Driver
With the printer physically connected to your Windows 7 system, the next crucial step is to install the appropriate printer driver. The printer driver serves as a communication bridge between your computer’s operating system and the connected printer, enabling the seamless transmission of print commands and ensuring compatibility with a wide range of applications and file formats. Follow these steps to install the printer driver:
- Locate the Printer’s Manufacturer Website: Navigate to the official website of the printer’s manufacturer using a web browser on your Windows 7 system. Alternatively, you can use the installation CD that came with the printer to initiate the driver installation process.
- Download the Driver Software: Once on the manufacturer’s website, locate the section dedicated to driver downloads and search for the specific driver compatible with your printer model and the Windows 7 operating system. Download the driver software to a location on your computer that is easily accessible, such as the desktop or the Downloads folder.
- Run the Driver Installation Wizard: Locate the downloaded driver file and double-click on it to initiate the installation process. Follow the on-screen prompts to complete the installation, ensuring that you carefully read and acknowledge any user agreements or additional software that may be bundled with the driver package.
- Restart Your Computer (If Prompted): After the driver installation is complete, you may be prompted to restart your computer to finalize the setup. Ensure that any open applications and documents are saved before proceeding with the restart.
By following these steps, you will have successfully installed the necessary printer driver on your Windows 7 system, enabling seamless communication between your computer and the connected printer. The installation of the driver software is a crucial component of the setup process, as it ensures that your printer is recognized and fully functional within your Windows 7 environment.
With the printer driver successfully installed, you are now ready to proceed to the final phase of the setup, which involves adding the printer to your Windows 7 system, allowing you to start printing documents and images with ease and efficiency.
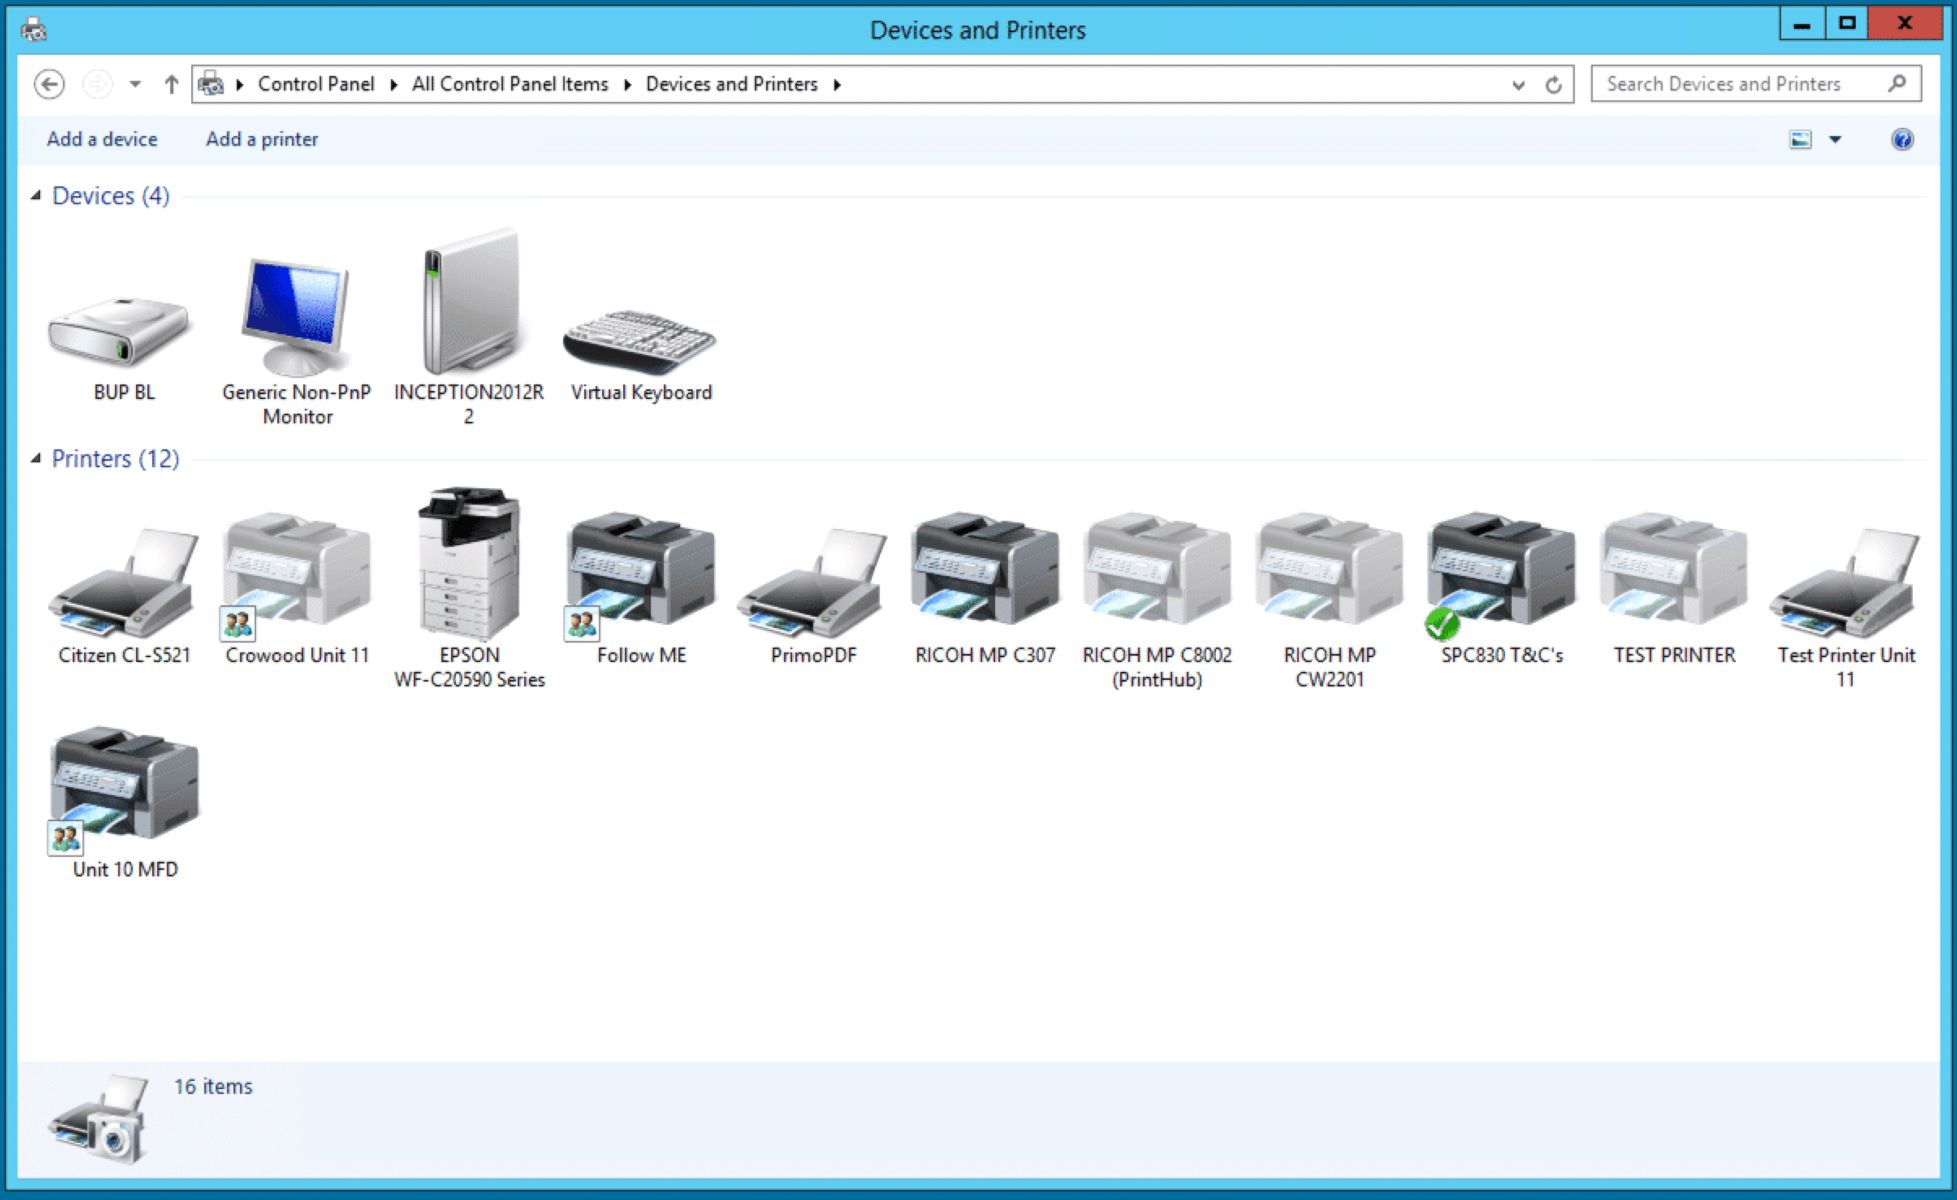
To add a printer on Windows 7, go to the Control Panel, select “Devices and Printers,” then click on “Add a printer.” Follow the on-screen instructions to complete the setup.
Step 3: Add the Printer
Now that the printer is physically connected to your Windows 7 system and the necessary printer driver has been installed, the final step is to add the printer to your list of available devices. This process ensures that your Windows 7 system recognizes the printer and allows you to print documents and images seamlessly. Follow these steps to add the printer:
- Access the Control Panel: Click on the “Start” button on your Windows 7 system and select “Control Panel” from the menu. Alternatively, you can type “Control Panel” in the search bar and press “Enter” to access the Control Panel directly.
- Select “Devices and Printers”: Within the Control Panel, locate and click on the “Devices and Printers” option. This will display a list of devices that are currently connected to your Windows 7 system, as well as the available printers.
- Click “Add a Printer”: Within the “Devices and Printers” window, click on the “Add a Printer” option located at the top of the window. This will initiate the printer detection process, allowing your Windows 7 system to search for and recognize the connected printer.
- Follow the On-Screen Prompts: Your Windows 7 system will guide you through the process of adding the printer, prompting you to select the detected printer from a list of available devices. Once the printer is selected, follow any additional on-screen prompts to complete the setup.
Upon successfully adding the printer to your Windows 7 system, you will be able to print documents and images from any application that supports printing. Whether you are using Microsoft Word, Adobe Acrobat, or any other software capable of producing physical copies, the added printer will be readily accessible and functional within your Windows 7 environment.
With the printer successfully added to your Windows 7 system, you have completed the comprehensive process of integrating a printer into your smart home setup. Your ability to seamlessly print documents and images directly from your computer underscores the convenience and efficiency that smart home devices bring to your daily life.
By following the steps outlined in this article, you have gained valuable insights into the setup and configuration of smart home devices within a Windows 7 environment, paving the way for a seamless and enriching computing experience.
Conclusion
Congratulations on successfully adding a printer to your Windows 7 system! Through the step-by-step process outlined in this article, you have gained valuable insights into the seamless integration of smart home devices, specifically printers, into your computing environment. By connecting the printer, installing the necessary driver, and adding the device to your Windows 7 system, you have unlocked the potential for efficient and convenient printing within your home network.
As you embark on your journey with smart home devices, it is essential to recognize the transformative impact they can have on your daily life. The ability to effortlessly print documents and images directly from your computer underscores the convenience and productivity that smart home devices bring to your living space.
Furthermore, the knowledge and skills you have acquired through this setup process extend beyond the realm of printers. The principles of device connectivity, driver installation, and system integration can be applied to a wide range of smart home devices, empowering you to expand and optimize your home network with confidence and proficiency.
As you continue to explore the possibilities of smart home technology, remember that each device you add to your network contributes to a more interconnected and efficient living environment. Whether it’s a printer, a smart thermostat, or a home security system, the seamless integration of these devices enhances your overall computing experience and enriches your daily routines.
With the printer successfully added to your Windows 7 system, you are now equipped to harness the full potential of smart home devices, fostering a more streamlined and interconnected living space. Embrace the possibilities that smart home technology offers, and continue to expand and optimize your home network to suit your evolving needs and preferences.
Thank you for joining us on this enlightening journey, and we hope that the knowledge and insights gained from this article will empower you to further explore the exciting world of smart home devices within your Windows 7 environment.
Frequently Asked Questions about How To Add A Printer On Windows 7
Was this page helpful?
At Storables.com, we guarantee accurate and reliable information. Our content, validated by Expert Board Contributors, is crafted following stringent Editorial Policies. We're committed to providing you with well-researched, expert-backed insights for all your informational needs.


0 thoughts on “How To Add A Printer On Windows 7”