Articles
How Do You Make A Quilt By Hand
Modified: August 22, 2024
Learn how to make a quilt by hand with our informative articles. Discover the essential techniques and tools needed to create beautiful quilts on your own.
(Many of the links in this article redirect to a specific reviewed product. Your purchase of these products through affiliate links helps to generate commission for Storables.com, at no extra cost. Learn more)
Introduction
Quilting is a time-honored craft that allows you to create beautiful and functional pieces of textile art. While many quilters today use sewing machines to speed up the process, there is a special charm and satisfaction that comes from making a quilt by hand. Hand quilting allows you to connect with the fabric and stitches on a deeper level, creating a uniquely personal and heirloom-quality quilt.
In this article, we will guide you through the process of making a quilt by hand. From gathering the necessary supplies to adding the finishing touches, we will cover each step in detail to help you create a quilt that you’ll be proud to showcase.
Whether you are a beginner or an experienced quilter looking to try your hand at hand quilting, this article is for you. So, roll up your sleeves, grab your thread and needle, and let’s dive into the wonderful world of hand quilting.
Key Takeaways:
- Hand quilting is a labor of love that requires patience and practice, allowing you to create a unique and personalized quilt that reflects your creativity and style.
- From gathering supplies to adding the finishing touches, making a quilt by hand is a gratifying journey that results in a beautiful piece of textile art to be treasured for generations.
Read more: How Do You Make A Memory Quilt
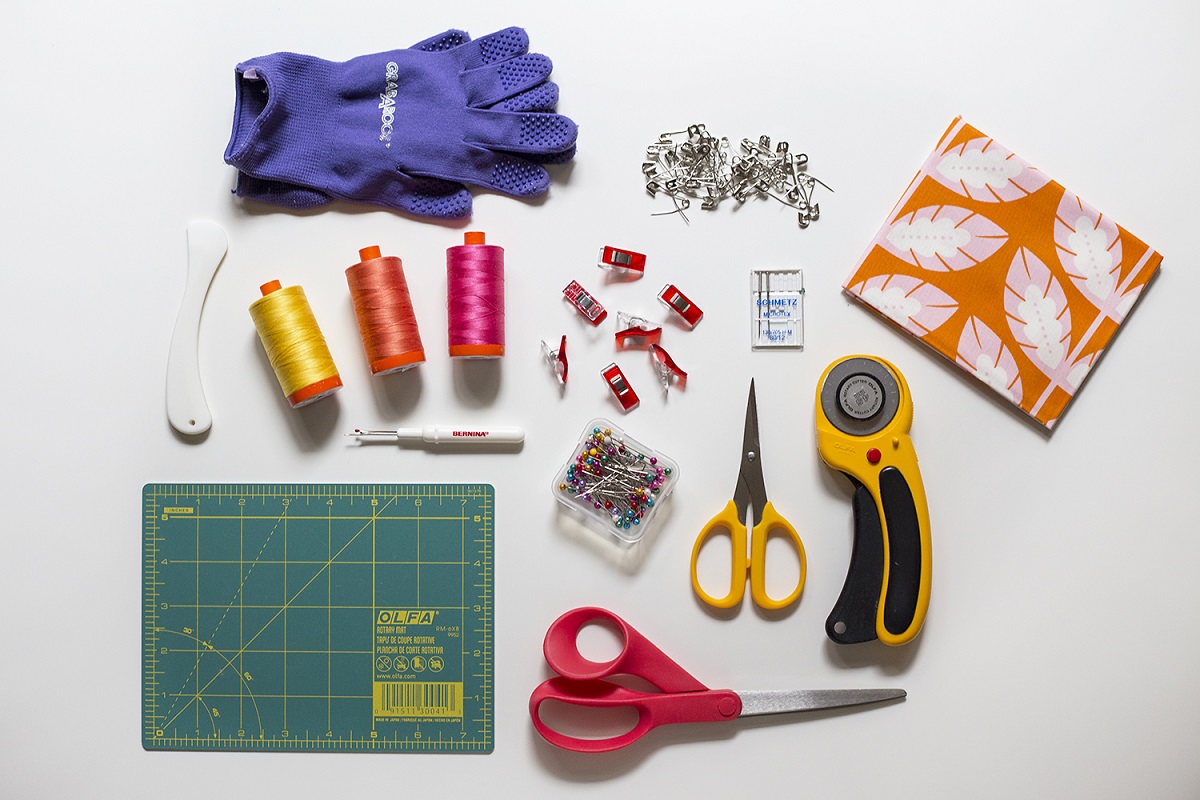
Gathering Supplies
Before you embark on your hand quilting project, it’s important to gather all the necessary supplies. Here’s a list of items you’ll need:
- Fabric: Choose fabric that is suitable for quilting, such as cotton or a cotton-blend. You’ll need enough fabric for the quilt top, backing, and binding.
- Sewing supplies: Don’t forget your trusty scissors, pins, and a seam ripper for any mistakes that may need fixing.
- Needles: Use sharp and thin needles specifically designed for hand quilting. Sizes may vary, so choose one that suits your preference.
- Thread: Opt for a high-quality cotton or polyester thread that matches your fabric colors.
- Quilting hoop or frame: This will hold your quilt taut and make it easier to quilt by hand. Choose a size that accommodates the dimensions of your quilt.
- Marking tools: Consider using washable fabric markers or chalk pencils to mark your quilt design.
- Batting: This is the middle layer of the quilt that provides warmth and loft. Choose a batting that suits the desired thickness of your quilt.
- Quilting template or ruler: These tools can help you achieve precise and consistent shapes in your quilt design.
- Thimble: Protect your finger from the repetitive motion of pushing the needle through multiple layers by using a thimble.
- Sewing machine (optional): While the focus of this article is on hand quilting, you may still need a sewing machine for certain steps, such as piecing the quilt top or adding borders.
Once you have gathered all these supplies, you’re ready to move on to the next step of making your quilt by hand.
Choosing Fabrics
Choosing the right fabrics is an important part of creating a visually appealing quilt. When selecting fabrics for your hand quilting project, consider the following:
- Color scheme: Decide on a color scheme that suits your taste and matches the purpose of the quilt. Consider whether you want a bold and vibrant quilt or a more subtle and calming design.
- Contrast: Look for fabrics that provide contrast to make your quilt design stand out. Mix light and dark fabrics or choose complementary colors to create visual interest.
- Prints and patterns: Determine if you want to use solid fabrics, prints, or a combination of both. Prints can add texture and character to your quilt, while solids provide a clean and timeless look.
- Scale of prints: Consider the scale of the prints you choose. Large-scale prints make a bold statement, while small-scale prints or solids can act as a complement or backdrop.
- Fabric quality: Opt for high-quality fabrics that are durable and easy to work with. Quilting-specific fabrics, such as cotton or cotton-blend, are recommended as they tend to be lightweight, breathable, and hold up well over time.
It’s also essential to think about the overall aesthetic and theme of your quilt. Are you going for a traditional, modern, or whimsical look? Think about the purpose of the quilt, whether it’s for a special occasion, a gift, or personal use.
Remember, there are no hard and fast rules when it comes to fabric selection. Trust your instincts and choose fabrics that resonate with you. Lay them out together to get a sense of how they work together and make adjustments as needed.
Once you have chosen your fabrics, it’s time to move on to the next step: preparing the fabric and supplies for your hand quilting project.
Preparing Fabric and Supplies
Before you start quilting, it’s important to properly prepare your fabric and supplies. Here are some essential steps to get you started:
- Wash and iron fabric: Pre-wash your fabric to remove any sizing or finish that may affect its texture or color. Follow the manufacturer’s instructions for washing and drying. After washing, iron the fabric to ensure it is smooth and free from wrinkles.
- Trim and square fabric edges: Use a rotary cutter and a cutting mat to trim the selvage edges of your fabric. Then, square up the edges to ensure they are straight and even.
- Prepare batting: If using batting, cut it to the desired size, allowing for a slight overhang around the quilt top. Follow the manufacturer’s instructions for trimming and handling the batting.
- Prewind bobbins: If you’re using a sewing machine for piecing or adding borders, prewind several bobbins with matching thread to save time later.
- Organize supplies: Gather all your quilting supplies and organize them in a convenient manner. Keep your needles, thread, and other small items in a labeled container or a quilting organizer for easy access.
- Set up your quilting space: Dedicate a comfortable and well-lit space for your hand quilting project. Make sure you have enough room to spread out your quilt and move freely as you work.
By taking the time to prepare your fabric and organize your supplies, you will set yourself up for a smoother and more enjoyable quilting experience. This attention to detail will also help ensure the best results in your finished quilt.
Now that your fabric and supplies are ready, it’s time to move on to designing your quilt and bringing your creative vision to life.
Designing Your Quilt
Designing your quilt is a crucial step that allows you to unleash your creativity and personalize your project. Consider the following aspects when designing your hand quilt:
- Quilt size and shape: Determine the desired dimensions and shape of your quilt. Common sizes include lap quilts, baby quilts, twin, queen, or king-size quilts. Keep in mind the purpose and intended use of the quilt when deciding on its size.
- Block design: Decide on the design and arrangement of blocks in your quilt. Blocks can be simple squares, rectangles, triangles, or more intricate patterns. Sketch your block design on graph paper or use digital quilt design software to visualize the layout.
- Sashing and borders: Consider adding sashing strips between the blocks to create separation and add visual interest. Borders can frame your quilt and create a finishing touch.
- Color placement: Plan the placement of colors and fabrics in your quilt. Experiment with different combinations to achieve a balanced and visually pleasing result. Consider techniques such as color gradients or using a focal fabric to make certain elements stand out.
- Quilting motifs: Think about the types of quilting motifs or patterns you want to incorporate into your quilt. You can choose traditional motifs such as feathers or stippling or create your own unique designs.
Take your time in this design process. Play with different ideas and explore various options before finalizing your quilt design. You can even create a sample block to see how the colors and patterns work together.
Remember, designing your quilt is all about expressing your creativity and making a piece that reflects your style. So, don’t be afraid to experiment and make it truly unique.
Once you have a clear design in mind, it’s time to start cutting the fabric pieces and bringing your quilt to life. We will cover that step in the next section.
Read more: How Do You Make A Barn Quilt
Cutting Fabric Pieces
Now that you have your quilt design finalized, it’s time to start cutting the fabric pieces. Here’s how to proceed:
- Refer to your design: Use your quilt design as a guide to determine the number and size of fabric pieces you’ll need for each block and border. Calculate the measurements, allowing for seam allowances.
- Prepare your fabric: Lay out your fabric on a clean, flat surface. Ensure that it is wrinkle-free and positioned with the right side facing up.
- Measure and mark: Use a ruler or quilting template to measure and mark the dimensions of each fabric piece directly on the wrong side of the fabric. A washable fabric marker or chalk pencil can be helpful for this step.
- Cut with precision: Use sharp fabric scissors or a rotary cutter to cut along the marked lines, making sure to maintain accuracy and clean edges.
- Organize fabric pieces: As you cut the fabric pieces, keep them organized and labeled according to your quilt design. This will make it much easier when it comes time to piece them together.
Accuracy is key when cutting fabric pieces, as any discrepancies can affect the overall appearance and fit of your quilt blocks. Take your time and double-check your measurements before cutting.
If your quilt design includes any fussy cutting or specific fabric placement, pay extra attention to aligning patterns or motifs to achieve the desired effect.
Once all your fabric pieces are cut, it’s time to move on to the exciting step of piecing the quilt top together. We will cover this in the next section of the article.
Piecing the Quilt Top
With your fabric pieces cut and ready, it’s time to piece them together to create the quilt top. This step brings your quilt design to life. Follow these steps to effectively piece your quilt top:
- Refer to your quilt design: Use your quilt design as a reference for the layout of your fabric pieces. Arrange them in the desired pattern, ensuring that the color placement and block arrangement match your design plan.
- Pin and sew: Start by pinning the fabric pieces together, right sides facing each other. This will help to keep the pieces aligned during sewing. Use a quarter-inch seam allowance and stitch along the pinned edges, removing the pins as you go.
- Press the seams: After sewing each seam, press it open or to one side using an iron. This will create flat and crisp seams and ensure that the quilt top lies flat.
- Continue piecing: Repeat the pinning, sewing, and pressing steps for each subsequent fabric piece until all the blocks and borders are pieced together.
- Square up the quilt top: Once the quilt top is complete, trim any excess fabric or uneven edges to ensure that the top is square and the dimensions are consistent.
As you piece your quilt top, take your time to ensure accurate seams and alignment. Pressing the seams as you go will help create a polished and professional-looking finish.
Remember to refer to your quilt design frequently to ensure that you’re staying true to your initial vision. If adjustments are needed, make them before moving on to the next step.
Now that your quilt top is pieced together, it’s time to add borders to enhance the design and prepare for the next stage of the quilting process. We will cover this in the following section.
When making a quilt by hand, be sure to use a thimble to protect your fingers from the needle. This will help prevent soreness and make the process more comfortable.
Adding Borders
Adding borders to your quilt provides a finishing touch and frames the quilt top. Follow these steps to effectively add borders to your quilt:
- Measure the sides: Start by measuring the length of the top and bottom edges of your quilt top. Take note of the longest measurement.
- Cut border fabric: Cut fabric strips for the side borders, making sure they are the same length as the longest measurement from step 1. The width of the border is a matter of personal preference, but a common width is between 2 and 6 inches.
- Pin and sew side borders: Place the border fabric strip right sides together with one side of the quilt top. Pin the border in place along the entire length, making sure to match the raw edges. Sew the border to the quilt top, using a quarter-inch seam allowance. Press the seam toward the border fabric.
- Measure and cut top and bottom borders: Measure the width of the quilt top, including the newly attached side borders. Cut two fabric strips for the top and bottom borders to that measurement.
- Pin and sew top and bottom borders: Place the top and bottom border fabric strips right sides together with the quilt top, aligning the raw edges. Pin the borders in place and sew them to the quilt top using a quarter-inch seam allowance. Press the seams toward the border fabric.
- Square up the quilt top: Once the borders are attached, trim any excess fabric or uneven edges to ensure that the quilt top is square and the borders are even.
When choosing border fabric, consider using a complementary or contrasting color to make the borders stand out. You can also experiment with different border widths to achieve the desired effect.
Throughout the border-adding process, take care to maintain straight and even seams. Pressing the seams as you go will result in a polished and professional-looking finish.
With the borders added, your quilt top is now complete and ready for the next stage: layering the quilt. We will cover this step in detail in the upcoming section.
Layering the Quilt
Layering the quilt involves sandwiching the quilt top, batting, and backing together before quilting. This step ensures the stability and structure of the quilt. Follow these steps to effectively layer your quilt:
- Lay out the backing fabric: Start by laying out the backing fabric with the wrong side facing up on a clean and flat surface. Smooth out any wrinkles and secure the fabric in place.
- Prepare the batting: Lay the batting on top of the backing fabric, ensuring that it is centered and smooth. Smooth out any wrinkles or creases to create an even layer.
- Place the quilt top: Carefully place the quilt top on top of the batting, aligning it with the backing fabric and ensuring that it is centered. Smooth out any wrinkles or creases in the quilt top.
- Secure the layers: To secure the layers together, you have a few options. You can use safety pins to baste the layers together, starting from the center and working your way out. Another option is to thread baste using a contrasting thread, stitching through all layers around the perimeter of the quilt.
- Ensure tautness: Check that the layers are taut and smooth, without any excess fabric or puckers. Adjust as needed before moving on to the next step.
When selecting the backing fabric, choose a fabric that complements the colors and design of your quilt top. It should be at least a few inches larger than the quilt top on all sides to allow for quilting and binding.
By properly layering your quilt, you create a stable foundation for the quilting process. It’s essential to take the time to ensure that each layer is smooth and securely held together for the best results.
Now that your quilt layers are basted or secured together, it’s time to move on to the next step: quilting by hand. We will explore various hand quilting techniques in the following section.
Read more: How Do You Make A Lone Star Quilt
Basting the Layers Together
Basting the layers of your quilt together is an essential step before you begin the hand quilting process. Basting temporarily holds the quilt top, batting, and backing fabric in place to prevent shifting during quilting. There are a few methods you can use to baste the layers together:
- Safety pins: One popular method is to use safety pins to secure the layers. Start in the center of the quilt and work your way out, spacing the pins a few inches apart. Make sure the pins go through all layers and are fully closed to prevent any snagging or catching.
- Thread basting: Thread basting involves using a contrasting thread to temporarily sew long stitches through all layers of the quilt. Begin in the center and work your way out, stitching about every 4-6 inches. This method allows for easy removal of the basting stitches later.
- Spray adhesive: Another option is to use a temporary spray adhesive. Spray a light, even layer of adhesive onto the batting and carefully smooth the quilt top onto it. Practice caution when using adhesive as it can cause fabric bunching or residue if not applied properly.
When basting your quilt, it’s important to ensure that the layers are smooth and taut, without any wrinkles or puckers. Take your time and double-check as you go to prevent any issues during the quilting process.
Remember to remove any basting pins or stitches as you progress with your hand quilting. They can get in the way and cause interference as you stitch through the layers.
Once your layers are securely basted together, you can move on to the exciting part: hand quilting the layers to create beautiful patterns and textures. We will explore various hand quilting techniques in the next section.
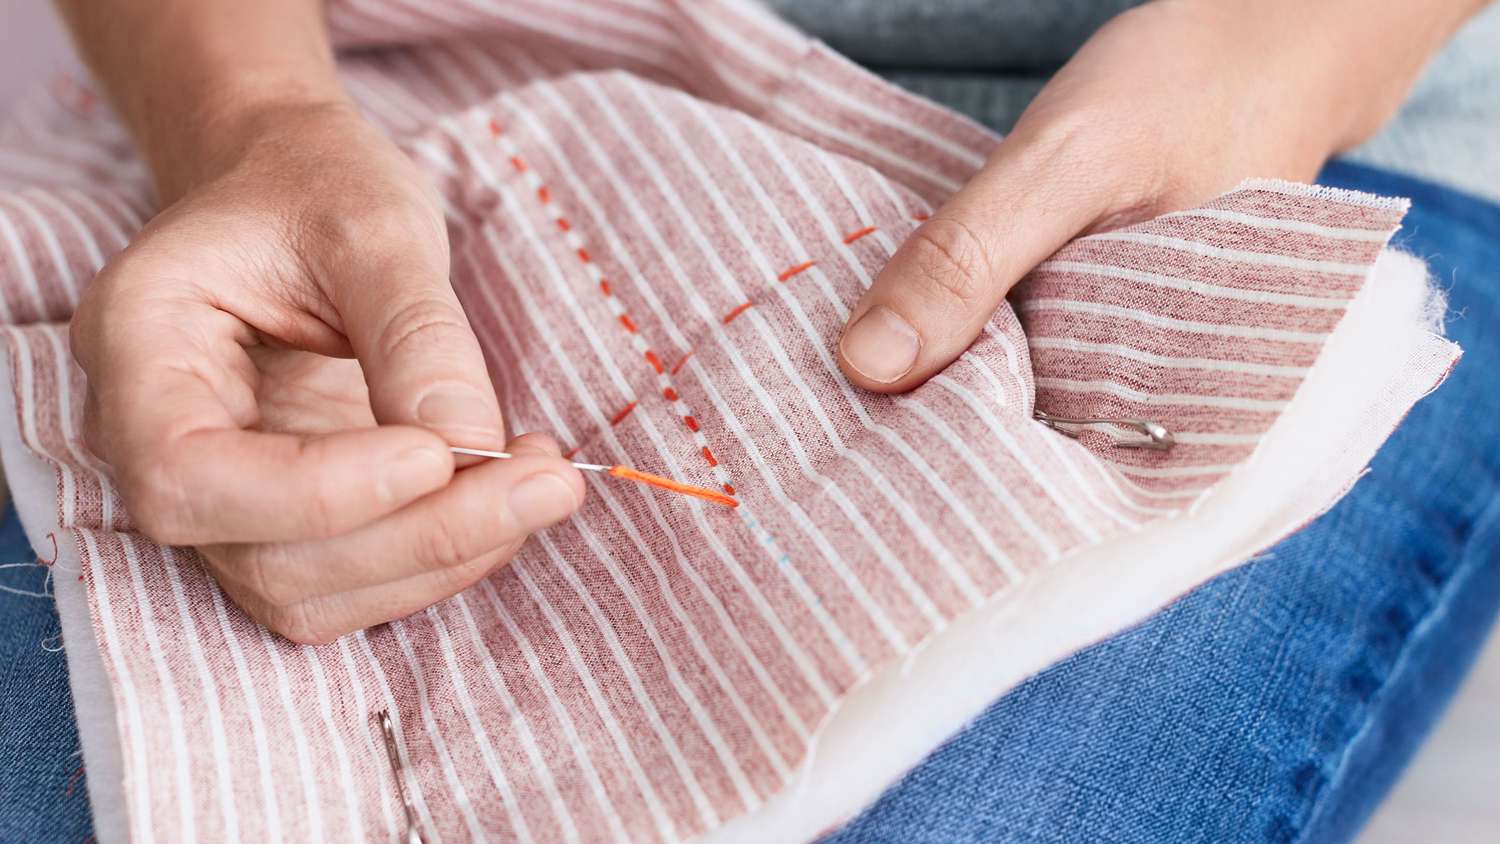
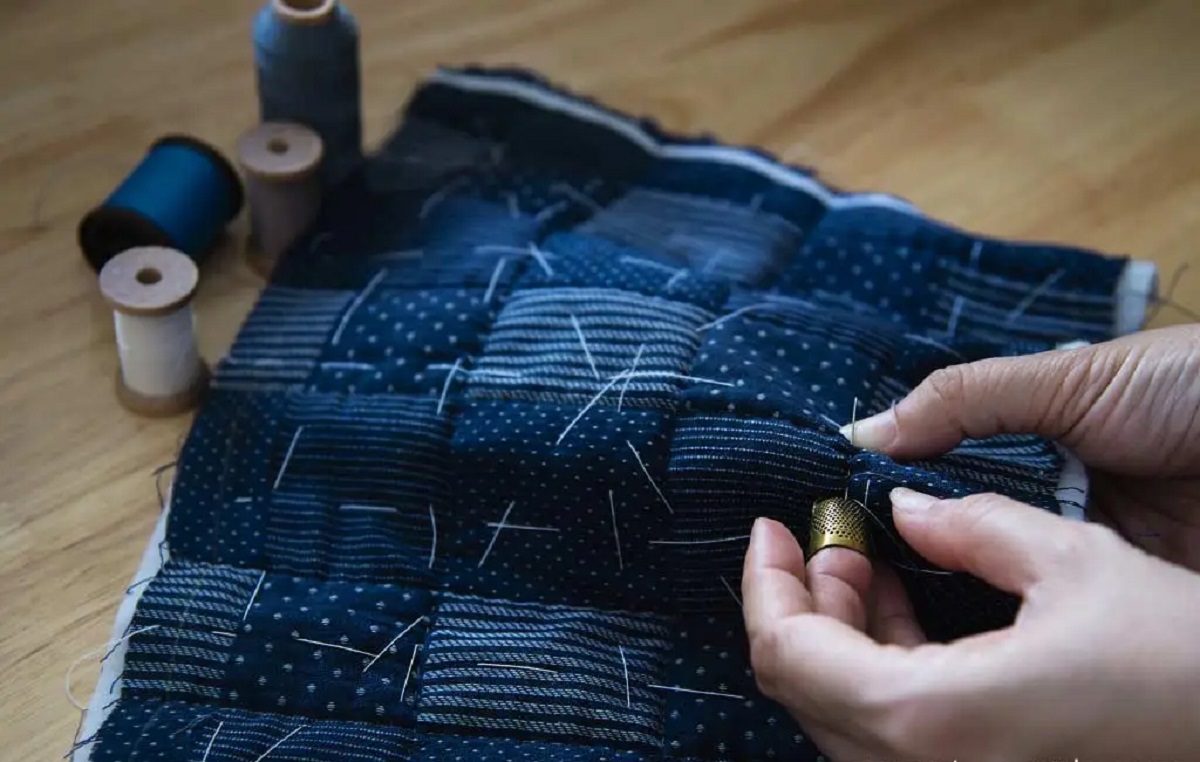
Hand Quilting Techniques
Hand quilting adds a unique touch of artistry and craftsmanship to your quilt. It allows you to create intricate designs, add texture, and bring your quilt to life. Here are some popular hand quilting techniques to consider:
- Traditional Quilting: Traditional hand quilting involves stitching small, even stitches through all layers of the quilt. Use a quilting hoop or frame to keep the quilt taut and make stitching easier. Traditional quilting patterns include straight lines, cross-hatching, feathers, and intricate motifs.
- Big Stitch Quilting: This technique is characterized by using thicker threads, such as perle cotton or embroidery floss, and longer stitches. The larger stitches create a bold and rustic look. Experiment with different thread colors and stitch patterns to add visual interest.
- Outline Quilting: Outline quilting involves stitching around the shapes and elements of the quilt design. It emphasizes the contours and adds definition. You can use contrasting thread colors or match the thread to the fabric for a subtle effect.
- Echo Quilting: Echo quilting involves stitching concentric lines around a shape or design element. This technique creates a beautiful ripple effect and adds dimension to your quilt. Experiment with varying the spacing between the lines to achieve different effects.
- Sashiko Quilting: Sashiko is a traditional Japanese hand quilting technique characterized by geometric patterns and even stitches. It uses a running stitch with white thread on indigo-dyed fabric, creating a striking contrast. Sashiko stitching adds a unique cultural element to your quilt.
When hand quilting, it’s important to choose the right needle and thread for the job. Quilting needles are longer with sharper points, making them ideal for piercing through multiple layers of fabric. Use quilting-specific threads like perle cotton, quilting thread, or embroidery floss, depending on the desired effect.
Practice your hand quilting techniques on a scrap fabric or a quilt sandwich before working on your final quilt. This will help you perfect your stitches and get comfortable with the process.
Remember, hand quilting is a labor of love that requires patience and practice. Enjoy the meditative and artistic process as you bring your quilt to life with your hand-stitched designs.
Once you have completed the hand quilting, it’s time to add the final finishing touch to your quilt: binding. We will cover this step in the next section.
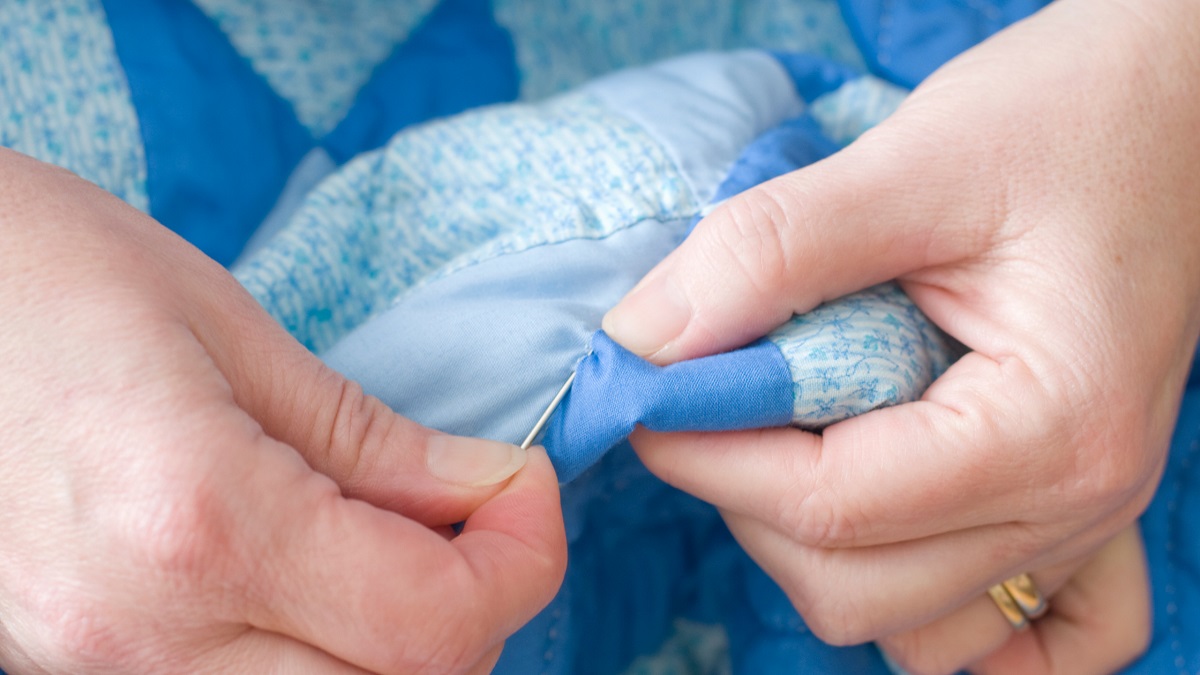
Binding the Quilt
Binding is the final step in completing your quilt and provides a clean and finished edge. It not only serves a functional purpose but also adds a polished touch to your quilt. Follow these steps to effectively bind your quilt:
- Measure and cut the binding strips: Measure the perimeter of your quilt to determine the length of the binding strips. The width of the binding strip is typically 2.5 inches, but you can adjust it according to your preference. Cut enough binding strips to cover the entire perimeter of the quilt.
- Join the binding strips: If your quilt requires multiple binding strips, join them together diagonally by placing two strips right sides together at a 90-degree angle. Sew a diagonal seam from one corner to the opposite corner and trim the excess fabric. Press the seam open.
- Prepare the binding: Fold the binding strip in half lengthwise, wrong sides together, and press it to create a crisp crease. This will help you achieve tidy corners and a smooth finish.
- Attach the binding to the quilt: Starting in the middle of one side of the quilt, align the raw edges of the binding strip with the raw edge of the quilt. Leave a tail of binding about 6-8 inches long. Pin the binding in place, and using a quarter-inch seam allowance, sew along the edge, stopping ¼ inch away from the corner.
- Miter the corners: To create neatly mitered corners, fold the binding up at a 45-degree angle, away from the quilt. Then, fold it back down, aligning the raw edge with the next side of the quilt. Secure with pins and continue sewing the binding in place. Repeat this process at each corner.
- Join the binding ends: As you approach the starting point, stop sewing a few inches away and leave an 8-10 inch tail of binding. Trim the excess binding, leaving a small overlap. Open up both ends of the binding strips and sew them together with a diagonal seam. Trim the excess fabric and press the seam open.
- Finish the binding: Fold the binding over the raw edge of the quilt to the backside. Pin it in place and hand stitch it down using a blind or whip stitch, ensuring that your stitches are secure but not too tight. As you approach the corners, fold them neatly for a clean finish.
Choosing a binding fabric that complements or contrasts with your quilt enhances the overall aesthetic. Consider using a fabric from your quilt top or a solid color that complements the colors in your quilt.
Remember to take your time while binding the quilt, as neat and precise work will result in a professional-looking finish. Enjoy the process of adding the final touch to your quilt.
With the binding in place, your quilt is now complete! However, there are a few finishing touches you can add to enhance the overall look and durability of your quilt. We will cover this in the next section.
Finishing Touches
Congratulations! You have successfully completed your hand-quilted masterpiece. While your quilt is now complete, there are a few finishing touches you can add to enhance its overall look and durability:
- Trimming and squaring: Once your quilt is bound, take the time to trim any excess batting or backing fabric. Square up the corners and edges to ensure a clean and straight finish.
- Labeling: Consider adding a label to your quilt. Include your name, the date, and any other relevant information. This personal touch will serve as a reminder of the love and effort you put into creating your quilt.
- Quilting stitches: If desired, examine your quilt’s stitching and make any necessary repairs or reinforcements. Check for any loose or skipped stitches and secure them to ensure the longevity of your quilt.
- Quilt care instructions: Include a note or attach a small card with care instructions for the quilt. This will help the recipient or future generations understand how to properly care for the quilt to maintain its beauty for years to come.
- Blocking: If your quilt appears wrinkled or uneven, you can block it to ensure a smooth and even finish. Blocking involves wetting the quilt, gently stretching it, and allowing it to dry in its desired shape.
- Display or gift wrapping: Decide how you want to showcase your quilt. Whether you choose to display it on a quilt rack or present it as a gift, take the time to arrange and present it in a way that highlights its beauty.
Remember to enjoy the process and take pride in your finished quilt. Hand quilting is a labor of love and a testament to your creativity and skill. Treasure your quilt or share it as a thoughtful and cherished gift.
With these finishing touches complete, your hand-quilted masterpiece is ready to be admired and enjoyed for years to come. Congratulations on completing your quilting journey!
Should you have any further questions or require additional guidance, please don’t hesitate to ask. Happy quilting!
Read more: How Do You Quilt As You Go
Conclusion
Making a quilt by hand is a gratifying journey that allows you to create a beautiful piece of textile art. From gathering supplies to adding the finishing touches, each step of the process contributes to the creation of a quilt that is not only visually appealing but also holds a special personal touch.
Throughout this article, we covered essential aspects of making a quilt by hand. We explored the importance of gathering the right supplies, choosing fabrics that reflect your style and vision, and properly preparing the fabric and supplies. We delved into the process of designing your quilt, cutting fabric pieces, piecing the quilt top, adding borders, and layering the quilt.
We also learned about various hand quilting techniques that allow you to express your creativity, including traditional quilting, big stitch quilting, outline quilting, echo quilting, and sashiko quilting. Finally, we discussed the final step of binding the quilt and shared some finishing touches to ensure a polished and professional-looking finish.
Through patience, creativity, and attention to detail, you have the power to create a quilt that will be treasured for generations. Whether you make a quilt for yourself or as a gift for someone special, the beauty and warmth it brings will leave a lasting impression.
Remember, quilting is an art form that requires practice and experimentation. Allow yourself to grow and develop your skills as you embark on this beautiful journey. Don’t be afraid to make mistakes and learn from them. The joy is in the process and the satisfaction of seeing your ideas come to life.
So, grab your supplies, select your fabrics, and begin your hand quilting adventure. Immerse yourself in the stitches, the patterns, and the love that goes into every inch of your quilt. Your masterpiece awaits!
If you have any questions or need further assistance, feel free to ask. Happy quilting!
Frequently Asked Questions about How Do You Make A Quilt By Hand
Was this page helpful?
At Storables.com, we guarantee accurate and reliable information. Our content, validated by Expert Board Contributors, is crafted following stringent Editorial Policies. We're committed to providing you with well-researched, expert-backed insights for all your informational needs.


0 thoughts on “How Do You Make A Quilt By Hand”