Articles
How To Build A Corrugated Metal Fence
Modified: December 7, 2023
Learn how to build a beautiful and sturdy corrugated metal fence with our helpful step-by-step articles. Enhance your outdoor space with this trendy and durable fencing option.
(Many of the links in this article redirect to a specific reviewed product. Your purchase of these products through affiliate links helps to generate commission for Storables.com, at no extra cost. Learn more)
Introduction
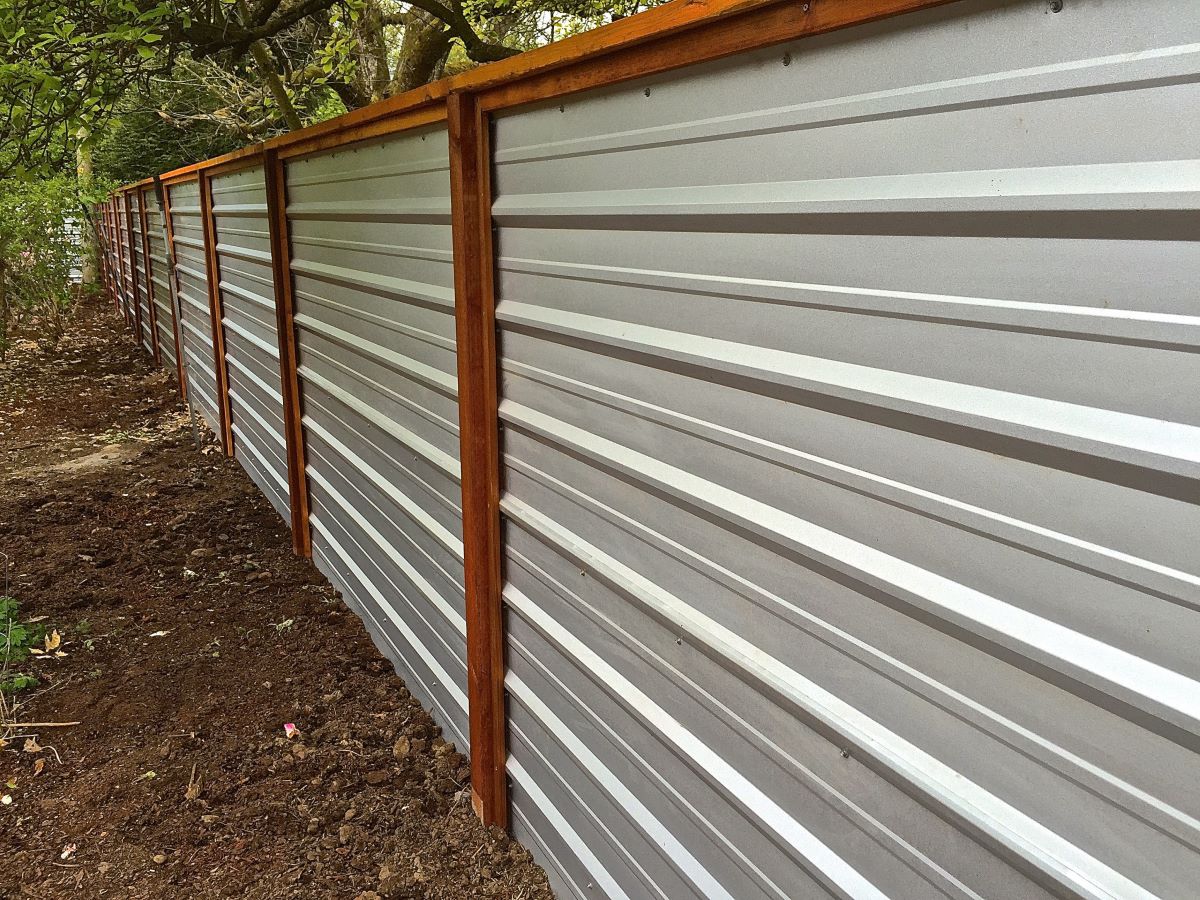
Building a corrugated metal fence can add a unique and modern touch to your property. Whether you want to create a sense of privacy or enhance the aesthetic appeal of your outdoor space, a corrugated metal fence is a versatile and durable option. This type of fence is made from corrugated metal panels, which have a distinctive wavy pattern that adds visual interest and texture to the structure.
In this article, we will guide you through the step-by-step process of building a corrugated metal fence. From gathering the necessary materials to adding the finishing touches, we’ll cover everything you need to know. So, put on your work gloves and let’s get started!
Key Takeaways:
- Building a corrugated metal fence requires careful planning, accurate measurements, and secure installation of posts and panels. Proper maintenance is essential for longevity, ensuring a beautiful and functional fence for years to come.
- From gathering materials to adding finishing touches, constructing a corrugated metal fence is a rewarding project that enhances privacy, security, and the visual appeal of outdoor spaces. With attention to detail and creativity, a stylish and durable fence can be achieved.
Step 1: Gather the necessary materials
Before you begin building your corrugated metal fence, you’ll need to gather all the necessary materials. Here’s a list of what you’ll need:
- Corrugated metal panels: These panels will serve as the main material for your fence. Measure the length and height of your desired fence to determine how many panels you’ll need.
- Fence posts: You’ll need sturdy posts to support the fence. The type and size of the posts will depend on the height and weight of the panels.
- Rails: Rails are horizontal support beams that connect the fence posts. They provide stability and help secure the panels.
- Fasteners: You’ll need screws or nails to attach the panels to the rails and posts. Make sure to choose fasteners that are suitable for outdoor use and can withstand the elements.
- Concrete mix: If you’re installing your fence posts in the ground, you’ll need concrete mix to secure them in place.
- Tools: You’ll need a variety of tools, including a tape measure, level, post hole digger, shovel, drill, and saw. Make sure you have all the necessary tools before you start.
- Safety equipment: Don’t forget to prioritize safety. Wear protective gear, such as gloves, safety glasses, and earplugs, to protect yourself during the construction process.
Once you have gathered all the necessary materials, you’ll be ready to move on to the next step: preparing the ground for the fence.
Step 2: Prepare the ground for the fence
Before you can install your corrugated metal fence, you’ll need to prepare the ground to ensure a stable and even foundation. Here’s what you need to do:
- Mark the fence line: Use stakes and string to mark the exact location of your fence. This will help you visualize the layout and ensure straight lines.
- Clear the area: Remove any obstacles, such as rocks, weeds, or debris, from the fence line. This will make it easier to dig the post holes and ensure a clean installation.
- Check for underground utilities: Before you dig any post holes, contact your local utility company to check for the location of underground utilities. This will help prevent any accidents or damage during the construction process.
- Dig the post holes: Use a post hole digger to dig holes along the fence line. The depth and spacing of the holes will depend on the height and spacing of your fence posts. Make sure the holes are deep enough to provide stability.
- Level the ground: Use a shovel and a level to ensure that the ground is level and even along the fence line. This will help prevent any sagging or unevenness in your fence.
- Optional: Install gravel or concrete: If you want to provide extra stability to your fence posts, you can fill the bottom of the post holes with gravel or pour concrete. This will help keep the posts in place even during strong winds or heavy rain.
Once you have prepared the ground for your corrugated metal fence, you can move on to the next step: measuring and marking the fence line.
Step 3: Measure and mark the fence line
Measuring and marking the fence line accurately is crucial to ensure a straight and properly aligned corrugated metal fence. Follow these steps to get it right:
- Start at one end: Begin at one end of the fence line and use a tape measure to determine the desired length of your fence. Measure horizontally from one point to the next, keeping in mind any corners or turns you want to include.
- Take note of obstacles: As you measure the fence line, make note of any obstacles that might impact the installation. This could include trees, structures, or uneven terrain that may require adjustments in the fence placement.
- Mark the measurements: Use marking paint or stakes to mark the measured points along the fence line. This will serve as a visual guide during the installation process.
- Double-check the measurements: Before proceeding, double-check your measurements for accuracy. Use a level or string to ensure that the marked points are all aligned and at the proper height.
- Consider the height of the fence: Determine the desired height of your corrugated metal fence and mark this height on the posts or stakes. This will make it easier to position the panels correctly once you start installing them.
By taking the time to measure and mark the fence line accurately, you’ll ensure a smooth and successful installation process. Now that you have the fence line prepared, it’s time to move on to the next step: setting the fence posts.
Step 4: Set the fence posts
Setting the fence posts is a critical step in building a sturdy and secure corrugated metal fence. Follow these steps to set the posts correctly:
- Position the first post: Start at one end of the fence line and position the first fence post in the corresponding post hole. Ensure that the post is straight and aligned with the marked points along the fence line.
- Check for level and plumb: Use a level and plumb line to check that the post is perfectly vertical and level in all directions. Adjust the position of the post as needed to achieve the desired alignment.
- Secure the post: Once the post is properly positioned, fill the hole with concrete mix according to the manufacturer’s instructions. Use a trowel to compact the concrete and ensure a solid foundation around the post. Repeat this process for each fence post.
- Allow the concrete to set: Give the concrete time to cure and set as per the recommended timeframe provided by the manufacturer. This will ensure that the posts are securely anchored in place.
- Check for stability: Once the concrete has hardened, check the stability of each fence post. Give them a gentle shake to ensure they are firmly set in the ground.
Setting the fence posts correctly is essential for the structural integrity of your corrugated metal fence. Take your time and ensure that each post is securely anchored in the ground. Once the posts are set, you can proceed to the next step: attaching the rails to the posts.
When building a corrugated metal fence, make sure to use pressure-treated wood for the posts to prevent rotting and ensure the stability of the fence over time.
Step 5: Attach the rails to the posts
Attaching the rails to the fence posts is an important step in the construction of your corrugated metal fence. The rails provide support and stability to the fence panels. Follow these steps to properly attach the rails:
- Measure and mark the rail placement: Start at one end of the fence and measure the distance between the first two posts. Mark the placement of the top and bottom rails on each post, ensuring they are level and parallel to the ground.
- Pre-drill holes: Using a drill and appropriate sized drill bit, pre-drill holes at the marked rail placement on each post. This will prevent the wood from splitting when attaching the rails.
- Attach the top rail: Position the first rail at the marked placement on the first post. Align the pre-drilled holes and use screws or nails to secure the rail in place. Repeat this process for the remaining posts.
- Attach the bottom rail: Repeat the same process to attach the bottom rail on each post. Make sure the bottom rail is parallel to the top rail and level with the ground.
- Check for level and alignment: Use a level to ensure that the rails are straight and level across the fence. Make any necessary adjustments before proceeding to the next step.
By attaching the rails securely and ensuring they are level, you are now ready to proceed with the installation of the corrugated metal panels in the next step.
Step 6: Install the corrugated metal panels
Now that you have the rails securely attached to the fence posts, it’s time to install the corrugated metal panels. Follow these steps to properly install the panels:
- Measure and cut the panels: Measure the distance between the top and bottom rails to determine the height of each panel. Use a saw or metal-cutting tool to cut the panels to the desired height.
- Position the first panel: Start at one end of the fence and position the first panel between the first two posts. Allow a small gap between the panel and the ground to prevent moisture buildup.
- Align and level: Use a level to ensure that the panel is straight and level. Make any necessary adjustments to ensure proper alignment.
- Attach the panel to the rails: Use screws or nails to attach the panel to the top and bottom rails. Place the fasteners through the corrugated ridges on the panel, being careful not to overtighten and damage the metal.
- Continue with the remaining panels: Repeat the process for each panel, ensuring that there is a small gap between them for expansion and contraction due to temperature changes.
- Overlap the panels: If necessary, overlap the edges of the panels to create a seamless appearance. Secure the overlapping sections with screws or nails.
As you install the corrugated metal panels, make sure to maintain a consistent height and alignment for a professional-looking fence. Once all the panels are in place, you can move on to the next step: securing the panels to the rails and posts.
Step 7: Secure the panels to the rails and posts
Securing the corrugated metal panels to the rails and posts is essential to ensure a strong and sturdy fence. Follow these steps to properly secure the panels:
- Check for alignment: Before you begin securing the panels, double-check the alignment and make any necessary adjustments to ensure they are straight and level.
- Attach the panels to the rails: Use screws or nails to fasten the panels to the top and bottom rails. Position the fasteners through the corrugated ridges and into the rails, ensuring a secure connection.
- Secure the panels to the posts: Attach the panels to the fence posts using screws or nails. Make sure to position the fasteners through the corrugated ridges and into the posts, providing maximum support.
- Space the fasteners evenly: Space the screws or nails evenly along the panels for a secure and uniform attachment. Avoid placing fasteners too close to the edges of the panels, as it may cause the metal to warp or crack.
- Ensure a tight fit: As you secure the panels, make sure they are snug against the rails and posts to prevent any gaps or wobbling. This will ensure a sturdy and visually appealing fence.
By properly securing the corrugated metal panels to the rails and posts, you are one step closer to completing your fence. Now, it’s time to add the finishing touches and learn some maintenance tips in the next step.
Step 8: Add finishing touches and maintenance tips
As you near the completion of your corrugated metal fence, it’s important to add some finishing touches and consider maintenance tips to keep your fence looking its best. Follow these steps to add those final touches:
- Trim the panels: If needed, trim any excess material from the panels using a saw or metal-cutting tool. This will give your fence a clean and polished appearance.
- Paint or seal the panels: Consider applying a protective coating, such as paint or sealant, to the metal panels. This can help prevent rust and corrosion, as well as enhance their durability and longevity.
- Decorate or accessorize: Get creative and personalize your fence by adding decorative elements or accessories. This could include hanging plants, outdoor artwork, or decorative lighting.
- Maintain regularly: To ensure the longevity of your corrugated metal fence, it’s important to perform regular maintenance. Inspect the fence for any signs of damage or wear, and make timely repairs as needed.
- Clean periodically: Clean the metal panels periodically using a mild soap and water solution. This will help remove dirt, debris, and any build-up, keeping your fence looking fresh and vibrant.
- Watch for rust: Keep an eye out for any signs of rust on the metal panels. If you notice any rust spots, promptly remove them using a wire brush and apply a rust-resistant paint or coating.
- Trim vegetation: Regularly trim any vegetation growing near or against the fence. This will prevent plant growth from causing damage or interfering with the stability of the fence.
- Stay vigilant during extreme weather: In areas prone to high winds or storms, regularly inspect and reinforce your corrugated metal fence to ensure it can withstand the elements.
By adding these finishing touches and following proper maintenance practices, you can keep your corrugated metal fence looking beautiful and functioning effectively for years to come.
Congratulations! You have successfully completed the construction of your corrugated metal fence. Enjoy the privacy, security, and unique aesthetic appeal that it brings to your outdoor space.
Read more: How To Install Metal Fence Post
Conclusion
Building a corrugated metal fence can be a rewarding project that enhances both the functionality and visual appeal of your property. With careful planning and execution, you can create a sturdy and stylish fence that provides privacy, security, and a modern touch to your outdoor space.
In this comprehensive guide, we have walked you through the step-by-step process of building a corrugated metal fence. From gathering the necessary materials to adding the finishing touches, each step plays a crucial role in constructing a fence that stands the test of time.
Remember to take accurate measurements, properly prepare the ground, and set the fence posts securely. Attaching the rails and installing the corrugated metal panels requires attention to detail, ensuring proper alignment and level installation. Once complete, securing the panels and adding finishing touches, such as painting and accessorizing, will give your fence a polished look.
To maintain the longevity and visual appeal of your corrugated metal fence, regular maintenance is essential. Keep an eye out for rust, perform periodic cleaning, and stay vigilant during extreme weather conditions. By following these maintenance tips, you can enjoy a beautiful and functional fence for years to come.
Now that you have the knowledge and steps to build a corrugated metal fence, it’s time to get started and transform your outdoor space into a haven of style and security.
Happy building!
Frequently Asked Questions about How To Build A Corrugated Metal Fence
Was this page helpful?
At Storables.com, we guarantee accurate and reliable information. Our content, validated by Expert Board Contributors, is crafted following stringent Editorial Policies. We're committed to providing you with well-researched, expert-backed insights for all your informational needs.


0 thoughts on “How To Build A Corrugated Metal Fence”