Articles
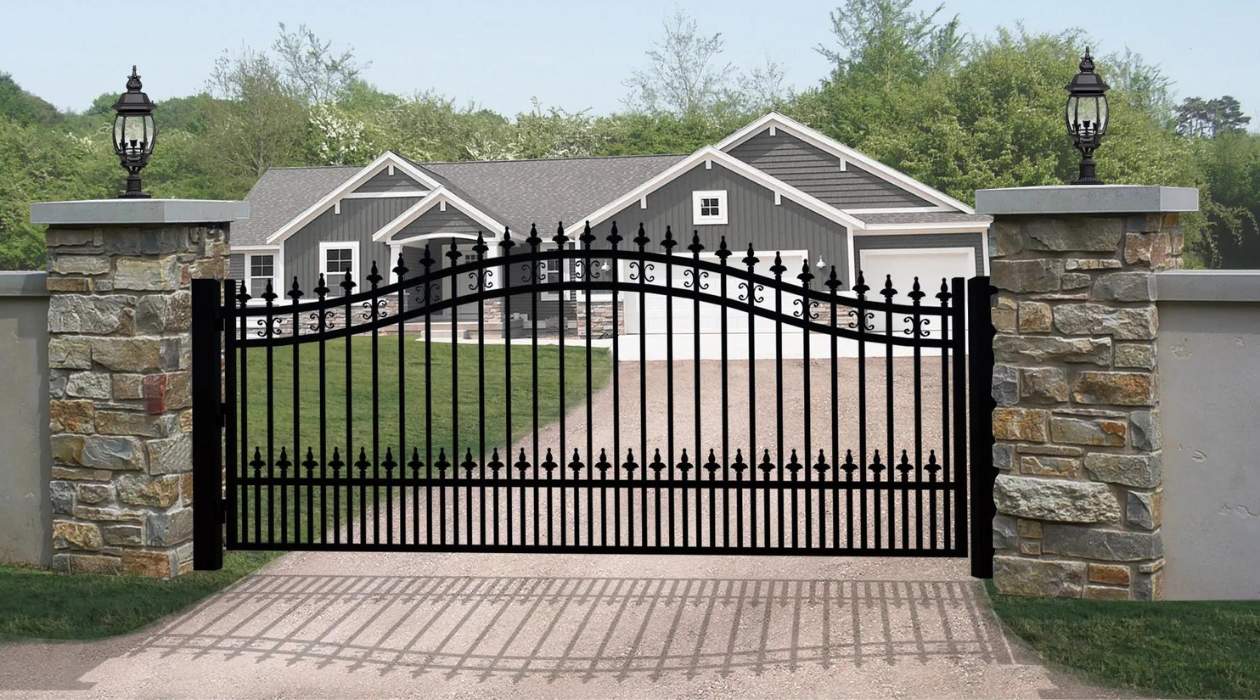
How To Build A Metal Gate For Driveway
Modified: December 7, 2023
Learn step-by-step instructions and expert tips in our comprehensive articles on how to build a sturdy and stylish metal gate for your driveway.
(Many of the links in this article redirect to a specific reviewed product. Your purchase of these products through affiliate links helps to generate commission for Storables.com, at no extra cost. Learn more)
Introduction
Welcome to our guide on how to build a metal gate for your driveway. A well-constructed and durable metal gate can add beauty, security, and value to your property. Whether you’re looking to enhance the aesthetics of your home or improve privacy and protection, a custom metal gate is an excellent choice.
In this step-by-step tutorial, we will walk you through the process of building a metal gate for your driveway. We will cover everything from measuring and planning to welding and finishing. By following our instructions and using the right tools and materials, you can create a stunning metal gate that will last for years to come.
Before we jump into the project, it’s important to note that building a metal gate requires some level of skill and safety precautions. If you don’t have experience with metalworking or welding, it’s advisable to consult with a professional or take a welding class to ensure proper technique and safety awareness.
Now, let’s dive into the materials and tools you’ll need to get started on your metal gate project.
Key Takeaways:
- Building a metal gate for your driveway requires careful planning, precise measurements, and proper welding techniques. With the right materials and tools, you can create a durable and visually appealing gate that adds security and value to your property.
- Safety is paramount when working with metal and welding equipment. Proper preparation of metal panels, accurate cutting and shaping, and meticulous welding are essential for a long-lasting and well-maintained metal gate. Regular inspection and maintenance will ensure the gate remains functional and attractive for years to come.
Read more: How To Install A Driveway Gate
Materials Needed
Before you start building your metal gate, gather all the necessary materials to ensure a smooth and efficient construction process. Here’s a list of the key materials you’ll need:
- Metal Panels: Choose a sturdy material such as steel or aluminum for optimal strength and durability. Measure the dimensions of your driveway to determine the size of the panels needed.
- Galvanized Steel Posts: These will serve as the main supports for your gate. Select posts that are appropriate for the size and weight of your gate.
- Welding Supplies: This includes a welding machine, welding rods, welding mask, gloves, and other safety equipment. Make sure to use proper welding techniques and follow safety protocols.
- Hinges: Select heavy-duty hinges that can withstand the weight of the gate. The number of hinges needed will depend on the size and weight of your gate.
- Latch: Choose a secure latch mechanism that will keep your gate closed and locked when desired. Consider options such as a padlock latch or magnetic latch.
- Paint and Primer: Select a high-quality paint and primer suitable for outdoor use. Opt for a color that complements the overall aesthetic of your property and offers protection against rust and corrosion.
- Screws and Bolts: Use strong, corrosion-resistant screws and bolts to secure the gate panels, posts, hinges, and latch.
- Measuring Tape: Accurate measurements are essential for a precise and well-fitting gate. Use a reliable measuring tape to ensure the dimensions are correct at each stage of the construction process.
- Grinder or Metal Saw: Depending on the material you choose for your gate panels, you may need a grinder or metal saw to cut and shape the metal to the desired size and design.
- Safety Equipment: Safety should always be a top priority. Wear protective gear such as safety goggles, ear protection, and sturdy work gloves to prevent injuries during the construction process.
Having all the materials ready and organized before you start building will save you time and make the construction process more efficient. Once you have gathered the necessary materials, it’s time to move on to the next step: measuring and planning your metal gate.
Step 1: Measure and Plan
The first step in building a metal gate for your driveway is to accurately measure the space where the gate will be installed and plan out the design. This will ensure that your gate fits properly and functions as intended. Here’s how to do it:
- Measure the Opening: Use a measuring tape to measure the width and height of the driveway opening where the gate will be installed. Take precise measurements from the inside edges of the support posts or existing structures.
- Consider Clearance: Determine how much clearance you need on each side of the gate to allow for smooth opening and closing. This will depend on factors such as the type of gate hinges you plan to use and any obstructions in the surrounding area.
- Sketch the Design: Create a rough sketch of your gate design, including any decorative elements or patterns you want to incorporate. This will help you visualize the final product and guide you during the construction process.
- Calculate Materials Needed: Based on your measurements and design, calculate the amount of material you will need for the gate panels, support posts, hinges, latch, and any additional accessories.
- Check Local Regulations: Before proceeding with the construction, check with your local municipality or homeowners association regarding any regulations or permits required for installing a driveway gate. This will ensure that your gate complies with any height, setback, or design restrictions in your area.
Proper measuring and planning are crucial to the success of your metal gate project. Taking accurate measurements and considering all factors will help you avoid costly mistakes and ensure a seamless installation process. Once you have measured and planned everything, you’re ready to move on to the next step: gathering the tools and safety equipment necessary for the construction.
Step 2: Gather Tools and Safety Equipment
Once you have measured and planned your metal gate, it’s time to gather the necessary tools and safety equipment to carry out the construction process. Having the right tools at hand will make the project more efficient and help ensure precise and secure construction. Here are the essential tools you’ll need:
- Welding Machine: Depending on your level of experience and the complexity of your gate design, choose a suitable welding machine, such as a MIG or TIG welder. Make sure it’s capable of handling the thickness and type of metal you will be working with.
- Welding Rods: Select the appropriate welding rods for welding the metal panels and support posts. Different metals may require different types of rods, so consult the manufacturer’s recommendations.
- Welding Mask: Protect your eyes and face from harmful sparks and UV radiation with a welding mask. Choose a mask that provides sufficient visibility and a comfortable fit.
- Welding Gloves: Heavy-duty welding gloves will protect your hands from burns and cuts while working with hot metals and tools. Ensure they fit properly and allow for dexterity.
- Grinder or Metal Saw: Depending on the metal panels you are using, you may need a grinder or metal saw to cut and shape the metal as per your design.
- Measuring Tape: Maintain accurate measurements throughout the construction process with a reliable measuring tape. A longer tape is preferable for measuring large gate panels or distances between support posts.
- Drill: A power drill will be useful for drilling holes in the metal panels, posts, and other components of the gate. Use drill bits suitable for metal piercing.
- Screwdriver: A screwdriver is essential for fastening screws, bolts, and other hardware components of the gate.
- Paintbrushes and Rollers: To paint and finish your metal gate, have a selection of paintbrushes and rollers on hand. Use different sizes for various areas of the gate.
- Safety Equipment: Safety should always be a priority. Wear protective gear such as safety goggles, ear protection, and work gloves to prevent injuries during construction.
Gathering these tools and safety equipment before starting the construction process will ensure you have everything you need within reach. It’s important to prioritize safety by using the appropriate safety gear and following safety guidelines for each tool. Once you have gathered the tools, you’re ready to move on to the next step: preparing the metal panels for construction.
Step 3: Prepare the Metal Panels
Before you begin the construction of your metal gate, it’s important to properly prepare the metal panels. This involves cleaning, sanding, and priming the panels to ensure optimal adhesion of paint and enhance the longevity of your gate. Follow these steps to prepare the metal panels:
- Clean the Panels: Using a mild detergent and water, clean the metal panels to remove any dirt, debris, or grease. Scrub gently with a sponge or cloth, paying attention to any heavily soiled areas. Rinse thoroughly and allow the panels to dry completely.
- Remove Rust and Oxidation: If there are any areas of rust or oxidation on the metal panels, use a wire brush or sandpaper to remove them. Scrub in a circular motion until the surface is smooth and free from rust. Wipe away any loose debris with a clean cloth.
- Sand the Panels: To create a smooth and even surface, lightly sand the metal panels using fine-grit sandpaper. This will help improve the adhesion of the primer and paint. Be sure to sand in the direction of the metal’s grain.
- Clean Again: After sanding, clean the panels once more to remove any dust or residue left from the sanding process. Use a damp cloth or compressed air to ensure the surface is clean and ready for priming.
- Apply Primer: Using a high-quality metal primer, apply a thin, even coat to the metal panels. Follow the instructions provided by the manufacturer for optimal application and drying time. Allow the primer to dry completely before moving on to the next step.
By properly preparing the metal panels, you are creating a solid foundation for your gate that will help protect against rust, corrosion, and peeling paint. Taking the time to clean, sand, and prime the panels will ensure a professional-looking finish and increase the lifespan of your gate. Once the panels are prepared, you’re ready to move on to the next step: cutting and shaping the metal panels to fit your desired design.
When building a metal gate for a driveway, make sure to use durable and weather-resistant materials such as steel or aluminum to ensure longevity and security. Additionally, consider adding a sturdy locking mechanism for added safety.
Read more: How To Make Driveway Gates
Step 4: Cut and Shape the Metal Panels
Now that your metal panels are prepared, it’s time to cut and shape them to fit your desired design for the gate. This step will require precision and attention to detail. Follow these steps to cut and shape the metal panels:
- Refer to Your Design: Use the sketch or design plan you created earlier as a reference. Take measurements and mark the metal panels accordingly, ensuring accuracy and symmetry.
- Secure the Panels: Use clamps or sturdy workbenches to secure the metal panels in place. This will provide stability and prevent movement while you work.
- Mark the Cutting Lines: Use a marker or scribe to mark the cutting lines on the metal panels. Double-check your measurements to ensure accuracy.
- Cut the Panels: Depending on the thickness and type of metal panels, use appropriate cutting tools such as a grinder with a metal cutting disk, or a metal saw. Follow the marked cutting lines and use steady, controlled movements to achieve clean and precise cuts.
- Smooth the Edges: After cutting the panels, use a file or sandpaper to smooth any rough edges or burrs. This will create a neater appearance and reduce the risk of injury during handling and installation.
- Shape the Panels (if necessary): If you have specific design elements that require shaping or bending of the metal panels, use a vice and appropriate tools to achieve the desired shape. Take your time and work slowly to avoid damage to the panels.
It’s important to exercise caution and wear appropriate protective gear, such as safety goggles and gloves, when cutting and shaping the metal panels. Follow all safety guidelines for the specific tools you are using. Once you have cut and shaped the metal panels, you’re ready to move on to the next step: welding the frame of the gate.
Step 5: Weld the Frame
Now that you have prepared and shaped the metal panels, it’s time to move on to the welding process to create the frame of your metal gate. This step will require knowledge and experience in welding techniques. Follow these steps to weld the frame of your gate:
- Ensure Safety Precautions: Before starting the welding process, make sure you are wearing all necessary safety gear, including a welding mask, gloves, and protective clothing. Ensure you are working in a well-ventilated area to avoid inhaling harmful fumes.
- Secure the Panels and Posts: Use clamps or welding jigs to secure the metal panels and posts in the correct alignment. This will provide stability and ensure accuracy during the welding process.
- Prepare and Position the Welder: Set up your welding machine according to the manufacturer’s instructions and adjust the settings based on the type and thickness of the metal you are working with.
- Clean Welding Surfaces: Before starting the actual welding, clean the surfaces that will be welded with a wire brush or grinder. This will remove any debris, rust, or oxidation that may interfere with the quality of the weld.
- Tack Weld: Begin by tack welding the corners and joints of the frame to hold the pieces together. This will help ensure proper alignment and prevent movement during the welding process.
- Weld the Joints: With the frame pieces securely tacked, proceed to weld the joints using a consistent and smooth motion. Aim for deep, penetrating welds that will provide strength and stability to the gate.
- Check for Weld Quality: After each weld, inspect the bead for any signs of incomplete fusion, porosity, or other defects. If necessary, re-weld any areas that require further attention.
It’s important to practice good welding technique, maintaining a steady hand and control of the puddle. Take breaks as needed to avoid overheating the welding machine. Once the frame is fully welded and all joints have been checked for quality, you’re ready to move on to the next step: attaching hinges and a latch to the gate.
Step 6: Attach Hinges and Latch
Now that you have completed the welding of the frame, it’s time to attach the hinges and latch to your metal gate. Properly installing these components will ensure smooth operation and secure closure of your gate. Follow these steps to attach hinges and a latch:
- Position the Gate: Position your gate in the desired location, ensuring it is level and properly aligned with the support posts or existing structures.
- Attach Hinges: Determine the number of hinges needed based on the size and weight of your gate. Place the hinges on one side of the gate and mark the screw hole locations on both the gate and the support post. Use a drill with a suitable bit to create pilot holes for the screws.
- Secure Hinges: Align the hinge plate with the pilot holes and secure it to both the gate and support post using appropriate screws or bolts. Ensure the hinges are firmly attached and allow for smooth movement of the gate.
- Install Latch: Depending on the type of latch you have chosen, follow the manufacturer’s instructions for installation. This may involve drilling holes, attaching mounting plates, or aligning the latch mechanism with the gate and frame.
- Test the Gate: Once the hinges and latch are securely installed, test the gate to ensure it opens and closes smoothly. Make any necessary adjustments to the hinge tension or latch mechanism to ensure proper operation.
It’s important to consider the weight and size of your gate when selecting hinges and a latch. Choose high-quality, heavy-duty components that will withstand the demands of daily use and provide adequate security and stability. Once the hinges and latch are securely attached, you’re ready to move on to the final step: painting and finishing your metal gate.
Step 7: Paint and Finish
Painting and finishing your metal gate not only enhances its appearance but also provides protection against rust and corrosion. By applying a suitable paint and sealant, you can prolong the lifespan of your gate and maintain its aesthetic appeal. Follow these steps to paint and finish your metal gate:
- Clean the Surface: Ensure the surface of the gate is clean and free from any dust, debris, or grease. Use a mild detergent and water to wash away any dirt, then rinse thoroughly and allow the gate to dry completely.
- Apply Primer: Use a metal primer that is specifically designed for outdoor use. Apply a thin, even coat of primer to the entire gate, using a paintbrush or roller. Follow the manufacturer’s instructions for drying time and any additional coats required.
- Choose the Right Paint: Select a high-quality paint that is formulated for metal surfaces and provides good adhesion and durability. Consider factors such as weather resistance, UV protection, and the overall aesthetic of your property.
- Prepare the Paint: Stir the paint thoroughly to ensure an even consistency. If needed, thin the paint according to the manufacturer’s instructions.
- Paint the Gate: Begin painting the gate, starting with the frame and then moving on to the panels. Use long, even strokes to apply the paint, working in one direction for a smooth finish. Apply multiple coats as needed, allowing sufficient drying time between each coat.
- Seal with a Clear Coat: For added protection and a glossy finish, consider applying a clear coat sealer. This will help to guard against fading, chipping, and environmental damage. Follow the manufacturer’s instructions for proper application.
- Allow to Dry: Let the paint and sealant dry completely according to the instructions provided. This will ensure a durable and long-lasting finish.
Painting and finishing your metal gate not only enhances its appearance but also provides protection against the elements. Regular maintenance is also necessary to keep your gate looking its best. Inspect the gate periodically for any signs of damage, touch up any chipped or scratched areas, and clean the surface as needed.
Congratulations! You have successfully completed all the steps to build and finish your metal gate for the driveway. Enjoy the beauty, security, and functionality it brings to your property.
Read more: How To Attach A Metal Gate To A Brick Wall
Conclusion
Building a metal gate for your driveway is a rewarding project that adds beauty, security, and value to your property. With the right materials, tools, and techniques, you can create a custom gate that fits your style and meets your functional needs. By following the step-by-step process outlined in this guide, you can successfully build a durable and visually appealing metal gate.
Remember, safety should always be a top priority when working with metal and welding equipment. Make sure to wear proper protective gear and follow the manufacturer’s instructions for all tools and equipment. If you are inexperienced with welding, consider seeking professional assistance or taking a welding class to ensure proper technique and safety.
From measuring and planning to welding and finishing, each step plays a crucial role in the construction of your metal gate. Taking the time to prepare the metal panels, cut and shape them, weld the frame, attach hinges and a latch, and apply a high-quality paint finish will result in a gate that not only looks great but also stands the test of time.
Once your metal gate is complete, remember to maintain it regularly by inspecting for any damages or wear, touching up paint as needed, and keeping the gate clean. Proper maintenance will help extend its lifespan and keep it looking its best for years to come.
Whether you’re looking for added security, privacy, or simply enhancing the overall curb appeal of your property, a well-built and well-maintained metal gate is an excellent investment. Enjoy the benefits of your new gate and take pride in the craftsmanship you put into its creation.
Frequently Asked Questions about How To Build A Metal Gate For Driveway
Was this page helpful?
At Storables.com, we guarantee accurate and reliable information. Our content, validated by Expert Board Contributors, is crafted following stringent Editorial Policies. We're committed to providing you with well-researched, expert-backed insights for all your informational needs.


0 thoughts on “How To Build A Metal Gate For Driveway”