Articles
How To Change HVAC Capacitor
Modified: October 20, 2024
Learn how to change your HVAC capacitor with our informative articles. Improve your HVAC system's performance and save money on repairs.
(Many of the links in this article redirect to a specific reviewed product. Your purchase of these products through affiliate links helps to generate commission for Storables.com, at no extra cost. Learn more)
Introduction
When it comes to ensuring the comfort of your home or office, a properly functioning HVAC (Heating, Ventilation, and Air Conditioning) system plays a crucial role. The HVAC system relies on various components to cool or heat the air and circulate it throughout the space. One such component is the HVAC capacitor.
An HVAC capacitor is an important part of the system’s electrical system. It stores and releases electrical energy to help start the motors of the compressor and fan. Over time, capacitors can wear out and become faulty, leading to issues with the HVAC system’s performance.
In this article, we will guide you through the process of changing an HVAC capacitor. We will discuss the signs of a bad capacitor, important safety precautions to take, the tools and materials needed for the job, and provide a step-by-step guide to help you replace the capacitor. By following these instructions, you can restore the functionality of your HVAC system and keep your indoor environment comfortable.
Key Takeaways:
- Safety First!
Prioritize safety when changing an HVAC capacitor. Always turn off the power supply, wear protective gear, discharge the capacitor, and follow manufacturer instructions to ensure a safe and successful replacement process. - Test and Monitor
After replacing the capacitor, test the HVAC system and monitor its performance. Pay attention to airflow, temperature output, and any unusual sounds. If issues persist, seek professional assistance for further troubleshooting.
Read more: How To Test HVAC Capacitor
What is an HVAC Capacitor?
An HVAC capacitor is an electronic component that stores and releases electrical energy in an HVAC system. It is commonly found in air conditioners, heat pumps, and furnaces. The capacitor works in conjunction with the motors of these systems, providing the necessary electrical boost to start them up.
There are two types of HVAC capacitors: the start capacitor and the run capacitor. The start capacitor is responsible for providing the initial jolt of electricity needed to start the motor. Once the motor is running, the run capacitor takes over, continuously providing a steady flow of electricity for the motor’s operation.
Capacitors are typically rated in microfarads (μF) and have a voltage rating that must match or exceed the system’s electrical requirements. The capacitance value indicates how much electrical charge the capacitor can store. Higher capacitance values generally correspond to larger electrical storage capabilities.
Capacitors are essential for the proper functioning of the HVAC system’s motors. Without a working capacitor, the motor may struggle to start or not start at all, resulting in poor system performance or complete system failure.
It’s important to note that capacitors can degrade and lose their effectiveness over time. Factors such as temperature fluctuations, electrical surges, and prolonged use can shorten the lifespan of the capacitor. Regular maintenance and inspection of the HVAC system can help identify any capacitor issues and prevent potential problems.
Signs of a Bad HVAC Capacitor
A faulty HVAC capacitor can have a significant impact on the performance of your HVAC system. It is important to be aware of the signs that indicate a capacitor problem so that you can address it promptly and prevent further issues. Here are some common signs that your HVAC capacitor may be bad:
- Hard start: If your HVAC system takes longer than usual to start or requires multiple attempts before it kicks in, it could be a sign of a failing capacitor. The capacitor may not be providing the necessary electrical boost to start the motors efficiently.
- Weak airflow: A capacitor that is starting to fail may not be able to provide sufficient power to the fan motor. As a result, you may notice a decrease in the airflow coming from the vents, making it difficult to maintain a comfortable temperature in your space.
- Frequent cycling: If your HVAC system is constantly turning on and off, it may indicate a capacitor problem. The capacitor helps regulate the start and stop cycles of the motors, so a faulty capacitor can lead to frequent and irregular cycling.
- Excessive energy consumption: A malfunctioning capacitor can cause the HVAC system to work harder to achieve the desired temperature, leading to a spike in energy consumption. If you notice a significant increase in your energy bills without any other apparent reasons, it’s worth checking the capacitor.
- Strange noises: A failing capacitor can cause the motors to make unusual or buzzing noises during operation. These noises can be a result of irregular electrical flow and can indicate a problem with the capacitor.
- Burning smell: In some cases, a bad capacitor can emit a burning odor. This can be an indication of electrical overheating, and it’s important to address the issue promptly to prevent further damage to the HVAC system.
If you notice any of these signs, it is advisable to consult a professional HVAC technician to inspect and diagnose the capacitor. They will be able to determine if a replacement is necessary and ensure that your HVAC system is functioning optimally.
Safety Precautions
Changing an HVAC capacitor involves working with electrical components, so it is essential to prioritize safety throughout the process. Here are some important safety precautions to follow:
- Turn off the power supply: Before starting any work on the HVAC system, make sure to shut off the power supply. This should be done at the circuit breaker or electrical disconnect switch to ensure that no electricity is flowing to the system.
- Wear protective gear: It is recommended to wear safety goggles and gloves to protect your eyes and hands from any potential hazards. Additionally, wearing non-slip footwear can provide stability and prevent accidents.
- Ensure proper ventilation: Working on HVAC systems often involves handling refrigerants and chemicals. Make sure the area has proper ventilation to prevent the accumulation of fumes and ensure fresh air circulation.
- Discharge the capacitor: Capacitors store electrical energy even when the power is off, so it’s crucial to discharge them before touching any wires or components. Use an insulated screwdriver with a rubber or plastic handle to short out the terminals of the capacitor.
- Avoid touching live wires: When working with the capacitor or any electrical components, never touch live wires or terminals with bare hands. Always use insulated tools and handle wires carefully to avoid electric shock.
- Follow manufacturer instructions: Different HVAC systems may have specific instructions for capacitor replacement. Consult the manufacturer’s manual or guidelines for your specific model and follow them carefully.
- Take photos or label wires: Before disconnecting any wires from the capacitor, take photos or label them to ensure proper reconnection later. This will help you avoid confusion and potential electrical issues.
- Seek professional help if needed: If you are unsure about any aspect of the capacitor replacement process or lack the necessary expertise, it is best to hire a licensed HVAC technician to handle the job. They have the knowledge and experience to perform the replacement safely and efficiently.
By following these safety precautions, you can minimize the risk of accidents or injuries and ensure a safe working environment while replacing your HVAC capacitor.
Tools and Materials Needed
Before proceeding with the replacement of an HVAC capacitor, gather the necessary tools and materials to ensure a smooth and efficient process. Here is a list of the common items you will need:
Read more: Where To Buy HVAC Run Capacitor
Tools:
- Insulated gloves
- Safety goggles
- Screwdriver (preferably insulated)
- Adjustable wrench
- Needle-nose pliers
- Multimeter (to test electrical connections)
Materials:
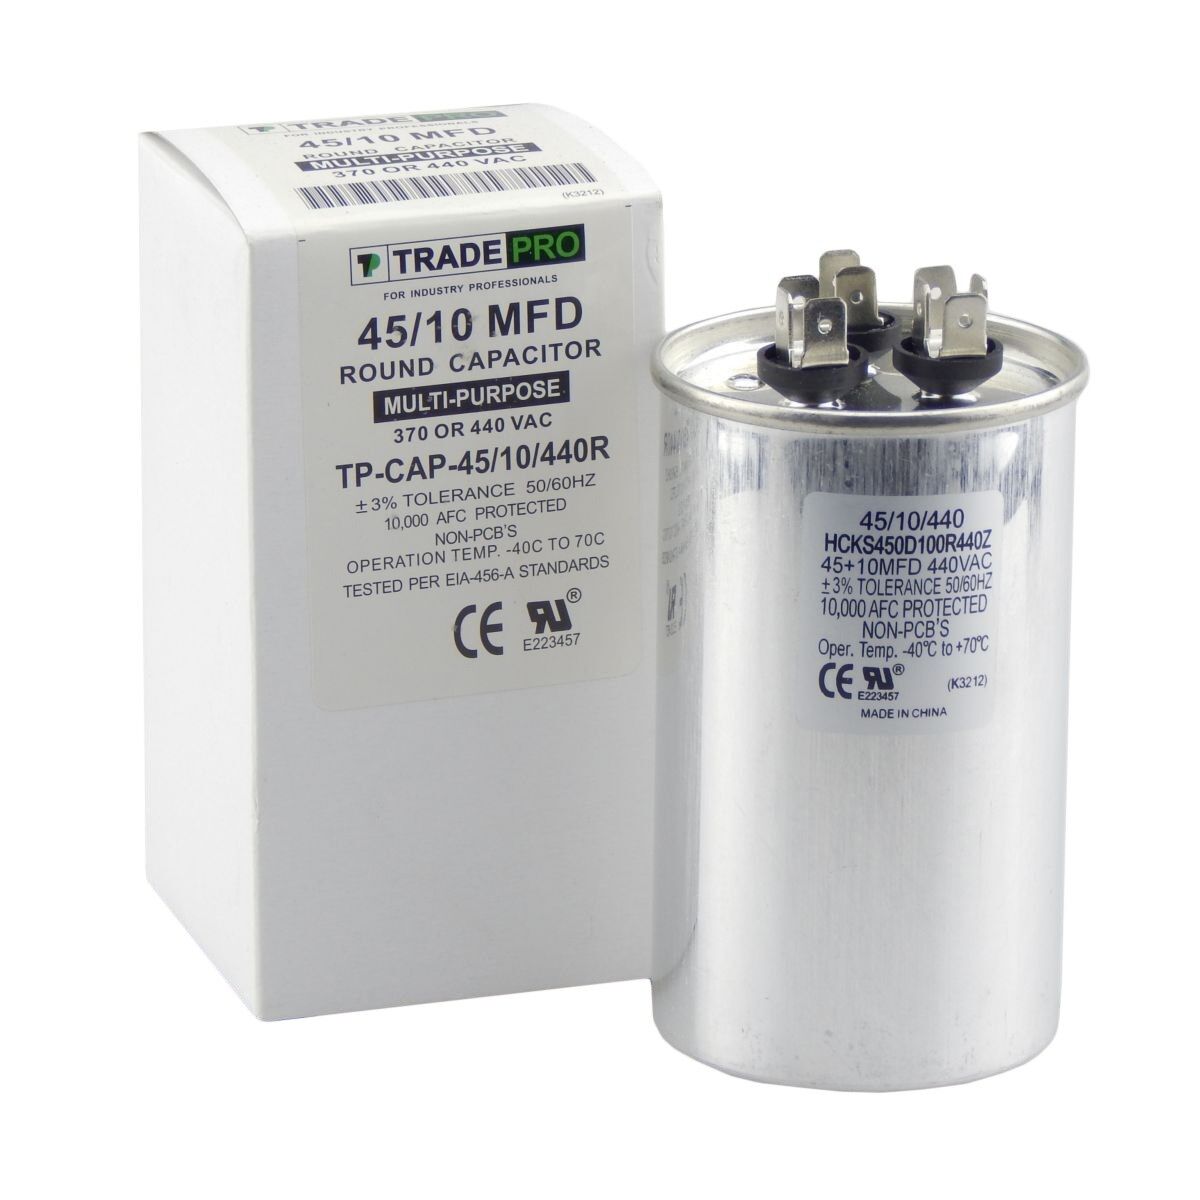
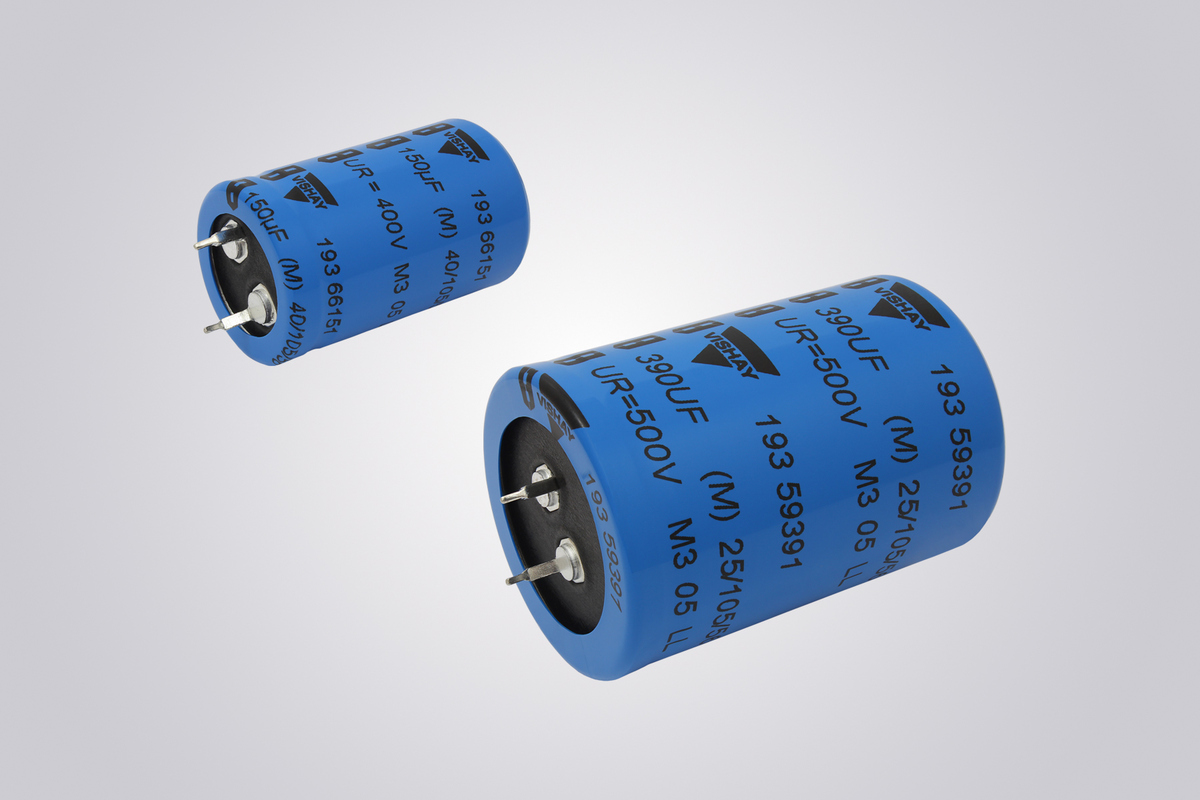
- New HVAC capacitor (ensure it matches the rating of the old capacitor)
- Wire connectors
- Electrical tape
- Zip ties or cable clamps
It’s important to note that the specific tools required may vary depending on the make and model of your HVAC system. Refer to the manufacturer’s guidelines or consult an HVAC professional for any specialized tools or additional materials that may be needed for your particular system.
Ensure that all the tools and materials are in good working condition and readily available before you start the replacement process. This will help streamline your work and minimize any potential delays or complications.
Step 1: Turn off the Power Supply
Before you begin working on your HVAC system, it is crucial to turn off the power supply to ensure your safety. Follow the steps below to properly shut off the power:
- Locate the circuit breaker or electrical disconnect switch for your HVAC system. This is usually found near the outdoor unit or in the electrical panel of your home.
- Open the electrical panel cover and locate the circuit breaker or switch labeled for your HVAC system. It may be labeled as “Air Conditioner,” “Heat Pump,” or “Furnace.”
- Flip the circuit breaker to the “Off” position or switch off the electrical disconnect switch to cut off the power supply to the HVAC system.
- Double-check that the power is indeed off by attempting to turn on the thermostat. If the HVAC system does not activate, it means the power supply has been successfully cut off.
It’s important to ensure that the power supply is completely shut off before proceeding with any further steps. This will eliminate the risk of electrical shock or injury while working on the HVAC capacitor.
Remember to keep the power supply turned off throughout the entire capacitor replacement process. Only turn the power back on once you have completed all the necessary steps and are ready to test the HVAC system.
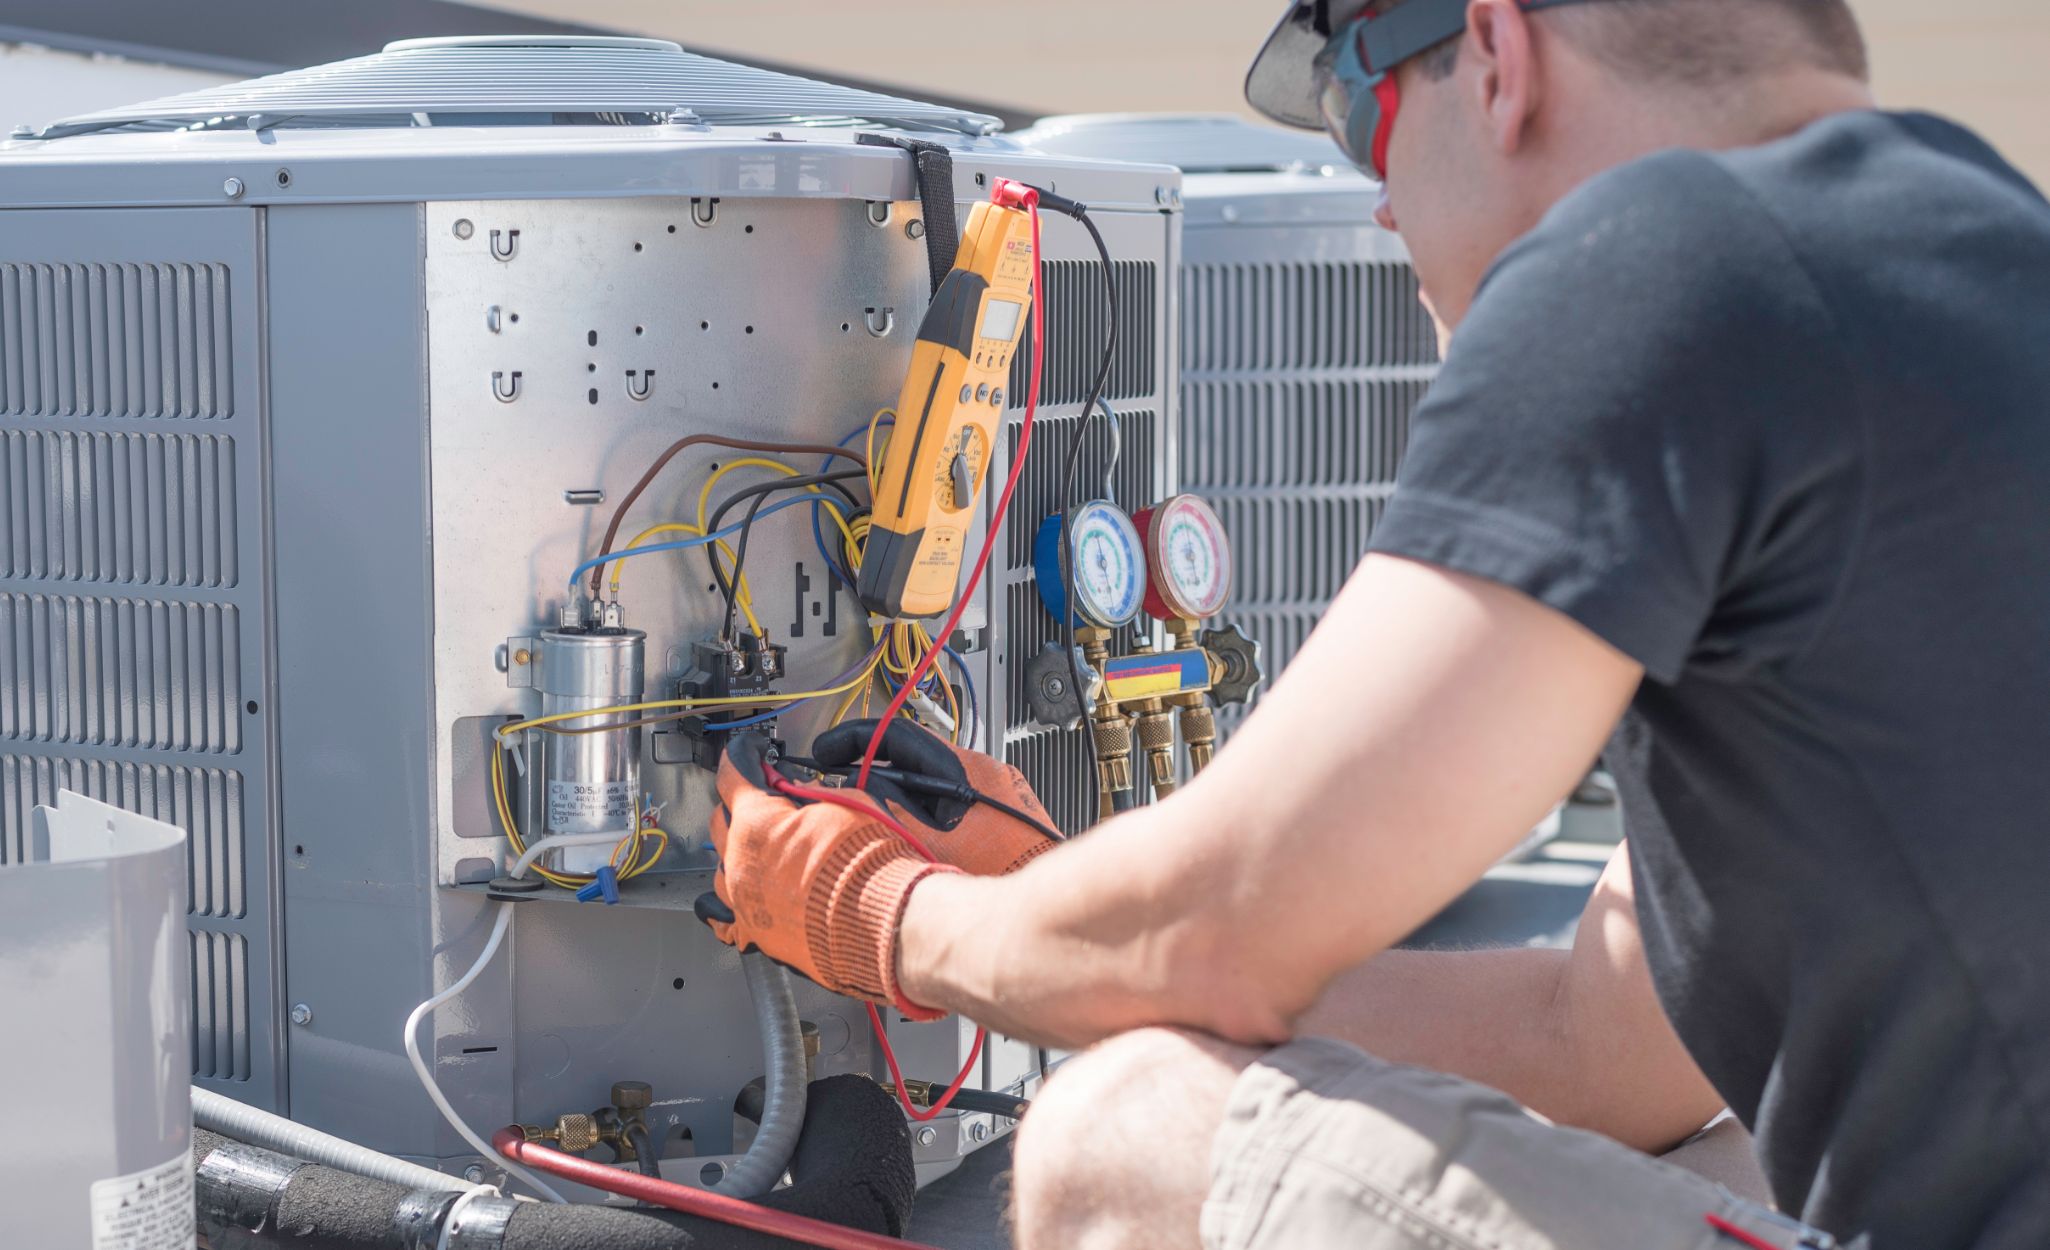
Step 2: Locate the Capacitor
After ensuring the power supply is turned off, you can proceed to locate the HVAC capacitor. The capacitor is typically located near the air conditioner’s outdoor unit or inside the furnace or air handler. Follow these steps to find the capacitor:
- If you have an outdoor air conditioning unit, start by locating it. The capacitor is often situated within the outdoor unit itself.
- Examine the unit and look for a metal or plastic box with wires connected to it. This box is the capacitor housing.
- If you are working with a furnace or air handler, check inside the blower compartment. You may find the capacitor mounted on the side or top of the blower motor assembly.
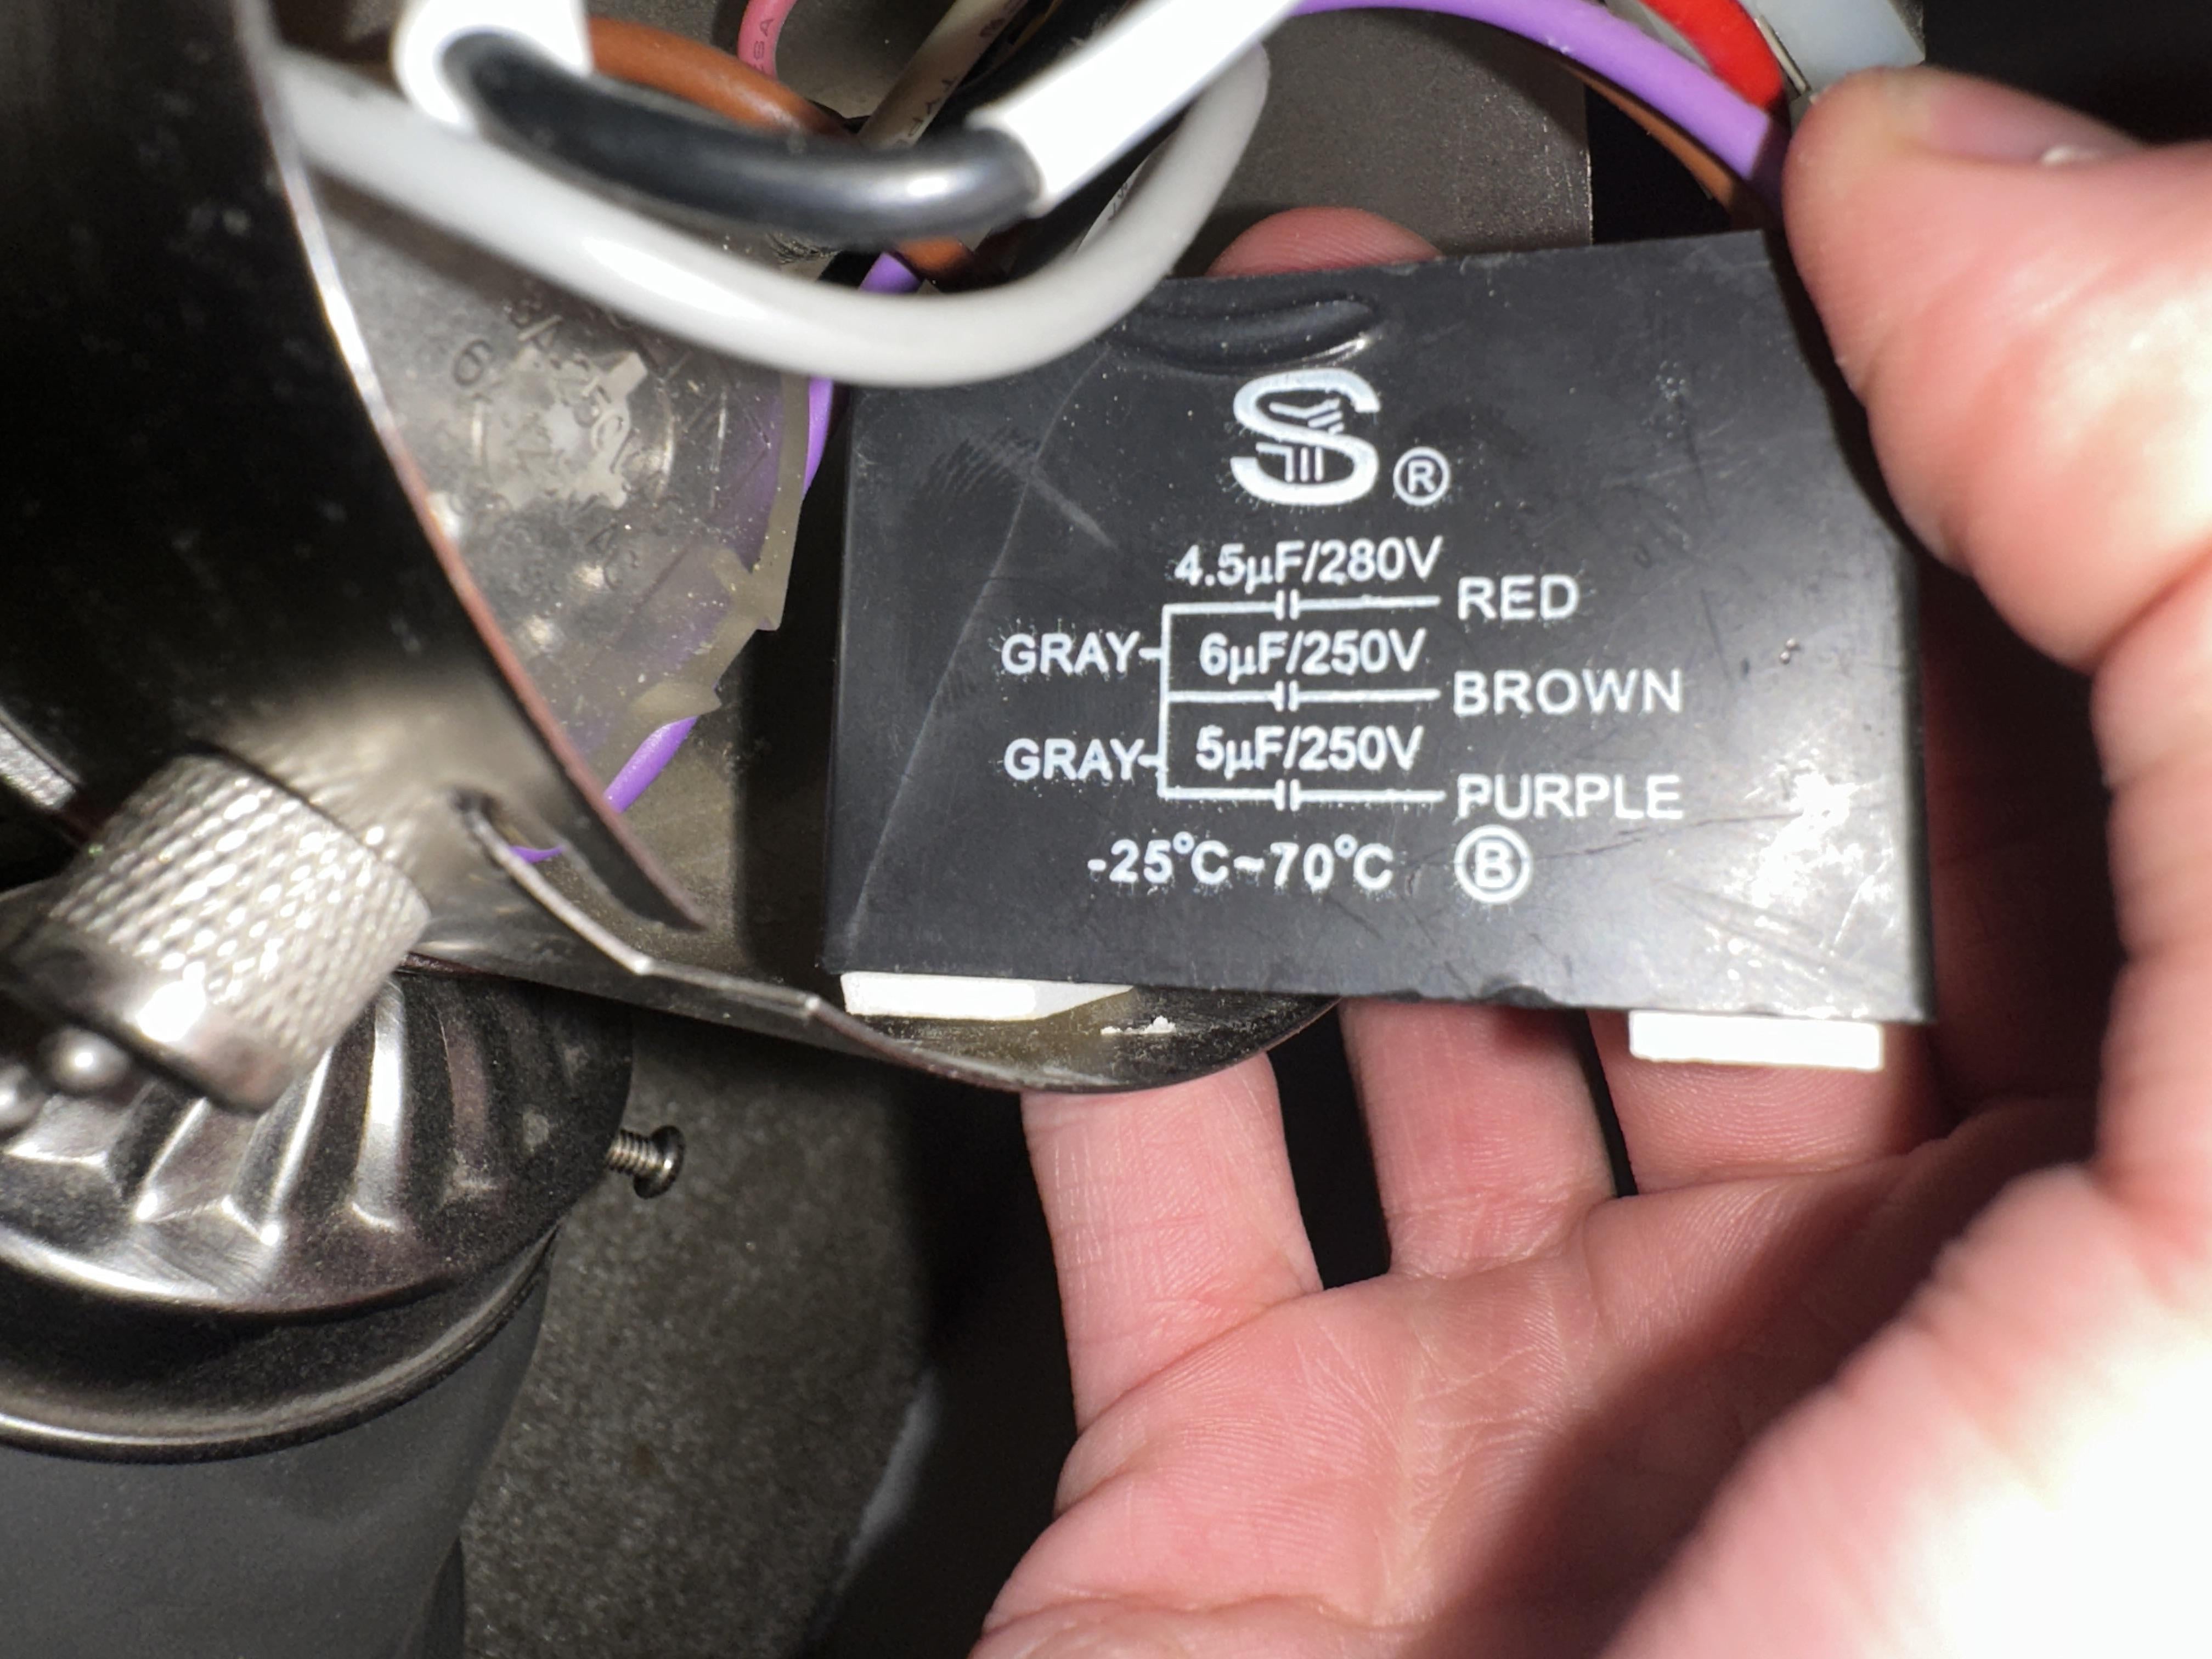
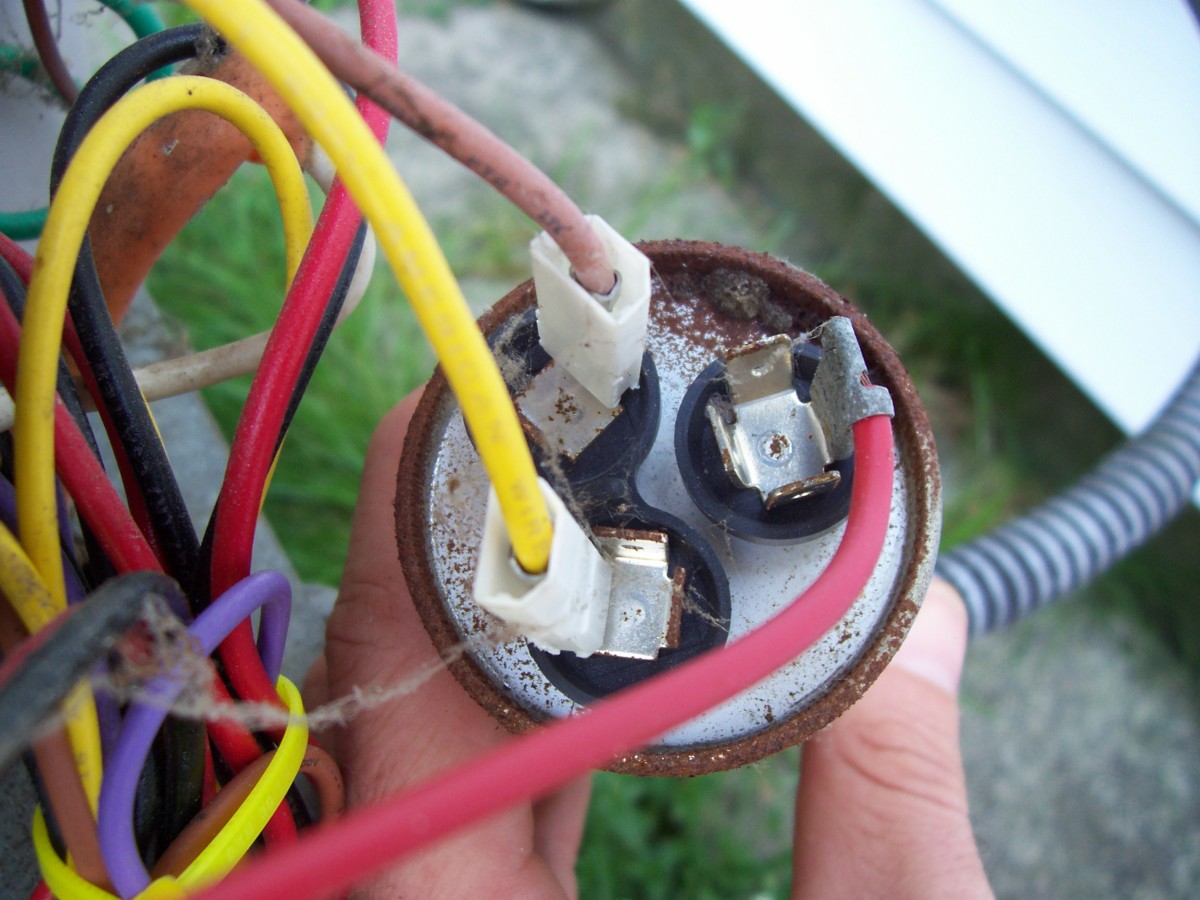
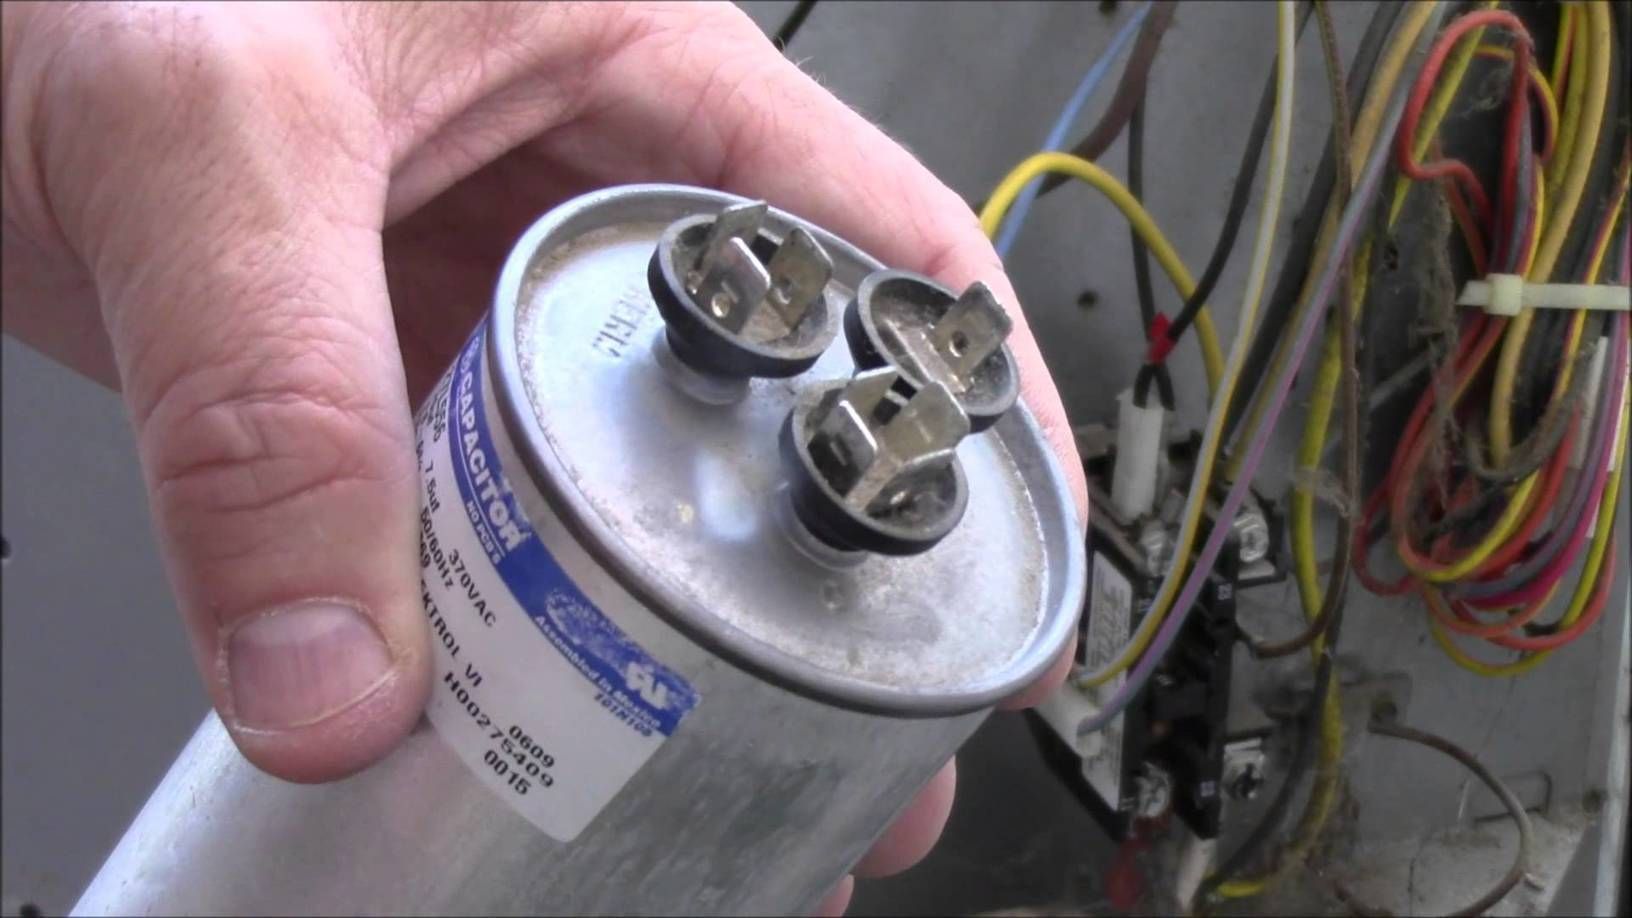
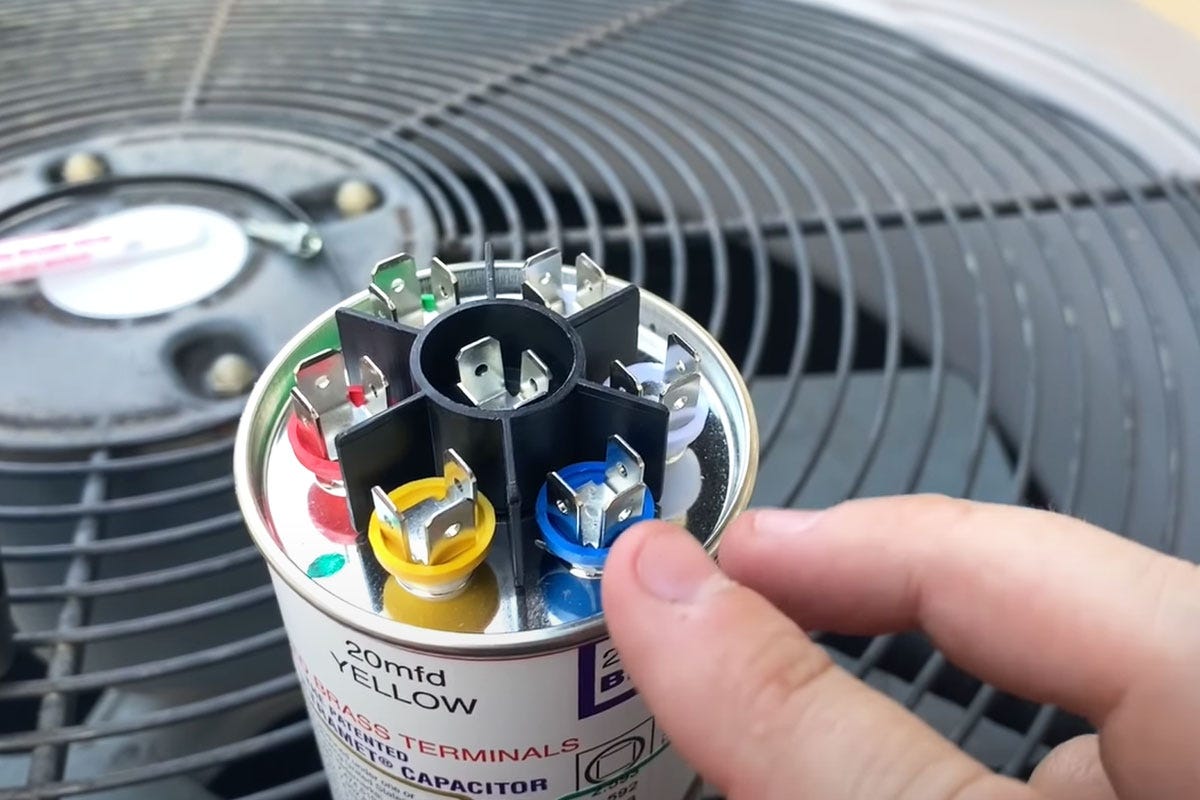
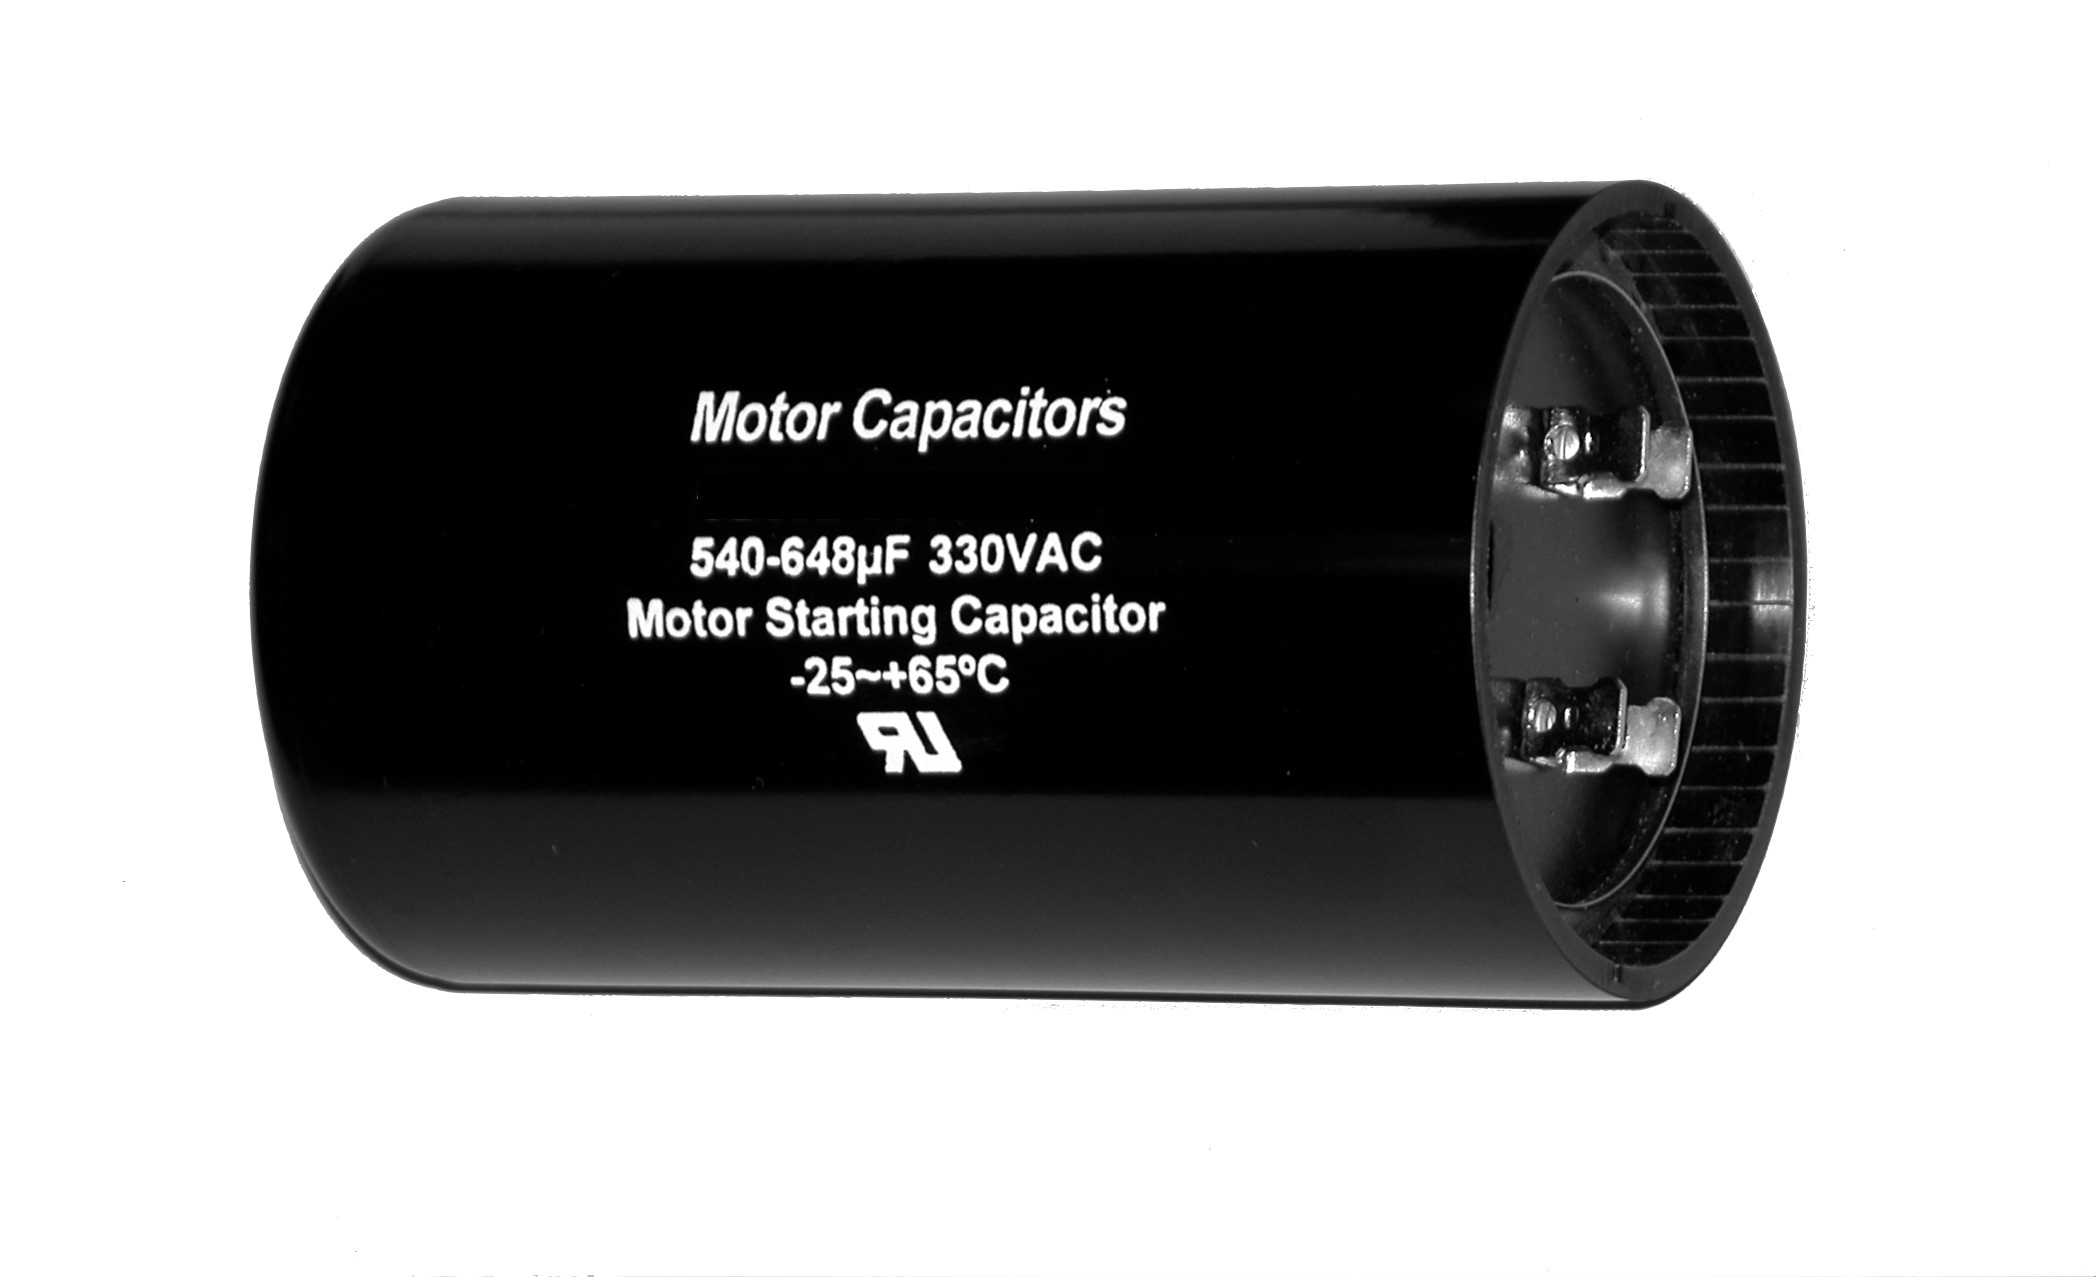
- Inspect the capacitor housing carefully. It will have multiple terminals for connecting wires and may have a label indicating its capacitance rating and voltage specifications.
Once you have located the capacitor, take note of its orientation and the position of the wires connected to it. This will make it easier to reconnect the wires correctly when installing the new capacitor.
It’s important to exercise caution while locating the capacitor, as it may be situated in tight or hard-to-reach spaces. Take your time to ensure a proper and safe inspection of the capacitor’s placement.
In the next step, we will cover the process of discharging the capacitor, an essential step before proceeding with the replacement.
Read more: How To Change HVAC Thermostat
Step 3: Discharge the Capacitor
Before you can safely handle the HVAC capacitor, it is crucial to discharge any residual electrical charge that may be stored in it. This step is essential to prevent any potential electric shock. Follow these steps to discharge the capacitor:
- Put on insulated gloves and safety goggles for added protection.
- Locate the terminals on the capacitor. The terminals are labeled and have wires connected to them.
- Using an insulated screwdriver with a rubber or plastic handle, carefully touch the metal end of the screwdriver simultaneously to both terminals of the capacitor. This will create a short circuit, allowing any stored electrical charge to dissipate.
- Hold the screwdriver in place for a few seconds to ensure that the capacitor is fully discharged. You may hear a brief spark or see a small arc as the charge is released.
- Once you are confident that the capacitor is discharged, you can safely proceed with removing the wires and replacing the capacitor.
It’s important to note that capacitors can store electrical energy for a short time even after the power is turned off. Discharging the capacitor ensures your safety and reduces the risk of electric shock during the replacement process.
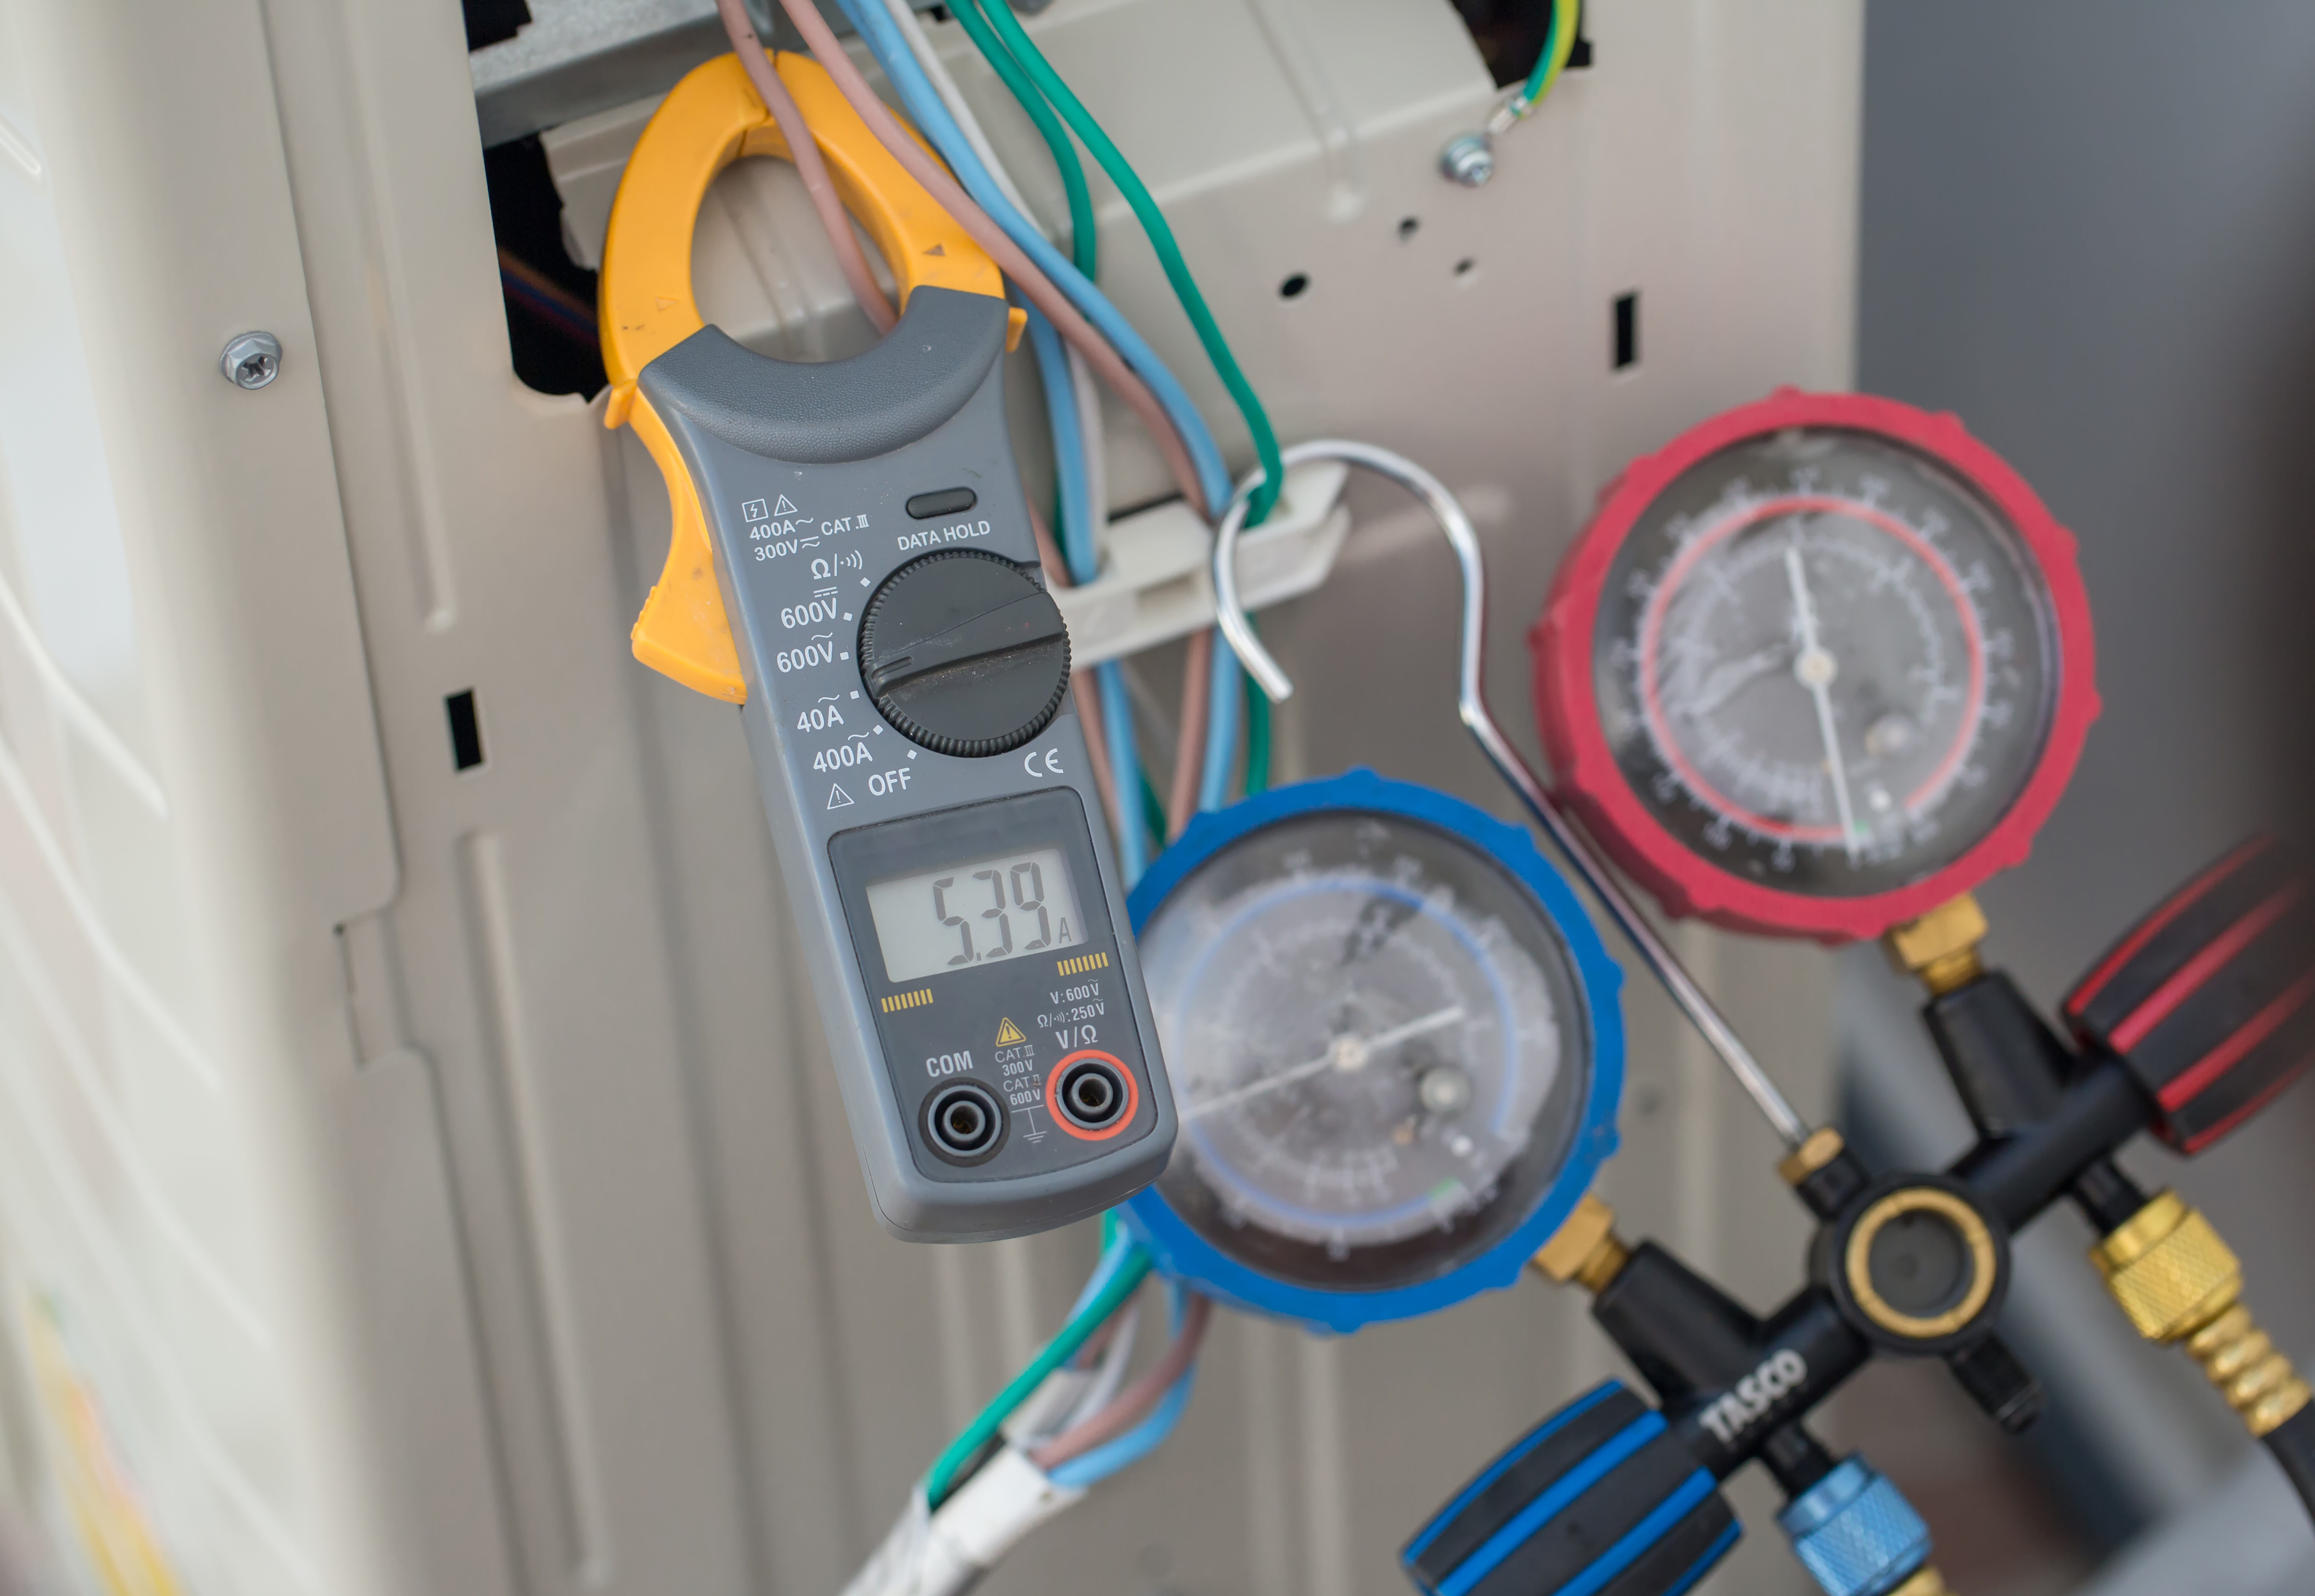
After discharging the capacitor, double-check that no electrical charge remains by using a multimeter to test for any residual voltage. If the multimeter indicates no voltage, you can proceed to the next step with peace of mind.
When changing an HVAC capacitor, always discharge the capacitor by using an insulated screwdriver to bridge the terminals. This will prevent any potential electrical shock.
Step 4: Disconnect Wires from the Capacitor
With the HVAC capacitor discharged, it’s time to disconnect the wires connected to it. Follow these steps to safely remove the wires:
- Double-check that the power supply is turned off to avoid any electrical hazards.
- Inspect the wires connected to the capacitor. Take a moment to identify the wires and their corresponding terminals on the capacitor.
- Using a screwdriver or needle-nose pliers, loosen the screws or terminals that secure the wires to the capacitor. Slowly and gently pull the wires away from the terminals.
- If multiple wires are connected to the same terminal, take note of their order or location for proper reconnection later. You can take photos or label the wires if necessary.
- Once all the wires are disconnected, carefully trace their paths and ensure they are free from any obstructions or entanglements.
It’s important to handle the wires with care to avoid damaging them or causing accidental electrical contact. If any of the wires appear damaged or frayed, it’s advisable to replace them as well to ensure the integrity of the electrical connections.
By disconnecting the wires, you can now proceed to remove the faulty capacitor and install the new one. We will cover the replacement process in the next step.
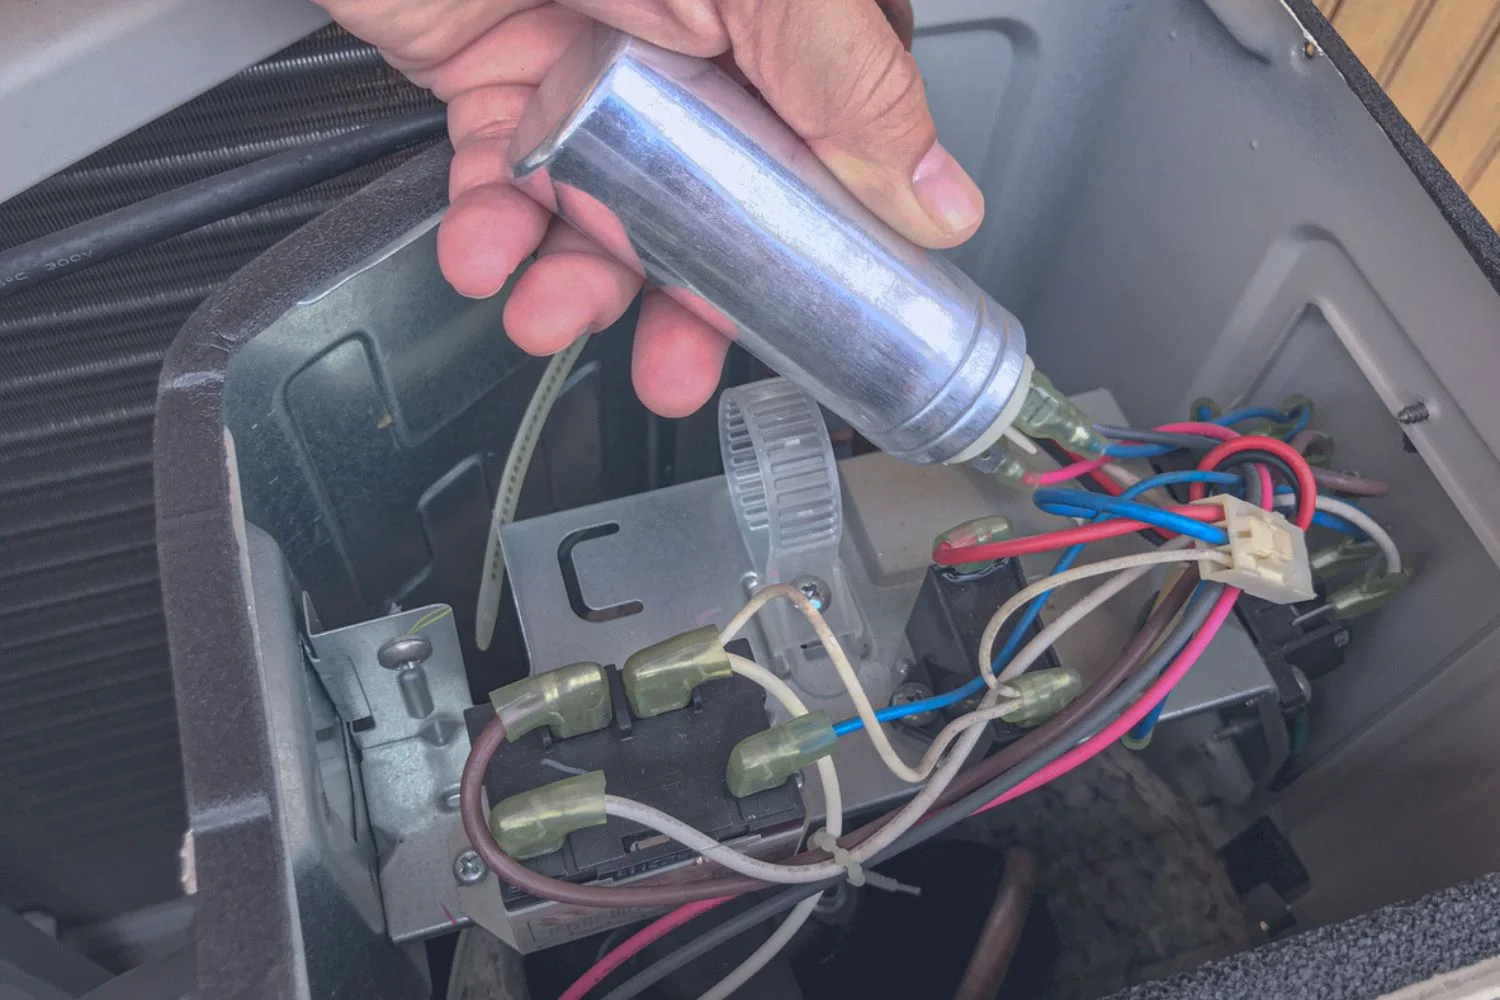
Step 5: Remove and Replace the Capacitor
Now that the wires are disconnected, you can proceed to remove the old HVAC capacitor and install the new one. Follow these steps to safely replace the capacitor:
- Ensure the power supply is still turned off to prevent any electrical accidents.
- Inspect the mounting bracket or clips that secure the capacitor in place. Remove any screws or fasteners that hold the capacitor in position.
- Carefully slide out the old capacitor from its housing, taking note of its orientation and location.
- Compare the capacitance and voltage ratings of the old capacitor with the new one to ensure they match. The new capacitor should have the same or higher ratings.
- Position the new capacitor in the same orientation as the old one, aligning the terminals with the corresponding wires.
- Secure the new capacitor in place by reattaching any mounting brackets or clips that were removed.
It’s important to handle the new capacitor with care and avoid touching the metal terminals. Touching the terminals can transfer oil and debris to the capacitor, potentially affecting its performance.
By successfully removing the old capacitor and installing the new one, you are one step closer to restoring your HVAC system’s functionality. In the next step, we will guide you through reconnecting the wires to the new capacitor.
Step 6: Reconnect Wires to the New Capacitor
With the new capacitor securely in place, it’s time to reconnect the wires that were previously disconnected. Follow these steps to ensure proper reconnection:
- Take a moment to review the notes, photos, or labels you made during the wire disconnection process. This will help you correctly identify the order or location of the wires.
- Referencing your notes, start by connecting each wire to its corresponding terminal on the new capacitor. Gently push the wire into the terminal and secure it by tightening the screw or terminal clamp.
- If multiple wires were connected to the same terminal, make sure to reconnect them in the correct order or arrangement. This can help maintain the proper electrical flow within the HVAC system.
- Inspect each connection to ensure the wires are securely fastened and making good contact with the terminals.
- Once all the wires are reconnected, double-check that none of the wires are touching each other or any other metal parts of the HVAC system.
It’s crucial to ensure the wires are properly connected to the new capacitor. Loose or improper connections can result in electrical issues or system malfunction.
After completing this step, you are ready to move on to the final step of the process: testing the HVAC system to confirm the successful replacement of the capacitor.
Read more: How Often Should You Change HVAC Air Filter
Step 7: Test the HVAC System
After installing the new capacitor and reconnecting the wires, it’s time to test your HVAC system to verify that everything is functioning correctly. Follow these steps to test the system:
- Ensure the power supply is still turned off for safety.
- Double-check that all connections are secure and no wires are touching each other or any metal parts of the HVAC system.
- Turn on the power supply to the HVAC system at the circuit breaker or electrical disconnect switch.
- Set the thermostat to the appropriate setting to activate the HVAC system. You should hear the compressor and fan motor start up.
- Observe the performance of your HVAC system. Pay attention to the airflow, temperature output, and any unusual noises or vibrations.
- Allow the system to run for a few minutes to reach its optimal operating condition.
- Monitor the system closely for any signs of continued capacitor issues, such as weak airflow, frequent cycling, or unusual sounds. If you notice any problems, it may indicate a further issue that requires professional attention.
If your HVAC system is running smoothly, providing adequate cooling or heating, and operating without any apparent issues, it indicates a successful replacement of the capacitor.
However, if you encounter any persistent problems or difficulties, it is advisable to contact a licensed HVAC professional for a thorough inspection and further troubleshooting.
By completing this final step, you have successfully replaced the HVAC capacitor and tested the functionality of your HVAC system. Regular maintenance and inspections will help ensure the continued optimal performance of your HVAC system.
Conclusion
Replacing an HVAC capacitor is a task that can be accomplished with careful attention to details and safety precautions. By following the step-by-step instructions outlined in this guide, you can successfully change the faulty capacitor and restore your HVAC system’s functionality.
Throughout the process, it’s important to prioritize safety. Remember to turn off the power supply, wear protective gear, and discharge the capacitor before handling any electrical components. Taking these precautions will help prevent accidents and ensure a safe working environment.
Make sure to gather the necessary tools and materials before starting the capacitor replacement. Insulated gloves, safety goggles, screwdrivers, pliers, and a multimeter are essential for a smooth and efficient process.
During the replacement process, be mindful of wire connections and their proper reconnection to the new capacitor. Labeling wires or taking photos can help with accurate reattachment. Double-check all connections to ensure they are secure and free from any potential hazards.
Once the new capacitor is in place and all wires are reconnected, test the HVAC system by turning on the power supply and observing its performance. Pay attention to airflow, temperature output, and any unusual sounds or vibrations. If you encounter any persistent issues, it’s recommended to seek professional assistance.
By successfully replacing the HVAC capacitor, you can ensure the optimal functioning of your HVAC system and maintain a comfortable indoor environment. Regular maintenance and inspections are key to preventing future capacitor problems and ensuring the longevity of your HVAC system.
If you are uncertain or uncomfortable with performing the replacement yourself, it’s always wise to consult a licensed HVAC technician. They have the expertise and experience to handle the task efficiently and effectively.
Remember, taking care of your HVAC system ensures the comfort and well-being of your home or office. By addressing capacitor issues promptly, you can enjoy reliable heating and cooling year-round.
Frequently Asked Questions about How To Change HVAC Capacitor
Was this page helpful?
At Storables.com, we guarantee accurate and reliable information. Our content, validated by Expert Board Contributors, is crafted following stringent Editorial Policies. We're committed to providing you with well-researched, expert-backed insights for all your informational needs.


0 thoughts on “How To Change HVAC Capacitor”