Articles
How To Replace A Ceiling Fan Capacitor
Modified: October 19, 2024
Learn how to replace a ceiling fan capacitor with this comprehensive step-by-step guide. Find all the information you need in our informative articles.
(Many of the links in this article redirect to a specific reviewed product. Your purchase of these products through affiliate links helps to generate commission for Storables.com, at no extra cost. Learn more)
Introduction
Replacing a ceiling fan capacitor is a common maintenance task for homeowners. Over time, the capacitor in a ceiling fan can wear out or become faulty, resulting in issues such as slow spinning, erratic speeds, or the fan not working at all. Fortunately, replacing a ceiling fan capacitor is a relatively straightforward process that can be done with the right tools and a little know-how.
In this article, we will guide you through the step-by-step process of replacing a ceiling fan capacitor. We will start by listing the tools and materials you will need for the job. Then, we will walk you through the necessary safety precautions, including turning off the power supply. Next, we will explain how to remove the old capacitor and identify the correct replacement capacitor. Finally, we will guide you through the installation of the new capacitor and the testing process to ensure everything is functioning properly.
Whether you are experiencing issues with your ceiling fan or simply want to be prepared for future maintenance, learning how to replace a ceiling fan capacitor can save you time and money. So, let’s get started with the tools and materials you will need for this project.
Key Takeaways:
- Replacing a ceiling fan capacitor is a manageable DIY task that can restore your fan’s functionality. Follow the step-by-step guide, match the specifications, and test the new capacitor for smooth operation.
- Prioritize safety, gather the right tools, and turn off the power supply before replacing a ceiling fan capacitor. Troubleshoot common issues and seek professional help if needed for a fully functional fan.
Read more: How To Replace A Light With A Ceiling Fan
Tools and Materials Needed
Before you begin the process of replacing a ceiling fan capacitor, gather the following tools and materials:
- Screwdriver – You will need a screwdriver, preferably one with multiple interchangeable bits, to remove the screws holding the fan housing in place.
- Needle-nose pliers – These pliers will come in handy for disconnecting wires and removing the old capacitor.
- Safety goggles – Protect your eyes with safety goggles to prevent any debris from getting into your eyes while working on the fan.
- Voltage tester – A voltage tester is essential to ensure that the power supply is turned off before starting any work on the ceiling fan.
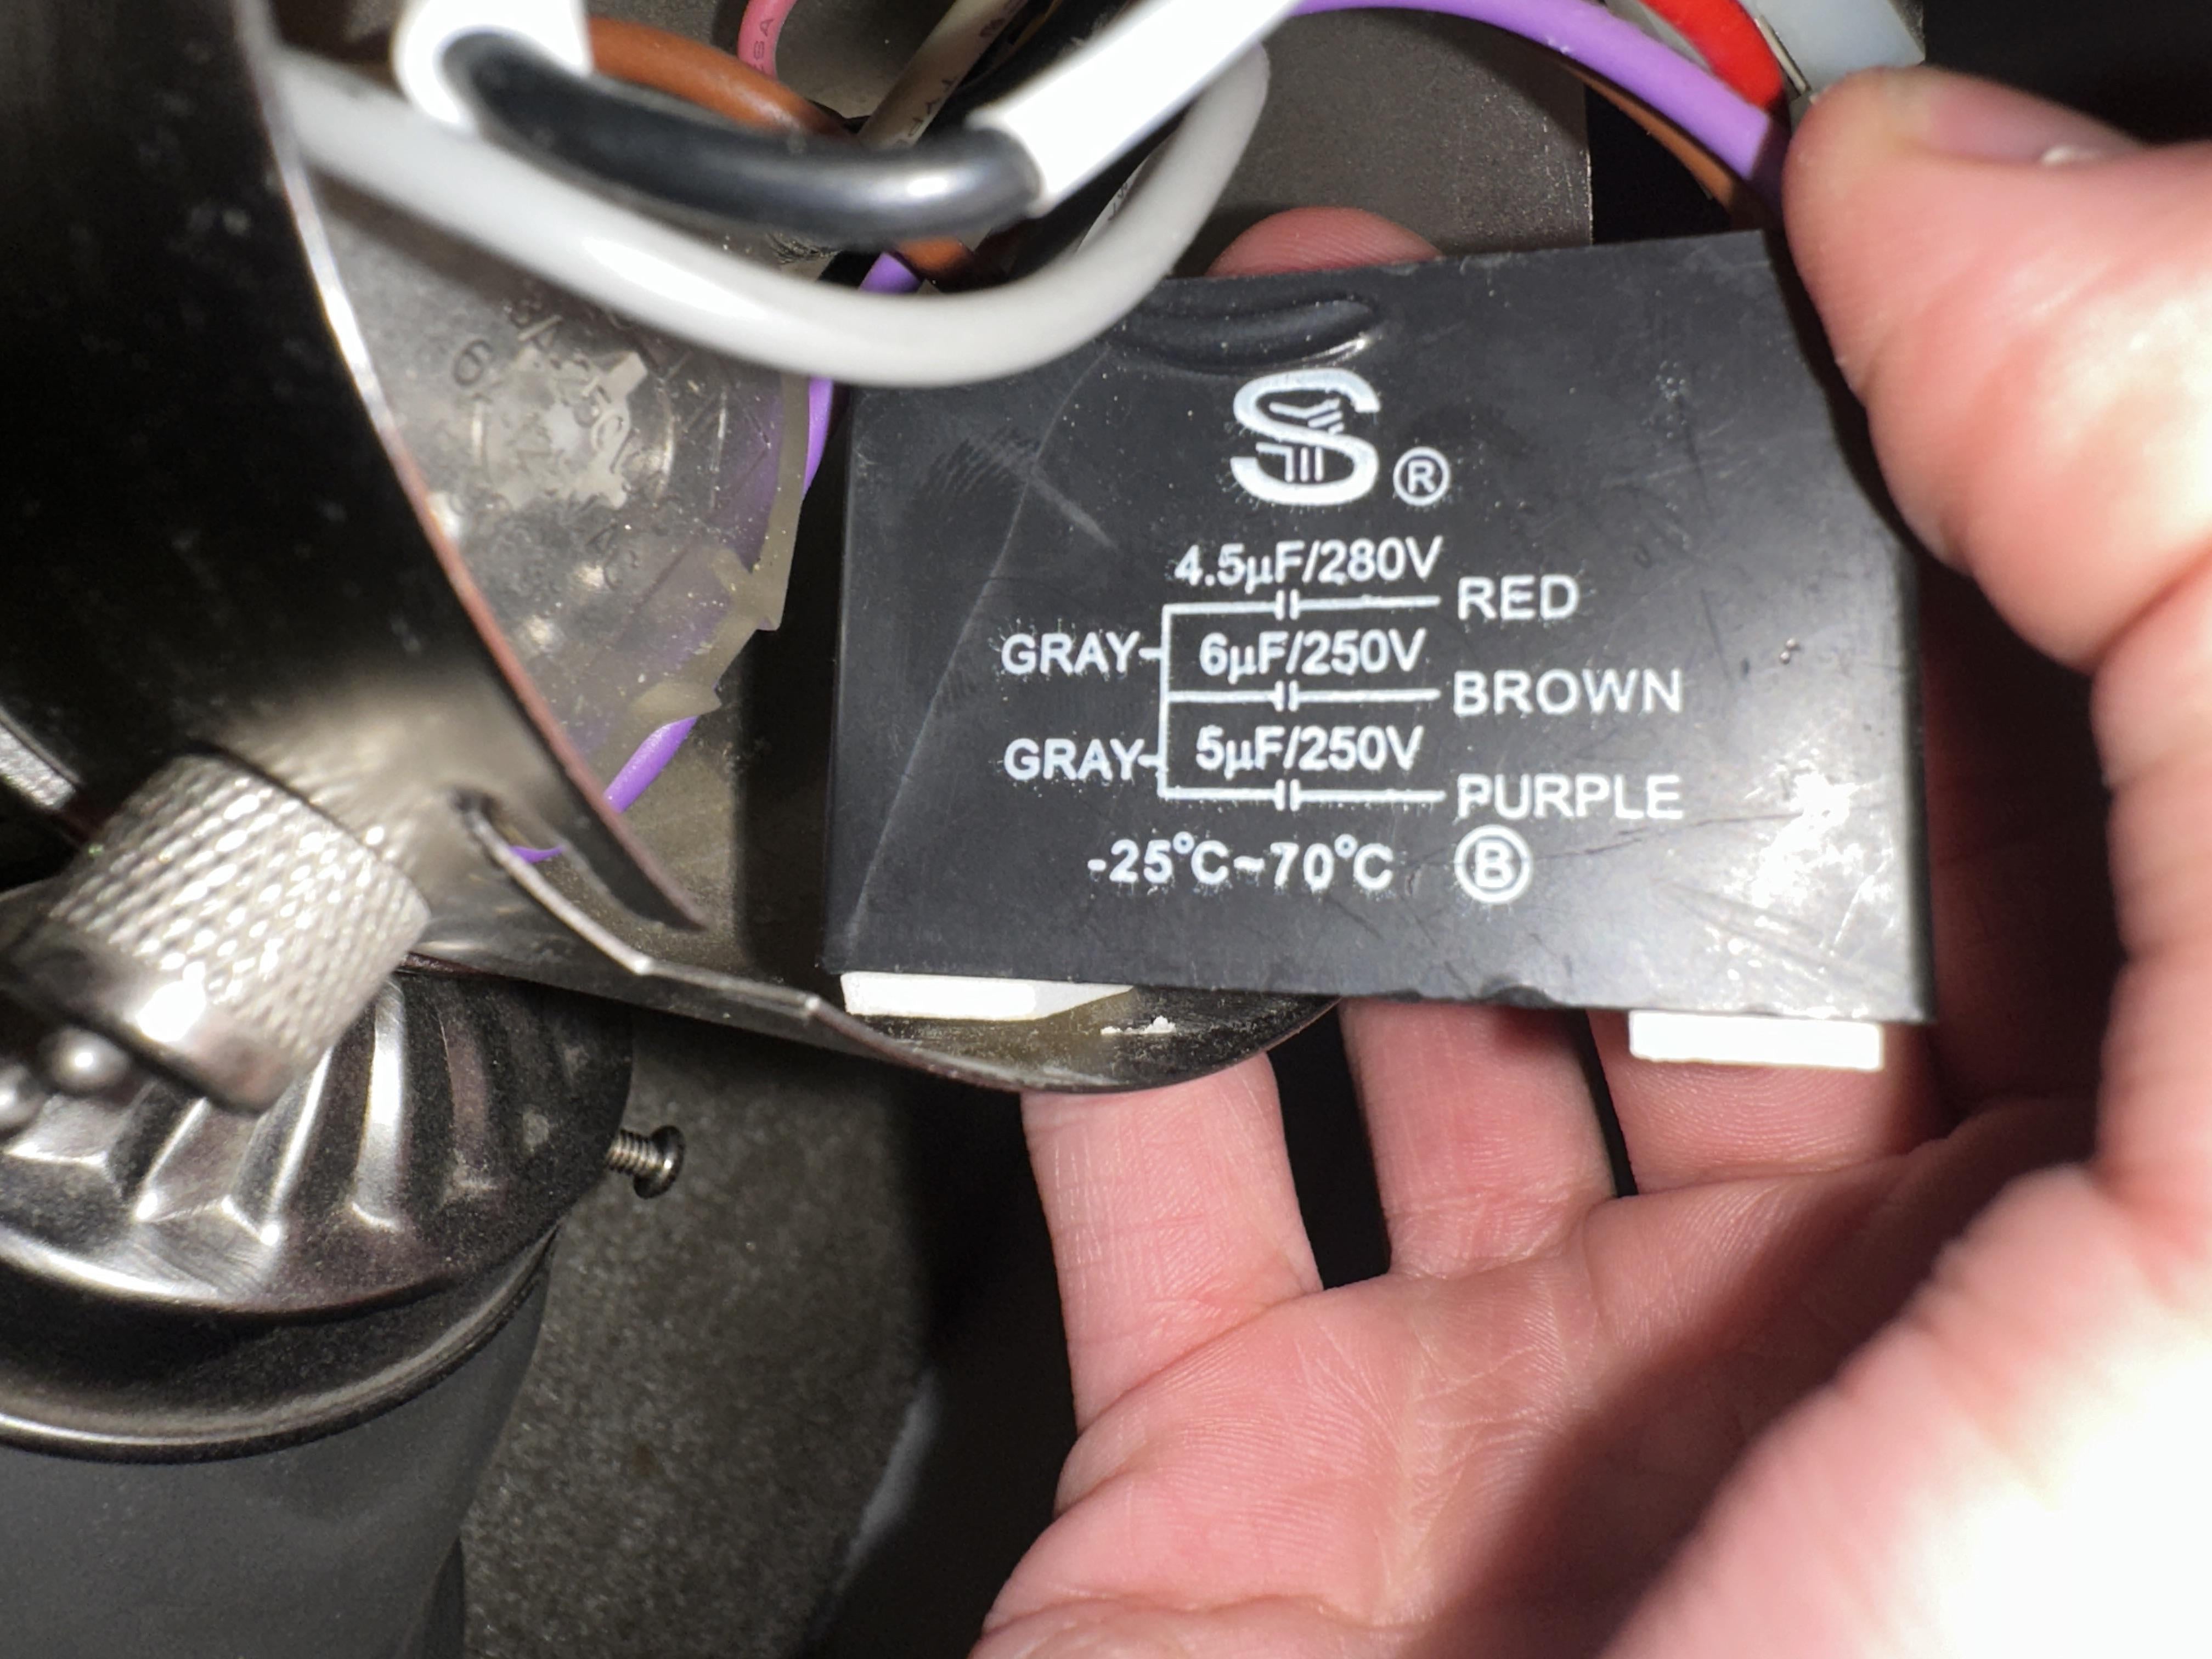
- New ceiling fan capacitor – Make sure to purchase a replacement capacitor that matches the specifications of your current one. Check the markings on the old capacitor or consult the fan’s manual for the correct specifications.
- Insulating gloves – To further protect yourself, wearing insulating gloves is recommended, especially when working near electrical connections.
- Step ladder – Depending on the height of your ceiling fan, you may need a step ladder to reach and access the fan.
- Electrical tape – Electrical tape will be used to secure the wire connections after installing the new capacitor.
- A pen and paper – These will come in handy for noting down wire connections and any other important information during the process.
By gathering these tools and materials beforehand, you will have everything you need to efficiently replace the ceiling fan capacitor without interruption. Now that you have your tools ready, let’s move on to the next step which is turning off the power supply.
Turning off the Power Supply
Before you start working on the ceiling fan capacitor, it is crucial to ensure that the power supply to the fan is turned off. This step is essential for your safety and to prevent any potential electrical hazards.
To turn off the power supply, follow these steps:
- Locate the circuit breaker panel in your home. This is usually found in the basement, garage, or utility room.
- Identify the circuit breaker or fuse that controls the power supply to your ceiling fan. If you are unsure which breaker or fuse it is, you can temporarily turn off the main power to your home to be safe.
- Flip the switch of the circuit breaker or remove the fuse to disconnect the power supply to the ceiling fan. You can double-check if the power is off by testing the fan’s operation with the wall switch or pulling on the fan’s pull chain.
- Confirm that the power is off by using a voltage tester. Place the tester against the wires or connectors to check for any electrical current. If the tester does not detect any voltage, it is safe to proceed with the replacement process.
Remember, safety should always be your top priority when dealing with electrical components. If you are uncertain about anything or do not feel comfortable working with electricity, it is best to consult a professional electrician.
Now that you have turned off the power supply to the ceiling fan, you are ready to move on to the next step, which is removing the old ceiling fan capacitor.
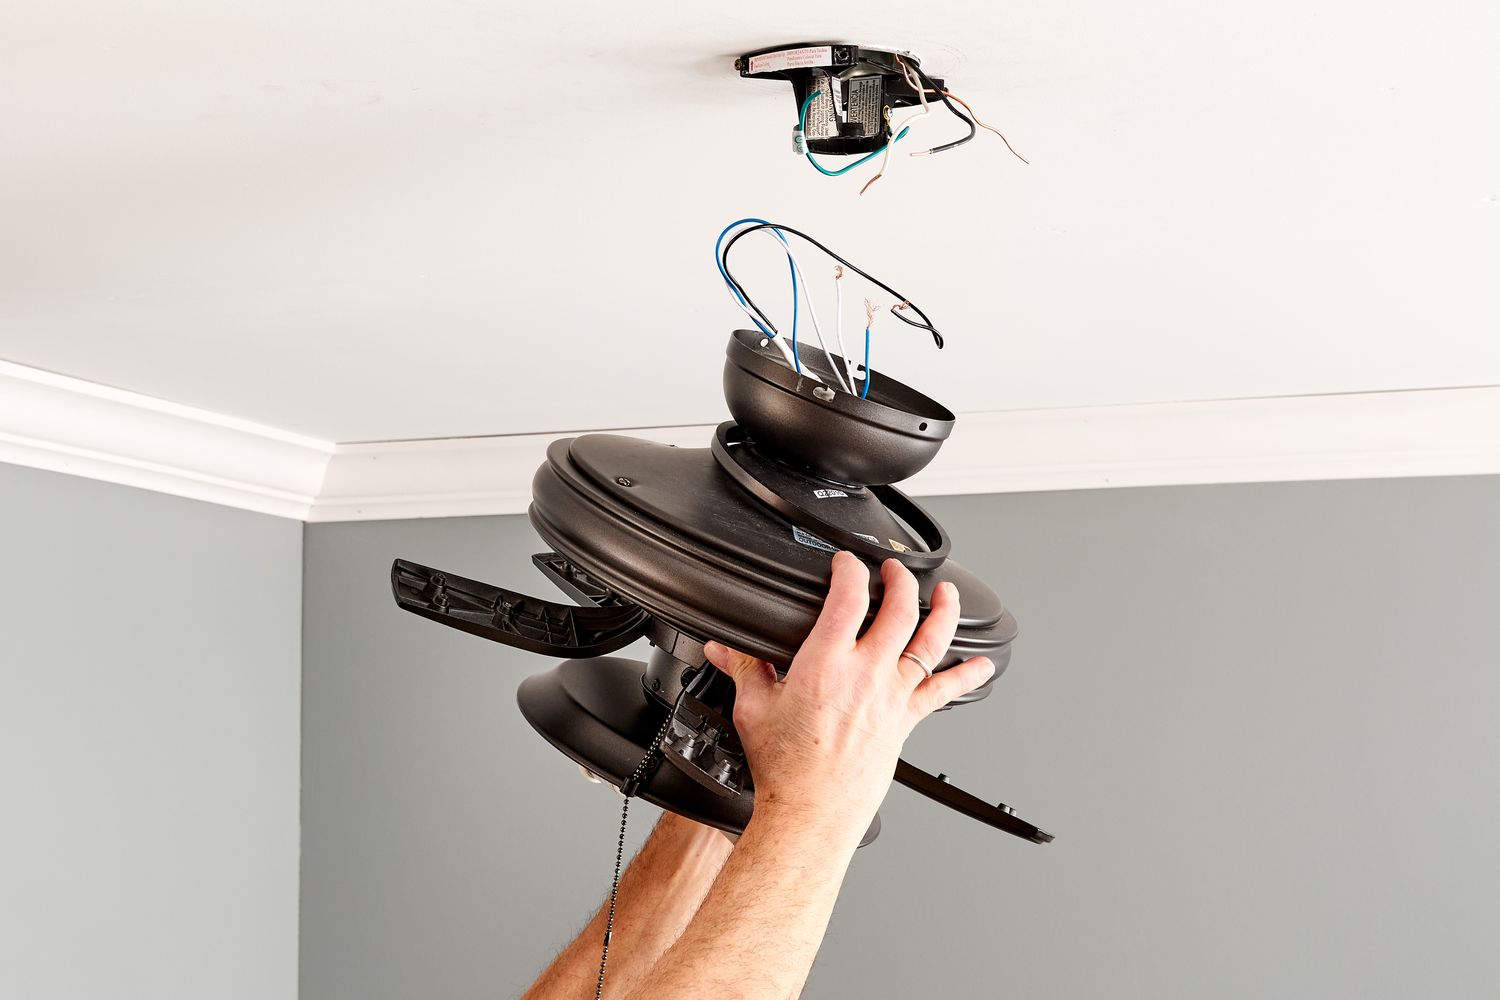
Removing the Old Ceiling Fan Capacitor
With the power supply turned off, you can now proceed with removing the old ceiling fan capacitor. Follow these steps:
- Locate the capacitor. In most ceiling fans, the capacitor is located in the fan’s canopy, which is the housing that covers the electrical connections.
- Remove the screws or clips that secure the canopy to the fan. Use a screwdriver or the appropriate tool to loosen and remove these fasteners.
- Gently lower the canopy to expose the internal wiring and components.
- Take note of the wiring connections to the old capacitor. Use a pen and paper to label the wires or take a clear photo for reference during reinstallation.
- Using needle-nose pliers, disconnect the wires from the old capacitor. Take care not to damage the wires or other components in the process.
- Once the wires are disconnected, remove the old capacitor from its mounting location. It may be held in place by clips or screws.
- Inspect the old capacitor for any signs of damage or leakage. If the capacitor appears swollen, has a foul odor, or has any visible signs of damage, it is likely to be faulty and in need of replacement.
Now that the old capacitor has been removed, you can move on to the next step, which involves identifying the correct replacement capacitor for your ceiling fan.
Identifying the Correct Replacement Capacitor
Once you have removed the old ceiling fan capacitor, it’s important to identify the correct replacement capacitor before making a purchase. The replacement capacitor should match the specifications of your old capacitor to ensure proper functioning of the fan. Here’s how you can identify the correct replacement:
- Examine the old capacitor. Look for any markings or labels on the capacitor indicating its voltage rating, capacitance value, and any other specifications.
- Check the fan’s manual. If you have the manual for your ceiling fan, it may provide information on the recommended capacitor specs. Look for a section detailing the electrical components or troubleshooting guide.
- If you cannot find the information from the above steps, take a clear photo of the old capacitor and bring it to a local hardware store or an electrical supply shop. The staff there should be able to assist you in finding a suitable replacement.
When purchasing a new capacitor, make sure it matches the voltage rating and capacitance value of the old one. The voltage rating is typically indicated in volts (V), while the capacitance value is measured in microfarads (μF).
It’s worth noting that some ceiling fans may have multiple capacitors, especially if they have multiple speeds or reverse functionality. Take note of the number of capacitors and their respective specifications when identifying the replacement.
Once you have determined the correct replacement capacitor, you can move on to the next step, which involves installing the new capacitor in your ceiling fan.
When replacing a ceiling fan capacitor, always make sure to turn off the power at the circuit breaker before starting any work to avoid the risk of electrical shock.
Read more: How To Test A Fan Capacitor
Installing the New Ceiling Fan Capacitor
Now that you have identified the correct replacement capacitor, it’s time to install it in your ceiling fan. Follow these steps:
- Ensure the power supply to the ceiling fan is still turned off to prevent any electrical accidents.
- Take the new capacitor and compare it with the old one to ensure they have the same voltage rating and capacitance value.
- Position the new capacitor in the same mounting location as the old one. Secure it using clips or screws, making sure it is stable and well-positioned.
- Refer to your notes or photo from earlier to reconnect the wires to the new capacitor. Make sure to connect each wire to the corresponding terminal on the capacitor.
- Use needle-nose pliers to firmly secure the wire connections. Ensure that the wires are properly inserted and tightly secured to prevent any loose connections.
- Double-check the wiring connections to ensure they are secure and properly attached. Any loose or incorrect connections can result in the fan not functioning correctly.
- After confirming the connections are secure, use electrical tape to wrap each wire connection. This provides added insulation and helps to keep the wires in place.
- Once the wiring is complete, carefully place the fan canopy back into position. Fasten the screws or clips to securely attach the canopy to the fan housing.
- Finally, turn the power supply back on and test the ceiling fan. Use the fan’s wall switch or pull chain to ensure it is running smoothly and at the correct speed.
If the fan is operating correctly, you have successfully installed the new ceiling fan capacitor. However, if you notice any issues such as unusual noises, inconsistent speeds, or the fan not working at all, you may need to troubleshoot further.
Speaking of troubleshooting, let’s discuss some common issues that may arise after installing a new capacitor and how to address them.
Testing the New Capacitor
After installing the new ceiling fan capacitor, it’s important to test its functionality to ensure that everything is working properly. Here are a few steps to help you test the new capacitor:
- Turn on the power supply to the ceiling fan.
- Use the fan’s wall switch or pull chain to activate the fan at the lowest speed.
- Observe the fan’s speed and rotation. Ensure that it is spinning smoothly and operating at the desired speed.
- Next, switch the fan to its highest speed setting and once again observe the fan’s performance. Ensure that it spins faster without any noise or wobbling.
- If your ceiling fan has a reverse function, test it by toggling the reverse switch and verifying that the fan reverses its rotation without any issues.
- Pay attention to any unusual noises or vibrations during the testing process. Such signs may indicate that there are still problems with the capacitor or other components.
- If the fan operates smoothly, without any issues or abnormalities, it means the new capacitor is functioning properly.
If you encounter any problems during testing, such as the fan not operating at all, inconsistent speeds, or unusual noises, it may indicate a faulty capacitor or other issues. In such cases, you may need to troubleshoot further or seek professional assistance to identify and resolve the problem.
By testing the new capacitor, you can ensure that your ceiling fan operates efficiently and effectively, providing you with the comfort and air circulation you need.
Now that you have successfully tested the new capacitor, let’s address some common issues that may arise and how to troubleshoot them.
Troubleshooting Common Issues
While replacing a ceiling fan capacitor is generally a straightforward process, there may be instances where you encounter issues after installation. Here are some common problems that may arise and troubleshooting steps to help you resolve them:
- Fan not working: If the fan does not turn on at all, double-check the wiring connections to ensure they are properly seated and secured. Verify that the capacitor is the correct replacement for your fan and that it has been installed correctly. Additionally, check the power supply to ensure it is turned on and functioning. If the issue persists, you may need to consult a professional electrician.
- Inconsistent speeds: If the fan operates at inconsistent speeds or does not reach the desired speed, check the wiring connections once again, ensuring they are properly connected. Verify that the capacitor’s voltage rating and capacitance value match the specifications of your fan. In some cases, the issue may be with the fan’s motor or other components, requiring professional assistance.
- Unusual noises: If the fan is making unusual noises, it may be an indication of a loose component or an issue with the fan’s bearings. Check for any loose screws or connections and tighten them if necessary. Lubricate the fan’s bearings if applicable, following the manufacturer’s instructions. If the noises persist, it is advisable to contact a professional for further inspection and repair.
- Fan wobbling: A wobbling fan can be caused by an imbalance in the blades or an issue with the fan’s mounting. Ensure that all blades are properly aligned and secured. Use a balancing kit to correct any imbalances. If the issue persists, it may be necessary to adjust the fan’s mounting bracket or consult a professional for assistance.
- Sparks or burning smell: If you notice sparks or a burning smell coming from the fan, turn off the power supply immediately and disconnect the fan. These signs may indicate a serious electrical problem. Consult a professional electrician to inspect and resolve the issue to ensure your safety.
Remember, if you are unsure about any troubleshooting steps or encounter complex issues, it is best to seek the assistance of a qualified electrician to avoid any potential hazards.
By addressing common issues and troubleshooting them effectively, you can ensure that your ceiling fan operates smoothly and efficiently, providing you with the comfort and functionality you desire.
Now that you are familiar with troubleshooting techniques, let’s conclude our guide on replacing a ceiling fan capacitor.
Conclusion
Replacing a ceiling fan capacitor is a manageable task that can help restore the functionality and performance of your ceiling fan. By following the step-by-step process outlined in this guide, you can successfully replace a faulty capacitor and ensure that your fan operates smoothly and efficiently.
We started by discussing the tools and materials you will need for the job, emphasizing the importance of safety gear and the right equipment. We then went on to explain the importance of turning off the power supply before proceeding with any work on the fan.
Next, we guided you through the process of removing the old capacitor and identifying the correct replacement. We emphasized the significance of matching the voltage rating and capacitance value of the old capacitor to ensure compatibility.
After that, we explained how to install the new capacitor, focusing on the proper wiring connections and securing the capacitor in its mounting location. We reminded you to test the fan after installation to ensure it is functioning correctly.
Lastly, we addressed common issues that may arise during the replacement process and provided troubleshooting steps to help you resolve them. We emphasized the importance of safety and knowing when to seek professional assistance for complex issues.
By following these steps and troubleshooting techniques, you can effectively replace a ceiling fan capacitor and enjoy the benefits of a fully functional fan.
Remember, if you are unsure or feel uncomfortable working with electrical components, it is always best to consult a professional electrician who can safely perform the replacement for you.
Now, armed with the knowledge and confidence to replace a ceiling fan capacitor, you can tackle this home maintenance task with ease and keep your ceiling fan running smoothly for years to come.
Frequently Asked Questions about How To Replace A Ceiling Fan Capacitor
Was this page helpful?
At Storables.com, we guarantee accurate and reliable information. Our content, validated by Expert Board Contributors, is crafted following stringent Editorial Policies. We're committed to providing you with well-researched, expert-backed insights for all your informational needs.


0 thoughts on “How To Replace A Ceiling Fan Capacitor”