Articles
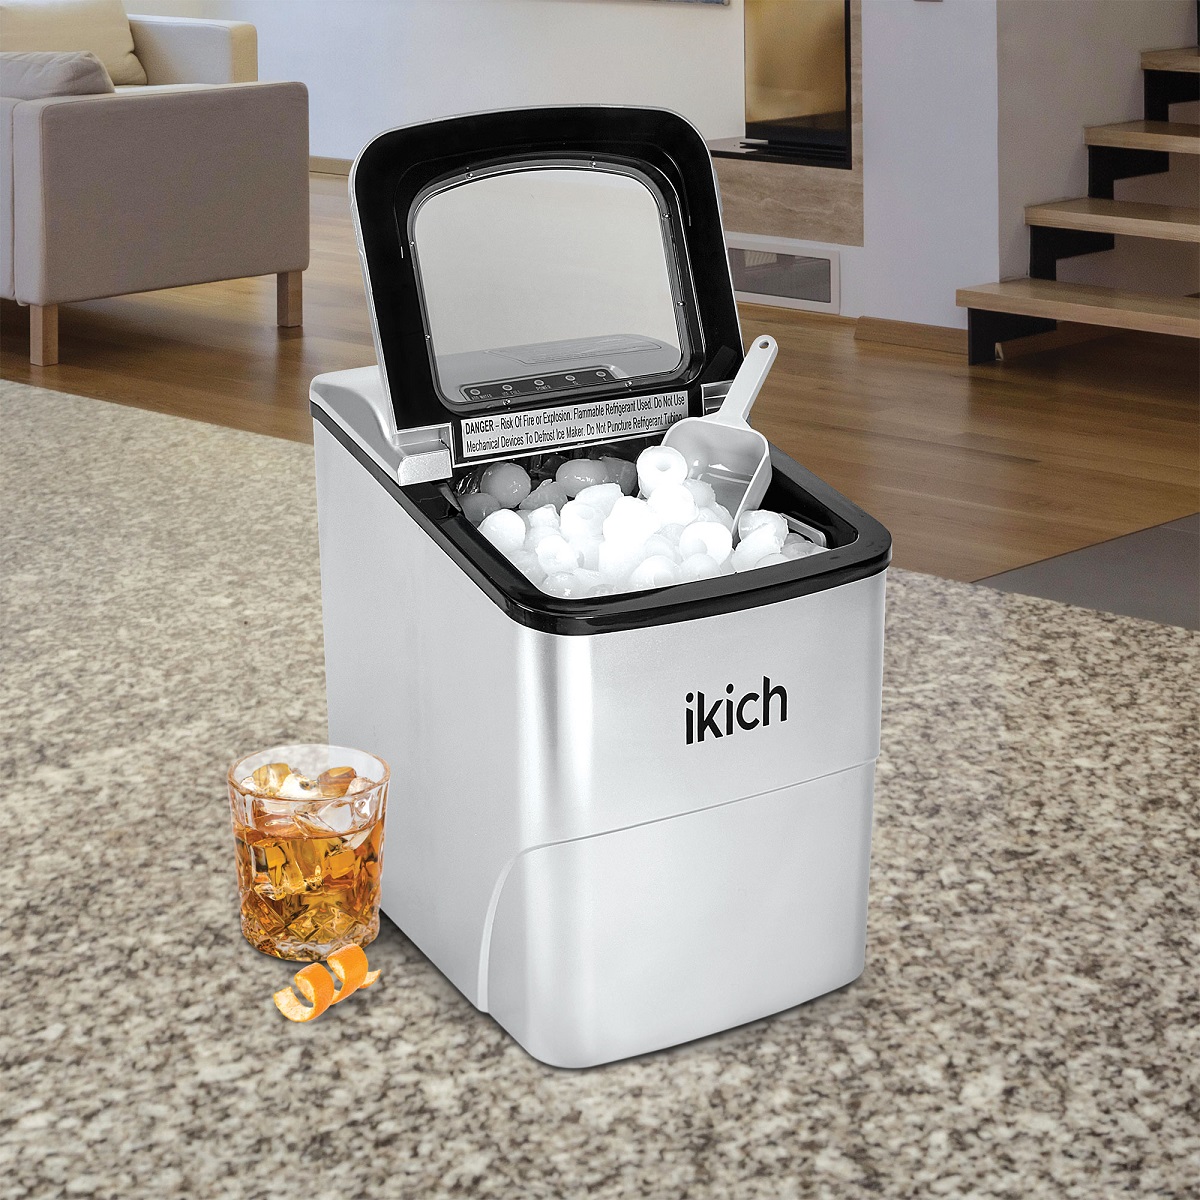
How To Clean An Ikich Ice Maker
Modified: October 27, 2024
Learn effective and easy ways to clean your Ikich ice maker with step-by-step instructions and helpful tips. Get your ice maker sparkling clean with these informative articles.
(Many of the links in this article redirect to a specific reviewed product. Your purchase of these products through affiliate links helps to generate commission for Storables.com, at no extra cost. Learn more)
Introduction
Keeping your Ikich ice maker clean is essential to ensure your ice cubes are fresh and free from any contaminants. Over time, mineral deposits, mold, and bacteria can accumulate inside the ice maker, affecting the taste and quality of the ice it produces. Regularly cleaning your ice maker will not only improve the ice quality but also extend the lifespan of the appliance.
Cleaning an Ikich ice maker may seem like a daunting task, but with the right materials and step-by-step instructions, it can be a straightforward process. This article will guide you through the proper cleaning techniques to maintain your ice maker’s hygiene and efficiency.
Key Takeaways:
- Regularly cleaning your Ikich ice maker with mild dish soap, vinegar, and warm water ensures fresh, hygienic ice cubes and prolongs the appliance’s lifespan. Prioritize safety, follow manufacturer’s instructions, and enjoy clean, refreshing ice!
- By following the step-by-step guide, you can effectively clean and maintain your Ikich ice maker, ensuring optimal performance and a constant supply of high-quality ice cubes for your beverages. Invest the time and effort in regular cleaning to enjoy a hygienic and refreshing experience.
Read more: How To Clean A Igloo Ice Maker
Safety Precautions
Before you start cleaning your Ikich ice maker, it’s important to take certain safety precautions to protect yourself and the appliance. Here are some key safety measures to keep in mind:
- Unplug the ice maker: Always unplug the ice maker from the power source before you begin the cleaning process. This will prevent any electrical accidents or damage to the appliance.
- Avoid contact with water: To avoid the risk of electric shock, ensure that the ice maker is completely dry before starting the cleaning process. Take extra care if using water or liquids during the cleaning process.
- Use protective gear: When handling cleaning agents or chemicals, make sure to wear gloves. This will protect your hands from any potential irritation or harm.
- Read the manufacturer’s instructions: Before cleaning the ice maker, refer to the instruction manual provided by the manufacturer. Familiarize yourself with any specific cleaning recommendations or warnings for your model.
By following these safety precautions, you can ensure a safe and effective cleaning process for your Ikich ice maker. Now that we have established the necessary precautions, let’s move on to the materials and supplies you’ll need for the cleaning process.
Cleaning Materials and Supplies
To effectively clean your Ikich ice maker, gather the following materials and supplies before getting started:
- Mild dish soap: Use a gentle dish soap that is free from harsh chemicals or fragrances. This will help to remove any residue or buildup from the ice maker.
- Vinegar: Vinegar is a natural disinfectant that can help kill bacteria and remove mineral deposits. It is a great alternative to harsh chemical cleaners.
- Soft cloth or sponge: Use a soft cloth or sponge to clean the exterior and interior of the ice maker. Avoid using abrasive materials that could scratch the surface.
- Toothbrush or small brush: A toothbrush or small brush will come in handy for cleaning hard-to-reach areas and removing any debris from the ice maker components.
- Warm water: Use warm water for rinsing and diluting cleaning solutions. Avoid using hot water, as it can damage the ice maker’s components.
- Bucket or sink: You will need a bucket or sink to fill with warm water and cleaning solution for soaking the ice maker components.
- Soft, lint-free towel: Use a soft, lint-free towel to dry the ice maker thoroughly after cleaning. This will prevent water spots and promote faster drying.
Once you have gathered all the necessary materials and supplies, you are ready to begin the cleaning process. Make sure to read and follow the manufacturer’s instructions provided in the ice maker’s manual while cleaning.
Step 1: Unplug the Ice Maker
Before you start cleaning your Ikich ice maker, it’s crucial to unplug it from the power source. This ensures your safety and prevents any electrical mishaps while handling the appliance.
Locate the power cord at the back or side of the ice maker and gently unplug it from the electrical outlet. Make sure the ice maker is completely disconnected from any power source before proceeding to the next steps.
By unplugging the ice maker, you minimize the risk of electric shock or damage to the appliance during the cleaning process. Safety should always be a top priority, so take this necessary precaution before moving forward.
Once you have unplugged the ice maker, you can proceed to the next step of emptying the ice storage basket.
Step 2: Empty the Ice Storage Basket
To begin the cleaning process, empty the ice storage basket of your Ikich ice maker. This step ensures that you have a clear and accessible area to clean the interior components of the appliance.
Gently slide out the ice storage basket from the ice maker. If the ice has melted and formed into a solid block, allow it to thaw slightly or use a plastic utensil to break it apart. Dispose of the ice in a sink or bucket.
Once the ice storage basket is empty, inspect it for any residue or debris. If you notice any buildup, rinse the basket with warm water and wipe it clean with a soft cloth or sponge. Ensure that the basket is completely dry before reinserting it into the ice maker.
Emptying the ice storage basket is an important step in the cleaning process as it allows you to remove any old or stagnant ice, ensuring that your ice maker produces fresh and clean ice cubes.
With the ice storage basket emptied and cleaned, you are now ready to move on to the next step of removing the ice maker components for a more thorough cleaning.
Read more: How To Clean Out An Ice Maker
Step 3: Remove the Ice Maker Components
To effectively clean your Ikich ice maker, you will need to remove the ice maker components. This step allows you to access and clean all areas of the appliance thoroughly.
Start by locating the removable parts of your ice maker. Common components that can be taken out for cleaning include the ice tray, water reservoir, and any other removable panels or trays.
Carefully remove the ice tray by gently pulling it out from the ice maker. If other components are removable, detach them as well following the manufacturer’s instructions. Pay attention to any clips, screws, or latches that may be holding the components in place.
Once the ice maker components are removed, place them in a bucket or sink filled with warm water and a small amount of mild dish soap or vinegar. Allow them to soak for a few minutes, helping to loosen any residue or mineral deposits.
While the components are soaking, use a toothbrush or small brush to scrub any hard-to-reach areas, such as the corners and crevices of the ice maker. This will help to dislodge any stubborn buildup or debris.
After the components have soaked for a sufficient amount of time, take them out of the soapy water and rinse them thoroughly under running water. Make sure to remove all traces of soap or vinegar.
Set the cleaned components aside on a clean towel to air dry. Avoid using a cloth to dry them, as it may leave lint behind. Allow them to dry completely before moving on to the next step.
By removing the ice maker components, you can ensure a more thorough cleaning and prevent any buildup or residue from affecting the performance of your ice maker. Once the components are clean and dry, you can proceed to the next steps of cleaning the exterior and interior of the ice maker.
Step 4: Clean the Exterior of the Ice Maker
Now that you have removed the ice maker components, it’s time to clean the exterior of your Ikich ice maker. This step will help remove any dirt, fingerprints, or stains that may have accumulated on the surface of the appliance.
Start by dampening a soft cloth or sponge with warm water. Gently wipe down the exterior of the ice maker, including the sides, top, and front panel. Be careful not to get any water near the electrical components or controls.
If you notice stubborn stains or residue, dip the cloth or sponge in a mixture of mild dish soap and warm water. Wring out any excess liquid to avoid dripping, and gently scrub the affected areas. Avoid using abrasive cleaners or scrub brushes that could scratch the surface of the ice maker.
Once you have cleaned the exterior, rinse the cloth or sponge under running water and wipe down the ice maker again to remove any soapy residue. Dry the exterior thoroughly with a soft, lint-free towel to prevent water spots or streaks.
Pay special attention to the control panel and buttons. Use a slightly damp cloth to wipe away any dirt or grime. Dry thoroughly to prevent moisture from damaging the electrical components.
Cleaning the exterior of your ice maker not only improves its appearance but also helps to maintain its overall cleanliness and hygiene. Once the exterior is clean and dry, you can move on to cleaning the interior of the ice maker in the next step.
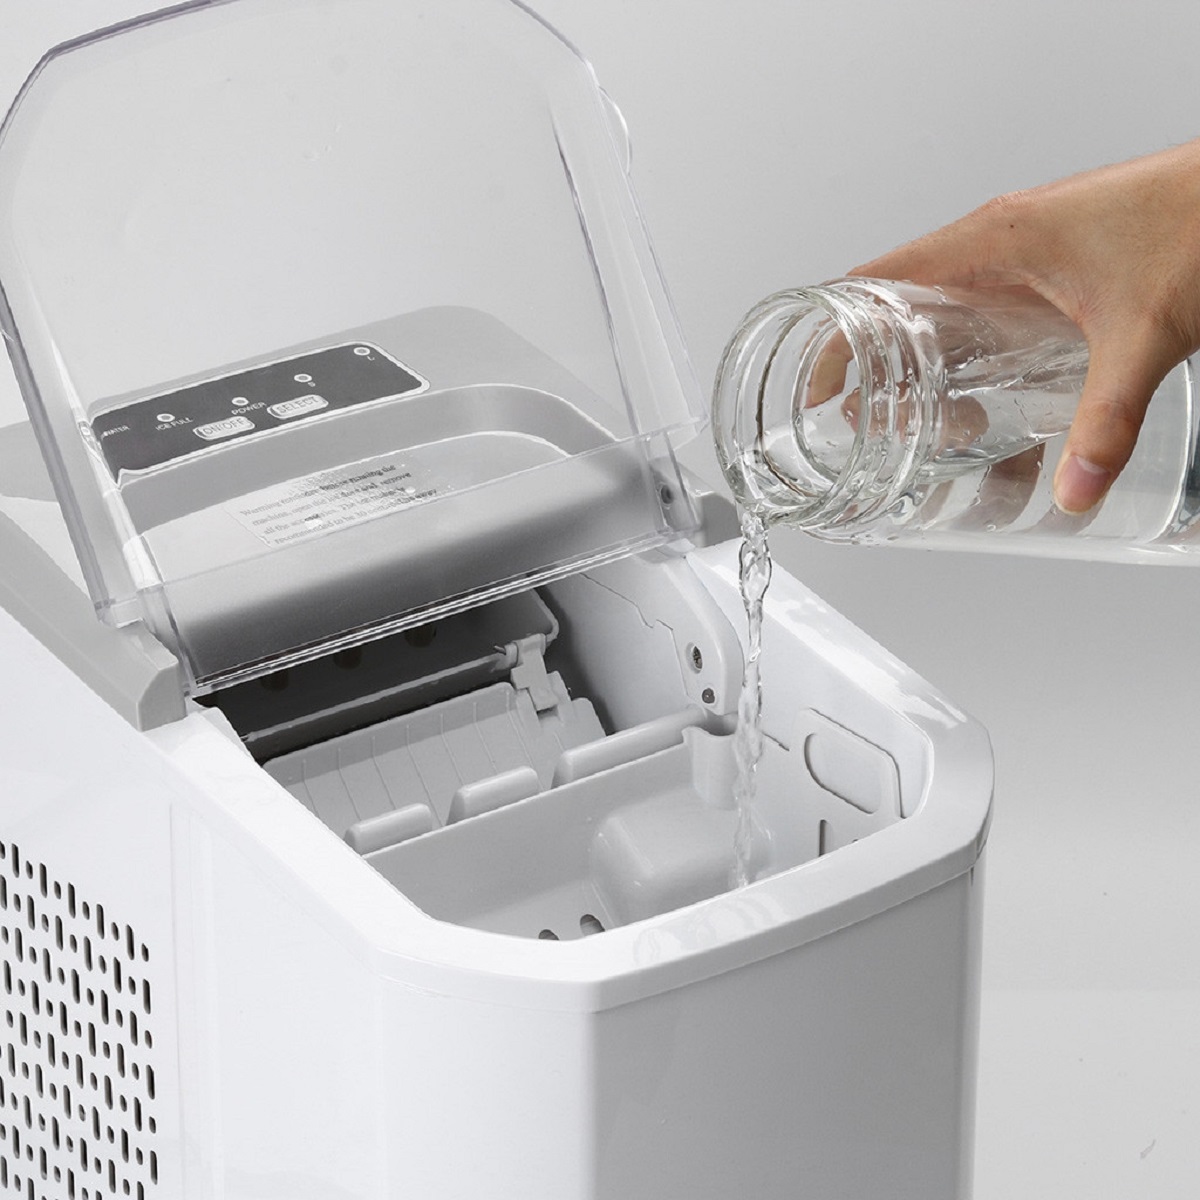
To clean an IKICH ice maker, mix equal parts of water and white vinegar and pour it into the water reservoir. Run a cleaning cycle and then rinse with clean water before making ice again.
Step 5: Clean the Interior of the Ice Maker
Now that you have cleaned the exterior of your Ikich ice maker, it’s time to focus on the interior. This step is crucial to remove any buildup or residue that may affect the quality and taste of the ice it produces.
Start by preparing a solution of warm water and mild dish soap or vinegar. Dip a soft cloth or sponge into the solution and wring out any excess liquid. Gently wipe down the interior walls, shelves, and any other accessible surfaces of the ice maker.
Pay close attention to any areas with visible stains, mold, or mineral deposits. Use the cloth or sponge to scrub gently in circular motions to remove the buildup. Take care not to use excessive force that may damage the interior of the ice maker.
For hard-to-reach areas, such as corners or crevices, use a toothbrush or small brush to scrub away any stubborn residue. Be thorough in your cleaning, ensuring all surfaces are clean and free from any visible contaminants.
Once you have finished cleaning the interior, rinse the cloth or sponge under running water and go over the surfaces again to remove any soap or vinegar residue. Make sure to wipe away any excess moisture to prevent standing water or dripping.
To ensure thorough drying, leave the ice maker open and allow it to air dry completely. This will help prevent the growth of mold or mildew inside the appliance. Avoid using a cloth to dry the interior, as it may leave behind lint or moisture.
By cleaning the interior of your ice maker, you are ensuring that it remains clean and free from any contaminants that might affect the quality of the ice. Once the interior is dry, you can proceed to the next step of cleaning the ice storage basket.
Step 6: Clean the Ice Storage Basket
To maintain the cleanliness of your Ikich ice maker, it’s essential to clean the ice storage basket. This step ensures that the basket remains free from any residue, mold, or bacteria, providing a safe and hygienic environment for your ice cubes.
Start by removing the ice storage basket from the ice maker, as you did in the earlier steps. If there is any remaining ice, empty it into a sink or bucket.
Fill a sink or bucket with warm water and add a small amount of mild dish soap or vinegar. Submerge the ice storage basket in the soapy water and allow it to soak for a few minutes. This will help to loosen any residue or buildup that may be present.
Using a soft cloth or sponge, gently scrub the inside and outside of the ice storage basket, paying particular attention to any areas with visible stains or debris. You can also use a toothbrush or small brush to reach into hard-to-reach corners or crevices.
Rinse the ice storage basket thoroughly under running water to remove any soap or vinegar residue. Ensure that all surfaces are clean and free from any traces of cleaning agents.
Once the basket is clean, place it on a clean towel to air dry. Allow it to dry completely before reinserting it back into the ice maker. Avoid using a cloth to dry the basket, as it may leave behind lint or moisture.
Cleaning the ice storage basket regularly ensures that it remains free from any contaminants, maintaining the quality and safety of the ice cubes produced by your Ikich ice maker.
With the ice storage basket clean and dry, you are now ready to move on to the next step of cleaning the ice maker components.
Read more: How To Clean A Silonn Ice Maker
Step 7: Clean the Ice Maker Components
Once the ice maker components have dried completely, it’s time to clean them to ensure they are free from any residue or buildup. This step is crucial for maintaining the efficiency and performance of your Ikich ice maker.
Start by inspecting each component individually. Use a soft cloth or sponge dampened with warm water and mild dish soap or vinegar to wipe down the surfaces of the components. Gently scrub any areas with visible stains or dirt.
For hard-to-reach areas, such as the corners or crevices of the ice tray or water reservoir, use a toothbrush or small brush to scrub gently. Ensure that all surfaces are thoroughly cleaned and free from any contaminants.
Rinse the components under running water to remove any soap or vinegar residue. Ensure that all cleaning agents are completely removed.
Place the cleaned components on a clean towel and allow them to air dry completely. Avoid using a cloth to dry them, as it may leave lint behind. Make sure the components are completely dry before proceeding to the next step.
While the components are drying, take the time to inspect the ice maker’s interior again. Wipe down any visible residue or debris with a soft cloth or sponge dampened with warm water and mild dish soap or vinegar. Ensure that all surfaces are clean and free from any contaminants.
Once the components and interior of the ice maker are clean and dry, you can move on to the next step of reassembling the ice maker.
Step 8: Reassemble the Ice Maker
Now that all the components of your Ikich ice maker are clean and dry, it’s time to reassemble the appliance. Proper reassembly ensures that the ice maker functions correctly and maintains its efficiency.
Start by carefully reinserting the ice tray back into the ice maker. Make sure it fits securely and is aligned properly. If there are any additional removable components, such as water reservoirs or trays, reattach them according to the manufacturer’s instructions.
Ensure that all clips, screws, or latches are fastened securely to hold each component in place. Double-check that everything is properly aligned and positioned before proceeding.
Take a moment to inspect the exterior of the ice maker, including the control panel and buttons. Wipe down any remaining residue or water spots using a soft cloth or sponge dampened with warm water. Dry the exterior thoroughly to prevent any moisture from affecting the electrical components.
Once the ice maker is reassembled and the exterior is clean, you’re almost done. The next step is to plug in the ice maker and test its functionality.
Note: It’s essential to refer to the manufacturer’s instructions for any specific reassembly guidelines or precautions. Each ice maker model may have unique requirements, so make sure you follow the provided instructions accordingly.
After reassembling the ice maker, you’re ready to proceed to the final step of plugging it in and testing its performance.
Step 9: Plug in and Test the Ice Maker
After reassembling your Ikich ice maker, it’s time to plug it back in and test its functionality. This final step ensures that the appliance is working properly and that your cleaning efforts have been successful.
Locate the power cord of the ice maker and plug it securely into a grounded electrical outlet. Make sure the outlet is in good condition and can support the power requirements of the ice maker.
Once the ice maker is plugged in, turn it on and allow it to go through its startup process. This may involve filling the water reservoir and initiating the ice-making cycle. Refer to the manufacturer’s instructions for specific details on operating your particular model.
Monitor the ice maker as it produces ice cubes. Ensure that the ice cubes are clear, odor-free, and free from any unusual flavors. Take note of the ice maker’s performance, such as the speed of ice production and the size and consistency of the ice cubes.
If you notice any issues with the ice maker’s performance or the quality of the ice cubes, refer to the troubleshooting section of the manufacturer’s instructions. It may provide solutions for common problems that can be easily resolved.
Congratulations! You have successfully cleaned and reassembled your Ikich ice maker. By regularly cleaning and maintaining your ice maker, you can ensure the production of fresh, clean ice cubes for your enjoyment.
Remember to repeat the cleaning process on a regular basis, depending on the usage and manufacturer’s recommendations, to keep your ice maker functioning optimally.
With your ice maker now in good working order, you can enjoy a constant supply of refreshing ice cubes for your beverages or any other needs.
Thank you for following this step-by-step guide. Cheers to clean and delicious ice!
Conclusion
Keeping your Ikich ice maker clean is essential for maintaining the quality and taste of the ice it produces. Regular cleaning not only ensures hygienic ice cubes but also prolongs the lifespan of the appliance. By following the step-by-step instructions provided in this guide, you can effectively clean and maintain your ice maker.
Throughout the cleaning process, it’s important to prioritize safety by unplugging the ice maker and following the manufacturer’s instructions. Use the recommended cleaning materials and supplies, such as mild dish soap, vinegar, soft cloths, and brushes, to ensure a thorough and gentle clean.
By properly cleaning the exterior, interior, ice storage basket, and components of your ice maker, you can remove residue, mold, and bacteria that may affect the quality of the ice cubes. Taking the time to reassemble the ice maker correctly and testing its performance ensures that it functions optimally after cleaning.
Remember to follow the manufacturer’s recommendations for regular cleaning intervals, as keeping your ice maker clean is an ongoing process. By establishing a routine and keeping up with maintenance, you can enjoy fresh, clean ice cubes that enhance your beverages and provide a refreshing experience.
Maintaining a clean and functioning ice maker not only enhances the taste of your drinks but also contributes to a hygienic environment in your kitchen. So, invest the time and effort in regularly cleaning your Ikich ice maker and enjoy an endless supply of high-quality ice cubes for your daily needs.
Thank you for following this comprehensive guide on how to clean an Ikich ice maker. Cheers to clean and refreshing ice!
Frequently Asked Questions about How To Clean An Ikich Ice Maker
Was this page helpful?
At Storables.com, we guarantee accurate and reliable information. Our content, validated by Expert Board Contributors, is crafted following stringent Editorial Policies. We're committed to providing you with well-researched, expert-backed insights for all your informational needs.
0 thoughts on “How To Clean An Ikich Ice Maker”