Articles
How To Cut Electrical Wire When Live
Modified: October 28, 2024
Learn how to safely cut electrical wire while it is still live with our informative articles. Gain the knowledge you need for a successful electrical project.
(Many of the links in this article redirect to a specific reviewed product. Your purchase of these products through affiliate links helps to generate commission for Storables.com, at no extra cost. Learn more)
Introduction
When it comes to working with electrical wires, safety should always be the number one priority. However, there may be situations where you need to cut electrical wires that are live or energized. While it is generally recommended to work with de-energized wires to minimize the risk of electrical shock, there are certain techniques and precautions you can follow to safely cut live electrical wires.
Cutting live electrical wires should only be done by experienced professionals or individuals with sufficient knowledge and understanding of electrical systems. If you are uncertain or do not have the necessary expertise, it is always wise to consult a licensed electrician or professional to handle the task.
In this article, we will discuss the importance of safety when working with live electrical wires and provide a step-by-step guide on how to cut them safely. We will also highlight the necessary precautions, tools, and materials needed for the job.
Remember, safety should never be compromised when working with electricity. Always exercise caution and follow proper procedures to avoid accidents or injuries.
Key Takeaways:
- Prioritize safety above all else when cutting live electrical wires. Always turn off the power if possible, use insulated tools, and double-check for safety to minimize the risk of accidents and ensure personal well-being.
- Properly identify, cut, and reconnect or isolate live electrical wires with caution and precision. Follow safety protocols, use the right tools, and double-check for safety to maintain the integrity of the electrical system.
Read more: How To Check If Electrical Wire Is Live
Importance of Safety
When it comes to working with live electrical wires, safety is of utmost importance. Handling electricity can be dangerous, and the consequences of not prioritizing safety can be severe, including electrical shock, burns, or even fatal injuries. Here are some key reasons why safety is crucial when cutting live electrical wires:
- Personal Safety: The most critical aspect of safety when working with live electrical wires is to protect yourself from potential electrical shock. Electricity can be unpredictable, and even low voltage can cause harm or loss of control. By following proper safety procedures, you can minimize the risk of electrical accidents and ensure your well-being.
- Property Safety: Cutting electrical wires incorrectly or without adequate precautions can pose a significant risk to your property. Improperly cut wires can lead to electrical fires, damage to appliances or electrical systems, and disruption to power supply. By prioritizing safety, you can protect yourself, your property, and others who may be affected by electrical mishaps.
- Legal and Code Compliance: Working with electricity requires compliance with local safety regulations and codes. Failure to adhere to these guidelines can result in legal consequences and potential liability for any damages incurred. Following safety protocols ensures that you meet the necessary legal requirements and maintain a safe working environment.
- Professional Reputation: For electricians or professionals working in the electrical field, safety is paramount for maintaining a good professional reputation. Clients and customers trust professionals who prioritize safety and adhere to industry-standard practices. By maintaining a strong safety record, you enhance your reputation as a reliable and responsible expert in the field.
- Cultivating a Safety Culture: Emphasizing safety when working with live electrical wires helps foster a culture of safety in the workplace. By setting an example and promoting safe practices, you encourage others to prioritize safety and reduce the risk of accidents. This contributes to a safer working environment for everyone involved.
Remember, safety should never be taken lightly when working with live electrical wires. Always follow safety guidelines, use the appropriate protective equipment, and seek professional assistance if you are unsure about any aspect of the work involved.
Precautions
Working with live electrical wires requires extra precautions to minimize the risk of accidents and ensure your safety. Here are some important precautions to keep in mind before cutting live electrical wires:
- Turn off the Power: If possible, it is always best to turn off the power supply to the area where you will be working. Cutting live wires should be a last resort when de-energizing is not feasible. Make sure to switch off the circuit breaker or remove the corresponding fuse before proceeding.
- Work in a Dry Environment: Ensure that the work area is dry and free from any moisture. Moisture can increase the risk of electrical shock, so it is essential to create a safe and dry environment before starting the task.
- Inspect the Wires: Before cutting any electrical wire, carefully inspect it for any signs of damage, wear, or fraying. Damaged wires can be unpredictable and may require additional safety precautions or professional assistance.
- Use Insulated Tools: Always use insulated tools specifically designed for working with electricity. These tools have handles made from non-conductive materials that help prevent electrical shock. Avoid using metallic or conductive tools that can conduct electricity and increase the risk of accidents.
- Wear Protective Gear: Put on the appropriate personal protective equipment (PPE), including insulated gloves, safety glasses, and protective clothing. These items provide an additional layer of protection against electrical shock and potential hazards.
- Avoid Touching Bare Skin: Ensure that your skin does not come into direct contact with the live wires. Even a slight touch can be dangerous. Use tools and wear gloves to handle the wires and maintain a safe distance from the live parts.
- Minimize Exposure: When cutting live wires, try to minimize the length of exposed conductor. The shorter the exposed section, the lesser the risk of electrical shock or arcing.
- Double-Check for Power: Before cutting a wire, use a voltage tester or a multimeter to confirm that the wire is indeed live. This step helps ensure that you are working on the correct wire and avoid any potential confusion or accidents.
- Work Methodically: Take your time and work methodically. Rushing can lead to mistakes or negligence, increasing the risk of accidents. Be patient, focused, and follow the proper steps to ensure a safe and successful wire-cutting process.
Keep in mind that these precautions are not exhaustive, and the specific safety measures may vary depending on the situation and local regulations. It is always advisable to consult a professional or licensed electrician for guidance and assistance, especially if you are unsure or uncomfortable with any aspect of cutting live electrical wires.
Required Tools and Materials
Before attempting to cut live electrical wires, it is crucial to gather the necessary tools and materials to ensure a safe and efficient process. Here are the essential items you will need:
- Insulated Gloves: Insulated gloves provide protection against electrical shock. They are designed to prevent electricity from passing through and should be worn at all times when working with live wires.
- Safety Glasses: Safety glasses protect your eyes from any potential debris, sparks, or particles that may be generated while cutting the wires.
- Insulated Hand Tools: Invest in high-quality insulated hand tools such as wire cutters, wire strippers, and pliers. These tools have non-conductive handles and are specifically designed for working with electrical wiring.
- Voltage Tester or Multimeter: A voltage tester or multimeter is essential for confirming if a wire is live before you start cutting it. This device helps ensure your safety by detecting the presence of electrical voltage.
- Wire Nuts or Connectors: Wire nuts or connectors are used to reconnect wires after cutting them. They ensure a secure and reliable connection and help prevent any electrical hazards.
- Wire Labels or Markers: It is important to label or mark the wires before you cut them. This will assist you in identifying the wires correctly when it comes time to reconnect them.
- Electrical Tape: Electrical tape is used to insulate the exposed ends of wires after cutting them. It provides an extra layer of protection against electrical shock and helps secure the wires.
- Wire Strippers: Wire strippers are used to remove the insulation from the ends of the wires. They allow for a clean and precise cut without damaging the conductors.
- Wire Cutters: Wire cutters are essential for cutting the wires cleanly and safely. Choose a pair of wire cutters that are suitable for the diameter and type of wire you will be working with.
- Pliers: Pliers are useful for gripping and holding wires securely. They provide additional control and stability during the cutting process.
Before you begin, ensure that all tools are in good working condition and properly insulated. Inspect the handles for any damage or wear, and avoid using tools with exposed metal or compromised insulation. Additionally, make sure that the materials, such as wire nuts and electrical tape, are of good quality to ensure a secure and reliable connection.
By having all the necessary tools and materials prepared in advance, you can approach the task of cutting live electrical wires with confidence and safety in mind.
Step 1: Turn Off Power
Before you begin cutting live electrical wires, the first and most important step is to turn off the power. While cutting live wires should be approached with caution and only done when necessary, it is always recommended to work with de-energized wires whenever possible. Here’s how to turn off the power:
- Locate the Circuit Breaker: Identify the circuit breaker or fuse box associated with the area where you will be working. It is typically located in a basement, utility room, or main electrical panel.
- Understand Your Electrical System: Familiarize yourself with the layout of the circuit breaker panel and understand which circuit corresponds to the area you will be working in. Most circuit breakers are labeled to indicate the specific areas they control.
- Switch Off the Circuit Breaker: Once you have identified the correct circuit breaker, turn it off by flipping the switch to the “off” position. Alternatively, if you have a fuse box, you can remove the corresponding fuse for the specific circuit.
- Confirm Power Loss: After turning off the circuit breaker or removing the fuse, double-check to ensure that power has been successfully disconnected. You can use a non-contact voltage tester to verify that there is no electrical voltage present.
- Communicate the Power Shutoff: If you are working with others, inform them about the power shutoff to avoid any accidental energization while you are cutting the wires. It is crucial to ensure that everyone involved is aware of the power shutdown to prevent any mishaps.
By turning off the power at the circuit breaker or fuse box, you significantly reduce the risk of electrical shock and create a safer environment for working with electrical wires. However, there may be situations where it is not possible or practical to de-energize the wires. In such cases, take extra precautions and follow the remaining steps carefully to ensure your safety.
Note: If you are unsure about turning off the power or handling the circuit breaker, it is recommended to consult a professional electrician for assistance.
Read more: How To Fix A Cut Electrical Wire In A Wall
Step 2: Gather Essential Tools and Materials
Once you have ensured that the power is turned off, the next step is to gather the essential tools and materials needed for cutting live electrical wires. Having the right equipment on hand will help you perform the task safely and efficiently. Here’s what you will need:
- Insulated Gloves: Insulated gloves are necessary to protect yourself from potential electrical shock when handling live wires. Choose gloves that are specifically designed for electrical work and ensure they are in good condition without any visible damage.
- Safety Glasses: Safety glasses provide protection for your eyes from any debris or particles that may be produced while working with wires. They help prevent eye injuries and should be worn throughout the process.
- Insulated Hand Tools: Invest in high-quality insulated hand tools such as wire cutters, wire strippers, and pliers. These tools have non-conductive handles and are specifically designed for working with live electrical wires. The insulation ensures that the tools provide a barrier against electrical shock.
- Voltage Tester or Multimeter: A voltage tester or multimeter is necessary to confirm if a wire is live before cutting it. This tool allows you to detect the presence of electrical voltage, ensuring your safety. Use it to double-check and make sure the power is indeed turned off.
- Wire Nuts or Connectors: Wire nuts or connectors are used to reconnect the wires after cutting them. They provide a secure and reliable connection while ensuring electrical safety. Make sure to have an assortment of different sizes on hand to accommodate various wire diameters.
- Wire Labels or Markers: Labeling or marking the wires before cutting them is essential for identifying and organizing them correctly during the reconnection process. Use wire labels or markers to clearly indicate which wire is which, ensuring a smooth and accurate reinstallation.
- Electrical Tape: Electrical tape is used to insulate the exposed ends of wires after cutting them. It provides an additional layer of protection against electrical shock and helps secure the wires together. Choose quality electrical tape that is suitable for electrical applications.
- Wire Strippers: Wire strippers are necessary for removing the insulation from the ends of the wires. They allow for a clean and precise cut without damaging the conductors. Select a pair of wire strippers that are suitable for the wire gauge you will be working with.
- Wire Cutters: Wire cutters are essential for cutting the wires cleanly and safely. Look for a pair of wire cutters specifically designed for electrical work and choose a size that can accommodate the wire diameters you will encounter.
- Pliers: Pliers are useful for gripping and holding wires securely during the cutting process. They provide additional control and stability, especially when dealing with thicker or more stubborn wires.
Ensure that all tools are in good working condition and properly insulated. Inspect the handles for any damage or wear, and avoid using tools with exposed metal or compromised insulation. Additionally, make sure that the materials, such as wire nuts and electrical tape, are of good quality to ensure a secure and reliable connection.
By gathering the necessary tools and materials beforehand, you can proceed with the next steps confidently and safely when cutting live electrical wires.
Step 3: Put on Safety Gear
Before you begin working with live electrical wires, it is crucial to put on the appropriate safety gear. Safety gear helps protect you from potential hazards and minimizes the risk of injuries. Here’s what you need to do:
- Insulated Gloves: Insulated gloves are an essential component of safety gear when working with live electrical wires. They provide a barrier between your hands and the electrical current, protecting you from electrical shock. Put on a pair of properly fitting insulated gloves to ensure maximum safety.
- Safety Glasses: Safety glasses are designed to protect your eyes from any debris or particles that may be released during the wire cutting process. They help prevent eye injuries and should be worn throughout the entire procedure.
- Protective Clothing: Depending on the nature of the electrical work you’re doing, consider wearing protective clothing such as a long-sleeved shirt, long pants, and non-conductive footwear. These items help provide an additional layer of protection against potential hazards.
- Additional Protective Gear: In some situations, additional protective gear may be required. This may include a face shield, a hard hat, or a safety apron, depending on the specific circumstances and risks involved. Assess the work environment and follow any safety guidelines or regulations that apply.
- Inspect Safety Gear: Before putting on the safety gear, inspect each item to ensure it is in good condition. Check for any signs of damage or wear, such as tears, punctures, or weakened areas. If any safety gear is damaged, replace it with new, reliable equipment.
- Ensure Proper Fit: Safety gear should fit properly to provide optimal protection. Gloves should fit snugly and allow for dexterity, while safety glasses should sit comfortably on your face without obstructing your vision. Adjust and secure any straps or fasteners to ensure a proper fit.
- Communicate the Importance of Safety Gear: If you are working with others, make sure everyone understands the significance of wearing safety gear. Emphasize the importance of following safety protocols and encourage others to put on the necessary protective equipment to create a safer work environment for everyone involved.
Remember, safety gear is designed to minimize the risk of injuries, but it is not a substitute for proper precautions and awareness. Always exercise caution and follow the recommended safety procedures when working with live electrical wires.
By putting on the appropriate safety gear, you can reduce the chances of accidents and ensure that you are adequately protected throughout the wire-cutting process.
Always turn off the power before cutting electrical wire. If it’s not possible, use insulated tools and cut the wire carefully to avoid contact with the live conductor. Wear rubber gloves for added protection.
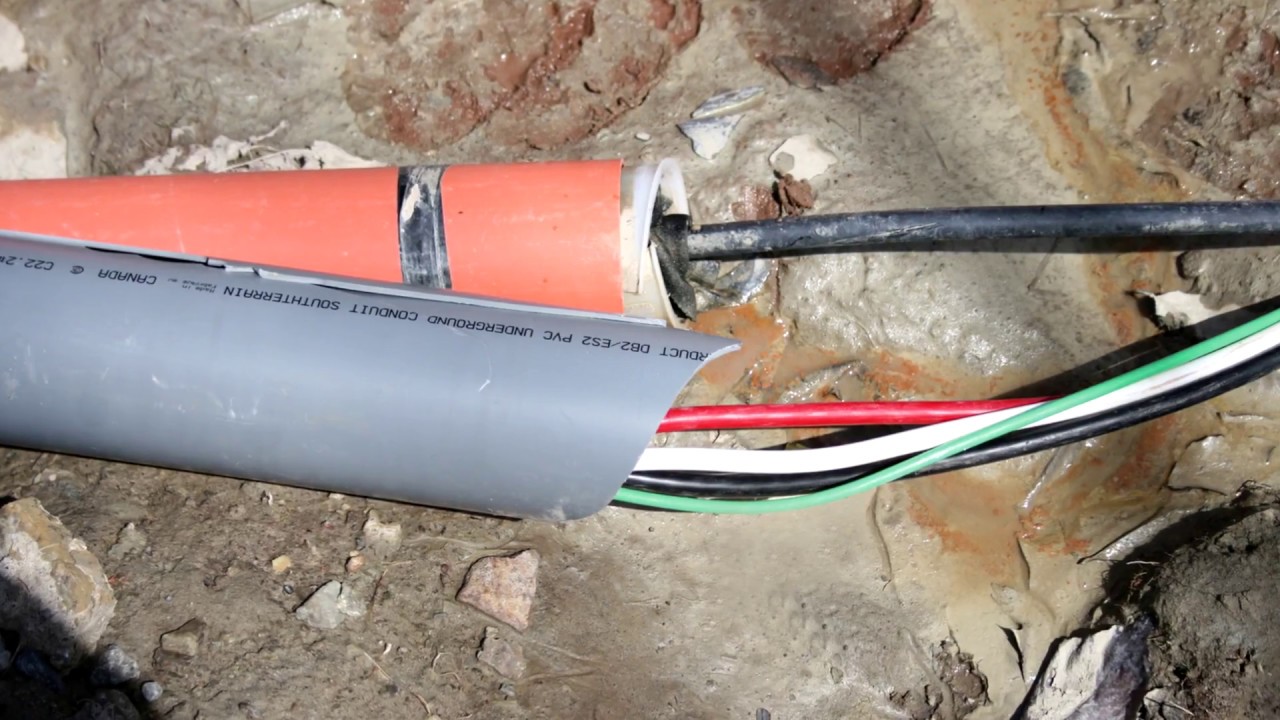
Step 4: Identify the Wire to be Cut
Before proceeding to cut the live electrical wire, it is essential to correctly identify the wire that needs to be cut. This step is crucial to ensure that you are working on the correct wire and avoid any potential mishaps. Here’s how to identify the wire to be cut:
- Review Electrical Plans or Diagrams: If you have access to electrical plans or diagrams of the system, refer to them to determine which wire you need to cut. These documents provide valuable information about the wiring layout and can help you identify the specific wire you are working with.
- Trace the Wire: If you don’t have access to electrical plans, you can physically trace the wire to identify it. Follow the wire path from the power source to the destination, taking note of any identifying markers or labels along the way.
- Use a Wire Tracer: In situations where it’s challenging to visually trace the wire, you can use a wire tracer or toner. A wire tracer emits a signal that can be detected with a receiver, allowing you to track the wire and identify the correct one.
- Label or Mark the Wire: Once you have identified the wire to be cut, it is essential to label or mark it to avoid any confusion later on. Use wire labels or markers to clearly indicate which wire you are working with. This will make it easier when it comes time to reconnect or isolate the wire.
- Double-Check Identification: Before proceeding to cut the wire, double-check your identification to ensure you have correctly identified the wire to be cut. Take a moment to review your notes, plans, and any other indicators to be certain that you are working on the right wire.
Properly identifying the wire that needs to be cut is crucial for maintaining the integrity of the electrical system and preventing potential accidents. Taking the time to confirm the correct wire before proceeding will help ensure a safe and successful wire-cutting process.
If you are unsure about identifying the wire or have any doubts, it is advisable to consult a professional electrician for guidance and assistance.
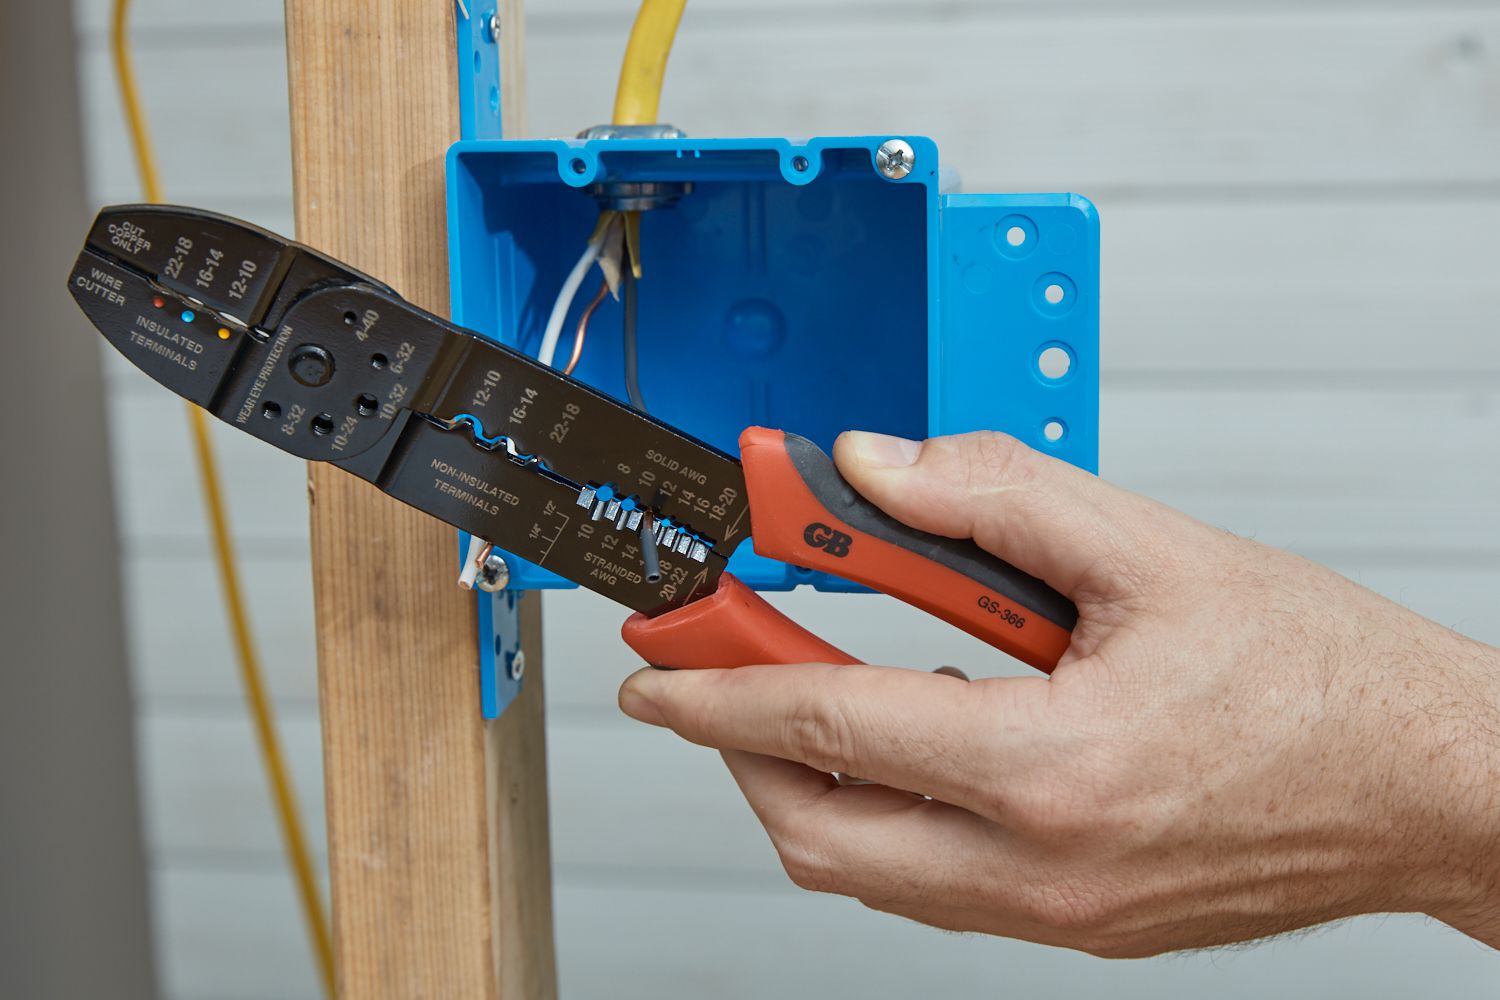
Step 5: Choose the Appropriate Cutting Tool
Choosing the right cutting tool is essential when working with live electrical wires to ensure a clean and precise cut while maintaining safety. Using the wrong tool can result in damage to the wire or compromise your safety. Here’s how to choose the appropriate cutting tool:
- Consider the Wire Type and Diameter: Different types of wires may require different cutting tools. Consider the type of wire you are working with, such as stranded or solid, and its diameter or gauge size. Select a cutting tool that is specifically designed to handle the wire type and size effectively.
- Insulated Handles: Ensure that the cutting tool has insulated handles. Insulated handles provide an extra layer of protection, minimizing the risk of electrical shock while using the tool.
- Choose a High-Quality Cutting Tool: Invest in a high-quality cutting tool from a reputable brand. High-quality tools are constructed with precision and are designed to withstand the demands of cutting electrical wires, ensuring durability and reliability.
- Wire Cutters: Wire cutters are the most commonly used cutting tool for electrical wires. They have sharp, precision blades that cleanly cut through the wires. Look for wire cutters with hardened cutting edges that can handle the wire gauge you are working with.
- Wire Strippers: In situations where you need to remove the insulation from the wires before cutting, wire strippers are the ideal tool. Wire strippers have specialized cutting edges that allow for precise stripping of the insulation without damaging the wire itself.
- Avoid Using Improvised Tools: It is crucial to refrain from using improvised tools such as scissors, utility knives, or any sharp object not specifically designed for cutting electrical wires. These tools may not provide the necessary insulation or precision, increasing the risk of accidents or damage to the wire.
- Maintain the Cutting Tool: Keep your cutting tool in good condition by regularly inspecting and maintaining it. Clean the blades after each use, check for any signs of wear or damage, and replace the tool if necessary. A well-maintained cutting tool ensures optimal performance and safety.
By choosing the appropriate cutting tool for the specific wire type and diameter, you can ensure a clean and accurate cut while minimizing the risk of accidents. Always prioritize safety and avoid using tools that are not specifically designed for cutting live electrical wires.
If you are uncertain about which cutting tool to use or have any doubts, it is always best to consult a professional electrician for guidance and assistance.
Read more: When To Use Conduit For Electrical Wiring
Step 6: Make a Clean and Proper Cut
When cutting live electrical wires, it is crucial to make a clean and proper cut to ensure the integrity of the wire and maintain safety. A clean cut helps maintain good electrical conductivity and reduces the risk of future problems. Follow these steps to make a clean and proper cut:
- Position Yourself Safely: Ensure that you are in a stable position and have a clear line of sight to the wire you are cutting. Stand on a dry surface, wear insulated gloves, and maintain a safe distance from any other live wires or sources of electricity.
- Verify Voltage Absence: Double-check that the wire is de-energized using a voltage tester or multimeter. Confirming the absence of voltage is essential to ensure your safety before proceeding with the cut.
- Prepare the Cutting Tool: Hold the appropriate cutting tool with insulated handles and position it at a right angle to the wire. Ensure a firm grip on the tool to provide stability and control during the cutting process.
- Position the Cutting Blade: Position the cutting blade of the tool on the marked spot where you aim to make the cut. Ensure that the blade is lined up correctly and securely against the wire.
- Apply Steady Pressure: Steadily squeeze the cutting tool handles to apply pressure to the wire. Avoid using excessive force, as this can result in a jagged or uneven cut. Apply even pressure and let the cutting blade do the work.
- Make the Cut: Use the cutting tool to make a clean, swift cut through the wire. Maintain a steady hand and make the cut in one smooth motion. Avoid any twisting or wiggling movements that can damage the wire or create an uneven cut.
- Inspect the Cut: After making the cut, visually inspect both ends of the wire. Ensure that the cut is clean and there are no frayed or loose strands. If necessary, use wire strippers to remove any remaining insulation from the cut ends.
Remember to exercise caution and focus when making the cut. Rushing or being careless can lead to accidents or damage to the wire. Ensure that you are using the appropriate cutting tool for the wire type and size to achieve the best results.
By following these steps, you can make a clean and proper cut on live electrical wires, ensuring safety and maintaining the integrity of the wire.
If you are unsure about making the cut or have any doubts, it is advisable to consult a professional electrician for guidance and assistance.
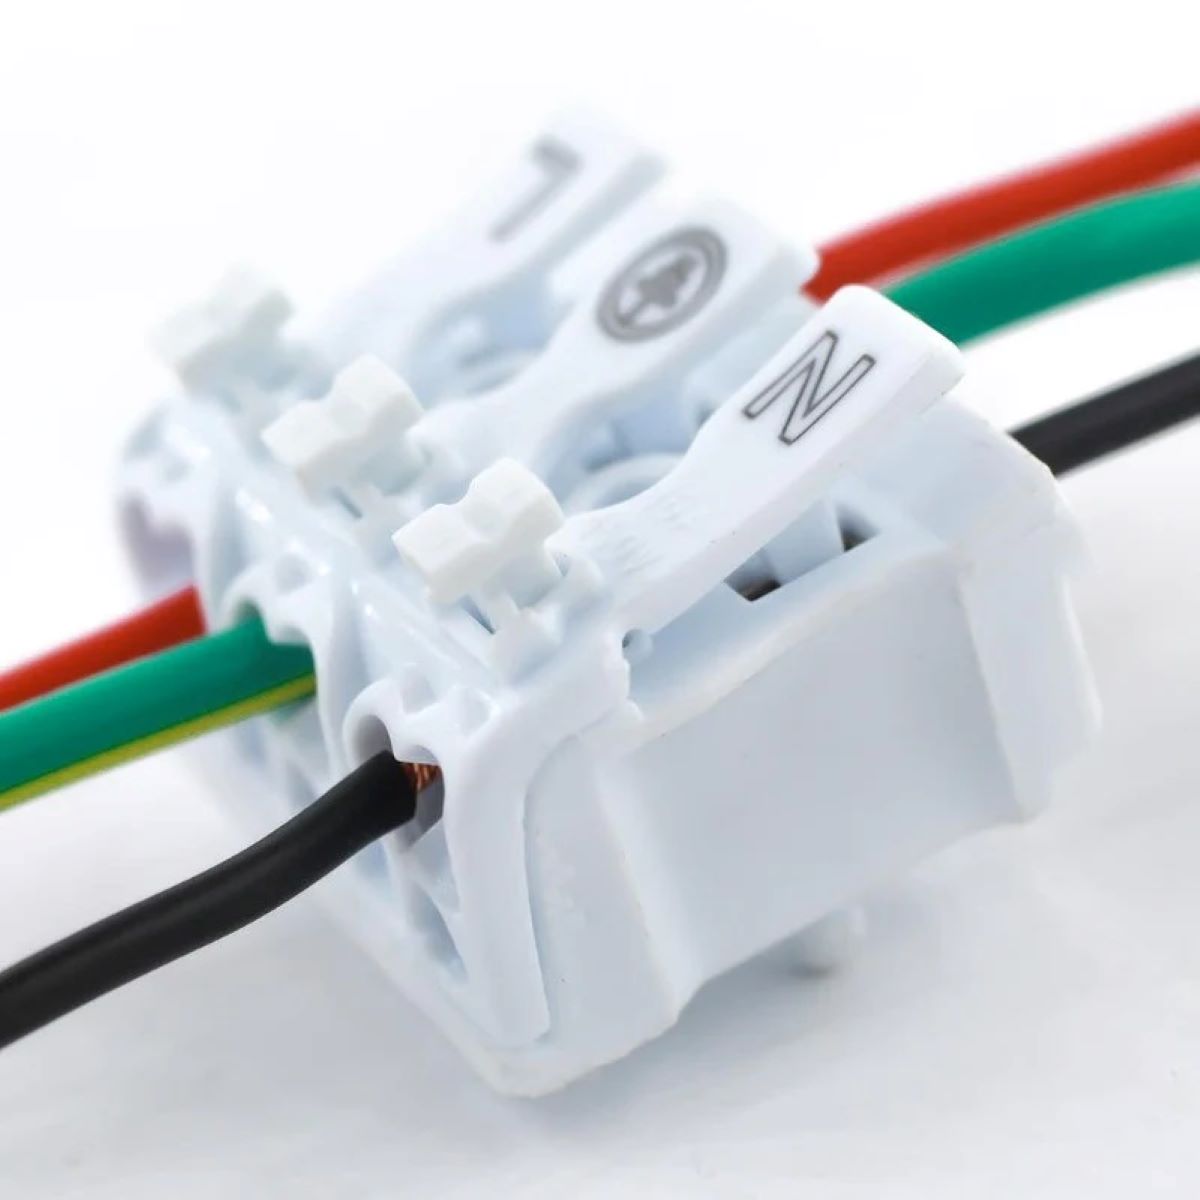
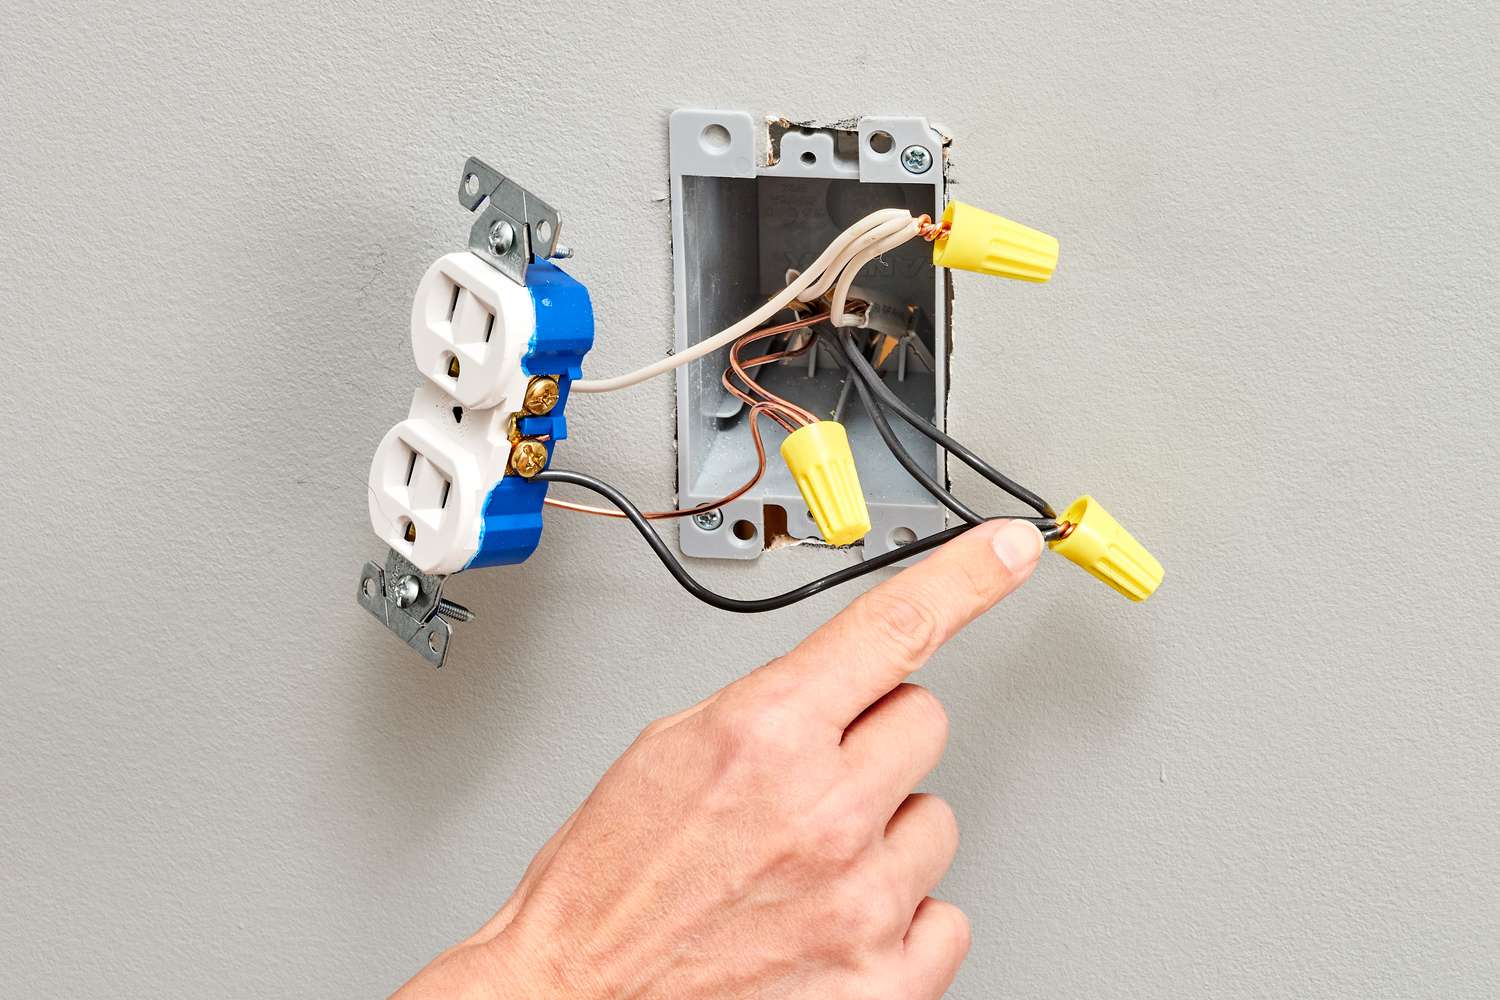
Step 7: Reconnect or Isolate the Wire
After cutting the live electrical wire, you will need to decide whether to reconnect the wire or isolate it, depending on the specific situation and purpose. Here are the steps for both scenarios:
If Reconnecting the Wire:
- Prepare the Wire Ends: Ensure that both ends of the cut wire are clean and free from any debris or insulation. Use wire strippers to remove any remaining insulation, exposing a sufficient length of bare wire for reconnection.
- Inspect the Wire Ends: Visually inspect the wire ends for any signs of damage or fraying. If the wire ends appear damaged, it is advisable to cut off the damaged sections and expose fresh, undamaged wire ends for a secure connection.
- Select the Correct Wire Nut or Connector: Choose a wire nut or connector that is appropriate for the wire size and type. The wire nut or connector should fit securely onto the exposed ends of the wires, ensuring a reliable connection.
- Twist the Wires Together: Twist the bare ends of the wires together in a clockwise direction. You want to create a tight, solid connection between the wires that will not come loose over time.
- Secure with the Wire Nut or Connector: Slide the selected wire nut or connector over the twisted wire ends. Twist the wire nut or connector clockwise until it is snug and secure. This will ensure a proper electrical connection.
- Tug Test: Perform a gentle tug test on the connected wires to make sure they are secure. If the wires come apart easily, redo the connection ensuring a tighter twist or a larger wire nut or connector, if necessary.
- Insulate the Connection: Once the connection is secure, wrap electrical tape around the wire nut or connector to insulate the connection and protect against any potential electrical hazards.
If Isolating the Wire:
- Prepare the Wire Ends: Ensure both ends of the cut wire are clean and free from any debris or insulation. Use wire strippers to remove any remaining insulation, exposing a sufficient length of bare wire.
- Insulate Each Wire End: Individually wrap each exposed wire end with electrical tape. Start a few inches away from the cut end and wrap the tape tightly around the wire, extending past the exposed area. Continue wrapping until the entire exposed portion is adequately insulated.
- Perform a Tug Test: Perform a gentle tug test on each insulated wire end to ensure the tape is securely attached. If the tape comes loose easily or the exposed wire is visible, apply additional layers of electrical tape until the insulation is sufficiently protected.
Remember to work carefully and double-check your connections or insulation to ensure a safe and reliable outcome. Take your time to ensure that the wires are properly connected or isolated before proceeding.
If you are unsure about reconnecting or isolating the wire or have any doubts, it is advisable to consult a professional electrician for guidance and assistance.
Step 8: Double-Check for Safety
After cutting and reconnecting or isolating the live electrical wire, it is crucial to perform a final double-check for safety. This step ensures that everything is in order and that you have taken the necessary precautions to minimize potential risks. Follow these steps to double-check for safety:
- Inspect the Wire Connection or Isolation: Take a close look at the wire connection or isolation to ensure that it is properly secured and insulated. Check for any signs of loose wires, exposed areas, or insufficient insulation. Make any necessary adjustments or improvements to address any issues.
- Ensure No Exposed Wires: Confirm that there are no exposed wires in the vicinity of the cutting area. Check the surroundings and make sure all wires are properly connected or isolated. If you see any exposed wires, attend to them immediately to prevent any potential hazards.
- Look for Potential Hazards: Scan the immediate area around the wire-cutting location for any potential hazards. Check for loose screws, damaged electrical boxes, or any other signs of compromised electrical infrastructure. Address any hazards you identify or notify a professional if necessary.
- Recheck the Power Supply Status: Using a voltage tester or multimeter, recheck the power supply status to ensure that the wire you cut is still de-energized. Confirm that the circuit breaker or fuse remains in the “off” position and that there is no voltage present before leaving the area.
- Dispose of Waste Material: Properly dispose of any waste material, such as excess wire, wire insulation, or unused wire nuts or connectors. Dispose of these materials according to local regulations and guidelines to maintain a clean and safe work environment.
- Clean Up: Thoroughly clean up the work area, removing any tools, debris, or potential trip hazards. Store your tools in their designated places and ensure that the area is left safe and organized.
- Perform a Final Safety Assessment: Once you have completed all the necessary checks and cleanup, perform a final overall safety assessment. Analyze the work area, connections, and electrical supply to ensure that everything is up to standard and there are no remaining safety concerns.
By diligently double-checking for safety, you can have peace of mind knowing that you have taken appropriate measures to minimize potential hazards. It is essential to prioritize safety throughout the entire process of cutting live electrical wires.
If you have any lingering doubts or concerns about safety, it is strongly recommended to consult a professional electrician for a thorough inspection and guidance.
Conclusion
Working with live electrical wires requires utmost caution and adherence to safety protocols. Cutting live wires should only be done by individuals with the necessary knowledge and experience. Throughout the process, it is essential to prioritize safety, ensuring personal well-being and the integrity of the electrical system.
In this article, we discussed the importance of safety when cutting live electrical wires and provided a comprehensive step-by-step guide on how to perform the task safely. We emphasized the need for turning off the power whenever possible and highlighted the precautions, tools, and materials required for the job.
We covered essential steps, including identifying the wire, choosing the appropriate cutting tool, making a clean and proper cut, and reconnecting or isolating the wire. We also emphasized the importance of double-checking for safety to mitigate any potential risks.
Remember, safety should never be compromised when working with live electrical wires. Always exercise caution, wear the necessary safety gear, and follow established safety procedures. If you are uncertain or uncomfortable with any aspect of cutting live wires, it is recommended to consult a professional electrician for guidance and assistance.
By following the proper protocols and prioritizing safety, you can successfully and safely cut live electrical wires when necessary. Remember, electrical work should always be approached with respect, knowledge, and a commitment to safety to ensure the well-being of everyone involved.
Frequently Asked Questions about How To Cut Electrical Wire When Live
Was this page helpful?
At Storables.com, we guarantee accurate and reliable information. Our content, validated by Expert Board Contributors, is crafted following stringent Editorial Policies. We're committed to providing you with well-researched, expert-backed insights for all your informational needs.


0 thoughts on “How To Cut Electrical Wire When Live”