Articles
How To Fix A Cut Electrical Wire In A Wall
Modified: October 20, 2024
Learn how to fix a cut electrical wire in a wall with these informative articles. Gain the knowledge and confidence to tackle this DIY project.
(Many of the links in this article redirect to a specific reviewed product. Your purchase of these products through affiliate links helps to generate commission for Storables.com, at no extra cost. Learn more)
Introduction
Electrical wires are the lifeline of our modern world. They carry the electricity that powers our homes, offices, and appliances. However, accidents can happen, and sometimes electrical wires get accidentally cut or damaged, which can be a cause for concern. It may seem like a daunting task to fix a cut electrical wire, especially if it is located inside a wall. But fear not, with the right tools, materials, and knowledge, you can safely and effectively repair a cut electrical wire in a wall.
In this guide, we will take you through the step-by-step process of fixing a cut electrical wire in a wall. Whether you are a DIY enthusiast or just want to save some money on hiring a professional electrician, this article will provide you with the necessary information to get the job done right.
Before we dive into the nitty-gritty of the repair process, it’s essential to prioritize safety. Dealing with electricity can be hazardous, so always exercise caution and follow safety protocols. If you are unsure or uncomfortable with any step, it is best to consult a licensed electrician.
Now, let’s get started on our journey to fix a cut electrical wire in a wall!
Key Takeaways:
- Safety First!
When fixing a cut electrical wire in a wall, always prioritize safety. Turn off the power, use the right tools, and consult a professional if unsure. Your well-being is paramount. - Methodical Repair Process
Repairing a cut electrical wire requires a methodical approach. Assess the situation, strip and reconnect the wires, insulate the connection, and test before restoring power. Attention to detail is key.
Read more: How To Cut Electrical Wire When Live
Step 1: Assess the Situation
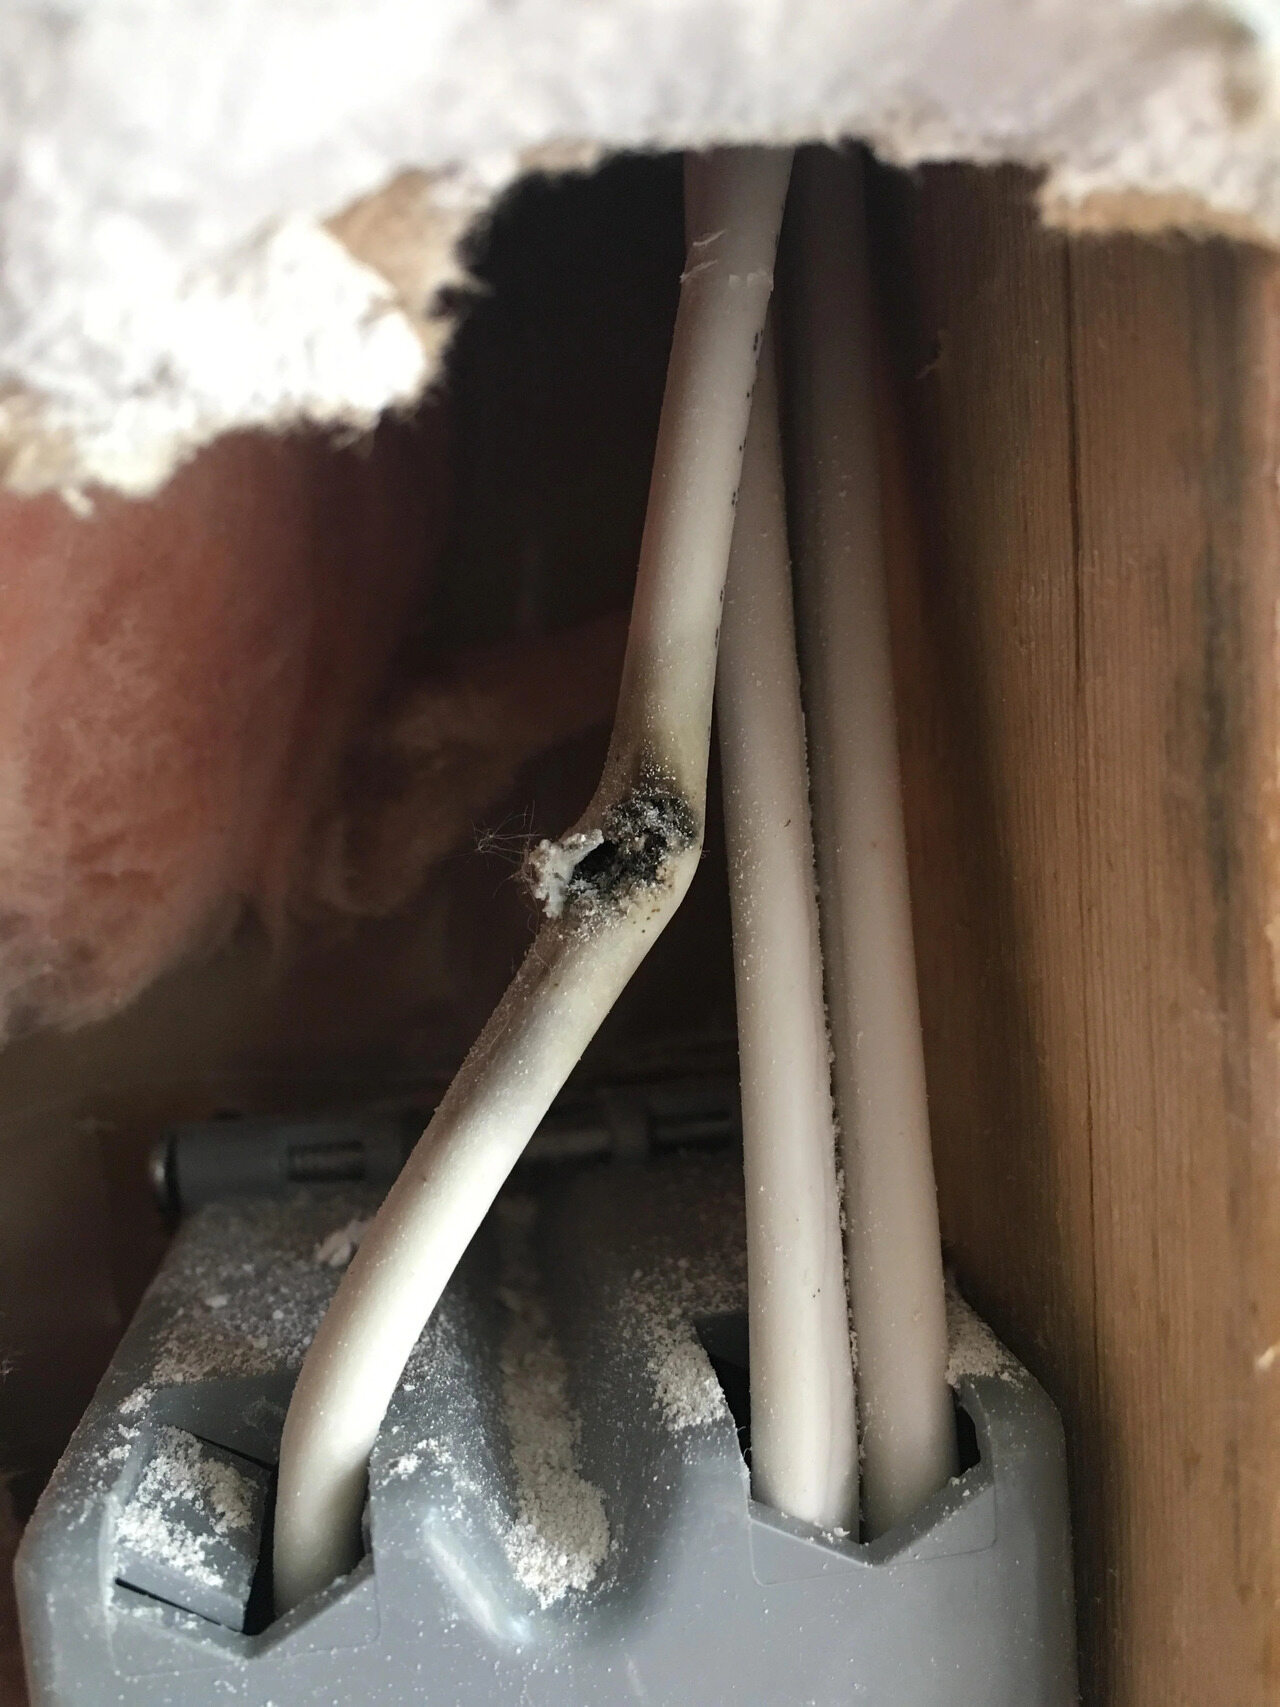
Before you begin the repair process, it’s crucial to assess the situation and determine the extent of the damage. Here are a few things you should consider:
- Identify the location of the cut wire: Take a close look at the wall and try to pinpoint the exact area where the wire has been cut. This will help you plan your repair strategy.
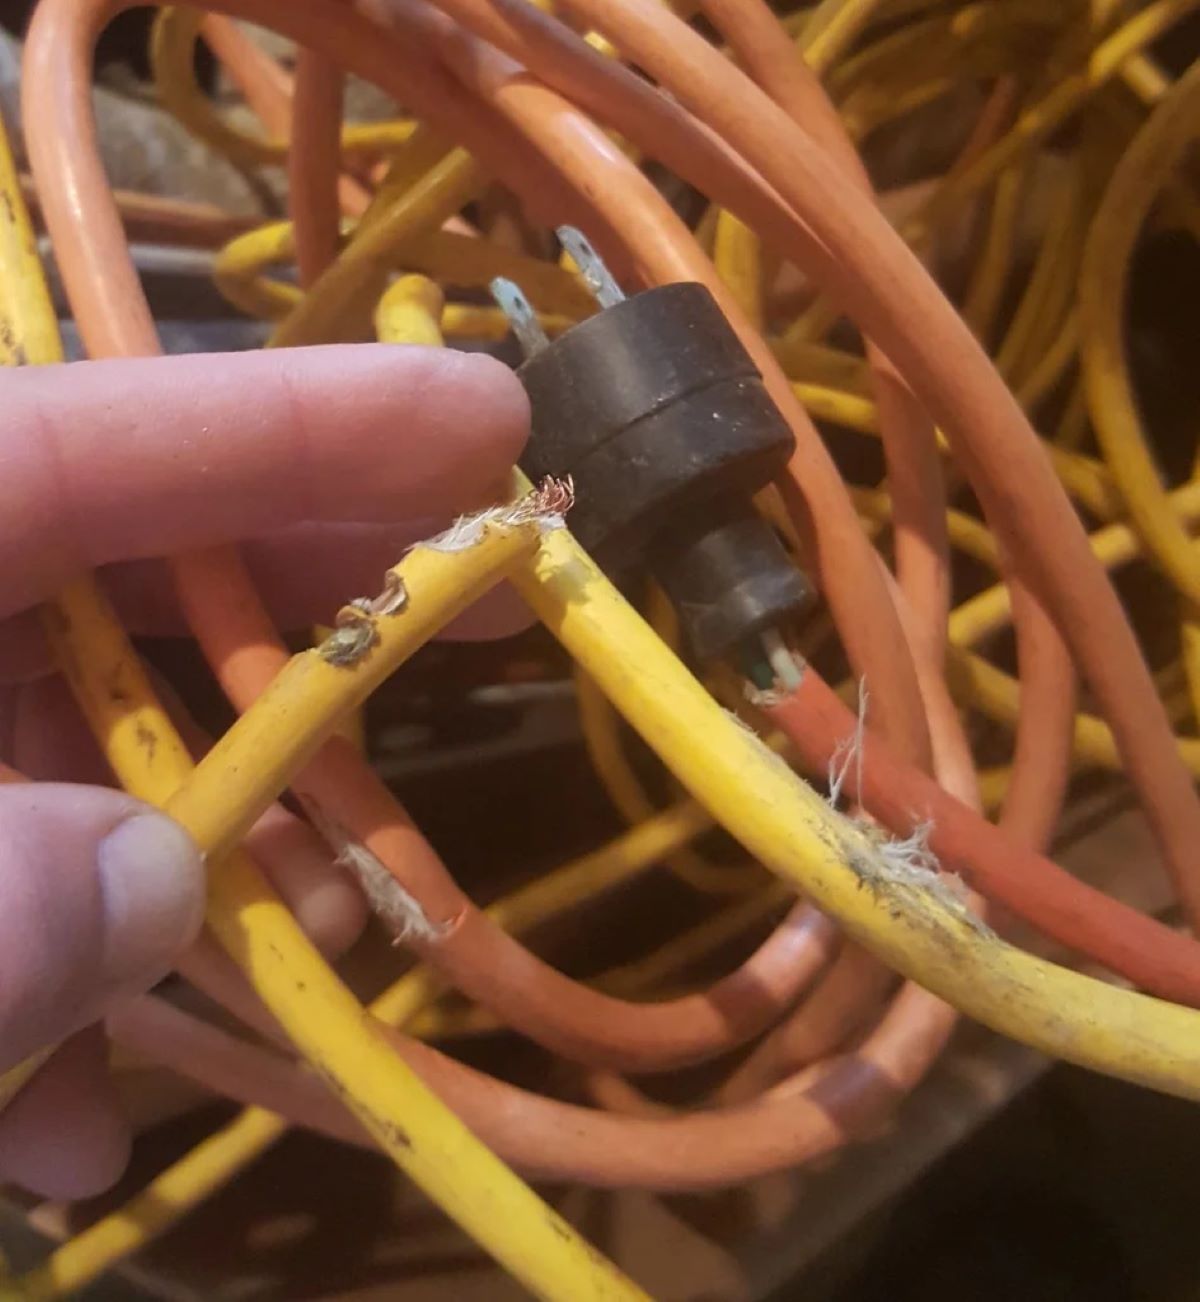
- Check for any visible damage: Inspect the wire for any signs of physical damage, such as frayed strands or exposed copper. Note down any observations as this will inform your repair approach.
- Confirm the power source: Find out which circuit breaker or fuse controls the electrical line that has been cut. This is essential for your safety and will allow you to turn off the power supply before starting the repair.
- Assess the accessibility of the cut wire: Consider the location of the cut wire within the wall. Is it easily reachable, or is it situated in a hard-to-reach area? This will determine the level of difficulty and the tools you will need for the repair.
By thoroughly assessing the situation, you will have a better understanding of the scope of the repair and can plan your next steps accordingly. Remember to document any relevant information and take pictures if necessary, as this will assist you throughout the process.
Step 2: Turn Off the Power
Before you begin working on the cut electrical wire, it’s crucial to turn off the power to prevent any accidents or electrical shocks. Here’s how you can safely turn off the power:
- Locate the circuit breaker: In your electrical panel, locate the circuit breaker corresponding to the area where the cut wire is located. Each circuit breaker is labeled, so look for one that indicates the area or room affected by the cut wire.
- Turn off the circuit breaker: Flip the switch of the identified circuit breaker to the “off” position. This will cut off the power supply to the area and ensure your safety while working.
- Test the power: To double-check that the power is indeed off, use a voltage tester on a nearby outlet or switch. If there is no voltage detected, you can proceed with confidence knowing that the power is off.
Remember, safety should always be your top priority when working with electricity. Never underestimate the potential dangers, and if you are unsure about the location of the circuit breaker or uncomfortable turning off the power yourself, it’s best to consult a qualified electrician.
Once you have confirmed that the power is off, you can proceed to the next steps of the repair process with peace of mind, knowing that you have taken the necessary precautions.
Step 3: Prepare the Tools and Materials
Before you start repairing the cut electrical wire, it’s essential to gather all the necessary tools and materials. Having everything prepared in advance will make the repair process smoother and more efficient. Here’s a list of what you’ll need:
- Wire strippers: These specialized tools will allow you to remove the insulation from the wire without damaging the conductive core.
- Electrical tape: This insulating tape is used to securely wrap the wire connections and provide additional protection.
- Wire connectors: These connectors will be used to join the cut ends of the wire together securely.
- Pliers: Pliers can be handy for gripping and manipulating wires during the repair process.
- Screwdriver: Depending on the type of electrical box or fixture you are working with, you may need a screwdriver to remove screws or access the wiring.
- Flashlight: If the cut wire is in a hard-to-reach or poorly lit area, a flashlight will help you see clearly and navigate the space.
- Electrical gloves: While not mandatory, wearing electrical gloves can provide an extra layer of protection when handling live wires.
- Wire nuts: Wire nuts are used to secure the wire connections and provide insulation. Make sure you have the appropriate size for your wire gauge.
- Voltage tester: This tool is used to confirm that the power has been turned off and to test the circuit before restoring the power.
Additionally, you may need a ladder or step stool if the cut wire is located in a high area. Make sure you have a safe and stable platform to work on.
By having all the necessary tools and materials on hand, you’ll be well-prepared to tackle the repair and minimize any potential downtime.
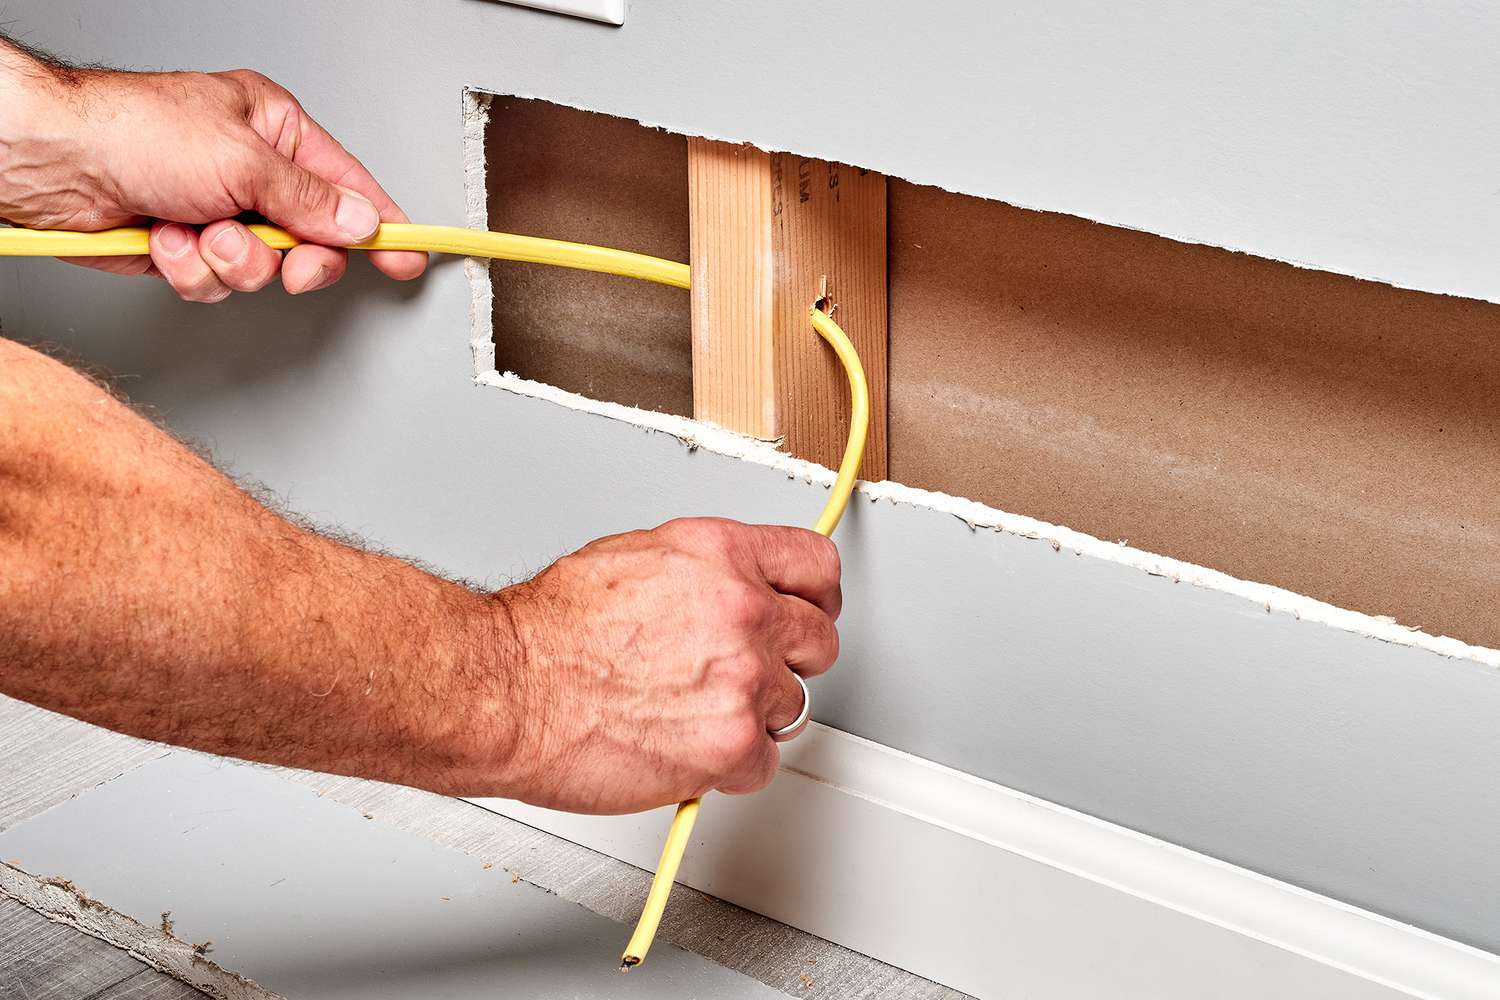
Step 4: Expose the Cut Electrical Wire
Now that you have everything you need, it’s time to expose the cut electrical wire for repair. Follow these steps to safely expose the wire:
- Remove any fixtures or covers: If the cut wire is connected to a light switch, electrical outlet, or any other fixtures, use a screwdriver to remove the covers or plates. This will allow you to access the wiring behind them.
- Turn off power to adjacent circuits (if necessary): If the cut wire is located in a junction box with other live circuits, consider turning off the power to those circuits for added safety. This extra precaution minimizes the risk of accidental contact with live wires.
- Use a utility knife or wire cutter: Carefully cut away the drywall or plaster surrounding the cut wire. Take your time to make precise cuts, ensuring that you don’t cut through or damage any other wires in the process.
- Create a wire loop: To make it easier to work with the exposed wire, create a small loop at both ends of the cut wire. This loop will provide some flexibility and make it easier to strip the wire ends and make the necessary connections.
While exposing the cut electrical wire, it’s important to be mindful of any other wires or electrical connections in close proximity. Avoid damaging or disturbing these wires to prevent any additional complications or electrical hazards.
By carefully following these steps, you will have successfully exposed the cut electrical wire, setting the stage for the next crucial steps in the repair process.
Read more: How To Extend Electrical Wire In Wall
Step 5: Strip the Wire Ends
With the cut electrical wire exposed, the next step is to strip the wire ends to prepare them for reconnection. Follow these steps to safely strip the wire ends:
- Choose the appropriate wire strippers: Select wire strippers that match the gauge of your wire. The gauge size is typically printed on the insulation of the wire. Using the wrong size stripper could damage the wire or leave it with inadequate insulation.
- Identify the stripped length: Most wire connectors require a specific length of wire to be stripped. Check the instructions provided with your wire connectors to determine the recommended length.
- Hold the wire firmly: Grip the wire securely, and hold it with one hand while using the wire strippers with the other hand. Make sure you have a stable grip to avoid any slippage or accidents.
- Align the wire strippers: Place the wire strippers over the wire, ensuring that they are positioned at the appropriate length for stripping. The stripping notch should be aligned with the insulation.
- Apply pressure and rotate: Apply gentle pressure and rotate the wire strippers around the wire to score the insulation. Be cautious not to cut into the copper wire strands underneath.
- Remove the insulation: Once the insulation is scored, gently pull the wire strippers away from the wire to remove the stripped insulation. Be careful not to pull too forcefully, as you don’t want to damage or break any of the wire strands.
- Inspect the wire strands: After stripping, inspect the wire strands to ensure they are intact and not damaged. If any of the strands are frayed or broken, it may be necessary to trim a small portion and re-strip the wire.
Stripping the wire ends properly is crucial for a secure and reliable connection. Take your time and pay attention to detail to ensure a clean, undamaged wire end for the next steps in the repair process.
Before attempting to fix a cut electrical wire in a wall, always turn off the power to that area to avoid the risk of electric shock. Use a wire stripper to carefully remove the damaged portion of the wire, then splice in a new section using wire connectors. Finally, test the connection to ensure it is working properly before restoring power.
Step 6: Reconnect the Wires
Now that you have stripped the wire ends, it’s time to reconnect them. Follow these steps to safely and effectively join the cut wires together:
- Identify the matching wire ends: Take a close look at the wire ends and identify which wire belongs to each side of the cut. Some wires may be color-coded, making it easier to determine their original connection. If the wires are not color-coded, you can label them with tape or use a marker to differentiate them.
- Twist the wire ends together: Take the corresponding wire ends and twist them together in a clockwise direction. This twisting motion ensures a secure connection and helps to maintain continuity of the electrical current.
- Hold the twisted connection: Once the wires are twisted together, hold the connection firmly with pliers or your fingers to keep them in place during the next steps.
- Insert a wire nut: Select an appropriately-sized wire nut for the wire gauge and insulation thickness. Place the wire nut over the twisted wire ends and start screwing it clockwise onto the connection. Continue tightening until the wire nut is secure and snug.
- Test the connection: Gently tug on the wires to ensure they are tightly connected and held in place by the wire nut. The connection should be firm and stable, with no movement or loosening.
It’s important to note that if the wires are damaged beyond repair or there is too much length lost due to the cut, it may be necessary to replace the damaged section of wire entirely. In such cases, consult a professional electrician for assistance.
By following these steps, you will successfully reconnect the cut wires and establish a reliable electrical connection, bringing you one step closer to completing the repair process.
Step 7: Insulate the Connection
After reconnecting the wires, it’s crucial to insulate the connection to ensure electrical safety and prevent any potential hazards. Follow these steps to properly insulate the wire connection:
- Inspect the wire nut connection: Before insulating, inspect the wire nut connection to ensure that it is secure and tightly holding the wires together. If you notice any looseness or movement, carefully tighten the wire nut to ensure a secure fit.
- Trim the excess wire: If there is excess wire extending beyond the wire nut, use wire cutters to trim off the excess. Leaving too much exposed wire can increase the risk of accidental contact or short circuits.
- Apply electrical tape: Take electrical tape and wrap it tightly around the wire nut and the exposed portion of the wire. Start a few inches away from the connection and wrap the tape overlapping and spiraling towards the wire nut. This provides a layer of insulation and protects the connection from moisture and other external elements.
- Continue wrapping: Continue wrapping the electrical tape until you reach a few inches past the wire nut. Tear or cut the tape and press the end against the tape body to secure it in place.
- Smooth out the tape: Use your fingers to smooth out and press the electrical tape against the wires. This helps to ensure a tight seal and a neat appearance. Avoid leaving any areas with exposed wire or loose sections of tape.
Proper insulation is essential to protect the wire connection and maintain the integrity of the repaired electrical system. By following these steps, you will effectively insulate the connection and enhance the safety of your electrical wiring.
Step 8: Secure the Wires
Once you have insulated the wire connection, the next step is to secure the wires properly. This will help to prevent any strain or movement that could potentially disrupt the connection or cause damage. Follow these steps to secure the wires:
- Inspect the wire connections: Before securing the wires, take a moment to inspect the wire nut connection and ensure that it is still tight and secure. If you notice any looseness, carefully tighten the wire nut to ensure a firm connection.
- Organize the wires: Arrange the wires neatly and ensure that they are not twisted or tangled. Proper organization will make it easier to manage the wires and protect them from unnecessary strain.
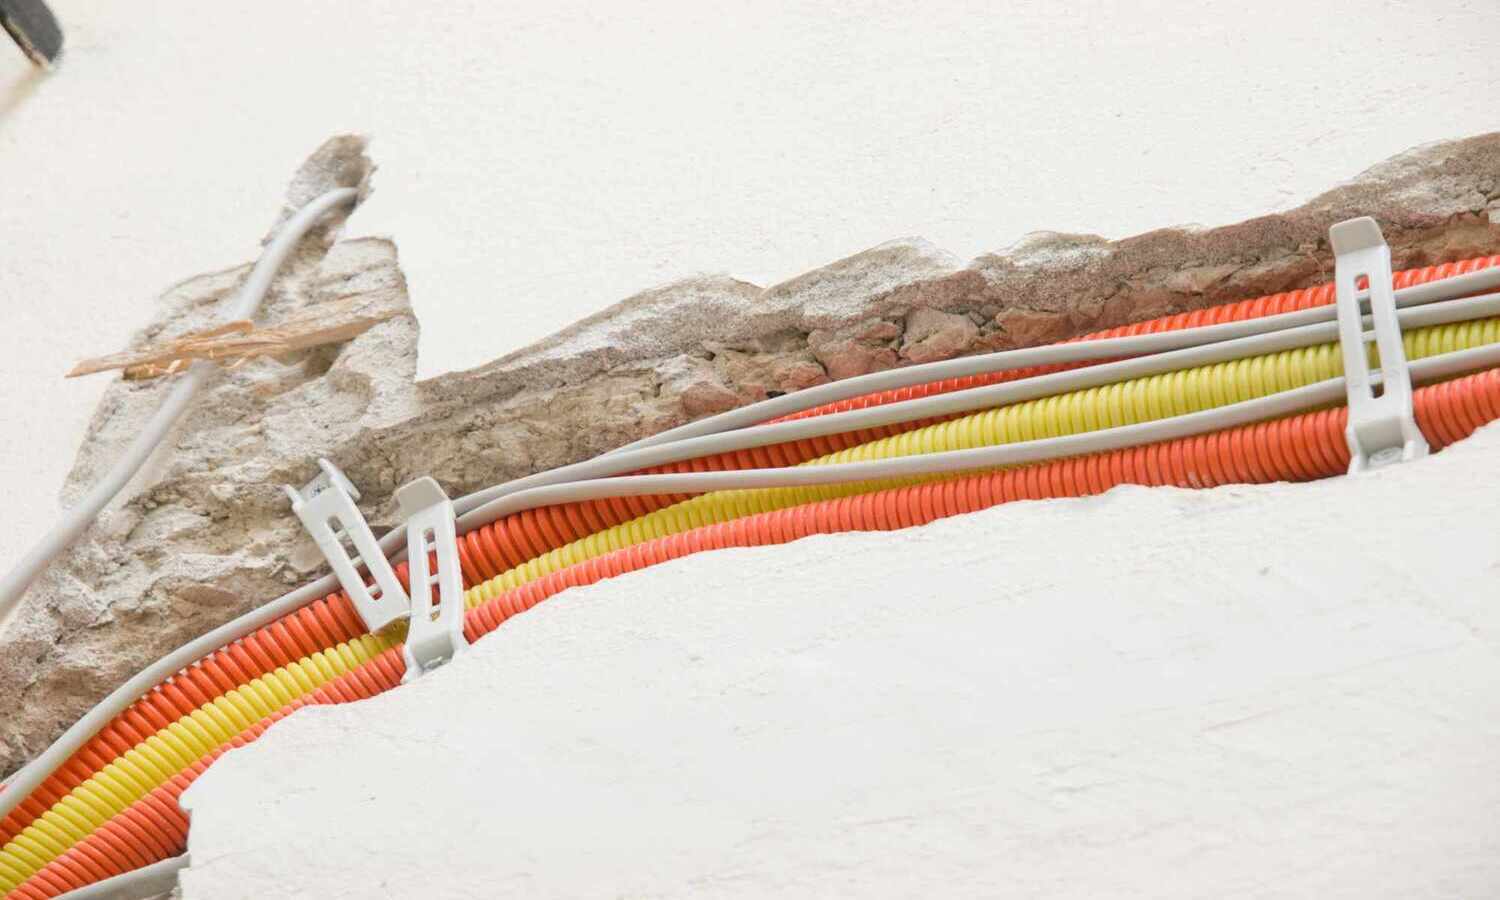
- Use wire clips or staples: Depending on the location of the repaired wires, you may need to use wire clips or staples to secure them to the wall or any supporting structure. These clips and staples will hold the wires in place and prevent them from hanging loosely or getting tangled.
- Space the clips or staples evenly: Place the clips or staples along the wire’s path, spacing them out evenly. Avoid placing them too close together, as it may create unnecessary stress on the wires.
- Gently secure the wires: Carefully press the wires into the clips or staples, ensuring they are held securely but not overly tight. The goal is to provide support and stability to the repaired wires without risking damage.
By securing the wires properly, you minimize the risk of accidental disconnection or damage. This step is especially important if the repaired wires are located in an area with potential movement or if there is a chance of the wires being disturbed.
Remember to work carefully and pay attention to detail to ensure the wires are properly secured and protected for long-term use.
Read more: How To Find Electrical Wire In Wall
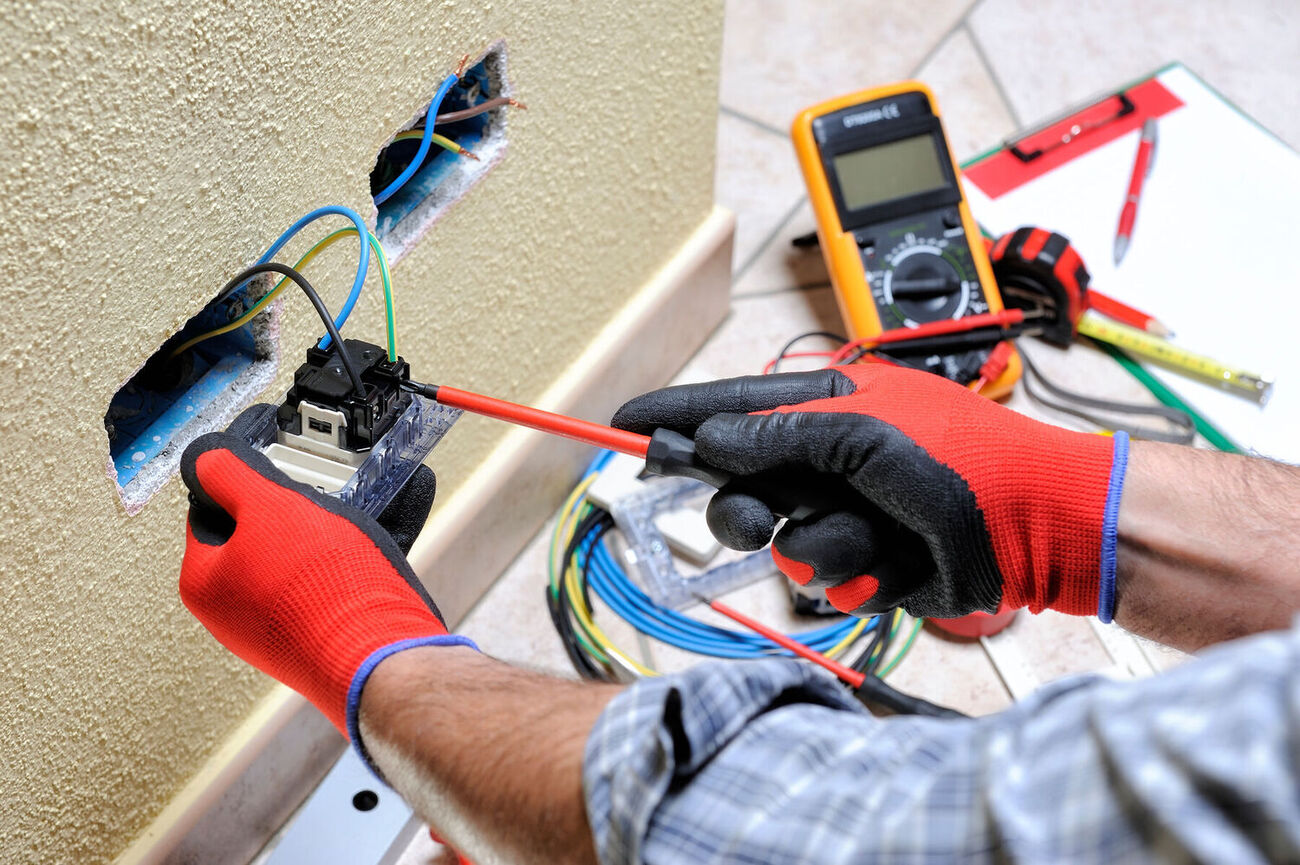
Step 9: Test the Connection
After completing the repair and securing the wires, it’s crucial to test the connection to ensure it is functioning properly. Testing the connection will help you verify that the electrical circuit is working correctly and there are no issues or faults. Follow these steps to test the connection:
- Restore the power: Turn the circuit breaker back on to restore power to the repaired electrical circuit. If you had turned off multiple circuit breakers during the repair, make sure to turn them all back on.
- Check for power: Use a voltage tester or a non-contact voltage tester to check for voltage at the repaired outlet or switch. Place the tester near the connection and verify that it detects the presence of electricity.
- Test the functionality: Once you have confirmed the presence of power, check the functionality of the circuit. If the repair was done on a light switch, test the switch to make sure it turns the light on and off. Similarly, if the repair was done on an outlet, plug in a device to ensure it receives power.
- Observe for any issues: While testing, pay close attention to any signs of sparks, flickering lights, or abnormal behavior. These could be indications of an improper connection or a deeper electrical issue. If you notice any problems, turn off the power immediately and consult a professional electrician.
Testing the connection is a critical step to ensure the repair was successful and that the electrical system is functioning as intended. It provides you with the peace of mind that your repaired wires are safe and reliable.
If you have any doubts or concerns about the test results, or if you encounter any issues during the testing process, it’s always a good idea to seek professional assistance from a licensed electrician.
Step 10: Restore Power
After successfully testing the repaired connection and ensuring everything is functioning correctly, it’s time to restore power and bring the electrical circuit back to full operation. Follow these steps to safely restore power:
- Double-check the repair: Before restoring power, take a final look at the repair and ensure that all the wire connections are secure, properly insulated, and free from any external damage.
- Reset the circuit breaker: If you had turned off the circuit breaker during the repair process, reset it by switching it to the “on” position. You may hear a click or feel a slight resistance when resetting the breaker.
- Confirm power restoration: Once the circuit breaker is reset, use a voltage tester or a non-contact voltage tester to confirm that power has been successfully restored to the repaired circuit. Check the outlet or switch and verify that there is a presence of electricity.
- Test the functionality: After confirming power restoration, test the circuit again to ensure that all lights, outlets, or appliances connected to that circuit are working correctly.
- Maintain vigilance: After restoring power, keep an eye out for any abnormal signs such as unusual smells, sparks, or flickering lights. If you notice anything out of the ordinary, turn off the power immediately and seek professional help.
By carefully following these steps to restore power, you can ensure a safe and successful repair of the cut electrical wire. Remember to exercise caution and prioritize your safety throughout the process.
If at any point during the power restoration process you encounter any difficulties or have concerns, it’s recommended to consult a professional electrician for further assistance and guidance.
Conclusion
Fixing a cut electrical wire in a wall may seem like a daunting task, but with the right knowledge and precautions, it is a DIY project that can be successfully undertaken. By following the step-by-step process outlined in this guide, you can safely and effectively repair a cut wire, ensuring the proper functioning and safety of your electrical system.
Throughout the repair process, it is important to prioritize your safety. Always turn off the power before working on the wires, and if you are unsure or uncomfortable with any step, consult a licensed electrician for assistance.
Remember to assess the situation, turn off the power, prepare the necessary tools and materials, and carefully expose and strip the wire ends. Reconnecting the wires securely, insulating the connection, and properly securing the wires are vital steps to achieve a reliable and safe repair.
Once the repair is completed, testing the connection and restoring power is crucial to ensure that the repaired circuit is functioning properly. Double-checking the repair and maintaining vigilance after power restoration will guarantee a successful repair and peace of mind regarding the safety and reliability of your electrical system.
However, please note that electrical work can be complex, and it is always recommended to consult a professional electrician if you are uncertain or uncomfortable with any aspect of the repair process. They have the expertise and knowledge to handle more complex electrical situations.
With proper precautions, the right tools, and a methodical approach, you can successfully fix a cut electrical wire in a wall and restore the functionality and safety of your electrical system. Remember, if in doubt, it’s always better to seek professional help!
Frequently Asked Questions about How To Fix A Cut Electrical Wire In A Wall
Was this page helpful?
At Storables.com, we guarantee accurate and reliable information. Our content, validated by Expert Board Contributors, is crafted following stringent Editorial Policies. We're committed to providing you with well-researched, expert-backed insights for all your informational needs.


0 thoughts on “How To Fix A Cut Electrical Wire In A Wall”