Articles
How To Finish And Paint Fences And Gates
Modified: November 1, 2024
Discover the best articles on how to finish and paint fences and gates, including expert tips and techniques for a flawless finish.
(Many of the links in this article redirect to a specific reviewed product. Your purchase of these products through affiliate links helps to generate commission for Storables.com, at no extra cost. Learn more)
Introduction
When it comes to enhancing the beauty and longevity of your fences and gates, finishing and painting them is essential. Not only does it improve their appearance but it also provides protection against the elements, preventing rot and corrosion. However, for a successful finish and paint job, proper preparation and selection of materials are crucial. In this article, we will guide you through the step-by-step process of finishing and painting your fences and gates, ensuring that you achieve professional-looking results.
Before diving into the details, it’s important to note that the techniques described in this article can be applied to different types of fences and gates, including wooden, metal, and PVC. Regardless of the material, the overall process remains quite similar, although some specific steps or materials may vary.
So, if you’re ready to elevate the look of your fences and gates and protect them from the elements, let’s get started!
Key Takeaways:
- Proper preparation, including clearing, repairing, and sanding, is crucial before painting fences and gates to ensure a smooth and professional finish.
- Choosing the right paint, gathering necessary tools, applying primer, and adding finishing touches are essential steps for achieving vibrant, long-lasting results.
Read more: How Much For A Fence Gate
Preparing the Surface
Before you can start painting your fences and gates, it’s crucial to prepare the surfaces properly. This involves clearing and cleaning the fence or gate, repairing any damages, and sanding the surface. Let’s take a closer look at each step:
Clearing and Cleaning the Fence or Gate
Begin by removing any debris, like leaves, dirt, or spider webs, from the surface of your fence or gate. Use a broom or a brush to sweep away loose particles. For stubborn dirt or stains, you may need to use a mild detergent solution and a scrub brush. Rinse thoroughly with water and allow the surface to dry completely before proceeding to the next step.
Repairing any Damages
If you notice any cracks, holes, or other damages on your fence or gate, it’s important to address them before painting. Repairing these damages will ensure a smooth and even surface for the paint application. Use appropriate materials, such as wood filler for wooden fences, and follow the manufacturer’s instructions for the best results. Allow the repairs to dry and cure completely before moving forward.
Sanding the Surface
Sanding the surface of your fences and gates is a critical step in the preparation process. This helps to remove any existing paint, smooth out rough areas, and create a clean and porous surface for better paint adhesion. Use medium-grit sandpaper or a sanding block to gently sand the entire surface, following the grain of the wood or the contours of the gate. Be sure to wear protective goggles and a dust mask when sanding to protect your eyes and respiratory system. Once you have finished sanding, use a damp cloth to remove any dust or debris.
By clearing and cleaning the fence or gate, repairing any damages, and sanding the surface, you have laid the groundwork for a successful paint job. Now, let’s move on to the next step: choosing the right paint for your fences and gates.
Read more: How To Install Fence Gate
Choosing the Right Paint
When it comes to painting your fences and gates, selecting the right paint is crucial for achieving long-lasting and beautiful results. Understanding different types of paint, selecting the appropriate paint for your specific needs, and considering color options are key factors to consider. Let’s explore these aspects in detail:
Understanding Different Types of Paint
There are various types of paint available on the market, each with its own unique properties. Here are a few common types:
- Acrylic paint: This water-based paint is versatile, dries quickly, and offers good durability. It is suitable for both interior and exterior applications.
- Oil-based paint: This type of paint provides a smooth and durable finish. It takes longer to dry but is more resistant to wear and tear.
- Latex paint: Also known as water-based paint, latex paint is easy to clean up, has low VOCs (volatile organic compounds), and is suitable for interior and exterior use.
- Enamel paint: Enamel paint is known for its hard and glossy finish, making it highly durable and resistant to stains, scratches, and weather conditions.
Selecting the Appropriate Paint for Your Fence or Gate
When choosing paint for your fences and gates, consider the type of material they are made from. For example, wooden fences may benefit from a paint that offers protection against moisture and UV rays. Metal fences may require a paint that prevents rust and corrosion. PVC fences may require a specific type of paint that adheres well to the surface. Be sure to read the product labels and choose a paint that is recommended for your specific fence or gate material.
Considering Color Options
Color selection is an important aspect of painting your fences and gates. You may want to choose a color that complements the style and aesthetics of your home or surroundings. Additionally, lighter colors may help reflect sunlight and reduce heat absorption, especially in warmer climates, while darker colors can offer a bold and dramatic look. Take your time to consider different color options and how they will impact the overall appearance of your fences and gates.
By understanding different types of paint, selecting the appropriate paint for your specific needs, and considering color options, you are well on your way to choosing the right paint for your fences and gates. Next, we’ll explore the necessary tools and materials you’ll need for the painting process.
Read more: How Wide Is A Fence Gate
Gathering the Necessary Tools and Materials
Before you begin the process of painting your fences and gates, it’s essential to gather all the necessary tools and materials. Having the right equipment will ensure a smooth and efficient painting experience. Here are some key items you’ll need:
Paintbrushes or Paint Sprayer
Paintbrushes are ideal for smaller areas and intricate details on your fences or gates. Look for brushes with synthetic bristles that are suitable for the type of paint you’ve chosen. If you’re working with a larger surface or want to save time, a paint sprayer can be a great option. Sprayers provide an even coat of paint and are especially useful for large, flat surfaces.
Paint Rollers and Trays
A paint roller and tray are necessary for applying paint quickly and efficiently to larger areas. Opt for a roller with the appropriate nap length, depending on the texture of your fences or gates. A tray will provide a convenient surface for loading the roller with paint.
Drop Cloths or Tarps
Painting can be a messy process, so it’s important to protect the surrounding area from accidentally splattering paint. Lay down drop cloths or tarps to cover the ground and any nearby plants or furniture. This will make clean-up much easier and prevent damage from paint drips.
Read more: How To Make A Fence Panel Into A Gate
Painter’s Tape
Painter’s tape is indispensable when it comes to achieving clean and crisp edges while painting. Use it to mask off areas you don’t want to paint, such as neighboring walls, trim, or hardware. Apply the tape carefully and make sure it adheres well to the surface, then remove it promptly after painting to avoid peeling or damage.
Having these tools and materials ready before you begin painting will save you time and help ensure a professional-looking finish. Now that you’re equipped with the necessary supplies, it’s time to move on to the next steps: applying the primer and paint!
Applying the Primer
Before painting your fences and gates, it’s crucial to apply a primer. The primer serves several important purposes, such as improving paint adhesion, enhancing durability, and providing a consistent base for the paint color. Here’s a breakdown of the steps involved in applying the primer:
Understanding the Importance of Primer
Primer acts as a preparatory coat that helps the paint adhere better to the surface. It creates a smooth and uniform base, filling in any pores or imperfections, ensuring a more even and professional finish. Additionally, primer helps to prevent stains from bleeding through, blocks moisture, and provides an extra layer of protection for your fences and gates.
Using a Brush or Roller to Apply the Primer
Depending on the size and intricacy of your fences and gates, you can use either a brush or a roller to apply the primer. A brush is ideal for corners, edges, and narrow areas where precision is required. For larger surfaces, such as flat panels, a roller can quickly and efficiently cover the area. Be sure to select a brush or roller that is appropriate for the type of primer you are using.
Read more: How To Build A Vinyl Fence Gate
Allowing Sufficient Drying Time
After applying the primer, it’s important to allow sufficient drying time before moving on to the next step. Check the product label for recommended drying times, as it can vary depending on the brand and type of primer. It’s crucial to ensure that the primer is completely dry and cured to avoid any issues with the subsequent paint layers.
By applying a primer to your fences and gates, you are creating an optimal foundation for the paint, enhancing its durability and appearance. The primer helps the paint adhere better, provides an extra layer of protection, and ensures a smoother and more professional finish. When the primer is dry and ready, it’s time to move on to the exciting part: applying the paint!
Applying the Paint
Now that you have prepared the surface and applied the primer, it’s time to apply the paint to your fences and gates. This step will bring your project to life and enhance the appearance of your outdoor space. Here’s what you need to know:
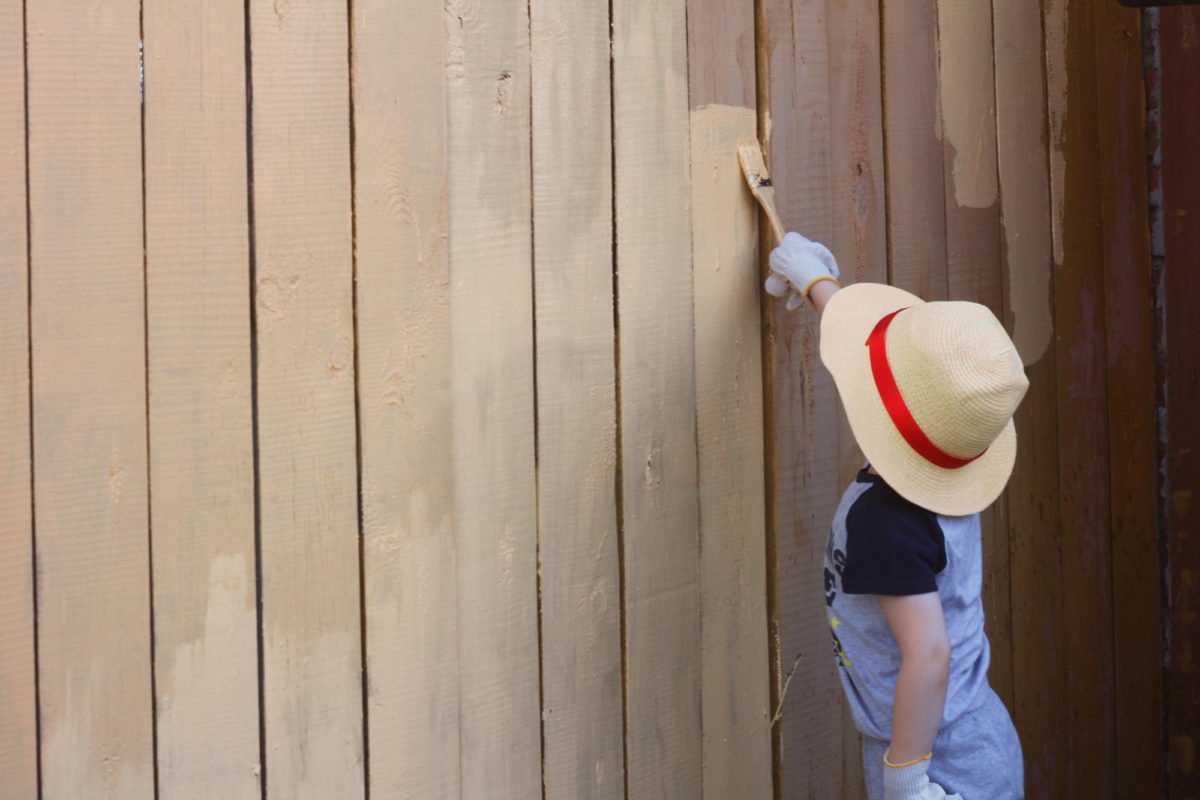
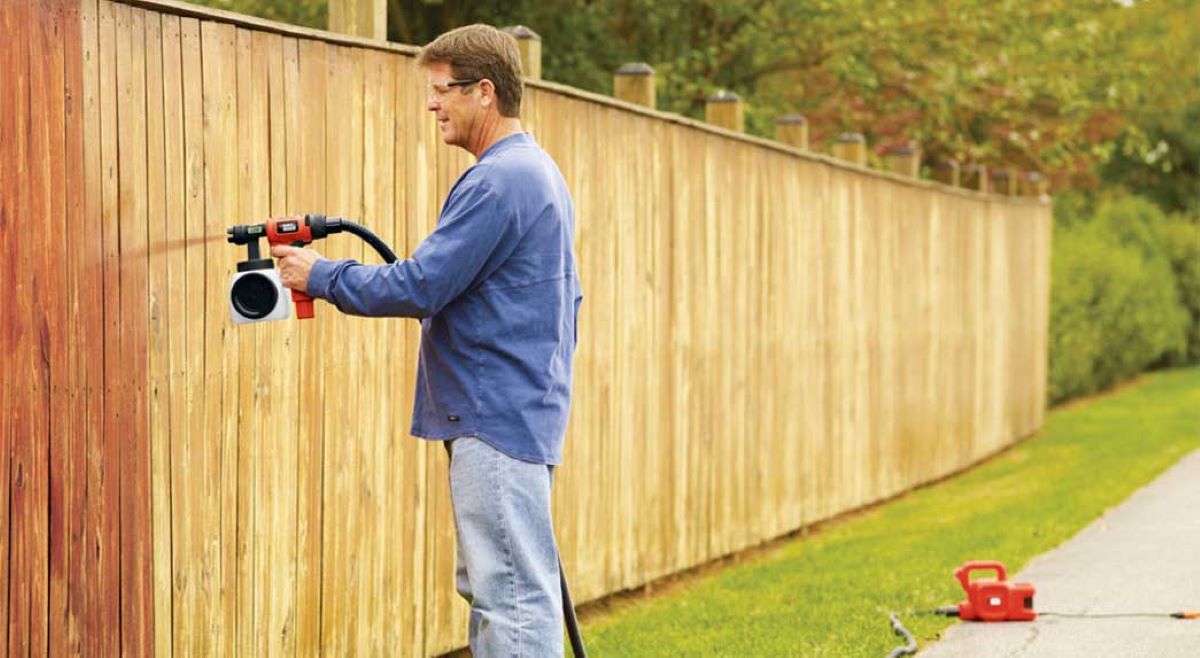
Deciding Between Brush or Sprayer Application
When it comes to applying the paint, you have the option of using a brush or a sprayer. The choice depends on personal preference, the size and complexity of the project, and the type of paint you’re using. A brush gives you more control and precision, making it ideal for detailed areas and smaller surfaces. On the other hand, a paint sprayer is more efficient for larger areas, providing a quicker and more even coverage. Consider your needs and select the method that works best for your project.
Applying the First Coat of Paint
Start by thoroughly stirring the paint to ensure an even consistency. If you’re using a brush, load the bristles with paint and apply the paint evenly in long, smooth strokes. Work in small sections, overlapping each stroke slightly to avoid visible brush marks. If you’re using a roller, pour the paint into a tray and evenly distribute it onto the roller. Apply the paint using a rolling motion, starting from the top and working your way down. Again, work in small sections, overlapping each pass to ensure an even coat.
Letting it Dry Before Adding Additional Coats
After applying the first coat of paint, allow it to dry completely before adding additional coats. The drying time can vary depending on the type of paint and environmental conditions, so refer to the product label for specific instructions. It’s important to give the paint enough time to dry to avoid smudging or ruining the finish. Once the first coat is dry, assess the coverage and decide if you need to apply additional coats for a more vibrant and uniform finish. Repeat the application process for each coat, allowing sufficient drying time between each layer.
By applying the paint using the method of your choice, whether it’s a brush or a sprayer, and ensuring that each coat is thoroughly dry before adding another, you’ll achieve a beautiful and long-lasting finish on your fences and gates. Now, it’s time to add the finishing touches to complete the project.
Adding Finishing Touches
Now that you’ve applied the paint to your fences and gates, it’s time to add the finishing touches to ensure long-lasting beauty and protection. This includes staining or sealing the fence or gate, applying a protective topcoat, and implementing a cleaning and maintenance routine. Let’s explore these important finishing steps:
Staining or Sealing the Fence or Gate
If you have wooden fences or gates, staining or sealing them is an excellent way to enhance their natural beauty and protect them from moisture, UV rays, and weather damage. Stains penetrate the wood, adding color while allowing the wood’s texture to show through. Sealing, on the other hand, creates a protective barrier on the surface. Both options provide durability and help prolong the life of your wooden fences and gates. Follow the manufacturer’s instructions for proper staining or sealing techniques and apply the product evenly for consistent coverage.
Applying a Protective Topcoat
After painting and sealing your fences or gates, it’s recommended to apply a protective topcoat. This extra layer adds an additional level of protection against the elements, including UV rays, moisture, and general wear and tear. Look for a topcoat specifically designed for outdoor use and compatible with the type of paint or stain you’ve used. Follow the instructions on the product label for proper application techniques and drying times.
Read more: How To Fix Sagging Fence Gate
Cleaning and Maintaining the Painted Surface
To keep your painted fences and gates looking their best, it’s important to implement a regular cleaning and maintenance routine. Regularly remove dirt, dust, and debris by gently washing the surface with a mild detergent and water. Avoid using harsh chemicals or abrasive cleaners that could damage the paint or surface. Additionally, inspect the fences and gates regularly for any signs of damage or wear and address them promptly to prevent further deterioration.
By staining or sealing your wooden fences or gates, applying a protective topcoat, and implementing a cleaning and maintenance routine, you’ll ensure that your painted surfaces remain vibrant and well-protected for years to come. With these finishing touches, your fences and gates will not only enhance the beauty of your outdoor space but also withstand the test of time.
Now that you have completed the final steps, take a step back and admire your finished fences and gates. You’ve successfully transformed them into durable and aesthetically pleasing features of your property. Enjoy the results of your hard work and take pride in the freshly painted and protected fences and gates!
Conclusion
Finishing and painting your fences and gates can make a significant difference in the overall appearance and longevity of your outdoor space. By following the steps outlined in this article, you can achieve professional-looking results and protect your fences and gates from the elements.
Remember, proper preparation is crucial before applying any paint or primer. Clearing and cleaning the fence or gate, repairing any damages, and sanding the surface will ensure a smooth and even finish. Choosing the right paint based on the type of material and considering color options allows you to customize the look of your fences and gates.
Gathering the necessary tools and materials, such as paintbrushes or a paint sprayer, paint rollers and trays, drop cloths or tarps, and painter’s tape, will help you complete the painting process more efficiently and with fewer messes.
Applying a primer before painting is essential for better adhesion and durability. Whether you use a brush or a sprayer, applying the first coat of paint evenly and allowing sufficient drying time between each coat will ensure a smooth and vibrant finish.
Don’t forget the finishing touches! Staining or sealing wooden fences and gates adds beauty and protection, while applying a protective topcoat adds another layer of defense against the elements. Regular cleaning and maintenance of the painted surfaces will help them maintain their appearance and integrity over time.
By following these steps and putting in the necessary effort, you can transform your fences and gates into eye-catching and long-lasting features of your outdoor space.
So, what are you waiting for? Roll up your sleeves, gather your materials, and get ready to give your fences and gates a fresh new look!
Happy painting!
Frequently Asked Questions about How To Finish And Paint Fences And Gates
Was this page helpful?
At Storables.com, we guarantee accurate and reliable information. Our content, validated by Expert Board Contributors, is crafted following stringent Editorial Policies. We're committed to providing you with well-researched, expert-backed insights for all your informational needs.


0 thoughts on “How To Finish And Paint Fences And Gates”