Articles
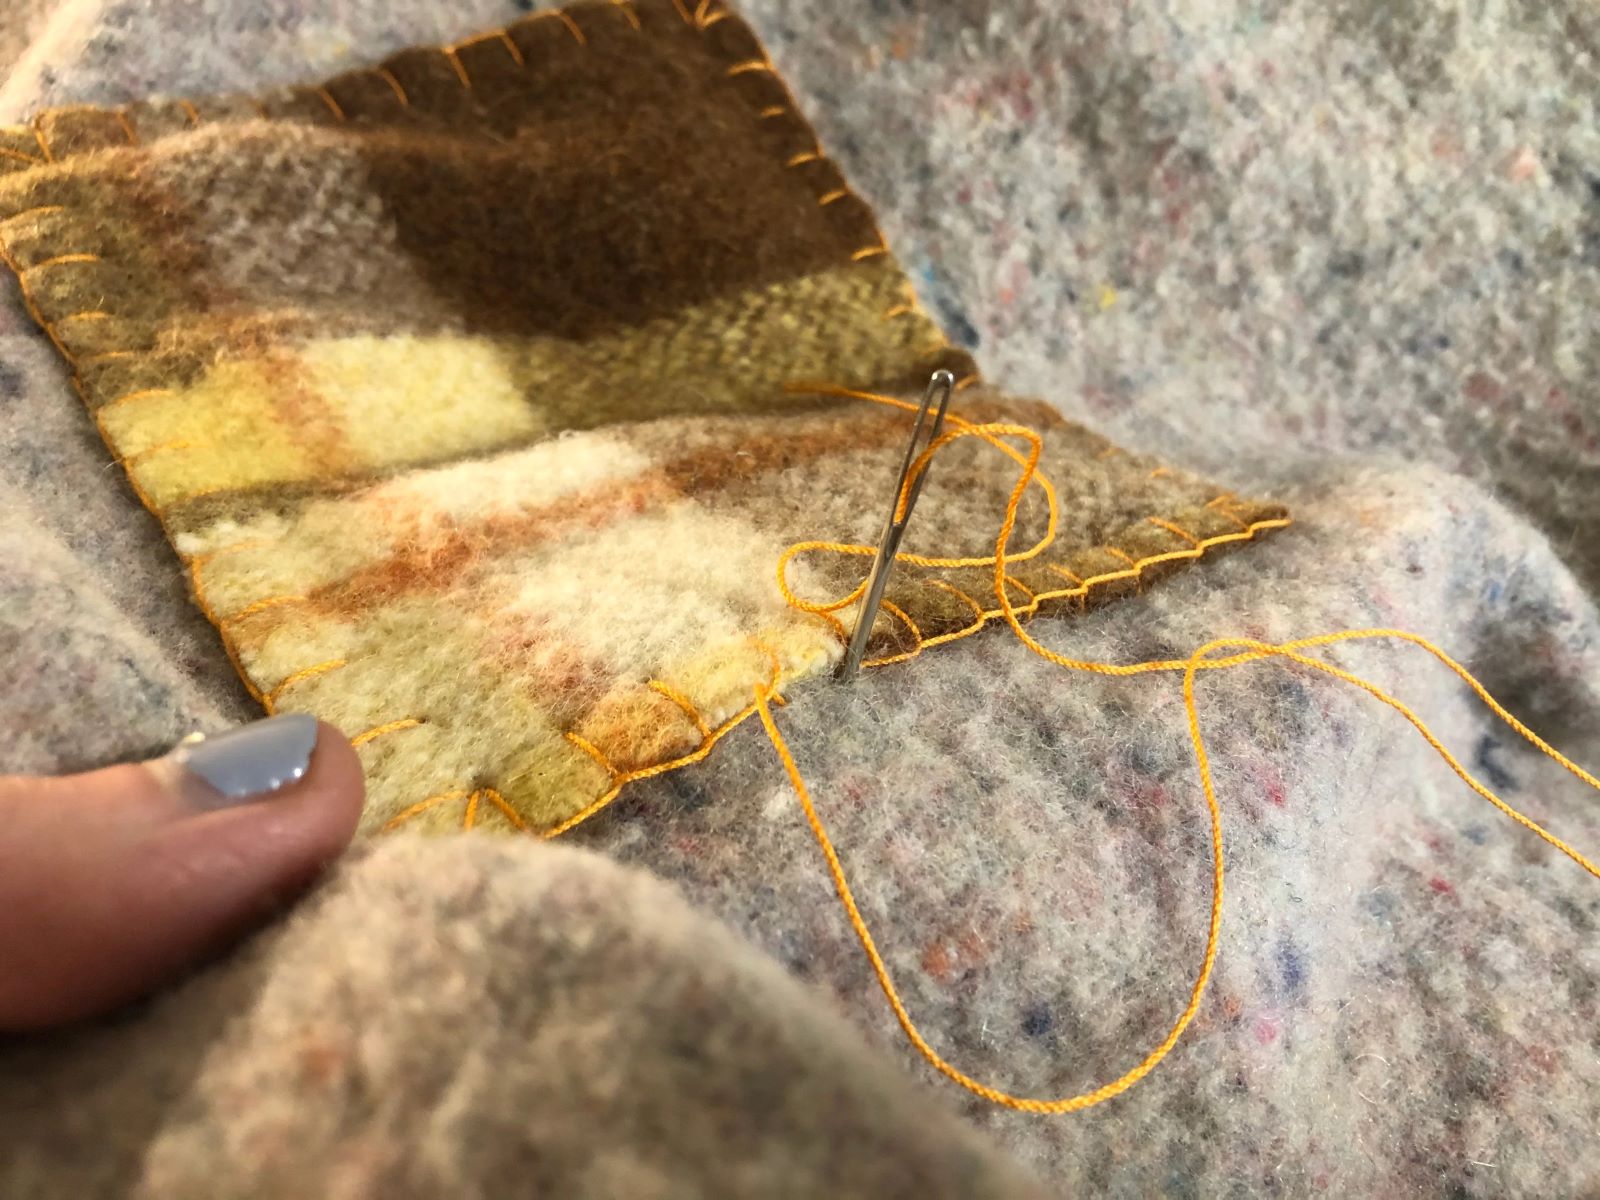
How To Fix A Hole In A Blanket
Modified: December 7, 2023
Learn how to fix a hole in a blanket with our informative articles. Get step-by-step instructions and helpful tips to mend your favorite blanket and extend its lifespan.
(Many of the links in this article redirect to a specific reviewed product. Your purchase of these products through affiliate links helps to generate commission for Storables.com, at no extra cost. Learn more)
Introduction
There’s nothing quite as frustrating as finding a hole in your favorite blanket. Whether it’s a cozy fleece throw or a cherished handmade quilt, a hole can not only compromise its functionality but also detract from its aesthetic appeal. However, fear not! With a few simple steps and some basic materials, you can easily repair that hole and restore your blanket to its former glory.
In this article, we will guide you through the process of fixing a hole in a blanket. We will cover everything from assessing the damage to reinforcing the area with patching material and stitching or mending the hole. By following these steps, you’ll be able to repair your blanket and enjoy its warmth and comfort for years to come.
Before we get started, it’s important to note that the method used to fix a hole in a blanket may vary depending on the type of fabric and the size and severity of the hole. It’s always a good idea to test any products or techniques on a small, inconspicuous area of the blanket before proceeding with the repair.
Now, let’s gather our materials and get ready to fix that pesky hole in your blanket!
Key Takeaways:
- Repairing a hole in a blanket is a manageable task with the right materials and techniques. Assess, prepare, reinforce, and stitch to seamlessly restore your beloved blanket to its former cozy glory.
- By following a step-by-step process, you can confidently repair a hole in your blanket, ensuring its functionality, comfort, and sentimental value are preserved for years to come.
Read more: How To Sew A Hole In A Blanket
Materials Needed
Before we begin the process of repairing the hole in your blanket, let’s make sure you have all the necessary materials. Here’s a list of items you’ll need:
- Needle and thread: Choose a needle and thread that are suitable for the fabric of your blanket. If the hole is in a delicate or lightweight fabric, use a finer needle and thread to minimize damage.
- Scissors: A pair of sharp scissors will be essential for trimming loose threads and cutting any necessary patching material.
- Patching material: This can include fabric scraps, iron-on patches, or fusible webbing, depending on the size and type of the hole. Select a patching material that matches the color and thickness of your blanket.
- Pins: Use pins to hold the patching material in place while you stitch or mend the hole.
- Thimble: A thimble can protect your finger from getting pricked by the needle while sewing.
- Measuring tape or ruler: This will help you measure and cut the patching material accurately.
- Fabric glue (optional): If you prefer to use fabric glue instead of stitching, make sure to choose a high-quality fabric glue that can withstand washing and drying.
- Iron and ironing board: If you’re using an iron-on patch, an iron and ironing board will be necessary to secure the patch to the blanket.
- Tweezers: These can be handy for picking up small fabric threads or removing any remaining debris from the hole.
Having these materials ready and within reach will streamline the repair process and ensure that you have everything you need to fix the hole in your blanket. Now that we have our materials in place, let’s move on to the next step: assessing the damage.
Step 1: Assess the Damage
Before diving into the repair process, it’s important to assess the extent of the damage to your blanket. Take a close look at the hole and examine its size, shape, and surrounding area. This will help you determine the best course of action for repairing it.
First, consider the size of the hole. Is it a small tear or a larger gap? Knowing the size of the hole will help you decide whether it can be easily stitched or if it will require a patching material to reinforce it.
Next, examine the fabric around the hole. Is it frayed or unraveling? Look for any loose threads or weakened areas adjacent to the hole. These may indicate additional areas that need reinforcement or repair.
Consider the location of the hole as well. Is it in a high-stress area, such as a seam or edge? Holes in these areas may require extra attention and reinforcement to ensure long-term durability.
Lastly, take note of any previous repairs or alterations that may be affecting the hole. If there are multiple layers of stitching or patches in the vicinity, it’s important to carefully remove them, if possible, before proceeding with the repair.
By thoroughly assessing the damage, you will have a better understanding of what needs to be done to fix the hole in your blanket. It will also help you determine if any additional steps, such as reinforcing the surrounding area or removing previous repairs, are necessary. Once you have a clear picture of the damage, you can move on to gathering the necessary supplies for the repair process.
Step 2: Gather the Necessary Supplies
Now that you’ve assessed the damage and have a plan in mind, it’s time to gather the necessary supplies to repair the hole in your blanket. Here’s what you’ll need:
- Needle and thread: Select a needle and thread that are appropriate for the fabric of your blanket. If you’re unsure, opt for a medium-weight needle and a thread that matches the color of your blanket.
- Scissors: Have a pair of sharp scissors on hand for cutting thread and trimming excess fabric.
- Patching material: Depending on the size and type of the hole, you may need fabric scraps, iron-on patches, or fusible webbing. Choose a patching material that matches the color and texture of your blanket.
- Pins: Use pins to temporarily secure the patching material in place while you work on the repair.
- Thimble: If you find it helpful, a thimble can protect your finger as you push the needle through the layers of fabric.
- Measuring tape or ruler: Use a measuring tape or ruler to ensure accurate sizing of the patching material.
- Fabric glue (optional): If you prefer not to sew, you can use fabric glue to attach the patching material instead. Choose a high-quality fabric glue that is suitable for your blanket fabric.
Having all the necessary supplies within reach will make the repair process much smoother. Ensure that your tools are in good condition and easily accessible. If using an iron-on patch, make sure your iron is ready and your ironing board is set up in a safe and stable area.
Now that you have everything you need, it’s time to move on to the next step: preparing the area for repair.
Step 3: Prepare the Area
Before beginning the actual repair process, it’s essential to prepare the area surrounding the hole in your blanket. This step will ensure that you have a clean and stable surface to work on. Follow these steps to prepare the area:
- Clean the blanket: If the blanket is dirty or stained, gently wash and dry it according to the manufacturer’s instructions. This will help remove any dirt or debris that may be present around the hole.
- Trim loose threads: Carefully trim any loose threads around the hole with a pair of sharp scissors. This will prevent them from getting tangled or caught during the repair process.
- Smooth out the fabric: Use your hands to gently smooth out and flatten the fabric around the hole. This will make it easier to position the patching material and ensure a seamless repair.
- Pin the patching material: If you’re using fabric scraps or other types of patching material, position them over the hole and secure them in place with pins. Make sure the patch extends beyond the edges of the hole for proper coverage.
By taking the time to prepare the area, you’ll create a clean and stable foundation for the repair process. Removing loose threads and smoothing out the fabric will ensure a more professional and seamless repair. Pinning the patching material in place will help you visualize the final outcome and ensure proper positioning.
Once you have prepared the area, you’re ready to move on to the actual repair process, which we will cover in the next step. Get your needle and thread or fabric glue ready, as we will be using them to fix the hole in your blanket.
To fix a hole in a blanket, use a needle and thread to carefully stitch the edges of the hole together. Make sure to use a thread that matches the color of the blanket for a seamless repair.
Read more: How To Fix A Hole In A Trampoline
Step 4: Repair the Hole from the Inside
Now that you have prepared the area, it’s time to begin the actual repair process. In this step, we will show you how to repair the hole in your blanket from the inside. This method provides a strong and durable fix that will keep your blanket intact for the long term. Follow these steps:
- Thread the needle: Thread the needle with a length of thread that is suitable for the size and thickness of your blanket fabric. Double-threading the needle can provide extra strength for the repair.
- Start from the inside: Turn your blanket inside out and locate the hole from the interior side. This will allow you to work on the repair without the thread and needle being visible on the outside of the blanket.
- Knot the thread: Make a small knot at the end of the thread to secure it in place.
- Anchor the thread: Insert the needle into the fabric slightly away from the hole, anchoring the thread securely. This will prevent the thread from pulling through the hole as you stitch.
- Sew a running stitch: Using a running stitch, sew along the edge of the hole, working your way around it. Make sure to keep your stitches small and evenly spaced for added stability.
- Continue stitching: Stitch beyond the hole by a few inches on each side to ensure a secure repair. This will reinforce the surrounding fabric and prevent further unraveling.
- Knot the thread: Once you have completed the running stitch, make a knot at the end of the thread to secure it in place.
By repairing the hole from the inside, you create a seamless and durable fix. The running stitch reinforces the fabric around the hole, preventing further damage and ensuring the longevity of your blanket.
Once you have finished repairing the hole from the inside, it’s time to move on to the next step: reinforcing the area with patching material. This additional step will provide extra strength and protection to the repaired area.
Step 5: Reinforce the Area with Patching Material
Now that you have repaired the hole from the inside, it’s time to reinforce the area with patching material. This step will provide additional strength and stability to the repaired section of your blanket. Follow these steps:
- Remove the pins: If you used pins to hold the patching material in place during the previous steps, carefully remove them.
- Cut the patching material: Measure and cut the patching material to a size slightly larger than the hole. This will ensure proper coverage and reinforcement.
- Position the patching material: Place the patching material over the hole, making sure it fully covers the repaired area. Smooth out any wrinkles or creases.
- Secure the patching material: If using fabric glue, carefully apply a thin layer to the back of the patching material and press it onto the fabric. If using an iron-on patch, follow the manufacturer’s instructions to bond it securely to the blanket.
- Allow the patching material to set: If using fabric glue, allow the adhesive to fully dry according to the manufacturer’s instructions. If using an iron-on patch, apply heat with an iron to activate the bonding process. Allow the patch to cool and set before proceeding.
Reinforcing the repaired area with patching material adds an extra layer of strength and protection. The patching material acts as a barrier, preventing further damage and ensuring the longevity of your blanket.
Once you have completed this step, it’s time to move on to the next step: stitching or mending the hole. This will further secure the patching material and ensure a seamless repair.
Step 6: Stitch or Mend the Hole
Now that you have reinforced the repaired area with patching material, it’s time to stitch or mend the hole. This step will ensure that the patching material is securely attached to the blanket and that the repair is seamless. Follow these steps:
- Thread the needle: Thread the needle with a matching thread color, ensuring that it is securely knotted at the end.
- Begin stitching: Start stitching along the edge of the patching material, using small and even stitches. If the hole is larger, you may need to extend your stitches further out to fully secure and blend the patching material with the surrounding fabric.
- Continue stitching: Work your way around the hole, making sure to maintain even tension and align your stitches with the existing fabric pattern. This will ensure that the repair is inconspicuous and blends seamlessly with the rest of the blanket.
- Knot the thread: Once you have completed stitching around the hole, make a knot at the end of the thread to secure it in place. Trim any excess thread, being careful not to cut the fabric.
- Inspect the repair: Take a step back and examine your work. Check for any loose stitches or areas that may need further reinforcement. Make any necessary adjustments or additional stitches as needed.
Stitching or mending the hole not only secures the patching material but also adds an extra layer of strength and longevity to the repair. By using small, even stitches and aligning them with the fabric pattern, you can ensure that the repair blends seamlessly with the rest of the blanket.
Once you have finished stitching or mending the hole, it’s time for the final step: adding the finishing touches and conducting a thorough inspection of your repaired blanket.
Step 7: Finishing Touches and Final Inspection
Congratulations! You’re almost done repairing the hole in your blanket. In this final step, we will add some finishing touches and conduct a thorough inspection to ensure that the repair is secure and seamless. Follow these steps:
- Trim any excess threads: Carefully trim any loose or excess threads from the repaired area with a pair of sharp scissors. This will give your blanket a neat and polished appearance.
- Smooth out the fabric: Use your hands to gently smooth out the fabric around the repaired area, making sure that it lies flat and blends seamlessly with the rest of the blanket.
- Inspect the repair: Take a close look at the repaired section to ensure that the stitches are secure, the patching material is firmly attached, and there are no visible gaps or inconsistencies.
- Test the integrity of the repair: Gently tug and pull on the repaired area to ensure that it can withstand everyday use. If the repair feels loose or weak, go back and reinforce the stitches or patching material.
- Wash and dry the blanket (if applicable): If your blanket is machine washable, follow the manufacturer’s instructions to launder it. This will help remove any remaining debris and ensure it is fresh and clean.
By completing these finishing touches and conducting a thorough inspection, you can be confident that your blanket is repaired and ready for use. The repaired area should blend seamlessly with the rest of the fabric, providing a strong and durable fix.
Now, wrap yourself up in your cozy, repaired blanket and enjoy its warmth and comfort once again!
Remember, each repair may vary depending on the size and type of the hole, as well as the fabric of the blanket. Adjust the techniques and materials as needed to suit your specific situation.
We hope this step-by-step guide has been helpful in repairing the hole in your blanket. With a little time and effort, you can restore your beloved blanket and continue to enjoy its comfort for many more years to come.
Happy repairing!
Read more: How To Fix Holes In Siding
Conclusion
Repairing a hole in your blanket doesn’t have to be a daunting task. With the right materials, techniques, and a little patience, you can restore your cherished blanket to its former glory. Whether it’s a small tear or a larger gap, following the steps outlined in this article will guide you through the process and ensure a successful repair.
We started by assessing the damage, understanding the size, location, and surrounding fabric conditions of the hole. Then, we gathered the necessary supplies, including a needle and thread, scissors, patching material, and pins. Preparing the area involved cleaning the blanket, trimming loose threads, and pinning the patching material in place.
We then went on to repair the hole from the inside, using a running stitch to secure the edges and reinforce the area. After that, we reinforced the repair with patching material, either through fabric glue or an iron-on patch, providing added strength and protection.
Further enhancing the repair, we stitched or mended the hole, ensuring that the patching material was securely attached and seamlessly blended with the rest of the blanket. Finally, we added the finishing touches, such as trimming excess threads and conducting a thorough inspection to ensure the repair’s integrity.
Remember, each repair may vary based on the blanket fabric and the size and severity of the hole. It’s always a good idea to test any products or techniques on a small, inconspicuous area before proceeding with the repair.
We hope this comprehensive guide has given you the confidence and knowledge to fix the hole in your blanket. By following these steps, you can not only restore functionality and comfort but also preserve the sentimental value of your beloved blanket for years to come.
So gather your materials, roll up your sleeves, and get ready to bring new life to your cherished blanket. Happy repairing!
Frequently Asked Questions about How To Fix A Hole In A Blanket
Was this page helpful?
At Storables.com, we guarantee accurate and reliable information. Our content, validated by Expert Board Contributors, is crafted following stringent Editorial Policies. We're committed to providing you with well-researched, expert-backed insights for all your informational needs.


0 thoughts on “How To Fix A Hole In A Blanket”