Articles
How To Hook Electrical Cord Up To A Ballast
Modified: December 7, 2023
Learn how to correctly hook up an electrical cord to a ballast with our informative articles. Gain expert insights and ensure safe, efficient connections.
(Many of the links in this article redirect to a specific reviewed product. Your purchase of these products through affiliate links helps to generate commission for Storables.com, at no extra cost. Learn more)
Introduction
Welcome to the world of electrical wiring! If you’re looking to connect an electrical cord to a ballast, you’ve come to the right place. In this article, we’ll walk you through the steps to successfully hook up an electrical cord to a ballast, ensuring a safe and reliable connection.
Electrical ballasts play a crucial role in lighting systems, regulating the flow of electric current to the light fixtures. They are commonly used in fluorescent and HID (High-Intensity Discharge) lighting systems. By hooking up the electrical cord to the ballast correctly, you’ll have a functional lighting system that illuminates your space efficiently.
Before we dive into the process, it’s important to note that working with electrical systems can be dangerous if proper precautions are not taken. If you’re not comfortable or familiar with electrical work, it’s always recommended to consult a licensed electrician. Now, let’s get started!
Key Takeaways:
- Properly connecting an electrical cord to a ballast is crucial for a safe and efficient lighting system. Understanding ballasts, following safety precautions, and testing the connection are essential steps for success.
- Safety is paramount when working with electrical systems. Always prioritize safety precautions, seek professional help if unsure, and follow manufacturer’s instructions to ensure a secure and reliable connection.
Understanding Electrical Ballasts
Before we proceed with connecting the electrical cord to the ballast, it’s essential to have a basic understanding of what a ballast is and how it works.
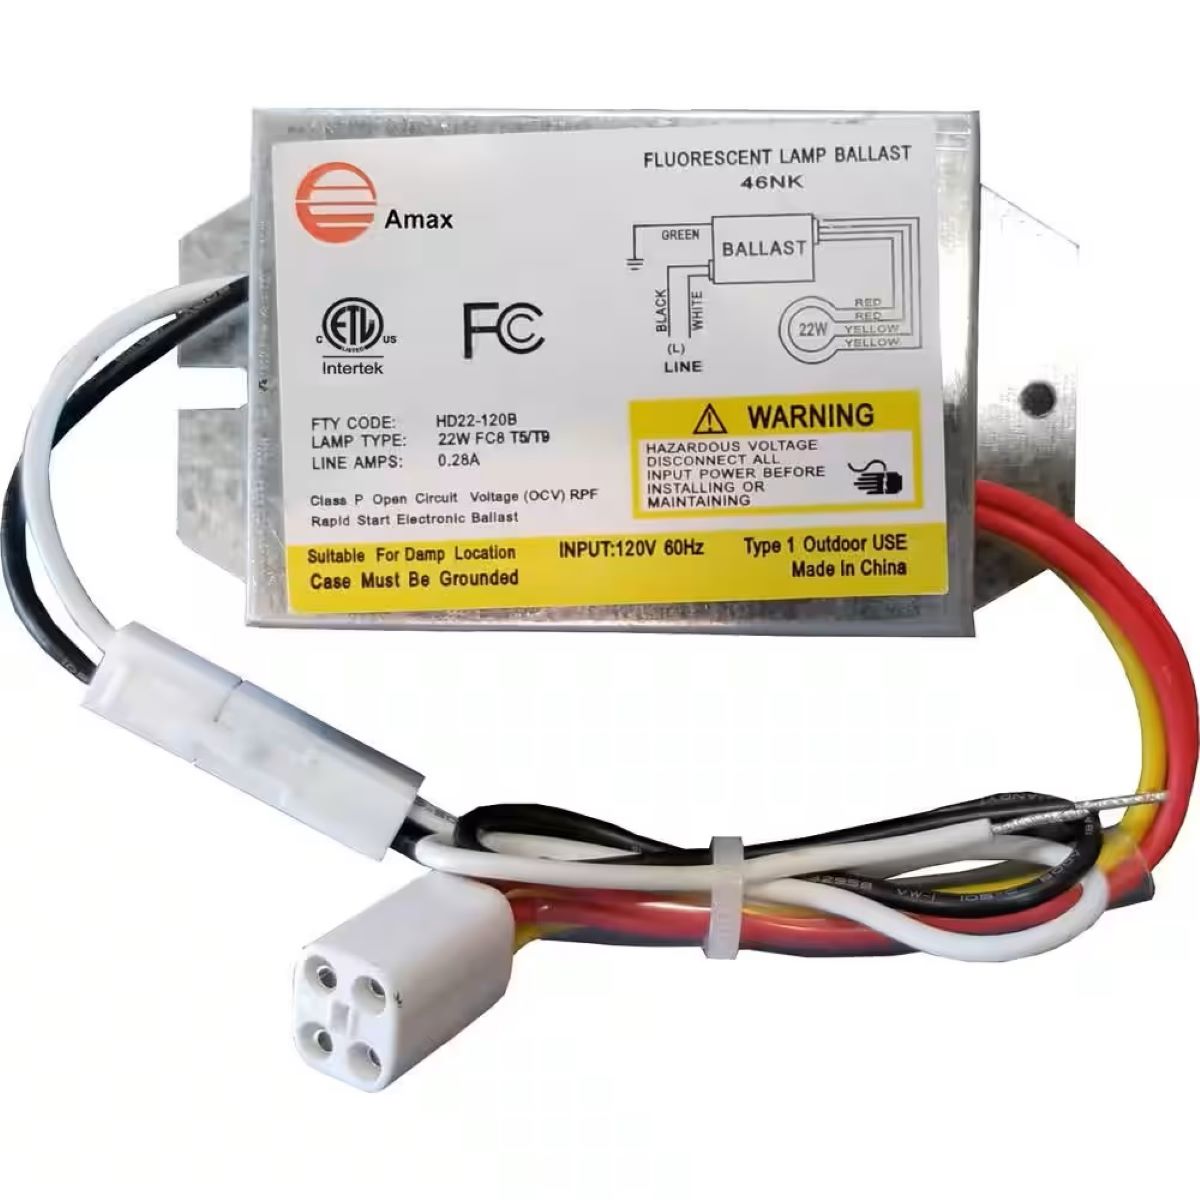
An electrical ballast is a device that helps regulate the current flowing through a lighting system. It ensures that the appropriate amount of electrical energy is supplied to the light fixture, preventing it from overheating and extending its lifespan.
There are different types of electrical ballasts available, but the most common ones are magnetic ballasts and electronic ballasts. Magnetic ballasts use an electromagnetic process to control the current flow, while electronic ballasts use solid-state electronic components.
When selecting a ballast, it’s important to consider factors such as the type of lighting fixture, the wattage of the lamps, and the voltage requirements. Understanding the specific requirements of your lighting system will help you choose the right ballast for the job.
Additionally, it’s worth noting that some ballasts are designed for specific types of lamps and may not be compatible with others. Make sure to check the manufacturer’s instructions or consult an expert to ensure that you’re using the appropriate ballast for your lighting setup.
Now that we have a basic understanding of electrical ballasts, let’s move on to preparing the electrical cord for connection.
Preparing the Electrical Cord
Before you can connect the electrical cord to the ballast, you’ll need to prepare the cord for the connection. Here are the steps to follow:
- Make sure the electrical cord is unplugged from any power source. Safety should always be the top priority.
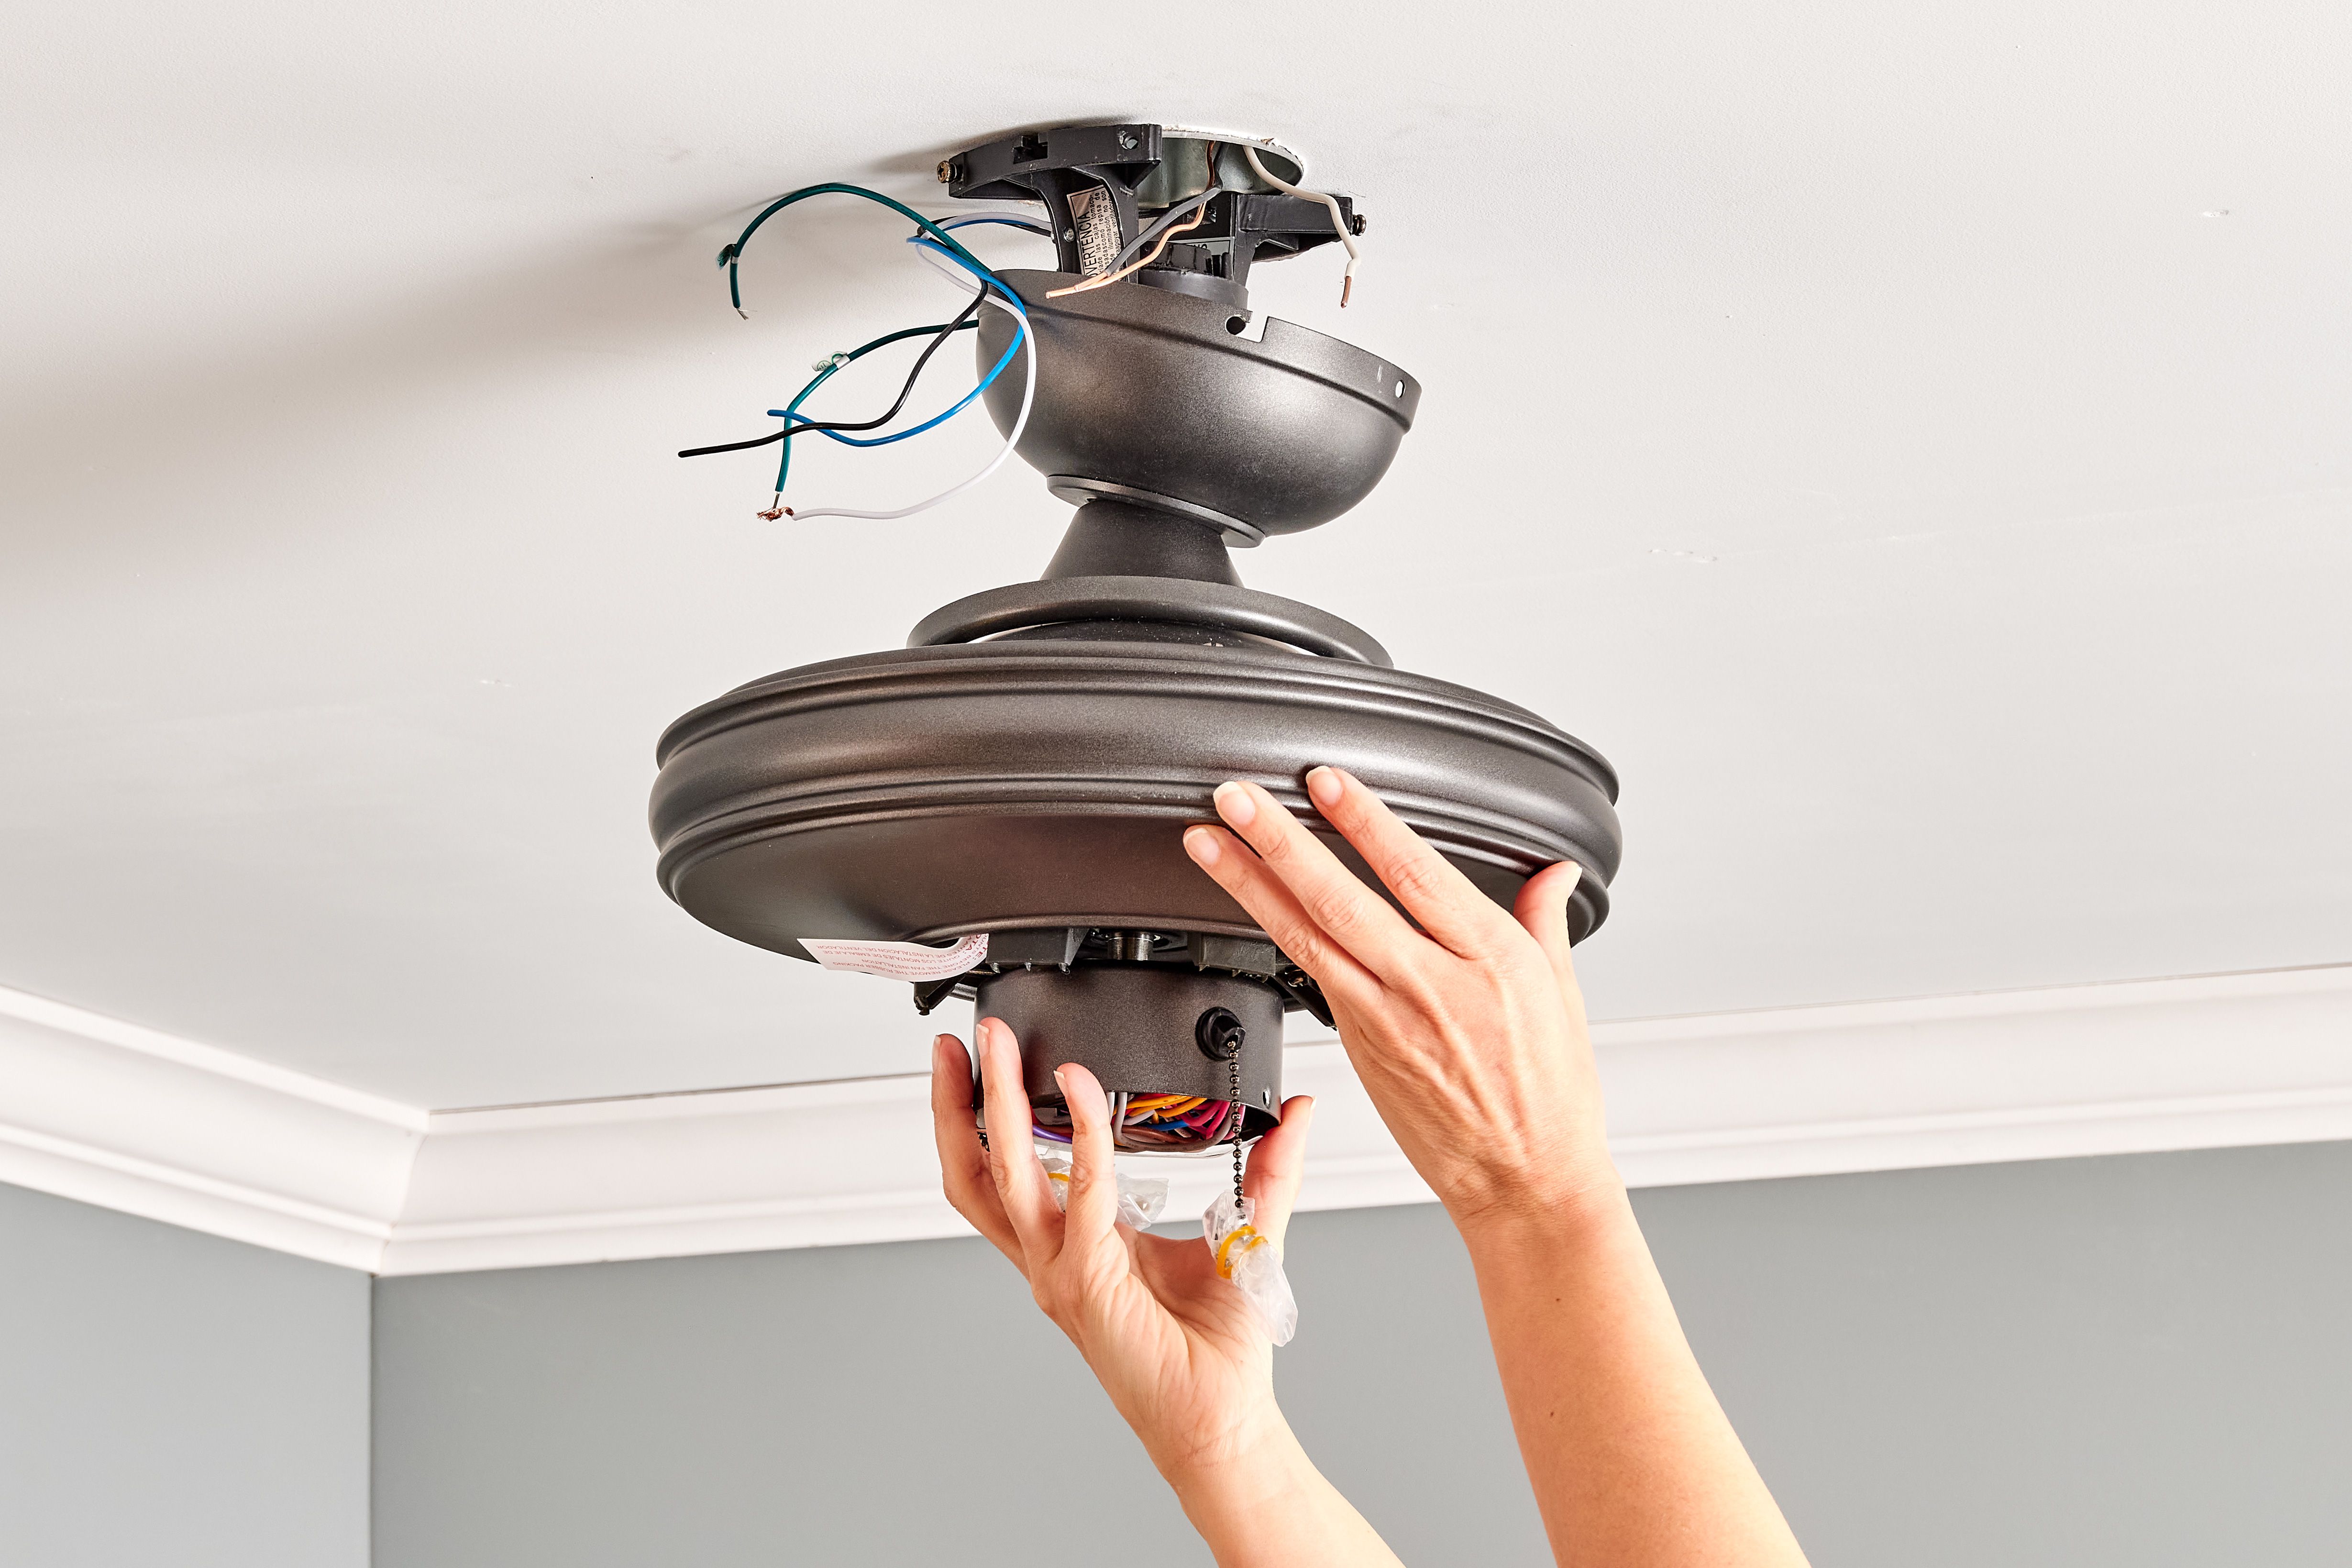
- If your electrical cord doesn’t have a plug attached, you’ll need to strip the insulation at the end to expose the wires. Use wire strippers to carefully remove about half an inch of insulation from each wire.
- After stripping the insulation, you’ll notice two or three wires within the cord. The most common colors are black (hot), white (neutral), and green or bare copper (ground).
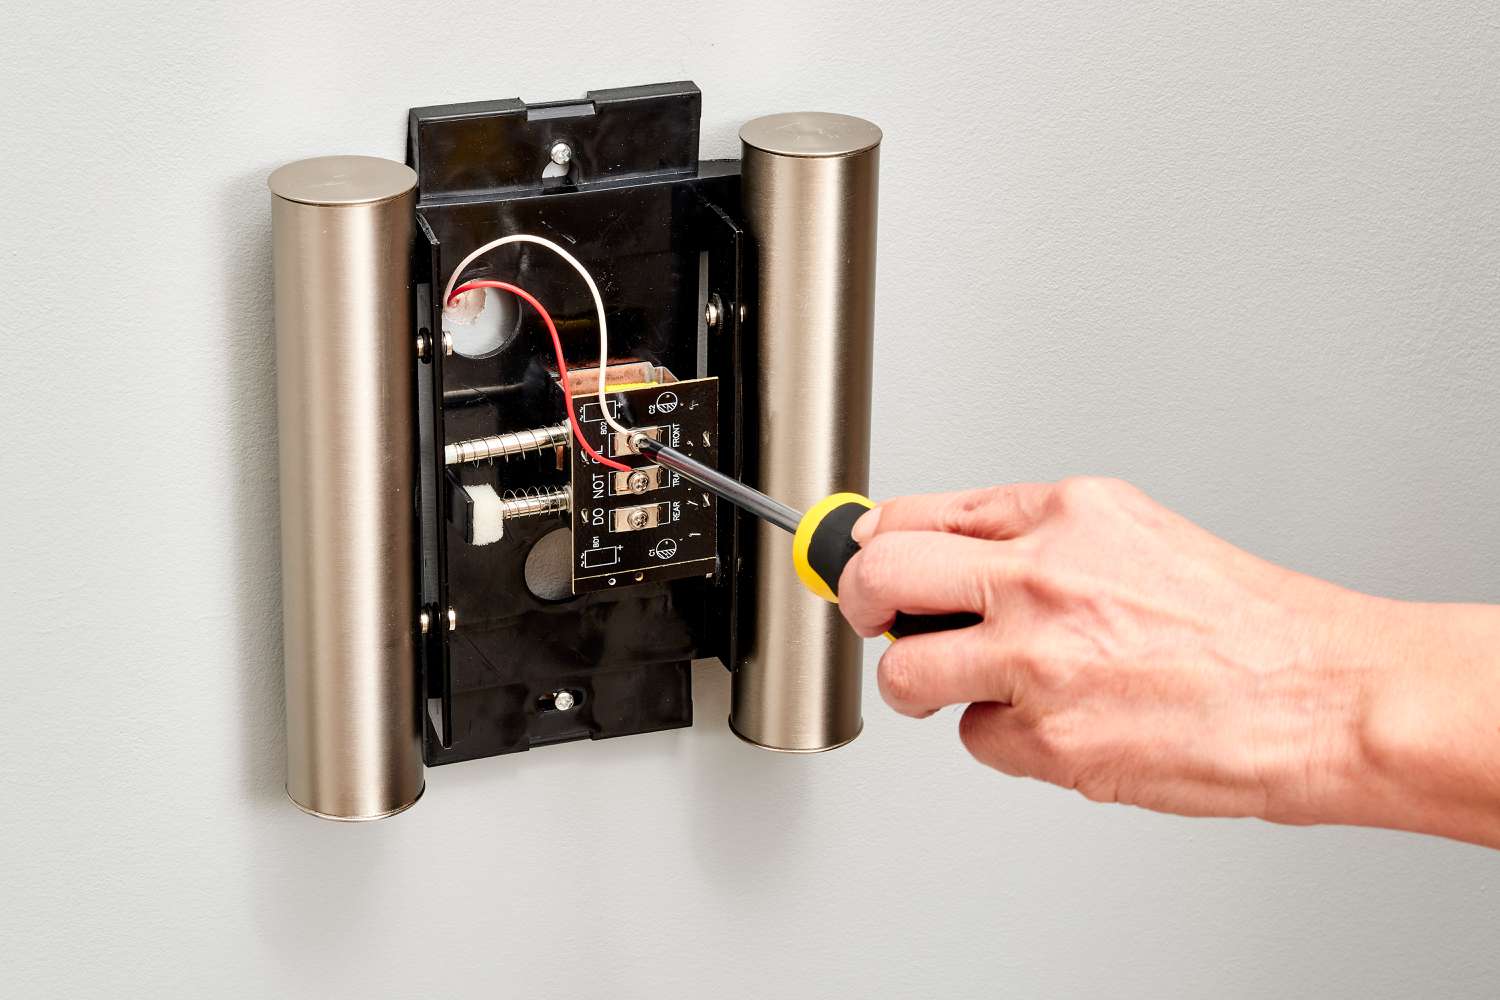
- If your cord has a ground wire, make sure to attach it to the grounding screw or terminal within the ballast. This step is crucial for electrical safety.
- For the hot (black) and neutral (white) wires, you’ll need to connect them to the appropriate terminals on the ballast. Refer to the manufacturer’s instructions or the wiring diagram provided with the ballast for guidance.
- Use wire connectors or terminal blocks to secure the connections between the cord and the ballast. Ensure that the connections are tight and that no exposed wires are left.
By properly preparing the electrical cord, you’ll have a solid foundation for connecting it to the ballast. Now, let’s move on to identifying the ballast connection points.
Identifying the Ballast Connection Points
Before you can connect the electrical cord to the ballast, it’s important to identify the connection points on the ballast itself. This will ensure that you make the proper connections and prevent any potential damage to the ballast or the electrical system. Here’s how to identify the ballast connection points:
- Refer to the manufacturer’s instructions or the wiring diagram provided with the ballast. These resources will typically indicate the specific terminals or wires that should be connected to the electrical cord.
- Inspect the ballast for labeled connection points. Some ballasts may have terminals or wires labeled as “Hot,” “Neutral,” “Ground,” or have specific markings corresponding to the wire colors.
- If the ballast does not have labeling or markings, you can usually determine the appropriate connection points by examining the wiring diagram. The diagram will illustrate how the ballast should be wired and indicate the corresponding terminals.
- Take note of the wire colors specified in the wiring diagram or instructions. This will help you ensure that you connect the correct wires from the electrical cord to the appropriate terminals on the ballast.
By carefully identifying the ballast connection points, you’ll be well-prepared to connect the electrical cord and avoid any confusion or mistakes. With this knowledge in hand, let’s move on to the actual process of connecting the electrical cord to the ballast.
Connecting the Electrical Cord to the Ballast
Now that you’ve prepared the electrical cord and identified the ballast connection points, it’s time to connect the two. Follow these steps to ensure a proper and secure connection:
- Double-check that the electrical cord is unplugged from any power source. Safety should always be the top priority when working with electricity.
- Hold the electrical cord and align the wires with their corresponding connection points on the ballast.
- For the hot wire (usually black), connect it to the hot terminal on the ballast. This is typically labeled “H” or “Hot.”
- For the neutral wire (usually white), connect it to the neutral terminal on the ballast. This is typically labeled “N” or “Neutral.”
- If your cord has a ground wire (usually green or bare copper), connect it to the ground terminal on the ballast. This is typically labeled “G” or “Ground.”
- Ensure that the wires are securely connected to the terminals on the ballast. Use wire connectors or terminal blocks to fasten the connections, making sure there is no exposed wire.
- Gently tug on the wires to ensure they are firmly connected and won’t come loose easily.
It’s important to be careful and precise when connecting the electrical cord to the ballast. Secure connections will ensure proper electrical flow and minimize the risk of electrical hazards.
Now that the electrical cord is properly connected, let’s proceed to the next step – securing the connection.
When hooking up an electrical cord to a ballast, make sure to match the voltage and wattage ratings of the ballast with the cord. Use wire connectors to secure the connections and always follow the manufacturer’s instructions for proper installation.
Read more: How To Hook Up An Electric Dryer
Securing the Connection
After connecting the electrical cord to the ballast, it’s crucial to secure the connection to ensure stability and prevent any accidental disconnections. Follow these steps to properly secure the connection:
- Check that all wire connections between the electrical cord and the ballast are tight and secure. Make sure there is no exposed wire or loose connections.
- If your ballast has a cover or casing, ensure that it is properly closed and fastened. This will protect the wiring and prevent any accidental contact with live electrical parts.
- If necessary, use electrical tape or zip ties to bundle and organize the wires, keeping them neat and free from any potential hazards. Avoid using excessive force or over-tightening, as this may damage the wires or the ballast.
- Double-check that all connections are properly insulated and protected from any potential damage or interference.
- Before moving on to the next step, visually inspect the secured connection to ensure everything is in order. Look for any signs of loose wires, exposed conductors, or other abnormalities.
By securely fastening the connection between the electrical cord and the ballast, you minimize the risk of accidental disconnection, electrical faults, and potential damage to the wiring system. A secure connection will also ensure the longevity and reliability of your lighting setup. With the connection secured, it’s time to test the electrical connection.
Testing the Electrical Connection
Before considering the job complete, it’s important to test the electrical connection to ensure everything is functioning properly and safely. Follow these steps to test the electrical connection:
- Ensure that the area where you will be testing the electrical connection is clear of any flammable materials or potential hazards.
- Plug in the electrical cord to a power source.
- If you have a switch or controller for the lighting system, turn it on. This will activate the ballast and illuminate the connected lights.
- Observe the lights to verify that they are functioning as expected. They should turn on without flickering and emit a steady, consistent light.
- If you notice any issues such as flickering lights, dim illumination, or no light at all, immediately unplug the electrical cord and double-check the connection. Ensure that all wires are securely connected and that the ballast and bulbs are compatible.
- If the issue persists, consult a licensed electrician for further troubleshooting and potential repairs.
Testing the electrical connection is a critical step to ensure that the ballast and the connected lights are operating safely and efficiently. Any irregularities or issues should be addressed promptly to prevent any potential hazards or damage.
With the testing completed successfully, let’s move on to the next section, where we’ll discuss some common troubleshooting tips for issues that may arise during the connection process.
Troubleshooting Common Issues
While connecting the electrical cord to a ballast is usually a straightforward process, occasional issues may arise. Here are some common problems you may encounter and how to troubleshoot them:
- Flickering or dim lights: If the lights connected to the ballast are flickering or emitting a dim light, it may indicate a loose connection. Double-check all the wire connections, ensuring they are securely fastened. If the issue persists, it could be a sign of a faulty ballast that needs to be replaced.
- No lights turn on: If the lights fail to turn on, check the power source and ensure it is providing electricity. If the power source is working properly, review the wiring connections between the cord and the ballast. Make sure all wires are correctly connected and secured. If the issue continues, the ballast or the bulbs may be faulty and require replacement.
- Electrical shocks or sparks: If you experience electrical shocks or see sparks during the connection process, immediately disconnect the power source and re-evaluate the connections. Loose or incorrect wiring can cause dangerous electrical hazards. If you’re unsure of how to proceed, consult a professional electrician to ensure the safety of yourself and your electrical system.
- Ballast overheating: If the ballast becomes excessively hot to the touch, it may indicate a problem with the ballast or an incompatible wattage setting. Check the manufacturer’s instructions to ensure that the ballast can handle the wattage of the connected lights. If the overheating continues, it may be necessary to replace the ballast.
If you encounter any other issues or are unsure how to proceed, it’s always recommended to seek assistance from a licensed electrician. They have the expertise to diagnose and resolve electrical issues effectively and safely.
Remember, safety should always be your top priority when working with electrical systems. If you’re uncertain about any aspect of the connection process or troubleshooting, don’t hesitate to consult a professional.
Now that we’ve covered common troubleshooting tips, let’s move on to discussing some essential safety precautions to keep in mind throughout the process.
Safety Precautions
Working with electrical systems can be hazardous if proper safety precautions are not followed. To ensure your safety and the safety of others, keep these essential safety precautions in mind when connecting an electrical cord to a ballast:
- Turn off the power: Before starting any work, always disconnect the power source to prevent electrical shock. Ensure the electrical cord is unplugged during the entire connection process.
- Use appropriate personal protective equipment (PPE): Wear insulated gloves and safety goggles to protect yourself from potential electrical hazards.
- Read the manufacturer’s instructions: Familiarize yourself with the manufacturer’s instructions and follow them carefully to ensure that you’re using the correct techniques and materials for the specific ballast. This will help prevent errors and potential safety risks.
- Avoid working in wet conditions: Wet conditions increase the risk of electrical shock. Always ensure that your work area is dry before proceeding.
- Inspect the electrical cord: Before starting the connection process, thoroughly inspect the electrical cord for any damage, such as fraying or exposed wires. Do not proceed if there are signs of damage; replace the cord instead.
- Take precautions against electrical overload: Ensure that the ballast can handle the wattage of the connected lights. Overloading the ballast can result in overheating and potential fires. Refer to the manufacturer’s instructions or consult an electrician if unsure.
- Avoid touching live wires: Never touch exposed wires or terminals while the power is on. Always assume that any wire could be live and potentially dangerous.
- Secure the electrical cord: Properly secure the electrical cord and the ballast connections to prevent accidental disconnections or damage. This will help maintain a stable and safe electrical connection.
- Consult a professional if unsure: If you are unsure about any aspect of the connection process, or if you encounter any issues or concerns, seek assistance from a licensed electrician. They have the expertise to handle electrical work safely and effectively.
By following these safety precautions, you can significantly reduce the risk of electrical accidents and ensure a safe working environment. Remember, it’s always better to be cautious and seek professional help when needed.
Now that you’re equipped with the necessary knowledge and precautions, you can confidently connect an electrical cord to a ballast. Let’s conclude this article.
Read more: How To Hook Up An Electric Fence
Conclusion
In this article, we have covered the essential steps to hooking up an electrical cord to a ballast. By following the proper procedures and safety precautions, you can successfully connect the cord and ensure a safe and functional lighting system.
We began by understanding the basics of electrical ballasts and their role in regulating current flow to lighting fixtures. We then walked through the process of preparing the electrical cord, identifying the ballast connection points, and making the necessary connections. We emphasized the importance of securing the connection and testing it to ensure proper functionality.
Throughout the process, we highlighted common troubleshooting tips and emphasized the need for safety precautions. Working with electricity requires utmost caution, and it’s crucial to follow proper procedures and seek assistance when uncertain or uncomfortable with any aspect of the work.
Remember, if you are unfamiliar with electrical work or have concerns about your ability to safely complete the connection, it’s always advisable to consult a licensed electrician. They have the expertise and experience to handle electrical projects safely and efficiently.
By following the guidelines outlined in this article, you can confidently connect an electrical cord to a ballast and enjoy a well-functioning lighting system in your space. Prioritize safety, take your time, and double-check your work to ensure a successful and reliable connection.
Thank you for reading, and we hope this article has been informative and helpful to you!
Frequently Asked Questions about How To Hook Electrical Cord Up To A Ballast
Was this page helpful?
At Storables.com, we guarantee accurate and reliable information. Our content, validated by Expert Board Contributors, is crafted following stringent Editorial Policies. We're committed to providing you with well-researched, expert-backed insights for all your informational needs.
0 thoughts on “How To Hook Electrical Cord Up To A Ballast”