Articles
How To Hook Up A Doorbell
Modified: October 20, 2024
Learn how to hook up a doorbell with this comprehensive guide. Find step-by-step instructions and helpful articles to ensure a successful installation.
(Many of the links in this article redirect to a specific reviewed product. Your purchase of these products through affiliate links helps to generate commission for Storables.com, at no extra cost. Learn more)
Introduction
Welcome to our comprehensive guide on how to hook up a doorbell! Whether you’re a DIY enthusiast or a homeowner who wants to upgrade their home security, installing a doorbell can be a simple and rewarding project. With just a few tools and some basic knowledge, you can have a fully functional doorbell system in no time.
Having a doorbell not only allows you to hear when someone is at your door, but it also adds convenience and security to your home. Imagine never missing a delivery again or being able to greet your guests with a pleasant chime. With our step-by-step instructions, you’ll be able to install a doorbell quickly and easily.
Before we dive into the installation process, let’s go over some key points. Firstly, it’s important to gather the necessary tools and materials. This will ensure that you have everything you need before getting started. Secondly, you’ll need to determine the ideal placement for your doorbell. This will depend on factors such as the layout of your home and your personal preferences. And finally, we’ll guide you through the installation steps, from attaching the doorbell button to connecting the wiring.
Throughout this guide, we’ll provide helpful tips and tricks to make the installation process as smooth as possible. We’ll also cover common troubleshooting issues that you may encounter along the way. So, let’s get started and learn how to hook up a doorbell!
Key Takeaways:
- Installing a doorbell is a simple and rewarding DIY project that enhances home security and convenience. From gathering tools to troubleshooting, this guide provides step-by-step instructions for a successful installation.
- Proper placement, secure installation, and thorough testing are essential for a fully functional doorbell system. Following the guide ensures a smooth process and empowers homeowners to enjoy the benefits of a doorbell.
Read more: How Do You Hook Up A Ring Doorbell
Step 1: Gather the necessary tools and materials
Before you begin installing your doorbell, it’s important to gather all the necessary tools and materials. This will ensure that you have everything you need at hand, saving you time and preventing any unnecessary delays. Here’s a list of items you’ll need:
- Doorbell kit: This typically includes a doorbell button, a doorbell chime, and the necessary wiring.
- Screwdriver: You’ll need a screwdriver to attach the doorbell button and chime to the wall.
- Wire strippers: These will be used to remove the insulation from the wire ends.
- Drill and drill bits: If you need to drill holes to mount the doorbell button or chime, be sure to have a drill and appropriate-sized drill bits.
- Electrical tape: This will be used to secure the wire connections and prevent any electrical hazards.
- Level: A level will come in handy to ensure that your doorbell button and chime are perfectly horizontal.
- Pencil or marker: You’ll need a pencil or marker to mark the placement of your doorbell components on the wall.
- Circuit tester: To ensure your safety, it’s important to have a circuit tester to check for any live electrical wires.
It’s important to note that the specific tools and materials needed may vary depending on the doorbell kit you have purchased. Be sure to read the instructions provided with your kit to identify any additional requirements.
Once you have gathered all the necessary tools and materials, you’ll be ready to move on to the next step: locating the ideal placement for your doorbell. This step is crucial as it determines the functionality and convenience of your doorbell system. Stay tuned for step 2!
Step 2: Locate the ideal placement for the doorbell
Now that you’ve got all the tools and materials ready, it’s time to determine the ideal placement for your doorbell. The placement will depend on several factors, including the layout of your home, the wiring capabilities, and your personal preferences.
Here are a few tips to help you find the perfect spot for your doorbell:
- Consider the entrance: The doorbell button should be easily accessible to visitors. Typically, it is placed near the main entrance of the house at a height that is comfortable for most people to reach.
- Avoid obstructions: Make sure there are no obstructions such as plants or decorations that could block the view of the doorbell button.
- Protect from the elements: If possible, choose a location that offers some protection from rain, snow, or direct sunlight. This will help prolong the lifespan of your doorbell.
- Check for wiring accessibility: Check if there are existing wires in the desired location or if you’ll need to run new wires. It’s often easier to install the doorbell near existing wiring to avoid complex installations.
- Consider the chime placement: The doorbell chime should be located inside your home and in a central area where it can be easily heard throughout the house.
Once you’ve determined the ideal placement for your doorbell, use a level and a pencil or marker to mark the exact positions where the doorbell button and chime will be installed. Take your time to ensure that the markings are level and aligned properly.
With step 2 complete, you’ve successfully located the ideal placement for your doorbell. In the next step, we’ll guide you through the installation process of the doorbell button. Stay tuned!
Step 3: Install the doorbell button
With the ideal placement of your doorbell determined, it’s time to install the doorbell button. Follow these step-by-step instructions to ensure a successful installation:
- Start by checking the back of your doorbell button for any mounting holes or slots. Use a pencil or marker to mark the exact position where you will be mounting it on the wall.
- Using a drill and an appropriate-sized drill bit, create the necessary holes in the marked positions. Be careful not to drill too deep or damage the surrounding area.
- Insert wall anchors, if provided, into the drilled holes to ensure a secure fit for the screws.
- Place the doorbell button over the drilled holes and align it properly. Insert the mounting screws through the back of the doorbell button into the wall anchors or directly into the wall if anchors are not needed.
- Use a screwdriver to tighten the screws, ensuring that the doorbell button is securely attached to the wall.
It’s important to note that different doorbell models may have variations in installation methods. Always refer to the instructions provided with your specific doorbell kit for the most accurate and detailed instructions.
Once the doorbell button is installed, give it a gentle push to ensure that it is properly secured and functioning correctly. You should hear a satisfying click or feel a slight resistance when the button is pressed.
Congratulations! You have successfully installed the doorbell button. In the next step, we’ll guide you through the installation of the doorbell chime. Stay tuned for step 4!
Step 4: Install the doorbell chime
Now that you have installed the doorbell button, it’s time to install the doorbell chime. The chime is responsible for producing the sound when the doorbell button is pressed. Follow these step-by-step instructions to install the chime:
- Choose a suitable location for the chime inside your home. It should be centrally located so that the sound can be heard throughout the house.
- Hold the chime against the wall at the desired location and use a pencil or marker to mark the positions of the mounting holes.
- Using a drill and an appropriate-sized drill bit, create holes at the marked positions. Be sure to drill at the correct depth and angle to ensure a secure fit.
- If your chime comes with mounting anchors, insert them into the drilled holes. This will provide additional stability for the screws.
- Align the mounting holes on the chime with the drilled holes on the wall. Insert the screws through the back of the chime and into the anchors or directly into the wall.
- Tighten the screws using a screwdriver, ensuring that the chime is securely attached to the wall.
It’s important to note that different doorbell chime models may have variations in their installation methods. Always refer to the instructions provided with your specific chime for the most accurate and detailed instructions.
Once the chime is securely installed, give it a gentle tap to ensure that it is mounted properly and won’t easily come loose. You can also test the sound by temporarily connecting the doorbell button wires to the corresponding terminals on the chime. Press the button to check if the chime produces the desired sound.
Great job! You have successfully installed the doorbell chime. In the next step, we’ll guide you on how to connect the wiring. Stay tuned for step 5!
When hooking up a doorbell, make sure to turn off the power to the existing doorbell before starting any installation or wiring work to avoid the risk of electrical shock. Always follow the manufacturer’s instructions for proper installation.
Read more: How To Hook Up An Electric Fence
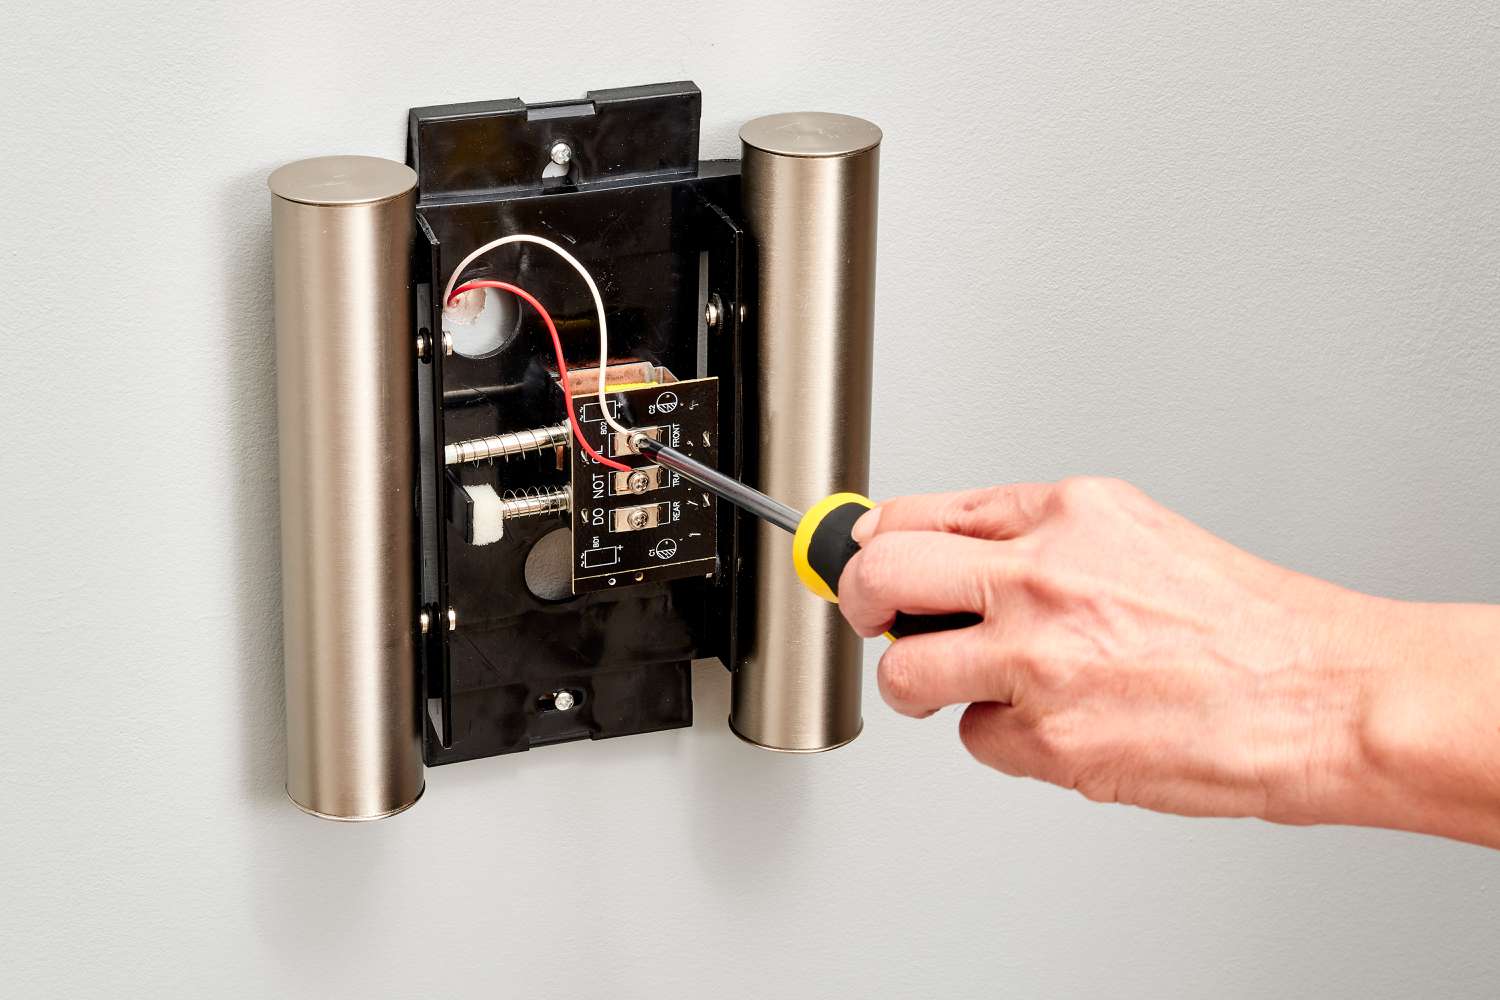
Step 5: Connect the wiring
Connecting the wiring is a crucial step in the doorbell installation process. It involves establishing the electrical connections between the doorbell button, doorbell chime, and the power source. Follow these step-by-step instructions to connect the wiring:
- Identify the wires: Start by identifying the wires coming from the doorbell button and the chime. Usually, these wires are color-coded, with one wire being positive (+) and the other negative (-).
- Strip the wire ends: Use wire strippers to carefully strip off a small portion of insulation from each wire end. This will expose the bare metal wire for easier connection.
- Connect the wires to the doorbell button: Locate the terminals on the back of the doorbell button. Wrap the exposed wire around the corresponding terminals, ensuring a tight connection. Use electrical tape to secure the wire and prevent any loose connections.
- Connect the wires to the chime: Locate the terminals on the back of the chime. Match the wire colors and attach them to the appropriate terminals. Again, wrap the exposed wire around the terminals and use electrical tape for added security.
- Connect the power source: If your doorbell system requires a power source, locate the transformer or power supply and connect the appropriate wires. Follow the instructions provided with your specific doorbell kit to ensure the correct connection.
It’s important to handle the wiring with caution and ensure that all connections are secure and properly insulated. Improperly connected wiring can result in malfunctions or even electrical hazards.
Once all the wiring connections are made, carefully tuck the wires into the wall or use clips to secure them along the wall. This will help keep the installation clean and eliminate any tripping hazards.
Congratulations! You have successfully connected the wiring for your doorbell. In the next step, we’ll guide you on how to test the doorbell functionality. Stay tuned for step 6!
Step 6: Test the doorbell functionality
After completing the wiring connections, it’s time to test the functionality of your doorbell. Follow these steps to ensure that everything is working properly:
- Ensure the power is on: Before testing the doorbell, make sure that the power supply is turned on and providing power to the system.
- Press the doorbell button: Press the doorbell button to see if the chime produces the expected sound. Listen for the chime inside your home to confirm that it is working correctly.
- Adjust the volume: Some doorbell chimes have adjustable volume settings. If your chime allows it, adjust the volume to your desired level.
- Test from different locations: Walk around your home and test the doorbell from various locations to ensure that the sound can be heard clearly throughout the house.
- Check for any issues: Pay attention to any issues such as a weak sound, no sound at all, or inconsistent functionality. If you encounter any problems, refer to the troubleshooting section in the instructions or consult a professional for assistance.
If you’re satisfied with the doorbell’s functionality, you can proceed to the final step of the installation process. If there are any issues or the doorbell is not working properly, refer to the troubleshooting section in your specific doorbell kit’s instructions. It’s important to address any problems promptly for a fully functioning doorbell system.
By successfully testing the doorbell functionality, you’re one step closer to enjoying the convenience and security that a doorbell provides. In the next step, we’ll cover some common troubleshooting issues that you may encounter. Stay tuned for step 7!
Step 7: Troubleshooting common issues
Even with a well-installed doorbell system, you may encounter some common issues. Don’t worry – we’ve got you covered with some troubleshooting tips to help you resolve common doorbell problems:
1. No sound from the doorbell chime: If you press the doorbell button and there’s no sound from the chime, first check that the power supply is connected and working. Ensure that the wiring connections are secure and properly insulated. If everything seems fine, there may be an issue with the chime itself. Check the chime’s settings and consult the instructions for further troubleshooting steps.
2. Weak or distorted sound: If the doorbell chime produces a weak or distorted sound, it could be due to insufficient power or a faulty chime. Make sure that the power supply is sufficient for your doorbell system. If the power supply is adequate and the problem persists, consider replacing the chime with a higher-quality model.
3. Button not working: If the doorbell button doesn’t produce a response when pressed, check the wiring connections at both the button and the chime. Ensure that the wiring is properly connected to the correct terminals. If the wiring connections are secure, try replacing the doorbell button with a new one. If the problem persists, there may be an issue with the wiring or the chime itself, and you may need to consult a professional for assistance.
4. Inconsistent functionality: If the doorbell works intermittently or inconsistently, check the wiring connections for any loose or frayed wires. Ensure that all connections are secure and properly insulated. If the issue persists, it may be a sign of a faulty chime or a wiring problem. Consider seeking professional help to diagnose and fix the issue.
Remember, it’s essential to refer to the specific instructions provided with your doorbell kit for troubleshooting tips and guidelines. If you’re unsure or uncomfortable with any troubleshooting steps, it’s always best to consult a professional electrician or technician.
With these troubleshooting tips, you should be able to resolve common doorbell issues and enjoy a fully functional doorbell system. Congratulations on successfully installing and troubleshooting your doorbell!
As a final note, always prioritize safety during the installation and troubleshooting process. If you’re not familiar with electrical work or uncomfortable with any step, it’s best to seek professional assistance to ensure a safe and effective installation.
Conclusion
Congratulations! You have successfully completed the process of hooking up a doorbell. By following the steps outlined in this guide, you have gained the knowledge and skills to install a doorbell and enjoy the convenience and security it provides to your home.
We started by gathering the necessary tools and materials for the installation, ensuring that you had everything you needed at hand. Then, we guided you through locating the ideal placement for your doorbell, considering factors such as accessibility, obstructions, and protection from the elements.
Next, we walked you through the installation of the doorbell button and the doorbell chime, providing step-by-step instructions and tips for a secure and proper installation. We discussed the importance of connecting the wiring correctly and ensuring that all connections are properly insulated for safety.
We then moved on to testing the doorbell functionality, allowing you to confirm that the system is working as expected. In case you encounter any issues, we provided troubleshooting tips to help you address common doorbell problems.
By completing all of these steps, you have successfully installed and tested your doorbell, taking a significant step towards enhancing the convenience and security of your home. Enjoy the peace of mind that comes with being alerted when someone is at your door, whether it’s a visitor or a package delivery.
Remember, safety is a top priority during the installation process. If you’re unsure about any step or uncomfortable with electrical work, it’s best to consult a professional electrician to ensure a safe and proper installation.
We hope this guide has empowered you with the knowledge and confidence to hook up a doorbell. Thank you for choosing our comprehensive guide, and we wish you many pleasant doorbell chimes in the future!
Frequently Asked Questions about How To Hook Up A Doorbell
Was this page helpful?
At Storables.com, we guarantee accurate and reliable information. Our content, validated by Expert Board Contributors, is crafted following stringent Editorial Policies. We're committed to providing you with well-researched, expert-backed insights for all your informational needs.

0 thoughts on “How To Hook Up A Doorbell”