Articles
How To Hook Up An Electric Fence
Modified: August 22, 2024
Learn how to hook up an electric fence with our informative articles. Discover the best tips, tricks, and techniques for successful installation and maintenance.
(Many of the links in this article redirect to a specific reviewed product. Your purchase of these products through affiliate links helps to generate commission for Storables.com, at no extra cost. Learn more)
Introduction
Welcome to the world of electric fences, where technology meets security and convenience. If you’re looking to protect your property, contain animals, or deter intruders, an electric fence can be a highly effective solution. In this comprehensive guide, we’ll take you through the process of setting up an electric fence, step-by-step.
Electric fences are not just for farms and agricultural settings; they are increasingly being used in residential areas for various purposes. From keeping pets safely confined to creating a boundary around your garden to prevent wildlife from entering, an electric fence offers a versatile and customizable solution.
Before we dive into the details of how to install an electric fence, let’s briefly understand how it works. An electric fence consists of several components, including a charger, wire, insulators, grounding system, and fence posts. The charger, also known as an energizer, sends short pulses of electrical energy through the wire, creating a deterrent shock for anyone or anything that comes into contact with it.
Now that we have a basic understanding of electric fences, let’s gather the necessary supplies and get started with the installation process. Whether you’re a beginner or have some experience with DIY projects, this guide will provide you with the information you need to successfully hook up an electric fence.
Key Takeaways:
- Proper planning, installation, and maintenance of an electric fence can provide peace of mind, security, and protection for your property, animals, and loved ones. Understanding the components, gathering supplies, and following safety guidelines are crucial for a reliable and effective electric fence system.
- Regular inspections, vegetation control, weather protection, periodic testing, and proper training for animals are key considerations for maintaining the longevity and effectiveness of an electric fence. Adhering to safety precautions, displaying warning signs, and seeking professional assistance when needed further promote a secure and reliable electric fence system.
Read more: How To Hook Up An Electric Dryer
Understanding Electric Fences
Before diving into the installation process, it’s important to understand the key components and principles behind electric fences. This knowledge will help you make informed decisions and ensure the effectiveness and safety of your electric fence setup.
1.1 Electric Fence Charger: Also known as an energizer or controller, the electric fence charger is the heart of the system. It supplies the electrical pulses that create the deterrent shock. Chargers come in different types, such as battery-powered, solar-powered, or plug-in models. Choose a charger based on your specific needs and the size of your fence.
1.2 Wire Types: The wire is what carries the electrical current throughout the fence. There are different types to consider, such as steel wire, aluminum wire, or polywire. Steel wire is the most durable option, while aluminum wire is lightweight and easier to handle. Polywire is a popular choice for temporary fences as it is highly visible and easily adjustable.
1.3 Insulators: Insulators are crucial for keeping the electric wire secure and preventing it from grounding out. They come in various forms, including porcelain, plastic, or rubber. Choose insulators based on the type of fence posts you’ll be using and the wire material.
1.4 Grounding System: A proper grounding system is essential for the electric fence to function effectively. It provides a path for the electrical pulse to return to the charger. A grounding rod, also known as an earth rod, is driven into the ground and connected to the charger with a grounding wire. Ensure the rod is made of copper or galvanized steel for optimal conductivity.
1.5 Fence Posts: Fence posts provide support and structure for the electric fence. They can be made of wood, metal, or fiberglass. The choice of fence posts depends on the type of terrain, the length of the fence, and your personal preference.
1.6 Safety Considerations: Electric fences are highly effective but also come with certain safety considerations. It’s crucial to place warning signs on your fence to alert people of its presence. Additionally, ensure that your fence meets local regulations and codes to avoid any legal issues.
Understanding these key components and principles of electric fences will set the foundation for a successful installation. In the next section, we will explore the supplies you’ll need to gather before starting the installation process.
Gathering the Necessary Supplies
Before you begin installing the electric fence, it’s important to gather all the necessary supplies. Having everything on hand will help streamline the installation process and ensure that you don’t run into any delays. Here are the essential supplies you’ll need:
2.1 Electric Fence Charger: The electric fence charger is the heart of your electric fence system. Choose a charger based on the size of your fence and the power source you prefer, such as battery-powered, solar-powered, or plug-in models.
2.2 Wire: Choose the appropriate wire for your electric fence based on your specific needs. Steel wire is a durable option, while aluminum wire is lightweight and easy to handle. Polywire is a popular choice for temporary fences, thanks to its high visibility and adjustability.
2.3 Insulators: Insulators are used to secure the wire to the fence posts and prevent it from grounding out. Select insulators based on the type of fence posts and the wire material you’re using. Porcelain, plastic, or rubber insulators are commonly used.
2.4 Grounding System: A properly installed grounding system is crucial for the effectiveness of your electric fence. You’ll need grounding rods, which are typically made of copper or galvanized steel, and grounding wire to connect the rods to the charger.
2.5 Fence Posts: Choose the type of fence posts that best suits your needs and terrain. Wood, metal, or fiberglass posts are common options. Consider the length of your fence and the level of stability required when selecting fence posts.
2.6 Warning Signs: Safety should always be a priority when installing an electric fence. Place warning signs at regular intervals to alert people of the presence of an electric fence. Make sure the signs are visible and easy to read.
2.7 Tools: Prepare a set of tools for the installation process, including a post hole digger, wire cutters, pliers, a hammer, and a tape measure. These tools will help you easily handle the materials and ensure a smooth installation.
Gathering these supplies in advance will save you time and make the installation process more efficient. Once you have everything you need, it’s time to move on to preparing the perimeter for your electric fence installation.
Preparing the Fence Perimeter
Preparing the fence perimeter is a crucial step in the installation process of an electric fence. Proper preparation ensures that your fence is secure, properly aligned, and positioned in the desired location. Here are the steps to prepare the fence perimeter:
3.1 Determine the Fence Layout: Decide on the desired layout of your electric fence. Take into consideration the boundaries of your property, any existing structures, and the areas you want to protect or enclose. Use surveyor stakes or marking flags to mark the corners and key sections of the fence.
3.2 Clear Vegetation and Obstacles: Clear the fence line of any vegetation, bushes, or debris that could obstruct the installation process or impede the fence’s effectiveness. Remove any rocks or obstacles that may interfere with the placement of the fence posts.
3.3 Measure and Mark the Post Locations: Use a tape measure to determine the spacing between fence posts along the perimeter. Typically, posts are placed approximately 8 to 12 feet apart, depending on the terrain and the type of fence you’re installing. Mark the locations of each post using marking paint or flags.
3.4 Dig Post Holes: Use a post hole digger to dig holes for the fence posts at each marked location. The holes should be deep enough to provide stability for the posts, typically around 2 to 3 feet deep. Ensure the holes are evenly spaced and aligned to maintain the integrity of the fence.
3.5 Insert Fence Posts: Once the post holes are dug, carefully insert the fence posts into the holes, ensuring they are secure and straight. Tamp the soil firmly around the posts to provide stability. Use a level to check that the posts are vertically aligned to prevent any leaning or tilting.
3.6 Check for Proper Alignment: Walk along the fence line and visually inspect the alignment of the posts. Make any necessary adjustments to ensure that the posts are evenly and consistently placed. This step is crucial for maintaining a straight and secure fence.
3.7 Secure Corner and End Posts: Corner and end posts provide extra support for the fence. To ensure their stability, consider using braces or additional support such as angle braces or guy wires. These measures will help maintain the integrity and strength of the entire fence structure.
3.8 Test the Fence Layout: Before proceeding to the next steps, walk along the fence line and envision how the wire will be attached to the posts. This will help identify any potential obstacles or challenges that may need to be addressed before installing the wire.
By following these steps to prepare the fence perimeter, you will have a solid foundation for the installation of the electric fence. In the next section, we will guide you through the process of installing the electric fence charger.
Installing the Electric Fence Charger
The electric fence charger, also known as an energizer or controller, is a crucial component of your electric fence system. It provides the electrical pulses that create the deterrent shock. Here are the steps to install the electric fence charger:
4.1 Select a Suitable Location: Choose a suitable location for installing the electric fence charger. Ideally, it should be in a protected area, such as a shed, barn, or covered structure. Ensure that the location is easily accessible for maintenance and that it is close to a power source if you’re using a plug-in charger.
4.2 Mounting the Charger: Mount the charger on a sturdy surface, such as a wall or post. Use the appropriate hardware to securely attach the charger, ensuring that it is level and stable. Follow the manufacturer’s instructions for the specific charger model to ensure proper installation.
4.3 Connecting the Charger to Power: If you’re using a plug-in charger, connect it to a nearby power source following the manufacturer’s instructions. Make sure to use a grounded outlet and check that the voltage requirements of the charger match the available power supply.
4.4 Battery or Solar-powered Chargers: If you’re using a battery-powered or solar-powered charger, follow the manufacturer’s instructions for setting up and connecting the battery or solar panel. Ensure that the charger is properly powered and functioning.
4.5 Grounding the Charger: Proper grounding is essential for the effective operation of the charger. Connect the grounding wire from the charger to the grounding system, which typically consists of grounding rods driven into the ground. Follow the manufacturer’s instructions for the specific charger model to ensure proper grounding.
4.6 Testing the Charger: Once the charger is installed and connected to power, test it to ensure that it is working correctly. Follow the manufacturer’s instructions on how to perform a test, which may involve checking voltage output or using a tester device. Ensure that the charger is providing the desired electrical pulses.
4.7 Safety Considerations: Keep safety in mind when installing the electric fence charger. Ensure that the charger is installed away from moisture, extreme temperatures, and other potential hazards that may compromise its performance. Follow all safety guidelines provided by the manufacturer.
Installing the electric fence charger properly is crucial for the overall functionality and effectiveness of your electric fence system. Once the charger is installed and tested, you can proceed to the next steps, which involve setting up the grounding system and installing the fence posts.
Read more: How To Hook Electrical Cord Up To A Ballast
Setting Up the Grounding System
The grounding system is a critical component of your electric fence setup as it completes the electrical circuit and ensures the proper functioning of the charger. Here are the steps to set up the grounding system:
5.1 Determine the Number of Grounding Rods: The number of grounding rods you’ll need depends on the power of your electric fence charger and the soil conditions. As a general rule, use at least three ground rods spaced about 10 feet apart. If you have a larger charger or challenging soil conditions, additional ground rods may be required.
5.2 Choose the Right Grounding Rods: Select grounding rods made of copper or galvanized steel for optimal conductivity. The rods should be at least 6 feet long and have a diameter of ½ inch. Avoid using aluminum or other materials that may not provide the same level of conductivity.
5.3 Grounding Rod Placement: Drive the grounding rods into the ground at least 6 feet deep using a post driver or a mallet. Place the rods at least 10 feet apart from each other within the grounding area. Ensure that the rods are fully buried in the soil and make good contact with the earth.
5.4 Connecting the Grounding Wire: Attach the grounding wire to the first grounding rod using a clamp or connector specifically designed for this purpose. Connect the other end of the grounding wire to the grounding terminal on the electric fence charger. Ensure that the connection is secure and tight.
5.5 Grounding Wire Installation: Lay the grounding wire in a straight line between each grounding rod, making sure it isn’t obstructed or tangled with other wires. Secure the wire to the ground using grounding stakes at regular intervals to prevent it from moving or becoming loose.
5.6 Additional Grounding Considerations: In certain cases, such as highly dry or sandy soil, additional grounding measures may be required. This can include adding more ground rods or using a ground enhancement material to improve conductivity. Consult with an electric fence specialist or refer to the charger manufacturer’s guidelines for specific recommendations.
5.7 Testing the Grounding System: Once the grounding system is installed, it’s important to test its effectiveness. Follow the manufacturer’s instructions on how to perform a grounding system test using a ground impedance tester or a multimeter. Ensure that the resistance of the grounding system is within the recommended range.
5.8 Safety Precautions: When working with the grounding system, ensure that you are wearing proper protective gear, such as gloves and safety glasses, to avoid injury. Follow all safety guidelines provided by the charger manufacturer and local regulations.
With the grounding system properly set up, your electric fence is ready to harness the electrical energy from the charger. The next step involves installing the fence posts, which provide support and structure for the electric fence wires.
Make sure to properly ground the electric fence system to ensure it is effective in deterring animals. Use a grounding rod and connect it to the fence energizer for maximum effectiveness.
Installing the Fence Posts
The fence posts provide the support and structure for your electric fence wires. Properly installed fence posts ensure the stability and integrity of the fence. Here are the steps to install the fence posts:
6.1 Determine the Spacing: Deciding on the spacing between fence posts depends on the type of terrain and the type of fence you’re installing. As a general guideline, the distance between posts should be around 8 to 12 feet apart. However, adjust the spacing as needed to accommodate any curves or uneven areas along the fence line.
6.2 Dig Post Holes: Use a post hole digger or auger to dig holes for the fence posts. The depth of the holes should be approximately 1/3 to 1/2 the height of the fence post. For example, if your fence posts are 6 feet tall, the holes should be around 2 to 3 feet deep. Make sure the diameter of the holes is wide enough to accommodate the size of the fence posts.
6.3 Properly Align the Posts: When installing the fence posts, ensure they are straight and aligned. Use a level or plumb line to ensure vertical alignment, and adjust as necessary. This step is crucial for maintaining the overall integrity and stability of the electric fence structure.
6.4 Set the Fence Posts: Place the fence posts into the prepared holes, making sure they are securely and firmly set in the ground. Fill the hole with the excavated soil or a mixture of soil and gravel, tamping it down firmly to provide stability. Continue this process for each fence post along the designated fence line.
6.5 Brace Corner and End Posts: Corner and end posts require extra support to withstand the tension of the electric fence wires. Install braces or additional support such as angle braces or guy wires to ensure the stability of these posts. This helps prevent leaning or sagging of the fence line.
6.6 Check Alignment and Height: After all the fence posts are installed, visually inspect the fence line to ensure proper alignment and height consistency. Double-check that all posts are vertically aligned and that they are at the desired height. Make any necessary adjustments before proceeding to the next steps.
6.7 Allow for Proper Clearance: Ensure that there is adequate clearance between the bottom of the electric fence wires and the ground. The recommended distance is typically around 6 to 8 inches. This prevents vegetation from shorting out the fence and also reduces the risk of animals getting entangled in the wires.
6.8 Safety Precautions: When installing fence posts, be cautious of any underground utilities or obstructions that may be present. Use proper safety equipment, such as gloves and protective eyewear, when handling fence posts and digging holes. Adhere to local regulations and guidelines regarding fence post installation.
With the fence posts securely installed, you’re now ready to move on to the next step, which involves attaching the insulators and wire to the fence posts.
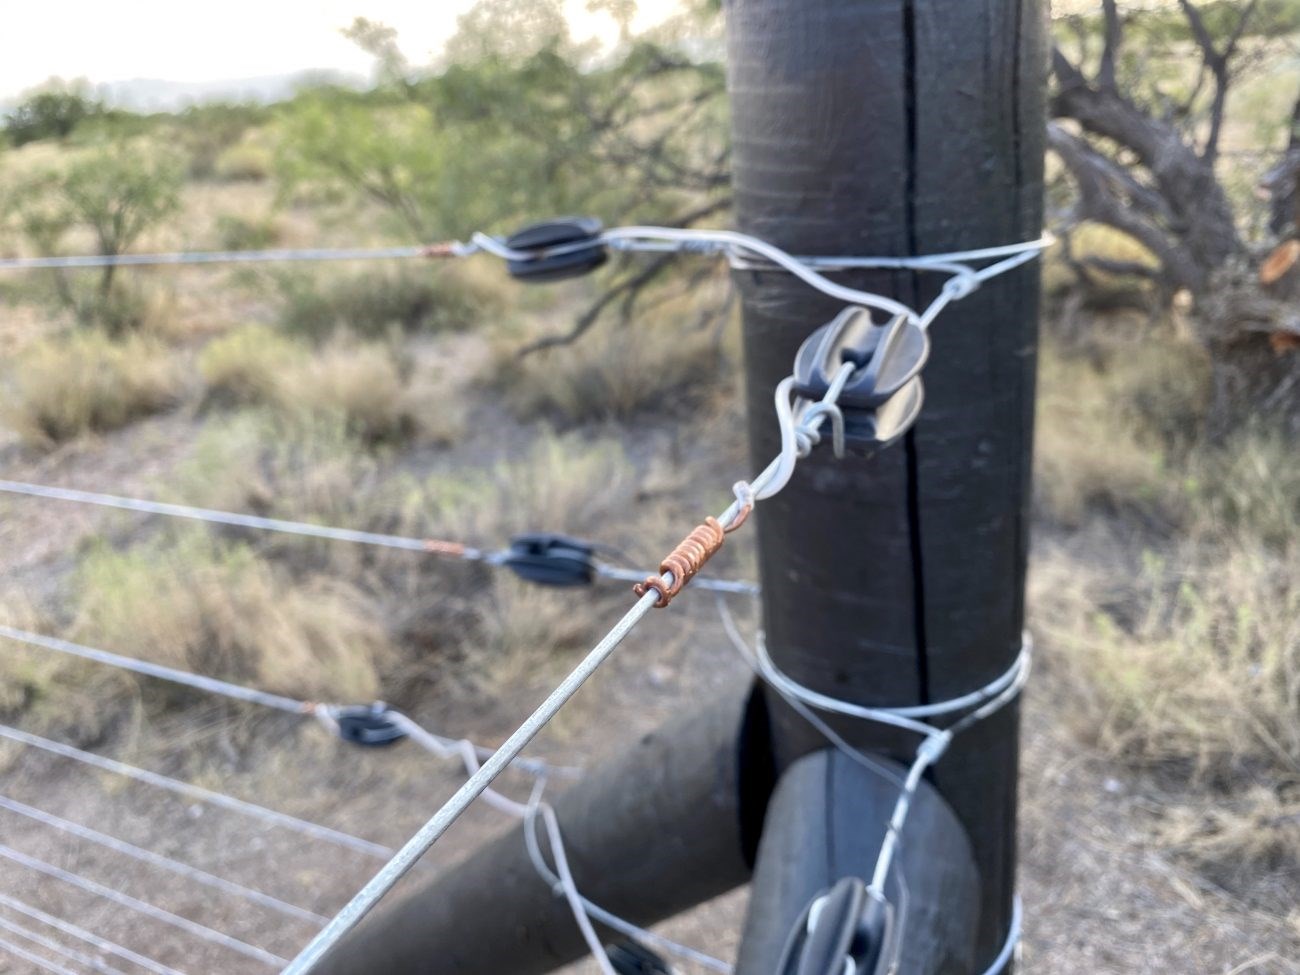
Attaching the Insulators and Wire
Attaching the insulators and wire to the fence posts is a crucial step in the installation process of an electric fence. The insulators hold the wire securely in place and prevent it from grounding out. Here are the steps to attach the insulators and wire:
7.1 Determine the Type and Placement of Insulators: Select the appropriate insulators based on the type of fence posts and wire you’re using. Insulators can be made of porcelain, plastic, or rubber and come in various designs, including screw-on, snap-on, or nail-on. Determine the placement of insulators along the fence posts based on the height and spacing you desire.
7.2 Attach the Insulators: Follow the manufacturer’s instructions to attach the insulators to the fence posts. Use the correct hardware, such as screws, nails, or clips, to securely fasten the insulators. Ensure that they are tightly and evenly attached to provide a stable base for the electric fence wire.
7.3 Thread the Wire through the Insulators: Starting at one end of the fence, thread the electric fence wire through the insulators. Be careful not to twist or tangle the wire as you go along. Make sure the wire is properly seated in each insulator to guarantee a secure connection.
7.4 Maintain Proper Tension: As you thread the wire through the insulators, maintain the desired tension throughout the length of the fence. This helps prevent sagging and keeps the electric fence wire at the desired height. Use tensioners or tighteners, if necessary, to adjust and maintain the tension as needed.
7.5 Connect Wires at Corners and Ends: When you encounter corners or end posts, ensure that the wires are properly connected. Use tensioners or connectors to join multiple wires together, providing a continuous electrical circuit. This ensures that the electric current flows smoothly along the entire fence line.
7.6 Space the Wires Evenly: If you’re using multiple wires, space them evenly along the height of the fence, ensuring consistent spacing between each wire. This helps maintain the effectiveness of the electric shock and provides a visible deterrent for both animals and potential intruders.
7.7 Attach Warning Signs: Install warning signs at regular intervals along the fence line to alert people of the presence of an electric fence. Make sure the signs are visible, easy to read, and comply with local regulations and requirements. This promotes safety and helps prevent any unintentional contact with the electric fence.
7.8 Safety Precautions: Always practice safety precautions when working with electric fence wire. Ensure that the charger is turned off or disconnected during the installation process to avoid any accidental electric shocks. Use appropriate protective equipment, such as gloves and safety glasses, when handling the wire.
By properly attaching the insulators and wire to the fence posts, you’ll have a secure and effective electric fence barrier. The next step involves connecting the wires to the charger, bringing the entire electric fence system to life.
Connecting the Wires to the Charger
Connecting the wires to the charger is the final step in setting up your electric fence system. This step ensures that the electrical pulses generated by the charger effectively flow through the electric fence wires. Here’s how to connect the wires to the charger:
8.1 Locate the Charger Terminal: Identify the terminals on the electric fence charger designated for connecting the wires. Typically, there will be a positive terminal (+) and a negative terminal (-) on the charger. Consult the charger’s manual or labeling if you’re unsure of which terminals to use.
8.2 Strip the Wire Ends: Strip approximately 1 inch of insulation from the end of each electric fence wire that will connect to the charger. Use wire strippers to carefully remove the insulation, exposing the bare wire. Ensure that the wire ends are clean and free from any debris or corrosion.
8.3 Connect the Positive (+) Wire: Attach the stripped end of the positive wire to the positive terminal (+) on the charger. Follow the manufacturer’s instructions on how to properly secure the wire to the terminal. This typically involves using a clamp, connector, or screw provided with the charger.
8.4 Connect the Negative (-) Wire: Attach the stripped end of the negative wire to the negative terminal (-) on the charger. Again, refer to the manufacturer’s instructions to ensure a secure connection. Double-check that the wire is firmly fastened to the terminal to prevent any loose connections.
8.5 Secure the Wire Connections: After connecting both wires to their respective terminals, ensure that the connections are secure and tight. Gently tug on the wires to test their stability. Loose connections can lead to a loss of power and diminish the effectiveness of the electric fence system.
8.6 Routing the Wires: Once the wires are connected to the charger, carefully route them along the designated path of the fence, making sure they are properly attached to the insulators and evenly spaced. Ensure that the wires are not twisted or tangled to maintain a consistent flow of electrical current.
8.7 Turn On the Charger: After confirming that all connections are secure, turn on the electric fence charger. Follow any specific instructions provided by the manufacturer to activate the charger and ensure that it’s operational. Be cautious and follow safety guidelines while handling an active electric fence.
8.8 Test the Electric Fence: Once the charger is turned on, it’s essential to test the electric fence to ensure that it’s functioning correctly. Use a fence tester or voltage meter designed for electric fences to confirm that an appropriate voltage is being emitted to deter animals or intruders.
8.9 Regularly Inspect the Connections: Regularly inspect the connections between the wires and the charger to ensure that they remain secure and free from corrosion. Loose or damaged connections can interrupt the electrical flow and decrease the effectiveness of your electric fence.
By properly connecting the wires to the charger, you’ve successfully set up your electric fence system. However, it’s important to note that regular maintenance and safety measures are crucial to ensure the continued effectiveness and longevity of your electric fence.
Read more: How To Hook Up A Doorbell
Testing the Electric Fence
Testing the electric fence is a crucial step to ensure that it is functioning effectively and providing the necessary deterrent. Regular testing helps identify any issues or faults in the system, allowing you to address them promptly. Here’s how to test your electric fence:
9.1 Fence Tester: Obtain a fence tester specifically designed for electric fences. This device measures the voltage and pulse strength of the electric current running through the fence wires. Fence testers come in various types, such as voltmeters or digital testers, so choose one that is compatible with your electric fence system.
9.2 Proper Grounding: Before testing the electric fence, ensure that the grounding system is properly installed and connected. A well-grounded fence is critical for creating an effective electric shock. Without proper grounding, the voltage may be weak or inconsistent, reducing the fence’s effectiveness.
9.3 Activate the Fence: Turn on the electric fence charger to activate the electric current in the wires. Ensure that all connections are secure and that the charger is functioning properly without any error codes or malfunctions. Take necessary safety precautions by keeping pets and people away from the fence during testing.
9.4 Test Voltage Output: Using the fence tester, touch the probe or wand to the electric fence wire. The tester will display the voltage output, indicating the strength of the electric shock delivered to anyone or anything coming into contact with the fence. Ensure that the voltage output falls within the recommended range for your specific application.
9.5 Check Pulse Strength: In addition to voltage, the fence tester will also indicate the pulse strength of the electric current. This refers to the duration and intensity of each pulse sent by the charger. It’s important to confirm that the pulse strength is consistent and strong enough to deter animals or intruders.
9.6 Inspect for Faults: While testing the electric fence, visually inspect the fence wires, insulators, and connections for any signs of damage or faults. Look for loose wires, broken insulators, or areas where the electric current may be weak or interrupted. Address any issues immediately to maintain the fence’s effectiveness.
9.7 Perform Systematic Testing: Conduct regular systematic testing of your electric fence, especially after storms, heavy rainfall, or any incidents that may have caused damage to the fence. Schedule periodic tests to ensure the fence is consistently providing an effective deterrent.
9.8 Document and Maintain Records: Keep a log or record of your testing results, including the date, voltage output, and any observations. This documentation is valuable for future reference, troubleshooting, and maintenance purposes. It helps identify patterns or trends and allows you to track the performance of your electric fence over time.
9.9 Seek Professional Assistance: If you encounter any issues during testing or are unsure about the results, consider seeking professional assistance from an electric fence specialist or technician. They can provide guidance, advice, or necessary repairs to ensure your electric fence remains functional and effective.
Regularly testing your electric fence is essential for maintaining its effectiveness and ensuring the safety of both pets and people. By following these testing procedures and addressing any issues promptly, you can enjoy the peace of mind that comes with a reliable and secure electric fence system.
Maintenance and Safety Tips
Maintaining your electric fence and adhering to safety guidelines are vital to ensure its longevity, effectiveness, and safety. Here are some important maintenance and safety tips to consider:
10.1 Regular Inspections: Conduct regular inspections of your electric fence system. Check for any signs of wear, damage, or loose connections. Inspect the wires, insulators, charger, grounding system, and fence posts. Address any issues promptly to maintain the integrity and effectiveness of the fence.
10.2 Vegetation Control: Keep vegetation such as tall grass, branches, or vines away from the electric fence wires. Vegetation can interfere with the electric current and reduce the effectiveness of the fence. Regularly trim or clear any vegetation near the fence line to prevent grounding or shorting out.
10.3 Weather Protection: Protect your electric fence charging unit from extreme weather conditions, such as heavy rain, snow, or severe heat. Consider using weatherproof covers or enclosures to shield the charger and connections from moisture or direct sunlight. This helps prolong the life of the equipment and ensures consistent performance.
10.4 Secure Loose Wires: Regularly check for any loose or sagging wires and re-tension them as needed. Loose wires can lower the fence’s effectiveness and may pose a hazard if they come into contact with people, animals, or objects. Ensure that all wires are properly secured and evenly spaced.
10.5 Test System Periodically: Perform regular testing of the electric fence using a fence tester to verify its voltage output and pulse strength. Periodic testing ensures that your fence remains effective in deterring animals or intruders. Keep a record of the test results for future reference.
10.6 Recharge Batteries or Solar Panels: If you have a battery-powered or solar-powered electric fence, monitor the charge levels regularly. Recharge or replace batteries as needed, or ensure that solar panels receive adequate sunlight exposure for proper charging. This ensures that your electric fence remains operational.
10.7 Warning Signs: Clearly mark and display warning signs at regular intervals along the fence line to alert people of the presence of an electric fence. Ensure that the signs are legible, visible, and comply with local regulations. This helps prevent accidental contact and promotes safety.
10.8 Safety Precautions: Follow safety guidelines and precautions when working with your electric fence system. Turn off the charger or disconnect the power supply when conducting maintenance or repairs. Use appropriate personal protective equipment, such as gloves, safety glasses, and insulated tools, to avoid electric shocks or injuries.
10.9 Proper Animal Training: If your electric fence is intended for animal containment, ensure that animals receive proper training and are familiar with the boundaries of the fence. Train them to respect the electric shock and avoid unnecessary stress or harm to the animals.
10.10 Consult Professionals: If you have any doubts or concerns regarding the maintenance or safety of your electric fence system, consult with an electric fence specialist or technician. They can provide expert guidance, troubleshooting assistance, or necessary repairs to keep your fence operating at its best.
By following these maintenance and safety tips, you can ensure the longevity, effectiveness, and safety of your electric fence system. Regular inspections, vegetation control, weather protection, periodic testing, and adherence to safety precautions are key to enjoying the benefits of an efficient and secure electric fence.
Conclusion
Installing an electric fence can provide numerous benefits, including property protection, animal containment, and enhanced security. By following the step-by-step guide outlined in this article, you can successfully hook up an electric fence and enjoy its many advantages.
Understanding the components of an electric fence, gathering the necessary supplies, and preparing the fence perimeter are critical initial steps. Installing the electric fence charger, setting up the grounding system, and securing the fence posts provide a solid foundation for the system.
Attaching the insulators and wire, connecting the wires to the charger, and testing the electric fence ensure that the system is properly functioning. Ongoing maintenance and adherence to safety guidelines are essential for the longevity and effectiveness of the electric fence.
Regular inspections, vegetation control, weather protection, periodic testing, and proper training for animals are key considerations for maintaining the electric fence. Adhering to safety precautions, displaying warning signs, and seeking professional assistance when needed further promote a secure and reliable electric fence system.
In conclusion, with proper planning, installation, and maintenance, an electric fence can provide peace of mind, security, and protection for your property, animals, and loved ones. Consider the unique requirements of your situation and consult with experts to ensure that your electric fence is tailored to meet your specific needs.
By taking the time to understand the intricacies of electric fences and implementing the necessary steps outlined in this guide, you can create a safe and effective barrier that serves its intended purpose for years to come.
Frequently Asked Questions about How To Hook Up An Electric Fence
Was this page helpful?
At Storables.com, we guarantee accurate and reliable information. Our content, validated by Expert Board Contributors, is crafted following stringent Editorial Policies. We're committed to providing you with well-researched, expert-backed insights for all your informational needs.


0 thoughts on “How To Hook Up An Electric Fence”