Articles
How To Hook Up A Keg In A Kegerator
Modified: September 2, 2024
Learn how to hook up a keg in a kegerator with our informative articles. Discover step-by-step instructions and expert tips to enjoy the perfect draft beer at home.
(Many of the links in this article redirect to a specific reviewed product. Your purchase of these products through affiliate links helps to generate commission for Storables.com, at no extra cost. Learn more)
Introduction
Hooking up a keg in a kegerator is a simple and rewarding process that allows you to enjoy draft beer from the comfort of your own home. Whether you’re hosting a party or just want to have a cold pint after a long day, having a kegerator can be a game-changer.
But how do you go about hooking up a keg in a kegerator? In this article, we will guide you through the step-by-step process of setting up your kegerator and getting that perfect pour. From selecting the right keg to tapping it and pouring the beer, we will cover everything you need to know.
Before we dive into the steps, let’s first understand the basic components of a kegerator. A kegerator is essentially a refrigerator that is specifically designed to hold and dispense kegs of beer. It consists of a cooling system to keep the beer cold, a CO2 tank to provide the necessary pressure, and a keg coupler to connect the keg to the system.
Now that we have a basic understanding, let’s get started on how to hook up a keg in a kegerator.
Key Takeaways:
- Setting up a keg in a kegerator involves selecting the right keg, preparing the kegerator, and ensuring proper CO2 tank connection. Attention to detail and regular maintenance are essential for a perfect pour and a delightful home draft experience.
- Tapping the keg and pouring the perfect beer require technique and precision. From glass selection to CO2 pressure adjustment, each step contributes to a visually appealing and delicious pour. Regular cleaning and maintenance ensure a continuous supply of high-quality draft beer.
Read more: How To Hook Up A Doorbell
Step 1: Selecting the Keg
The first step in hooking up a keg in a kegerator is selecting the right keg for your setup. There are a few factors to consider when choosing a keg:
- Type of beer: Determine what type of beer you want to serve. Whether it’s a popular lager, a refreshing ale, or a specialty craft beer, make sure to choose a keg that matches your taste preferences.
- Keg size: Kegs come in various sizes, such as 1/2 barrel (full-size), 1/4 barrel (pony keg), and 1/6 barrel (sixth barrel). Consider the amount of beer you plan to consume and the available space in your kegerator.
- Draft system compatibility: Check if your kegerator is compatible with the keg style you want. Different kegs may require different couplers or connectors to attach to the system.
- Freshness and expiration date: Ensure that the keg you choose has a good shelf life and is within its expiration date. Fresh beer will taste better and provide a more enjoyable experience.
Once you have considered these factors, you can visit your local brewery, liquor store, or online retailers to purchase the keg. They may require a deposit or rental fee for the keg, so be prepared for these additional costs.
It’s important to note that some kegerators also have the option to use disposable or reusable kegs, commonly known as “party kegs” or “keg-in-a-box.” These kegs offer convenience and portability but may have limited availability in terms of beer selection.
Remember to store the keg in a cool place until you are ready to hook it up in the kegerator. Excessive heat can affect the quality and taste of the beer.
With the right keg selected, you are ready to move on to the next step in the process: preparing the kegerator.
Step 2: Preparing the Kegerator
Before you can hook up the keg in your kegerator, it’s important to properly prepare the kegerator for use. Here are the steps to follow:
- Clean the kegerator: Start by cleaning the inside of the kegerator to remove any dirt or residue that may be present. Use a mild detergent and warm water to clean the surfaces, including the shelves, walls, and drip tray. Rinse thoroughly and allow the kegerator to dry completely.
- Organize the kegerator: Arrange the shelves and other components inside the kegerator to create enough space for the keg and its accessories. Make sure there is enough room for the CO2 tank and the beer lines to fit comfortably.
- Position the CO2 tank: Place the CO2 tank in an upright position inside the kegerator. Secure it using straps or brackets, if necessary, to prevent it from rolling or falling over. Ensure that the tank is easily accessible for refilling or adjusting the pressure.
- Attach the regulator: Connect the CO2 regulator to the CO2 tank. The regulator allows you to control the pressure of the CO2 gas that will be used to carbonate and dispense the beer. Follow the manufacturer’s instructions to properly attach the regulator.
- Check the seals: Inspect the seals and gaskets of the kegerator to ensure they are in good condition. If any seals are worn or damaged, replace them to prevent any leaks during operation.
- Check the temperature: Set the temperature of the kegerator to the appropriate level for the beer you will be dispensing. Different beers have different temperature recommendations, so refer to the brewery’s guidelines or the beer style’s ideal serving temperature.
By properly preparing the kegerator, you are ensuring that it is clean, organized, and ready to accommodate the keg and its components. This will help maintain the quality and freshness of the beer throughout the dispensing process.
Now that your kegerator is prepared, you can move on to the next step: connecting the CO2 tank.
Step 3: Connecting the CO2 Tank
Once your kegerator is prepared, it’s time to connect the CO2 tank, which will provide the necessary pressure to dispense the beer from the keg. Follow these steps to connect the CO2 tank:
- Locate the CO2 tank fittings: Look for the CO2 tank fittings inside the kegerator. Typically, there will be a nipple or valve where you can attach the regulator and the gas line.
- Attach the regulator: Take the regulator and align it with the CO2 tank fitting. Twist the regulator clockwise onto the tank until it feels secure. Ensure that the regulator’s pressure adjustment knob is in the closed or “off” position.
- Connect the gas line: Take the gas line connected to the regulator and attach it to the CO2 tank’s nipple or valve. Make sure to tighten any connections to avoid leaks, but be careful not to overtighten.
- Check for leaks: Before turning on the CO2 tank, it’s important to check for leaks. Apply a soapy water solution to all the connections and valves. If you see any bubbles forming, it indicates a leak. Tighten the connection further or replace the faulty component.
- Adjust the CO2 pressure: Once you have confirmed that there are no leaks, turn on the CO2 tank valve slowly. Gradually adjust the pressure by turning the regulator’s adjustment knob clockwise. Refer to the keg’s specific pressure requirements or consult a pressure chart to set the appropriate pressure for your beer.
It’s essential to ensure that the CO2 pressure is set correctly to avoid overcarbonation or undercarbonation of the beer. Improper pressure may result in a foamy or flat pour. Regularly monitor the CO2 pressure throughout the keg’s lifespan and make adjustments as needed.
With the CO2 tank connected and the pressure adjusted, you are ready to move on to the next step: attaching the keg coupler.
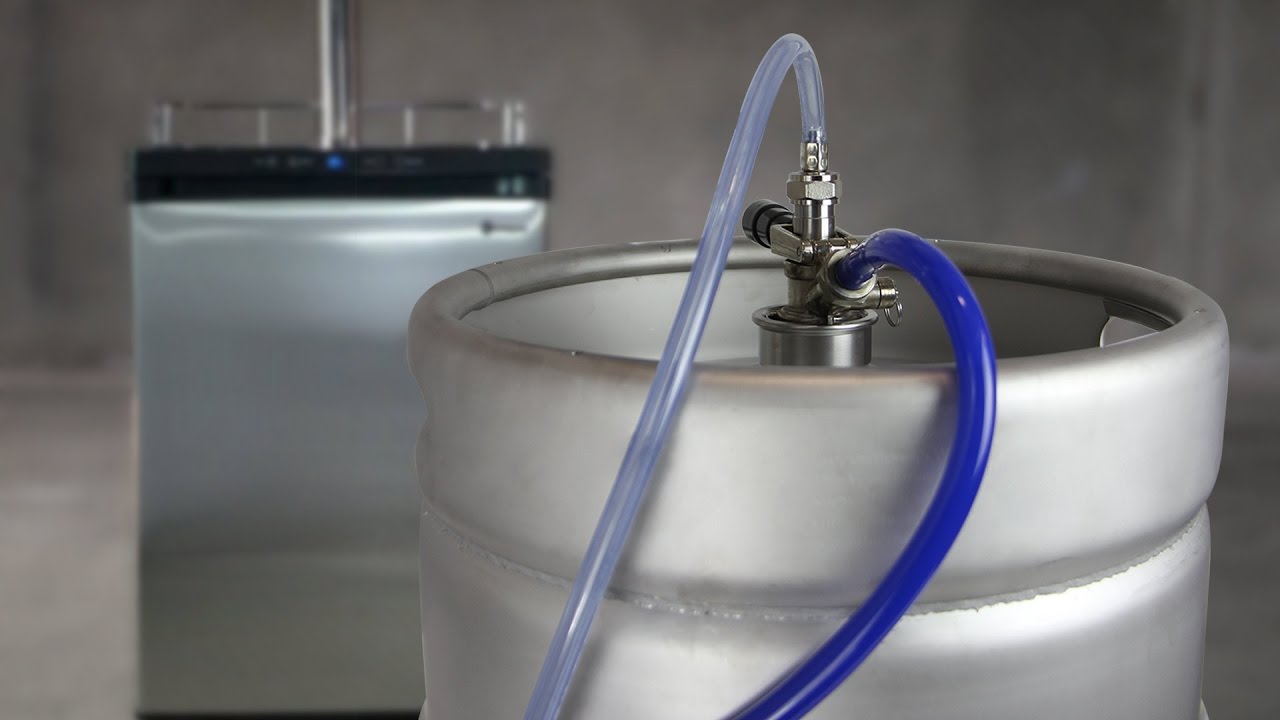
Step 4: Attaching the Keg Coupler
Attaching the keg coupler is the next crucial step in the process of hooking up a keg in a kegerator. The keg coupler acts as the interface between the keg and the beer dispensing system. Follow these steps to properly attach the keg coupler:
- Identify the keg coupler: There are different types of keg couplers available, depending on the style of the keg you are using. Common types include the Sankey D coupler for most domestic beers and the European S coupler for many imported beers. Make sure you have the appropriate coupler for your keg style.
- Inspect the coupler: Check the coupler for any signs of damage or wear. Ensure that the O-rings are in good condition. If any part of the coupler is damaged, replace it before proceeding.
- Prepare the keg: Before attaching the coupler, make sure the keg’s valve is in the “off” position. Remove any protective caps or covers from the keg valve to expose it.
- Align the coupler: Hold the keg coupler with the handle in the upright position and the probe facing downward. Align the coupler’s key or tab with the corresponding slot on the keg valve.
- Attach the coupler: While firmly holding the coupler in place, press it downward onto the keg valve. Rotate the coupler clockwise until it locks into place. You will hear a distinct click when it is properly attached.
- Lock the coupler: Some keg couplers have a lever or locking mechanism to secure them in place. Make sure to engage the locking lever to prevent the coupler from accidentally dislodging during use.
Once the keg coupler is securely attached, it forms a sealed connection with the keg, allowing the beer to flow through the system. Take care not to apply excessive force when attaching the coupler to avoid damaging the keg valve or the coupler itself.
With the keg coupler successfully attached, we can move on to the next step: securing the beer line.
Step 5: Securing the Beer Line
Securing the beer line is an important step in ensuring a smooth and steady flow of beer from the keg to the tap. Follow these steps to properly secure the beer line:
- Locate the beer line: Find the beer line connected to the keg coupler. It is usually a clear or translucent tube that carries the beer from the keg to the faucet.
- Inspect the beer line: Check the beer line for any kinks, leaks, or blockages. Ensure that the line is clean and free from any obstructions. If necessary, replace the beer line before proceeding.
- Route the beer line: Determine the best path for the beer line to reach the tap faucet. Avoid sharp bends or pinching the line, as this can disrupt the beer flow. Create a clear and direct path from the keg coupler to the tap.
- Secure the beer line: Use zip ties or clamps to secure the beer line along its route. Attach the line to the kegerator walls or any other appropriate surface. Make sure the line is held firmly in place but not overly tight to allow for flexibility as needed.
- Position the drip tray: Place a drip tray under the tap faucet to catch any spills or drips. The tray should be positioned in a convenient location for easy clean-up.
- Check for obstructions: Double-check that there are no obstructions or restrictions in the beer line. Ensure that it is free from any twists or knots that could impede the flow of beer.
Securing the beer line helps maintain a consistent flow and prevents any accidental disconnections while using the keg. By following these steps, you can ensure that the beer reaches the tap faucet without any interruptions or leaks.
With the beer line securely in place, we can move on to the next step: setting the CO2 pressure.
Before connecting the keg, make sure the CO2 tank is securely fastened and the regulator is set to the appropriate pressure for the type of beer you are serving. This will ensure proper carbonation and dispensing.
Step 6: Setting the CO2 Pressure
Setting the proper CO2 pressure is crucial for maintaining the right level of carbonation in your beer and achieving the perfect pour. Follow these steps to set the CO2 pressure:
- Refer to the keg’s recommended pressure: Check the keg’s specific recommendations for the ideal CO2 pressure. This information can usually be found on the keg label or provided by the brewery.
- Adjust the pressure: Using the pressure adjustment knob on the CO2 regulator, gradually increase the pressure to the recommended level. Turn the knob clockwise to increase the pressure or counterclockwise to decrease it.
- Monitor the pressure gauge: Keep an eye on the pressure gauge as you make adjustments. The gauge will indicate the current CO2 pressure inside the kegerator. Aim for the recommended pressure, but be cautious not to exceed it.
- Allow time to stabilize: After making pressure adjustments, give the system some time to stabilize. It may take a few hours for the beer to fully absorb the carbonation and for the keg pressure to reach equilibrium.
- Observe the pour: Once the pressure has stabilized, observe the pour from the tap faucet. If the beer is pouring too slowly or too quickly, you may need to make further adjustments to the CO2 pressure.
- Taste, adjust, and repeat: Pour a small sample of the beer and taste it. If it lacks carbonation, increase the CO2 pressure slightly. If it is overcarbonated or foamy, decrease the pressure. Make adjustments in small increments and continue tasting until you achieve the desired carbonation level.
It is important to note that different beer styles may require different CO2 pressures. Lighter beers typically require lower pressures, while heavier or highly carbonated beers may need higher pressures. Follow the recommendations and guidelines provided by the brewery or consult a carbonation chart for reference.
By setting the CO2 pressure correctly, you ensure that the beer is carbonated to perfection, resulting in a delicious and refreshing pour every time.
With the CO2 pressure properly set, we can move on to the next step: testing for leaks.
Step 7: Testing for Leaks
Before tapping the keg and enjoying your favorite beer, it’s crucial to test for any potential leaks in your kegerator system. Checking for leaks ensures that the beer is dispensed properly and that no CO2 is wasted. Follow these steps to test for leaks:
- Close all valves: Ensure that all valves on the keg coupler, regulator, and any other connections are tightly closed and turned off.
- Prepare a soapy water solution: Mix some dish soap or a specialized leak detecting solution with water in a spray bottle.
- Spray the solution: Liberally spray the soapy water solution onto the keg coupler, connections, and any other areas where leaks may occur. Pay close attention to the fittings, valves, and connections.
- Observe for bubbles: As you spray the solution, watch for any bubbles forming. If there is a leak, the escaping CO2 gas will cause the solution to bubble or foam.
- Inspect and tighten: If you notice any bubbles or evidence of a leak, identify the source. Gently tighten the affected connection or replace any faulty components.
- Repeat the test: After addressing any leaks, repeat the soapy water test to ensure that all leaks have been resolved. Be thorough and check all connections and fittings.
Testing for leaks is an essential step to ensure that your kegerator system is airtight and functioning properly. Leaks can lead to a loss of carbonation, a sluggish pour, or even complete beer wastage. By identifying and fixing any leaks, you can enjoy a seamless and efficient beer dispensing experience.
Once you have confirmed that there are no leaks, you’re ready to move on to the exciting step of tapping the keg!
Step 8: Tapping the Keg
Now that your kegerator system is set up and tested for leaks, it’s time to tap the keg and get ready to pour some refreshing beer. Follow these steps to properly tap the keg:
- Position the keg: Ensure that the keg is in the correct position in the kegerator. It should be secure and stable, with the keg coupler facing outward and easily accessible.
- Open the keg valve: Locate the keg’s valve, which is usually a small lever or handle on top of the keg coupler. Pull the lever all the way out or push it down to open the valve.
- Listen for the hiss of gas: As you open the keg valve, you may hear a hissing sound. This is the sound of the CO2 gas being released and pressurizing the keg.
- Allow the keg to pressurize: Give the keg a few moments to pressurize and settle. This helps ensure a consistent flow of beer when you start pouring.
- Pull the faucet handle forward: Grab the tap faucet handle and pull it forward to its fully extended position. This opens the beer line and allows the beer to flow from the keg to the tap.
- Hold the glass at a 45-degree angle: Hold a clean beer glass at a 45-degree angle just below the tap faucet. This helps in achieving the perfect pour and minimizing excessive foam.
- Pour the beer slowly: Gently push the faucet handle back to start pouring the beer. Begin with a slow and steady pour, gradually straightening the glass as it fills. Aim for a smooth, controlled stream of beer.
- Adjust the faucet handle: To control the speed of the pour and manage the amount of foam, you can adjust the faucet handle. Slightly close the faucet handle to slow down the flow and reduce the foam, or open it wider for a faster pour.
- Pause and top off the glass: As the glass fills, periodically pause the pour to allow the foam to settle. Once the foam has subsided, top off the glass by pouring a little more beer, leaving a slight head of foam at the top.
- Enjoy your beer: Once the glass is filled to your desired level, stop pouring and enjoy your perfectly tapped beer! Raise a toast to your kegging success.
Remember, practice makes perfect when it comes to pouring the perfect beer. It may take a few attempts to achieve the ideal balance of beer and foam, so don’t worry if your first pour isn’t flawless. With experience, you’ll become a pro at tapping your keg and pouring the perfect pint.
With the keg tapped and the beer flowing, it’s time to savor the fruits of your labor. Cheers!
Read more: What Is a Kegerator and What Is It Used For?
Step 9: Pouring the Perfect Beer
Pouring the perfect beer is an art that requires a combination of technique and precision. Follow these steps to ensure that you pour a delicious and visually appealing glass of beer:
- Choose the right glass: Select an appropriate beer glass that complements the style of beer you are pouring. Different beers may be best enjoyed in specific glassware, such as pint glasses, tulip glasses, or snifters.
- Rinse the glass: Rinse the glass with water to remove any dust or residue. This can help ensure a clean and pure taste when pouring the beer.
- Hold the glass at a 45-degree angle: Hold the glass at a slight angle of around 45 degrees, tilted away from the faucet. This angle allows the beer to gently glide down the side of the glass, reducing the formation of excessive foam.
- Pour the beer slowly: Begin pouring the beer slowly down the side of the glass, aiming for the midpoint of the slope. This gentle pour helps prevent excessive agitation and minimizes foam production.
- Straighten the glass gradually: As the beer level in the glass rises, gradually straighten the glass to an upright position. This allows the beer to flow directly into the center of the glass, encouraging the formation of a rich and creamy head.
- Control the head formation: To achieve the ideal amount of head, adjust the faucet handle or spigot flow rate. Tilt the glass slightly and increase the pour rate for a larger head, or decrease the pour rate for a smaller head.
- Leave room for aromatics: Be mindful not to fill the glass to the brim. Leave some space at the top to allow room for the beer’s aromatics to develop and be fully enjoyed.
- Serve at the appropriate temperature: Ensure the beer is served at the correct temperature for its style. Different beer styles have specific temperature recommendations, which can greatly impact their flavor profiles.
- Present with style: If desired, garnish the beer with appropriate additions like citrus slices, herbs, or spices. This can add an extra touch of flavor and visual appeal to the presentation.
- Enjoy responsibly: Now that you have poured the perfect beer, take a moment to appreciate its appearance, aroma, and taste. Savor each sip and enjoy the experience responsibly.
Remember, pouring the perfect beer takes practice and experimentation. Each beer style may require slight variations in technique to achieve the best results. With time and experience, you will develop your own pouring style and be able to consistently pour an excellent glass of beer.
Now, sit back, relax, and enjoy your perfectly poured beer!
Step 10: Cleaning and Maintenance
To ensure that your kegerator continues to provide you with fresh and enjoyable beer, regular cleaning and maintenance are essential. Follow these steps to keep your kegerator in top shape:
- Disconnect and empty the keg: Begin by disconnecting the keg coupler and removing the keg from the kegerator. Make sure the keg is emptied of any remaining beer.
- Clean the beer lines: Use a dedicated cleaning solution for beer line cleaning and follow the manufacturer’s instructions. Run the solution through the beer lines, using a cleaning kit or a hand pump. Rinse thoroughly with clean water to remove any residue.
- Clean the keg coupler: Disassemble the keg coupler and clean its components with warm soapy water. Pay special attention to the coupler probe and its gasket. Rinse thoroughly and let the parts air dry.
- Clean the faucet: Remove the faucet and disassemble it. Soak the components in a cleaning solution, then scrub them with a brush to remove any built-up residue. Rinse thoroughly and let them air dry before reassembling.
- Clean the kegerator interior: Wipe down the interior surfaces of the kegerator with a mixture of warm water and mild detergent. Pay attention to the walls, shelves, and drip tray. Rinse with clean water and allow it to dry completely.
- Sanitize: After cleaning, sanitize the beer lines, coupler, faucet, and any other components that come into contact with the beer. Use a food-grade sanitizer according to the recommended concentration and contact time.
- Inspect for damage: Regularly inspect the kegerator components for any signs of damage or wear. Check the seals, gaskets, and connections. Replace any worn or damaged parts to maintain the integrity of the system.
- Keep the kegerator clean: Regularly wipe down the exterior of the kegerator to keep it clean and free from dirt and fingerprints. This helps maintain the appearance and overall hygiene of your kegerator.
- Check CO2 levels: Monitor the CO2 levels in your tank regularly. When nearing empty, arrange for a refill or exchange. This ensures a steady supply of carbonation for your beer.
- Follow manufacturer’s maintenance guidelines: Consult your kegerator’s user manual for specific maintenance guidelines provided by the manufacturer. They may have additional recommendations or instructions tailored to your specific model.
Regular cleaning and maintenance not only ensure a clean and hygienic environment for your beer, but also extend the lifespan of your kegerator and its components. By keeping your kegerator well-maintained, you’ll continue to enjoy high-quality draft beer for years to come.
Remember, a well-kept kegerator leads to better-tasting beer and a more enjoyable home draft experience!
With these steps, you now have a comprehensive guide on how to hook up a keg in a kegerator. By following these instructions and taking proper care of your kegerator, you can enjoy the convenience of draft beer at home, impress your guests with perfectly poured pints, and become a kegging expert!
Cheers!
Conclusion
Hooking up a keg in a kegerator is a rewarding process that allows you to bring the joy of draft beer into your own home. By following the steps outlined in this guide, you can confidently set up your kegerator, tap the keg, and pour the perfect glass of beer.
We began by selecting the right keg for your setup, considering factors such as beer type, keg size, and draft system compatibility. We then moved on to preparing the kegerator, ensuring it was clean, organized, and ready to house the keg and its components.
Next, we discussed the importance of connecting the CO2 tank properly to provide the necessary pressure for carbonating and dispensing the beer. We emphasized the significance of testing for leaks to prevent any wasted CO2 or beer.
With the kegerator and CO2 system in place, we guided you through attaching the keg coupler and securing the beer line to ensure a steady flow of beer. Setting the CO2 pressure correctly was highlighted as a crucial step in achieving the perfect carbonation level.
We then explored the process of tapping the keg, providing tips on holding the glass, controlling the pour, and achieving the right amount of head for an appealing presentation. Furthermore, we emphasized the necessity of properly pouring the beer into a suitable glass and serving it at the appropriate temperature.
Lastly, we discussed the importance of regular cleaning and maintenance to keep your kegerator in top-notch condition. This involved cleaning the beer lines, keg coupler, and faucet, inspecting for any damage, and following manufacturer’s guidelines for maintenance.
By following these steps and taking proper care of your kegerator, you can enjoy the convenience and satisfaction of having fresh draft beer at your fingertips. Whether you’re hosting a party, entertaining friends, or simply enjoying a cold pint after a long day, a properly hooked up keg in a kegerator ensures a delightful and memorable experience.
Now that you have the knowledge and confidence to hook up a keg in a kegerator, it’s time to start enjoying the benefits of having draft beer on tap in your own home. So, raise your glass, cheers to your success, and savor the deliciousness of a perfectly poured draft beer!
Frequently Asked Questions about How To Hook Up A Keg In A Kegerator
Was this page helpful?
At Storables.com, we guarantee accurate and reliable information. Our content, validated by Expert Board Contributors, is crafted following stringent Editorial Policies. We're committed to providing you with well-researched, expert-backed insights for all your informational needs.

0 thoughts on “How To Hook Up A Keg In A Kegerator”