Articles
How To Install Subfloor In Basement
Modified: January 18, 2024
Learn how to install a subfloor in your basement with step-by-step articles that provide helpful tips and instructions.
(Many of the links in this article redirect to a specific reviewed product. Your purchase of these products through affiliate links helps to generate commission for Storables.com, at no extra cost. Learn more)
Introduction
Installing a subfloor in your basement can be a game-changer when it comes to transforming the space into a livable and comfortable area. Whether you plan to convert your basement into a home office, a guest room, or a cozy entertainment area, a subfloor is an essential component to consider.
Why is a subfloor important? Well, the basement floor is often cold, damp, and prone to moisture issues. Installing a subfloor not only helps to create a barrier against moisture but also provides insulation and soundproofing. It can also help to level out an uneven basement floor and provide a sturdy and durable surface for your finished flooring.
In this article, we will guide you through the step-by-step process of installing a subfloor in your basement. From measuring and planning to choosing the right materials and securing the subfloor panels, we’ll cover everything you need to know to successfully complete the installation.
Before we dive into the installation process, it’s important to mention that every basement is unique, and specific considerations may need to be taken based on your individual circumstances. It’s always a good idea to consult with a professional if you have any concerns or questions about your basement’s suitability for a subfloor.
Now, let’s get started with step one: measuring and planning the subfloor installation.
Key Takeaways:
- Transform your basement into a comfortable living space by installing a subfloor. Protect against moisture, level uneven surfaces, and prepare for the final flooring with these step-by-step instructions.
- Ensure a successful subfloor installation by measuring and planning, choosing the right materials, and addressing obstacles and irregularities. Create a sturdy, insulated, and inviting space in your basement.
Read more: How To Install Subfloor Over A Crawl Space
Step 1: Measure and plan the subfloor installation
Before you begin installing a subfloor in your basement, it’s crucial to measure the space accurately and create a detailed plan. This step will help ensure that you have the right amount of materials and that the installation process goes smoothly.
Here are the key steps to follow:
- Measure the basement: Start by measuring the length and width of your basement using a tape measure. Record these dimensions and calculate the total square footage.
- Consider the ceiling height: Take note of the ceiling height in your basement. This measurement will help you determine how much headroom you have and whether there are any limitations to consider when installing a subfloor.
- Assess the moisture levels: Before proceeding, it’s essential to check the moisture levels in your basement. Excessive moisture can cause damage to the subfloor and finished flooring. Use a moisture meter to test the moisture levels in the concrete floor. Ideally, the moisture reading should not exceed 4%, but specific guidelines may vary depending on the type of subflooring material you plan to use.
- Identify any obstructions: Take note of any obstructions in the basement, such as pillars, pipes, or HVAC systems. These obstructions will affect the layout and placement of the subfloor panels, so it’s crucial to plan accordingly and make necessary adjustments.
- Consider the access points: Determine the locations of any access points in your basement, such as stairways or utility closets. These areas may require special attention when planning the subfloor installation.
By taking the time to measure and plan the subfloor installation, you can ensure that you have all the necessary information to proceed with the project. Planning ahead will save you time and potential headaches during the installation process.
Once you have completed step one, you can move on to step two: preparing the basement for subfloor installation.
Step 2: Prepare the basement for subfloor installation
Preparing your basement for subfloor installation is a crucial step to ensure the success and longevity of your project. By properly preparing the space, you can address any existing issues and create a clean and suitable environment for the subfloor installation.
Follow these steps to prepare your basement for subfloor installation:
- Clean the basement: Start by thoroughly cleaning the basement floor. Remove any dirt, debris, or loose materials that could interfere with the installation process. Use a broom, vacuum, or mop to achieve a clean and dust-free surface.
- Repair any damage: Inspect the basement floor for any cracks, holes, or uneven areas. Repair these damages using a suitable concrete repair compound or filler. Ensuring a smooth and even surface will contribute to the stability and integrity of the subfloor installation.
- Address moisture issues: If your basement has ongoing moisture problems, it’s crucial to address these issues before installing the subfloor. Moisture can damage the subfloor and lead to mold and mildew growth. Install a reliable basement waterproofing system or consult with a professional to address any moisture concerns.
- Check for levelness: Use a level tool to check the levelness of the basement floor. If you notice any significant dips or slopes, consider using a self-leveling compound to create a flat surface. An even surface will ensure the proper installation and stability of the subfloor.
- Ensure proper ventilation: Adequate ventilation is crucial in a basement to prevent the buildup of moisture and improve air quality. Check if your basement has proper ventilation and consider installing additional vents or a dehumidifier if necessary.
By preparing your basement appropriately, you create an optimal environment for the subfloor installation. This step will contribute to the durability and functionality of the subfloor, allowing you to enjoy your finished basement for years to come.
With the basement prepared, you can now move on to step three: choosing the right subflooring material for your basement.
Step 3: Choose the right subflooring material for your basement
Choosing the right subflooring material for your basement is crucial as it will impact the overall performance, durability, and comfort of your finished flooring. There are several options available, each with its own set of benefits and considerations.
Consider the following factors when selecting a subflooring material:
- Moisture resistance: Since basements are prone to moisture, it’s important to choose a subflooring material that is resistant to moisture. Look for materials that have built-in moisture barriers or are specifically designed for damp environments.
- Insulation properties: Insulation is essential in basements to maintain a comfortable temperature and reduce energy costs. Opt for subflooring materials that have good insulation properties to minimize heat loss and dampen sound.
- Installation ease: Consider your DIY skills and the complexity of the installation process. Some subflooring materials are easier to install than others, so choose one that matches your comfort level and available tools.
- Budget: Determine your budget for the subflooring project. Different materials come at different price points, so choose one that meets your financial requirements without compromising on quality.
- Type of finished flooring: Consider the type of flooring you plan to install on top of the subfloor. Ensure that the chosen subflooring material is compatible and provides a suitable surface for the finished flooring.
Here are some popular subflooring materials to consider:
- Plywood: Plywood is a common and affordable choice for subflooring. Ensure that the plywood is treated for moisture resistance and follow the manufacturer’s guidelines for basement installations.
- OSB (Oriented Strand Board): OSB is another popular choice for subflooring. It is moisture-resistant, cost-effective, and widely available. Look for OSB specifically designed for basement applications.
- Dricore: Dricore is a subfloor system that features moisture-resistant panels with an air gap for enhanced moisture control and ventilation. It is easy to install and provides excellent insulation properties.
- XPS Foam Insulation: XPS foam insulation panels not only provide insulation but also act as a moisture barrier. These panels are easy to install and provide a smooth surface for the finished flooring.
Consider your specific requirements and consult with flooring professionals or contractors if needed. They can offer valuable insights and guide you towards the best subflooring material for your basement.
Once you have chosen the right subflooring material, you can move on to step four: cleaning the basement floor before installing the subfloor.
Step 4: Clean the basement floor before installing the subfloor
Before installing the subfloor in your basement, it is crucial to thoroughly clean the basement floor. A clean and debris-free surface will ensure a proper and secure installation of the subflooring material.
Follow these steps to clean your basement floor:
- Remove any existing flooring: If there is any existing flooring in your basement, such as carpet or vinyl, remove it completely. This will expose the concrete floor and allow for a more effective cleaning process.
- Sweep and vacuum: Start by sweeping the entire basement floor to remove loose dirt and debris. Pay special attention to corners and hard-to-reach areas. Once you have swept the floor, use a vacuum cleaner with a brush attachment to remove any remaining dust or particles.
- Scrub the floor: If your basement floor has stains or stubborn dirt, you may need to scrub it. Use a mop or scrub brush along with a mild detergent or concrete cleaner to scrub the floor thoroughly. Rinse the floor with clean water to remove any residue from the cleaning solution.
- Check for moisture: Before proceeding with the subfloor installation, it is important to ensure that the basement floor is dry. Use a moisture meter or perform a visual inspection to confirm that the floor is free from excess moisture. If there are still signs of moisture, you may need to address any underlying issues or allow more time for the floor to dry.
- Address any remaining issues: While cleaning, take note of any remaining issues on the basement floor, such as cracks or uneven areas. These issues should be addressed before proceeding with the subfloor installation. Fill in cracks or level uneven spots using an appropriate concrete repair product.
By cleaning the basement floor thoroughly, you create an ideal surface for the subfloor installation. This step ensures that the subflooring material is securely placed, promoting its longevity and effectiveness.
Once the basement floor is clean and dry, you can move on to step five: laying down the moisture barrier.
Read more: What Is A Subfloor
Step 5: Lay down the moisture barrier
Laying down a moisture barrier is a crucial step in the subfloor installation process, especially in basements where moisture can be a concern. The moisture barrier acts as a protective layer, preventing moisture from seeping into the subflooring material and potentially causing damage.
Here are the steps to effectively lay down a moisture barrier:
- Gather the materials: You will need a moisture barrier, such as a plastic or rubber sheet, that is specifically designed for basement applications. Measure the dimensions of your basement to ensure you have enough material to cover the entire floor.
- Prepare the basement floor: Ensure that the basement floor is clean, dry, and free from any debris. A clean surface will ensure proper adhesion of the moisture barrier and prevent any obstructions that could compromise its effectiveness.
- Roll out the moisture barrier: Start in one corner of the basement and unroll the moisture barrier over the entire floor. Allow the barrier to extend up the walls by a few inches to provide added protection against moisture seepage.
- Overlap seams: If your moisture barrier comes in multiple rolls, overlap the seams by a few inches to create a continuous barrier. Secure the seams using tape designed for this purpose, ensuring a tight and watertight seal.
- Trim excess material: Once the moisture barrier is laid and secured, trim any excess material along the edges using a utility knife. This will create a clean and professional-looking finish.
- Inspect for gaps or tears: Take a moment to inspect the moisture barrier for any gaps, tears, or punctures. These issues can compromise the effectiveness of the barrier, so make any necessary repairs or adjustments before moving on to the next step.
By laying down a moisture barrier, you create an additional layer of protection against moisture, ensuring the longevity and durability of your subfloor. It is an essential step in maintaining a dry and comfortable environment in your basement.
With the moisture barrier in place, you can now proceed to step six: installing the subfloor panels.
When installing a subfloor in a basement, be sure to use a moisture-resistant material such as pressure-treated plywood or rigid foam insulation to prevent damage from potential moisture.
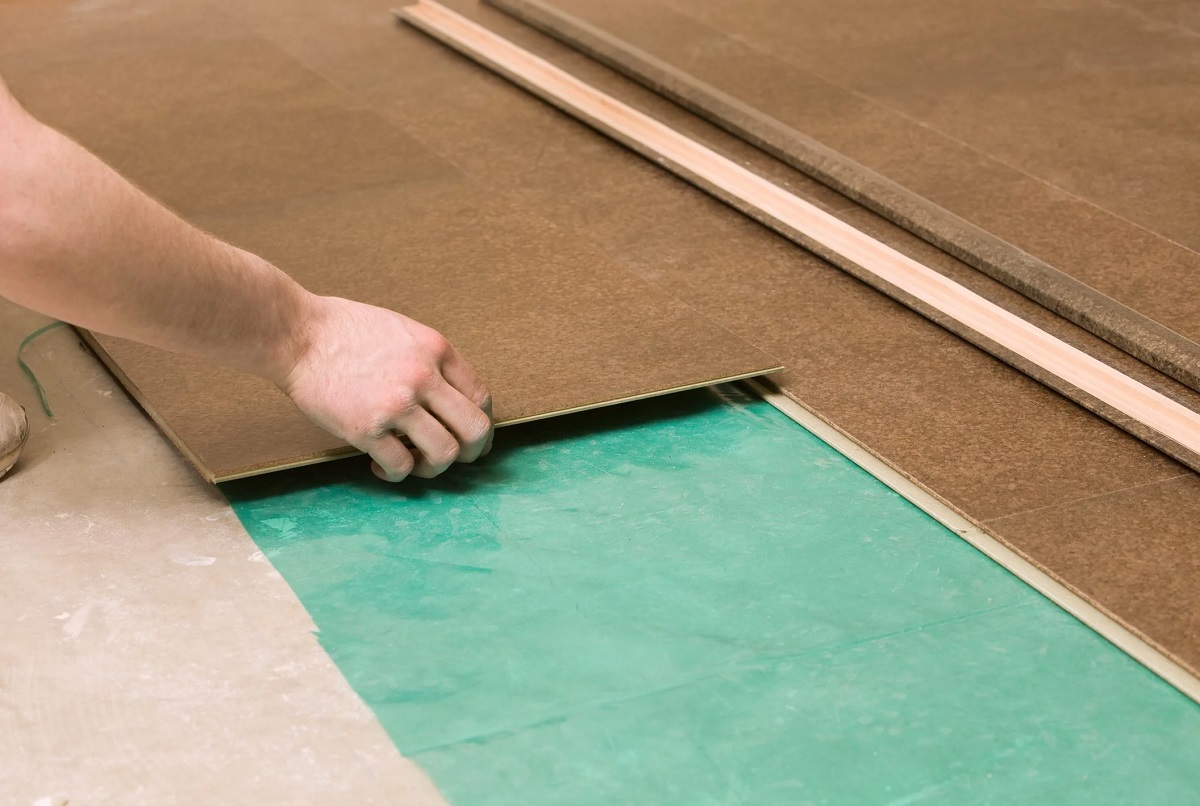
Step 6: Install the subfloor panels
Installing the subfloor panels is the next step in creating a sturdy and level surface in your basement. The subfloor panels provide a solid foundation for your finished flooring, while also serving as a barrier against moisture and cold temperatures.
Follow these steps to effectively install the subfloor panels:
- Gather the materials: You will need subfloor panels made of plywood, OSB, or another suitable material for your specific project. Measure the dimensions of your basement to determine the quantity of panels required.
- Start at one corner: Begin the installation at one corner of the basement. Place the first subfloor panel against the wall, leaving a small gap between the panel and the wall to account for expansion. Use shims to maintain a consistent gap along the entire perimeter.
- Continue with subsequent panels: Install the next subfloor panel, ensuring that the edges fit snugly against the previous panel. Stagger the panels to create a stronger and more stable subfloor. Use a level to check for evenness and adjust as necessary.
- Secure the panels: Secure the subfloor panels to the basement floor using screws or nails. Ensure that the fasteners penetrate through the subfloor panels and into the concrete floor for a secure and stable installation. Follow the manufacturer’s recommendations for fastener spacing and length.
- Cut panels as needed: Measure and cut any panels that need to fit around obstacles, such as pillars or utility pipes. Use a circular saw or jigsaw to make precise cuts, ensuring a proper fit.
- Leave expansion gaps: Leave small expansion gaps between subfloor panels to allow for natural movement. Consult the manufacturer’s instructions for the specific subflooring material to determine the appropriate gap size.
By properly installing the subfloor panels, you create a stable and even surface for your finished flooring. Remember to take your time and double-check your measurements to ensure a professional-looking result.
Once the subfloor panels are installed, you can move on to step seven: securing the subfloor panels together.
Step 7: Secure the subfloor panels together
Securing the subfloor panels together is an essential step to ensure the stability and integrity of your basement subfloor. Properly securing the panels will prevent any shifting or movement, providing a solid foundation for your finished flooring.
Follow these steps to effectively secure the subfloor panels together:
- Inspect the subfloor panels: Before securing them together, inspect the subfloor panels for any signs of damage or loose fasteners. Tighten any loose screws or nails and replace any damaged panels.
- Add adhesive (optional): Consider using a construction adhesive between the subfloor panels for added stability. Apply the adhesive where the panels meet, following the manufacturer’s instructions.
- Use tongue-and-groove panels: If using tongue-and-groove subfloor panels, fit the panels together tightly. The tongue of one panel should fit into the groove of the adjacent panel. Use a rubber mallet or a scrap piece of wood to ensure a tight fit.
- Secure with screws or nails: Secure the subfloor panels together by driving screws or nails at regular intervals along the seams. Follow the manufacturer’s recommended fastener pattern and spacing for optimal strength.
- Countersink the fasteners: For a smooth and even surface, countersink the screws or nails slightly below the surface of the subfloor panels. This will allow for a seamless installation of the finished flooring.
- Check for any protruding fasteners: After securing the subfloor panels, inspect the surface for any loose or protruding fasteners. Use a hammer or drill to make adjustments, ensuring that the surface is smooth and free from any obstructions.
By securely fastening the subfloor panels together, you create a solid and stable base for your finished flooring. This step is important to minimize any movement or squeaking that may occur over time.
With the subfloor panels secured, you can now move on to step eight: addressing any obstacles or irregularities in the basement.
Step 8: Address any obstacles or irregularities in the basement
Addressing any obstacles or irregularities in your basement is an important step in the subfloor installation process. By identifying and resolving these issues, you can ensure a smooth and level surface for your finished flooring.
Follow these steps to effectively address obstacles and irregularities in your basement:
- Identify the obstacles: Take a careful look at your basement and identify any obstacles or irregularities that may impact the installation of the subfloor. This could include pillars, HVAC ducts, or uneven sections of the concrete floor.
- Plan around the obstacles: Determine the best way to work around these obstacles. For pillars or HVAC ducts, consider installing subfloor panels around them to maintain a continuous surface. If there are uneven sections of the floor, use a leveling compound to create a flat surface.
- Make necessary adjustments: Measure and cut subfloor panels to fit around obstacles, ensuring a snug and secure fit. Use a jigsaw or circular saw for precise cuts. If there are irregularities in the floor, apply a suitable leveling compound to even out the surface.
- Double-check for stability: After addressing obstacles and irregularities, double-check the stability of the subfloor. Ensure that the subfloor panels are securely fastened and that there are no areas of instability or movement.
- Consider specialized underlayment: Depending on the specific obstacles or irregularities in your basement, you may need to consider specialized underlayment materials. These materials can provide added support or cushioning in areas where needed, ensuring a stable and comfortable subflooring surface.
By addressing obstacles and irregularities, you create a level and even subfloor that will optimize the performance of your finished flooring. Take the time to plan and make necessary adjustments to ensure a professional and seamless installation.
With the obstacles and irregularities addressed, you can now move on to step nine: insulate the subfloor for added comfort.
Read more: How To Install Carpet In A Basement
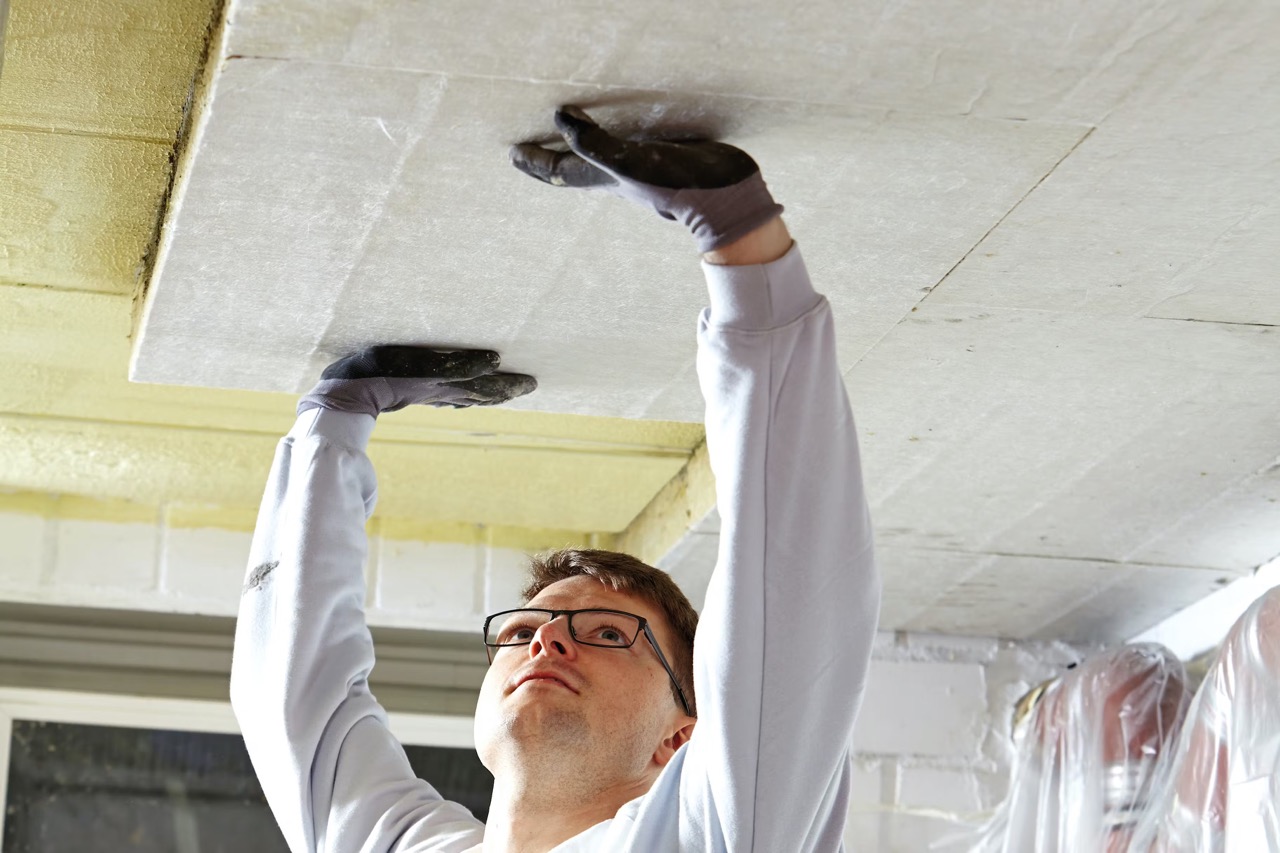
Step 9: Insulate the subfloor for added comfort
Insulating the subfloor is a crucial step to enhance the comfort and energy efficiency of your basement. Proper insulation helps to maintain a comfortable temperature and reduce heat loss, making the space more enjoyable to live in.
Follow these steps to effectively insulate the subfloor:
- Choose the insulation material: Select an insulation material that is suitable for your basement and meets your specific needs. Common options include foam insulation boards, fiberglass batts, or spray foam insulation.
- Measure and cut the insulation: Measure the dimensions of the subfloor panels and cut the insulation material accordingly. Leave a small gap around the edges to accommodate for expansion.
- Install the insulation: Place the insulation material snugly between the subfloor panels, ensuring it covers the entire surface. If using foam boards, secure them in place using adhesive or insulation tape. If using fiberglass batts, insert them tightly between the floor joists.
- Seal gaps and joints: Use insulation tape or spray foam to seal any gaps or joints between the insulation material and the subfloor panels. This will help create a continuous thermal barrier and prevent air leakage.
- Consider additional insulation methods: Depending on your climate and energy efficiency goals, you may want to consider additional insulation methods. For example, installing a radiant barrier or using underfloor heating systems can provide further comfort and energy savings.
By insulating the subfloor, you create a more comfortable living space in your basement. The insulation helps to regulate the temperature, reduce drafts, and minimize noise transmission. It also contributes to lower energy costs by improving the efficiency of your heating and cooling systems.
With the subfloor insulated, you can now move on to step ten: finishing the subfloor installation with necessary trimmings.
Step 10: Finish the subfloor installation with necessary trimmings
The final step in the subfloor installation process is to add the necessary trimmings to complete the project. These finishing touches will give your subfloor a polished and professional appearance while also providing functional benefits.
Follow these steps to finish the subfloor installation with necessary trimmings:
- Install baseboards: Install baseboards along the perimeter of the subfloor to cover the gaps between the subfloor and the walls. This not only provides a clean finish but also prevents debris and moisture from entering the subfloor space.
- Seal edges: Apply a bead of caulk along the edges of the subfloor where it meets the baseboards or walls. This will provide a seal against drafts and moisture infiltration.
- Add transition strips: Install transition strips at doorways and openings where the subfloor transitions to a different flooring material. This will create a smooth and seamless transition between different areas of your basement.
- Consider floor underlayment: Depending on the type of finished flooring you will be installing, you may want to add an additional layer of underlayment between the subfloor and the final flooring. This can provide extra cushioning, soundproofing, or moisture protection.
- Make any necessary adjustments: Take a final look at the completed subfloor installation and make any necessary adjustments or repairs. Address any visible imperfections or loose trimmings to ensure a professional and pristine finish.
- Prepare for the final flooring: Now that your subfloor is complete, you are ready to move on to installing the final flooring of your choice in your basement. Follow the manufacturer’s instructions for the specific flooring material to achieve the best results.
By finishing the subfloor installation with necessary trimmings, you complete the project with a clean and polished look. These finishing touches not only enhance the aesthetic appeal of your basement but also contribute to the functionality and longevity of your subfloor.
Congratulations! You have successfully completed the subfloor installation in your basement. Enjoy the benefits of a comfortable, insulated, and durable space that will serve as a solid foundation for your finished flooring.
If you plan on installing the final flooring yourself, make sure to research and follow the necessary steps and guidelines to ensure a successful installation. Alternatively, consult with a professional to assist you with the final flooring to achieve the best results.
With the subfloor installation complete, you are one step closer to transforming your basement into a functional and inviting living space.
Thank you for following along this comprehensive guide. Happy subfloor installation!
Conclusion
Installing a subfloor in your basement is a crucial step in creating a livable, comfortable, and functional space. It provides a solid foundation for your finished flooring, protects against moisture, improves insulation, and levels out any uneven surfaces. By following the step-by-step process outlined in this guide, you can successfully install a subfloor in your basement.
Throughout the installation process, it is important to measure and plan, prepare the basement, choose the right subflooring material, clean the floor, lay down a moisture barrier, install the subfloor panels, secure them together, address any obstacles or irregularities, insulate the subfloor, and finish the installation with necessary trimmings. Each step plays a crucial role in creating a structurally sound and comfortable subfloor.
Remember to choose subflooring materials that are moisture-resistant and suitable for basement applications. Take the time to properly clean and prepare the basement before installation. Consider insulation for added comfort and energy efficiency. Secure the subfloor panels together and address any obstacles or irregularities to ensure a sturdy and level surface. Complete the installation with trimmings and prepare for the final flooring.
It is important to consult with professionals or experts if you have any concerns or questions throughout the process. They can provide valuable guidance and ensure that your subfloor installation meets building codes and industry standards.
With a well-installed subfloor, you can transform your basement into a functional and inviting space for various activities, whether it’s a home office, a guest room, a recreation area, or a personal gym.
Remember to always consider your specific needs, budget, and the requirements of your basement when choosing materials and products. Take the time to properly measure, plan, and prepare before diving into the installation process. These steps will save you time and ensure the success and longevity of your subfloor.
Congratulations on completing the subfloor installation in your basement! Enjoy your newly transformed space and the endless possibilities it brings.
Frequently Asked Questions about How To Install Subfloor In Basement
Was this page helpful?
At Storables.com, we guarantee accurate and reliable information. Our content, validated by Expert Board Contributors, is crafted following stringent Editorial Policies. We're committed to providing you with well-researched, expert-backed insights for all your informational needs.


0 thoughts on “How To Install Subfloor In Basement”