Home>Articles>How To Install Or Replace A Front Door Handleset
Articles
How To Install Or Replace A Front Door Handleset
Modified: December 7, 2023
Learn how to easily install or replace a front door handleset with step-by-step instructions in this comprehensive articles guide.
(Many of the links in this article redirect to a specific reviewed product. Your purchase of these products through affiliate links helps to generate commission for Storables.com, at no extra cost. Learn more)
Introduction
Welcome to our comprehensive guide on how to install or replace a front door handleset. Whether you’re looking to upgrade the appearance of your front door or replace a faulty handleset, this step-by-step tutorial will provide you with the knowledge and guidance you need to get the job done.
A front door handleset not only serves as a functional component of your home’s entryway, but it also contributes to the overall aesthetic appeal and security of your property. By following these instructions and taking the necessary safety precautions, you’ll be able to successfully install or replace a front door handleset with ease.
Before diving into the installation process, it’s important to familiarize yourself with some key safety precautions to ensure a smooth and secure installation. Safety should always be the top priority when working with tools and equipment, and taking the necessary precautions will help prevent any accidents or injuries.
Key Takeaways:
- Upgrade your front door’s appearance and security by following our step-by-step guide to install or replace a front door handleset. Safety, preparation, and testing are key to a successful installation.
- Take your time to measure, prepare, and install a new handleset, ensuring proper alignment and functionality. Enjoy the enhanced aesthetics and security of your front door with a fresh, updated look.
Read more: How To Replace Porch Screen
Safety Precautions
Before you begin the installation or replacement of a front door handleset, it’s important to take the following safety precautions:
- Ensure that you are wearing appropriate safety gear, including safety glasses and gloves, to protect yourself from any potential hazards.
- Make sure that the area where you’ll be working is clear of any obstacles or clutter that could cause accidents.
- If you’re working with electrical components, turn off the power supply to your front door before starting the installation or replacement process.
- Handle tools and equipment with caution, following all manufacturer instructions and guidelines.
- If you’re not familiar with using certain tools, consider enlisting the help of a professional or seeking guidance from someone with experience.
- Take your time and work at a pace that is comfortable and safe for you. Rushing or being careless can lead to mistakes and potential injuries.
- If you encounter any difficulties or uncertainties during the installation or replacement process, don’t hesitate to seek assistance or consult a professional.
By adhering to these safety precautions, you’ll create a secure and risk-free environment for yourself while working on your front door handleset. Remember, it’s better to be cautious and take your time than to rush through the process and put yourself at risk.
Tools and Materials Required
Before you begin installing or replacing a front door handleset, gather the following tools and materials:
Tools:
- Screwdriver (typically Phillips head)
- Tape measure
- Pencil or marker
- Chisel
- Hammer
- Drill (optional, depending on the type of handleset and your front door)
- Level
- Safety glasses
- Gloves
Materials:
- New handleset
- Screws or fasteners (usually provided with the handleset)
- Strike plate (if not included with the handleset)
- Wood putty or filler (to patch any holes from the old handleset)
- Screw caps or cover plates (optional, for a neater finish)
Having the correct tools and materials on hand will make the installation or replacement process much smoother and more efficient. It’s always a good idea to double-check that you have everything you need before beginning the project to avoid any unnecessary delays or trips to the hardware store.
Keep in mind that the specific tools and materials required may vary depending on the type of handleset you’re installing or replacing, as well as the construction of your front door. Always refer to the manufacturer’s instructions for any specific requirements or recommendations.
Read more: How To Replace Columns On Front Porch
Step 1: Measure and Prepare
The first step in installing or replacing a front door handleset is to accurately measure your door and prepare it for the installation. Follow these guidelines to ensure a proper fit:
- Measure the backset: The backset refers to the distance from the edge of the door to the center of the handleset’s latch. Most standard backsets are either 2-3/8 inches or 2-3/4 inches. Measure the backset of your door to determine the correct size of handleset you’ll need.
- Check the door thickness: Handlesets are designed to fit specific door thicknesses, typically ranging from 1-3/8 inches to 2 inches. Measure the thickness of your door to ensure that the handleset you choose is compatible.
- Inspect the door’s surface: Assess the condition of your front door’s surface. If there are any existing holes or damage from the previous handleset, you may need to patch them up with wood putty or filler and sand them smooth. This will provide a clean surface for the new handleset.
- Remove any existing hardware: If you’re replacing an old handleset, take the time to remove all components of the previous handleset, including the latch, strike plate, and any screws or fasteners.
Once you have measured your door and prepared it for the installation, you’re ready to move on to the next step: removing the old handleset. It’s important to take your time and ensure that the door is properly prepared before proceeding, as this will help ensure a successful installation and a secure fit for your new handleset.
Step 2: Remove the Old Handleset
Now that you’ve measured and prepared your front door, it’s time to remove the old handleset. Follow these steps to safely and effectively remove the existing hardware:
- Take note of the current orientation: Before removing any screws or components, take a moment to observe and remember the orientation of the handleset. This will make it easier to install the new handleset correctly.
- Remove the screws: Using a screwdriver, carefully remove the screws that secure the handleset to the door. Keep track of the screws and set them aside safely, as you may need them for the installation of the new handleset.
- Detach the latch plate: Once the screws are removed, detach the latch plate from the edge of the door. Use a screwdriver or a chisel to gently pry it away if necessary.
- Remove the strike plate: Locate the strike plate on the door jamb, and remove the screws that hold it in place. Once the screws are removed, carefully pull the strike plate away from the jamb.
- Inspect the door and jamb: Take a moment to inspect the door and jamb for any damage or wear. If there are any issues, such as cracks or splintered wood, consider taking the time to address and repair them before proceeding with the installation of the new handleset.
By following these steps, you’ll be able to safely remove the old handleset and prepare your door for the installation of the new hardware. Remember to handle all components with care and set aside any screws or fasteners in a safe place for future use.
Step 3: Prepare the New Handleset
With the old handleset removed, it’s time to prepare the new handleset for installation. Follow these steps to ensure that the new hardware is ready to be installed on your front door:
- Read the manufacturer’s instructions: Before proceeding, carefully read through the instructions provided by the manufacturer. Familiarize yourself with the specific requirements and recommendations for installing the handleset.
- Assemble the components: Lay out all the components of the new handleset and familiarize yourself with them. This includes the handles, latch, strike plate, screws, and any additional accessories or trim pieces that may be included.
- Adjust the backset: If necessary, adjust the backset of the latch to match the measurement you took earlier. Follow the manufacturer’s instructions to make this adjustment, using a screwdriver or the provided adjustment mechanism.
- Test the latch: With the backset adjusted, test the latch to ensure that it smoothly extends and retracts. This helps confirm that the latch will function properly once installed on your front door.
- Verify the orientation: Check the manufacturer’s instructions or reference the old handleset to determine the correct orientation for the new handleset. Confirm that the handles, keyhole, and other components are positioned correctly.
By preparing the new handleset ahead of time, you’ll ensure that the installation process goes smoothly and efficiently. Take the time to read the instructions carefully and familiarize yourself with the components and their proper orientation. This will help you avoid any mistakes or misalignments during the installation process.
When installing or replacing a front door handleset, make sure to carefully follow the manufacturer’s instructions to ensure proper fit and function. It’s also important to double check the measurements and alignment before securing the handleset in place.
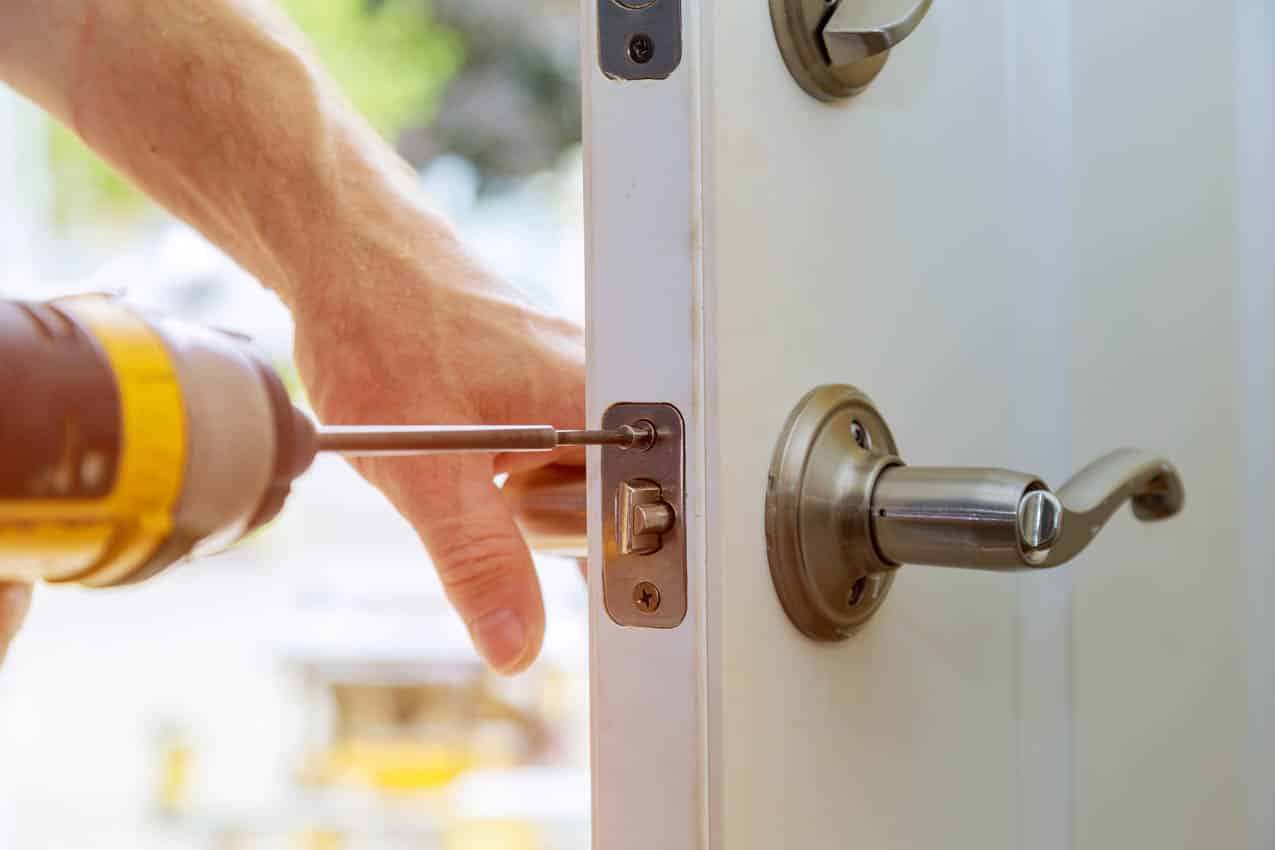
Step 4: Install the New Handleset
Now that you have prepared the new handleset, it’s time to install it on your front door. Follow these steps to properly install the new hardware:
- Position the new handleset: Begin by positioning the exterior portion of the handleset onto the exterior side of the door, aligning it with the previous holes if possible. Hold it in place firmly.
- Insert the latch: From the edge of the door, insert the latch into the hole, ensuring that the beveled side faces the direction that the door closes. Push it in until it is flush with the edge of the door.
- Secure the latch plate: From the edge of the door, attach the latch plate to the latch assembly using the provided screws. Make sure it is snug and properly aligned.
- Attach the strike plate: Position the strike plate on the door jamb, aligning it with the latch. Mark the screw holes using a pencil or marker. Pre-drill the pilot holes, then secure the strike plate using the provided screws.
- Connect the interior handleset: From the interior side of the door, align the interior portion of the handleset with the exposed screws on the exterior handleset. Securely fasten them together using the provided screws.
- Test the handleset: Double-check that the handleset operates smoothly, with the latch extending and retracting properly. Make any necessary adjustments if needed.
As you install the new handleset, pay attention to the alignment and snugness of the components. Take your time and ensure that everything is properly secured and functioning correctly before proceeding.
Remember, some handlesets may have slight variations in the installation process, so it’s important to consult the manufacturer’s instructions for any specific guidelines or recommendations.
Read more: How To Replace Porch Post
Step 5: Test and Adjust
After installing the new handleset, it’s important to thoroughly test and make any necessary adjustments to ensure that it functions properly and provides the desired level of security. Follow these steps to test and adjust your newly installed handleset:
- Test the latch: Close the door and test the latch by turning the handles and attempting to open the door. Ensure that the latch properly extends and retracts with ease.
- Check for alignment: Examine the alignment of the latch and strike plate. The latch should smoothly engage with the strike plate without any resistance or misalignment.
- Verify the lock: If your handleset includes a lock mechanism, test it to ensure that it locks and unlocks smoothly using the appropriate key or thumbturn.
- Make necessary adjustments: If you notice any issues with the latch alignment or lock mechanism, you may need to make minor adjustments. This can include tightening screws, repositioning the strike plate, or adjusting the latch’s position.
- Test the handle operation: Open and close the door multiple times to ensure that the handle operates smoothly and comfortably.
- Inspect the overall appearance: Step back and observe the handleset from a distance to ensure that it is visually appealing and in line with your expectations.
If you encounter any difficulties or issues during the testing and adjustment process, refer to the manufacturer’s instructions for troubleshooting tips. It’s important to address any problems promptly to ensure the proper functionality and security of your front door handleset.
Once you are satisfied with the performance and appearance of your new handleset, you can consider optional finishing touches, such as installing screw caps or cover plates, to give it a clean and polished look.
Congratulations! You have successfully installed or replaced a front door handleset, enhancing both the functionality and aesthetic appeal of your entryway.
Conclusion
Installing or replacing a front door handleset is a rewarding project that can significantly improve the appearance and security of your home’s entrance. By following the step-by-step guide outlined in this article and taking the necessary safety precautions, you can successfully complete this task with confidence.
Remember to carefully measure and prepare your door, ensuring that the new handleset is compatible with the backset and thickness of your door. Taking your time to remove the old handleset and prepare the new one will result in a smooth and successful installation.
Throughout the process, it’s important to reference the manufacturer’s instructions and use the provided tools and materials. Testing and adjusting the handleset after installation will ensure its proper functionality and alignment.
By completing this project, you not only enhance the functionality and security of your front door but also give your home a fresh and updated look. The new handleset will make a positive first impression on visitors and provide peace of mind for you and your family.
Remember, if you ever feel unsure or overwhelmed during the installation process, don’t hesitate to seek assistance from a professional or consult with someone experienced in handling handleset installations.
Enjoy your new front door handleset and the improved aesthetics and security it brings to your home!
Frequently Asked Questions about How To Install Or Replace A Front Door Handleset
Was this page helpful?
At Storables.com, we guarantee accurate and reliable information. Our content, validated by Expert Board Contributors, is crafted following stringent Editorial Policies. We're committed to providing you with well-researched, expert-backed insights for all your informational needs.


0 thoughts on “How To Install Or Replace A Front Door Handleset”