Articles
What Is Peel And Stick Roofing
Modified: August 24, 2024
Find informative articles about peel and stick roofing, including its benefits, installation process, and maintenance tips. Discover everything you need to know about this innovative roofing option.
(Many of the links in this article redirect to a specific reviewed product. Your purchase of these products through affiliate links helps to generate commission for Storables.com, at no extra cost. Learn more)
Introduction
When it comes to roofing materials, homeowners and contractors are always on the lookout for innovative and efficient options. One such option that has gained significant popularity in recent years is peel and stick roofing. This revolutionary technology offers a convenient and cost-effective way to install a durable and leak-free roof.
Peel and stick roofing, also known as self-adhesive roofing or modified bitumen roofing, is a type of roofing membrane that is applied directly to the roof deck. Unlike traditional roofing materials that require nails or heat to adhere, peel and stick roofing comes with a built-in adhesive layer, making it easy to install even for non-professionals.
Peel and stick roofing is typically made from a combination of asphalt, polymers, and reinforcing fibers. These materials are carefully designed to provide excellent waterproofing, UV resistance, and durability. The result is a roofing system that can stand up to the harshest weather conditions, protecting your home for years to come.
In this article, we will explore the various benefits of peel and stick roofing, the installation process, challenges and considerations, maintenance and repair, the cost involved, and how it compares to traditional roofing materials. So, if you’re considering a roof replacement or looking for a reliable roofing solution, keep reading to discover everything you need to know about peel and stick roofing.
Key Takeaways:
- Peel and stick roofing offers easy installation, excellent waterproofing, durability, flexibility, and cost-effectiveness. It’s a smart investment for homeowners and contractors seeking a reliable and efficient roofing solution.
- While peel and stick roofing provides numerous benefits, it’s essential to consider climate compatibility, surface preparation, complexity of the roof design, and long-term maintenance. Consulting with professionals and evaluating project-specific needs is crucial for a successful installation.
Read more: What Is Peel And Stick Tile
Definition of Peel and Stick Roofing
Peel and stick roofing, also known as self-adhesive roofing or modified bitumen roofing, is a type of roofing system that offers a convenient and efficient way to install a durable and watertight roof. This innovative technology is designed to provide superior protection against the elements while minimizing installation time and costs.
The primary component of peel and stick roofing is a modified bitumen membrane. This membrane consists of layers of asphalt that are modified with polymer additives to enhance its durability and flexibility. The modified bitumen membrane is then reinforced with polyester or fiberglass to provide strength and stability.
What sets peel and stick roofing apart from traditional roofing systems is its self-adhesive feature. The bottom surface of the modified bitumen membrane is coated with a specially formulated adhesive that allows for easy installation. Simply peel off the protective backing and stick the membrane directly onto the prepared roof deck.
The adhesive used in peel and stick roofing is designed to create a strong and long-lasting bond between the membrane and the roof deck. This adhesive is resistant to temperature changes, ensuring that it will not delaminate or lose its adhesion over time. Additionally, it provides excellent waterproofing properties, preventing water from seeping into the roof and causing leaks.
Peel and stick roofing offers a range of options to suit different types of roofs and climates. There are various thicknesses and finishes available, including granulated and smooth surfaces. Some peel and stick roofing membranes also come with a reflective coating to improve energy efficiency and reduce cooling costs.
Overall, peel and stick roofing provides a reliable and efficient solution for residential and commercial roofs. Its self-adhesive nature simplifies the installation process, while its durable and waterproof properties ensure long-term protection against leaks and weather damage.
Advantages of Peel and Stick Roofing
Peel and stick roofing offers several advantages over traditional roofing materials. Here are some of the key benefits:
Easy Installation: One of the biggest advantages of peel and stick roofing is its ease of installation. With the self-adhesive feature, the membrane can be applied directly to the roof deck without the need for additional tools or specialized equipment. This not only saves time but also reduces labor costs.
Waterproofing: Peel and stick roofing provides excellent waterproofing properties. The adhesive layer ensures a tight seal between the membrane and the roof deck, preventing water from seeping through and causing leaks. The durable bitumen membrane also acts as a barrier against moisture, protecting the underlying structure of the roof.
Durability: The modified bitumen membrane used in peel and stick roofing is highly durable. It is designed to withstand the harsh effects of UV rays, temperature fluctuations, and weather extremes. This makes it a long-lasting roofing solution that can withstand the test of time.
Flexibility: Peel and stick roofing membranes are highly flexible, allowing them to conform to the shape and contours of the roof. This flexibility ensures a tight and secure fit, even on roofs with complex designs or irregularities. It also helps to prevent cracking and damage due to movement or vibrations.
Energy Efficiency: Some peel and stick roofing membranes come with a reflective coating that helps to reduce heat absorption. This can result in lower cooling costs during hot summer months. The energy-efficient properties of peel and stick roofing contribute to a more comfortable indoor environment and can even lead to potential energy savings.
Low Maintenance: Once installed, peel and stick roofing requires minimal maintenance. The durable materials used in the membrane are resistant to common roofing issues such as cracking, blistering, and peeling. Regular inspections and basic cleaning are usually sufficient to keep the roof in optimal condition.
Cost-Effective: Peel and stick roofing can be a cost-effective option compared to traditional roofing materials. The simplified installation process reduces labor costs, and the durability of the membrane means fewer repairs and replacements over time. Additionally, the energy efficiency of peel and stick roofing can lead to long-term cost savings on utility bills.
Overall, peel and stick roofing offers a range of advantages that make it an attractive choice for homeowners and contractors alike. Its easy installation, waterproofing capabilities, durability, flexibility, energy efficiency, low maintenance requirements, and cost-effectiveness make it a smart investment for any roofing project.
Installation Process of Peel and Stick Roofing
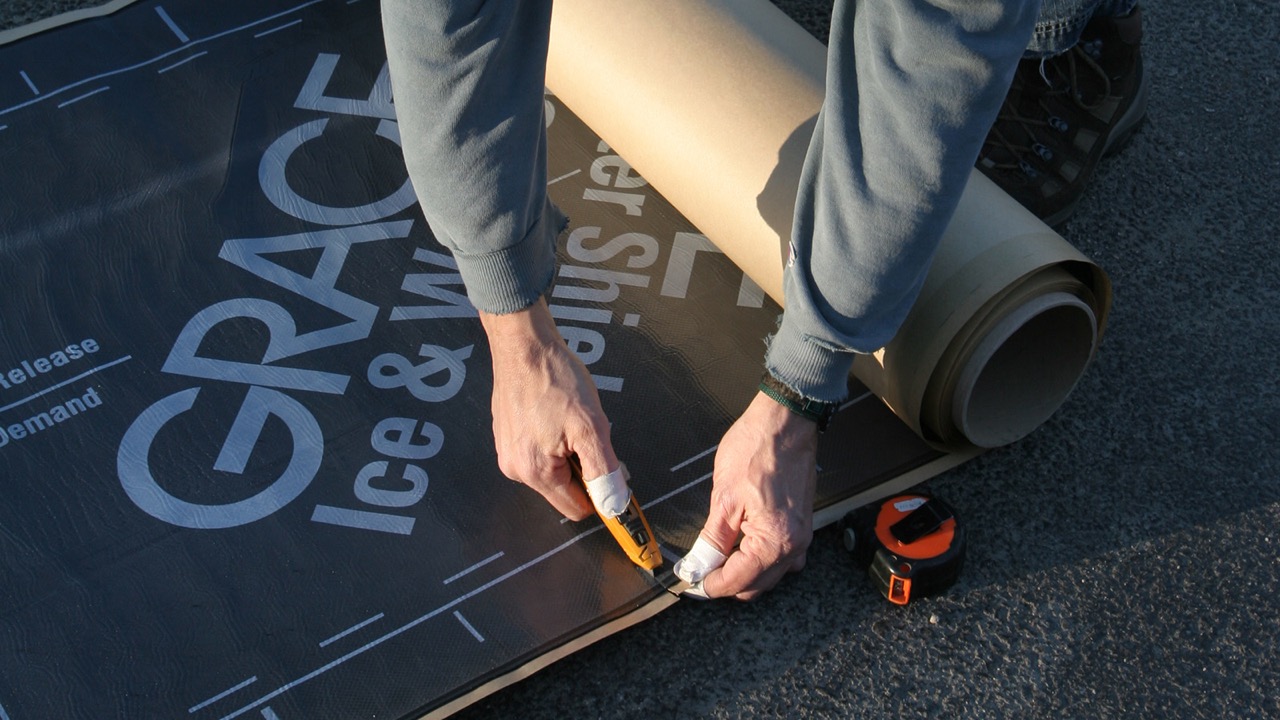
The installation process of peel and stick roofing is relatively straightforward and can be completed by both professional contractors and skilled homeowners. Here is a step-by-step guide to the installation process:
- Prepare the roof: Start by preparing the roof deck. Remove any existing roofing materials, nails, or debris. Ensure that the roof deck is clean, smooth, and dry before proceeding.
- Measure and cut the membrane: Measure the dimensions of the roof surface and cut the peel and stick roofing membrane accordingly. It’s essential to have accurate measurements to minimize waste and ensure a proper fit.
- Start from the eaves: Begin the installation at the eaves of the roof. Peel off the protective backing from the first section of the membrane and carefully stick it to the roof deck, ensuring proper alignment and overlap as specified by the manufacturer.
- Apply pressure: Once the first section is adhered to the roof deck, apply pressure using a roofing roller or a broom to ensure a strong bond between the membrane and the deck. This step is crucial to ensure proper adhesion and prevent air pockets or wrinkles.
- Continue to the next sections: Move horizontally along the eaves, peeling off the protective backing and sticking the membrane to the roof deck. Repeat the process for each section, overlapping the edges of the membrane according to the manufacturer’s instructions.
- Work your way up: After completing the first row, start the second row above it, ensuring proper overlap with the previous row. Continue working your way up the roof, adhering each section of the membrane and applying pressure to achieve a tight seal.
- Install flashing and accessories: As you progress with the installation, you may need to install flashing around roof penetrations such as chimneys or vents. Follow the manufacturer’s guidelines for installing flashing and any other necessary accessories.
- Finish at the ridge: Once you reach the ridge of the roof, trim the membrane to fit and ensure a clean, finished look. Pay attention to details and make sure the edges are properly sealed.
- Inspect and test for leaks: After completing the installation, conduct a thorough inspection of the roof to ensure there are no visible defects or areas that might compromise the waterproofing. Additionally, perform a water test to check for any potential leaks.
It’s important to note that while peel and stick roofing can be installed by homeowners, it is recommended to consult with a professional roofing contractor for complex roof designs or if you don’t have any prior experience with roofing installation. They can provide guidance, ensure proper installation, and address any specific concerns related to your roof.
By following these steps and adhering to the manufacturer’s instructions, you can successfully install peel and stick roofing and enjoy the benefits of a durable and watertight roof.
Challenges and Considerations of Peel and Stick Roofing
While peel and stick roofing offers numerous advantages, there are also some challenges and considerations to keep in mind. Understanding these factors will help you make an informed decision about whether peel and stick roofing is the right choice for your project. Here are some key considerations:
- Climate Compatibility: Peel and stick roofing may not be suitable for all climates. Extreme heat or cold can affect the adhesive properties of the membrane, potentially leading to reduced performance or even failure. It’s crucial to consult with roofing professionals and consider local climate conditions before opting for peel and stick roofing.
- Surface Preparation: The success of peel and stick roofing installation heavily relies on proper surface preparation. The roof deck must be clean, smooth, and free from any debris or moisture. Any imperfections on the surface can compromise the adhesive bond and the overall effectiveness of the roofing system.
- Complex Roofs: Peel and stick roofing may pose challenges for roofs with complex designs or multiple roof penetrations. Customizing the membrane to fit irregular shapes or around protrusions such as chimneys or vents requires careful cutting and maneuvering. It’s essential to have precision and attention to detail to ensure a proper installation.
- Professional Expertise: While peel and stick roofing can be installed by homeowners, it’s recommended to seek professional assistance, especially for larger or more intricate roofing projects. Professional roofers have the experience, tools, and knowledge to ensure a correct installation, minimize mistakes, and address any potential issues that may arise during or after the installation process.
- Longevity and Maintenance: While peel and stick roofing is known for its durability, it’s important to consider the longevity and maintenance requirements. Regular inspections and maintenance are necessary to preserve the roofing system’s effectiveness and identify any signs of damage or wear. Proper maintenance can help extend the lifespan of the roofing system and prevent costly repairs down the line.
- Cost Analysis: Peel and stick roofing may have a higher upfront cost compared to some traditional roofing materials. However, it’s important to consider the long-term benefits and potential cost savings associated with its durability, energy efficiency, and low maintenance requirements. Conduct a thorough cost analysis to determine the overall value and return on investment.
By taking these challenges and considerations into account, you can make an informed decision about whether peel and stick roofing is suitable for your specific roofing needs. Consulting with roofing professionals and carefully evaluating your project requirements will help ensure a successful installation and long-term satisfaction with your new roof.
When installing peel and stick roofing, make sure the surface is clean and dry to ensure proper adhesion. Avoid installing in extreme temperatures for best results.
Read more: What Is The Best Peel And Stick Flooring
Maintenance and Repair of Peel and Stick Roofing
Maintaining and repairing peel and stick roofing is relatively straightforward, thanks to its durable and low-maintenance nature. However, regular inspections and prompt repairs are still necessary to ensure the longevity and effectiveness of the roofing system. Here are some key maintenance and repair considerations for peel and stick roofing:
Regular Inspections: Inspect the roof at least once a year, preferably during the spring or fall seasons. Check for any signs of damage, such as cracks, blistering, or loose seams. Look for areas where the membrane may have pulled away from the roof deck. If you notice any issues, address them promptly to prevent further damage.
Cleaning: To keep your peel and stick roofing in optimal condition, it’s important to keep it clean. Remove any debris, leaves, or branches that may accumulate on the roof surface. Gently sweep or rinse the roof with a garden hose to remove dirt or algae buildup. Avoid using harsh chemicals or abrasive cleaning methods that could damage the membrane.
Repairs: In the event of damage or leaks, it’s crucial to address them as soon as possible. Small punctures or tears can be repaired with a peel and stick repair patch specifically designed for the roofing material. Clean and dry the damaged area, apply a primer if recommended by the manufacturer, and adhere the patch following the instructions provided. For larger or more extensive damage, it’s advisable to consult with a professional roofing contractor.
Sealing Joints and Seams: Over time, the adhesive used in peel and stick roofing may wear off or become less effective. Inspect the joints and seams of the roof regularly and reseal them if necessary. Use a compatible sealant recommended by the manufacturer and follow the application instructions carefully.
Preventative Measures: To prolong the life of your peel and stick roofing, consider taking some preventative measures. Trim nearby trees or vegetation that may overhang the roof and cause damage or excessive debris buildup. Avoid walking on the roof unnecessarily, as excessive foot traffic can potentially disrupt the integrity of the roofing system. Additionally, ensure that gutters and downspouts are clear of debris to prevent water backup and potential damage to the roofing system.
Professional Help: While peel and stick roofing is relatively low-maintenance, it’s advisable to have regular inspections and periodic maintenance conducted by a professional roofing contractor. They have the expertise and knowledge to identify potential issues, perform necessary repairs, and provide guidance on proper care to maximize the lifespan of your peel and stick roof.
By following these maintenance guidelines and addressing any repairs in a timely manner, you can ensure that your peel and stick roofing continues to provide effective protection for your home for years to come.
Cost of Peel and Stick Roofing
The cost of peel and stick roofing can vary depending on various factors, including the size of the roof, the complexity of the installation, and the quality of the materials used. Here are some key aspects to consider when evaluating the cost of peel and stick roofing:
Materials Cost: The materials used for peel and stick roofing, such as the modified bitumen membrane, adhesive, and any additional accessories, will contribute to the overall cost. Higher-quality materials may come with a higher price tag but can provide better durability and longevity.
Roof Size and Complexity: The size and complexity of the roof will affect the overall cost of the installation. Larger roofs will require more materials and labor, increasing the total expense. Additionally, roofs with multiple protrusions, complex designs, or steep slopes may require more time and effort to install, potentially adding to the cost.
Labor Costs: The cost of labor will vary depending on the region, the roofing contractor’s expertise, and the length of time required for the installation. It’s advisable to obtain multiple quotes from reputable roofing contractors to compare prices and ensure a fair deal.
Maintenance and Repair Costs: While peel and stick roofing is known for its low-maintenance nature, there may still be costs associated with regular inspections, cleaning, and any necessary repairs. It’s essential to factor in these ongoing maintenance expenses when considering the overall cost of the roofing system.
Additional Considerations: Depending on your specific requirements and local building codes, there may be additional costs to consider. This could include the need for underlayment, insulation, flashing, or other accessories to ensure a properly installed and code-compliant roofing system.
While the cost of peel and stick roofing may initially be higher than some traditional roofing materials, it’s important to consider the long-term benefits and potential savings. The durability and low maintenance requirements of peel and stick roofing can lead to reduced repair and replacement costs over time. Additionally, the energy efficiency of certain peel and stick roofing options can contribute to lower heating and cooling expenses.
To get an accurate estimate of the cost for your specific project, it’s recommended to consult with professional roofing contractors. They can evaluate your roof, provide a detailed cost breakdown, and help you determine whether peel and stick roofing is the right choice within your budget.
Remember, while cost is an important consideration, it should not be the sole factor in your decision-making process. Take into account the overall quality, longevity, and benefits of peel and stick roofing to make an informed decision that aligns with your specific roofing needs and budget.
Comparison with Traditional Roofing Materials
When considering peel and stick roofing as an option for your project, it’s important to compare it with traditional roofing materials to determine which choice best suits your needs. Here is a comparison between peel and stick roofing and traditional roofing materials:
Installation: Peel and stick roofing is generally easier and quicker to install compared to traditional roofing materials. Its self-adhesive nature eliminates the need for additional equipment or complex installation techniques. Traditional roofing materials, such as asphalt shingles or metal panels, often require nails, screws, or specialized tools for installation.
Durability: Peel and stick roofing is known for its durability and resistance to various environmental factors. The modified bitumen membrane offers excellent protection against UV rays, temperature fluctuations, and severe weather. Traditional materials may vary in terms of durability depending on the specific material chosen, with some options being more susceptible to damage or wear over time.
Waterproofing: Peel and stick roofing provides excellent waterproofing capabilities due to its self-adhesive design and the use of modified bitumen materials. The adhesive bond creates a reliable seal against water infiltration. Traditional materials, such as asphalt shingles or clay tiles, typically rely on overlapping or interlocking mechanisms to provide waterproofing. However, these mechanisms may deteriorate over time and lead to potential leaks.
Maintenance: Peel and stick roofing generally requires minimal maintenance. Regular inspections, cleaning, and addressing any necessary repairs are typically sufficient to keep the roof in optimal condition. Traditional roofing materials may require more frequent maintenance, including periodic cleaning, resealing, or replacing damaged shingles or tiles.
Longevity: Peel and stick roofing has a reputation for offering long-lasting performance. The durability of the modified bitumen materials and its resistance to weather extremes contribute to its longevity. Traditional roofing materials have varying lifespans depending on the material chosen, with some options needing replacement or repairs sooner than others.
Cost: The cost of peel and stick roofing can vary depending on factors such as roof size, complexity, and material quality. While peel and stick roofing may have a higher upfront cost compared to some traditional materials like asphalt shingles, it can offer long-term cost savings through its durability, low maintenance requirements, and potential energy efficiency.
Aesthetics: Traditional roofing materials often provide a wide range of aesthetic options, allowing homeowners to choose from various styles, colors, and textures. Asphalt shingles, wood shakes, or clay tiles can offer a more traditional or decorative appearance. Peel and stick roofing, on the other hand, typically has a sleek and modern appearance with options for different finishes and textures.
Ultimately, the choice between peel and stick roofing and traditional roofing materials will depend on your specific needs, preferences, and budget. It’s important to understand the pros and cons of each option and consult with professional roofing contractors to assess which material is the most suitable for your project.
Whether you opt for peel and stick roofing or a traditional roofing material, ensuring proper installation and regular maintenance will help to maximize the lifespan and performance of your roof, providing you with reliable and long-lasting protection for your home.
Conclusion
Peel and stick roofing offers a convenient and efficient solution for homeowners and contractors seeking a durable and watertight roofing system. Its self-adhesive nature, combined with the use of modified bitumen materials, simplifies the installation process and provides excellent protection against the elements.
Throughout this article, we have explored the definition of peel and stick roofing, the advantages it offers, the installation process, challenges and considerations, maintenance and repair requirements, cost comparisons with traditional roofing materials, and more.
Peel and stick roofing stands out for its ease of installation, waterproofing capabilities, durability, flexibility, energy efficiency, and low maintenance requirements. It offers a reliable and cost-effective roofing solution for both residential and commercial properties.
However, it is important to consider the specific factors of your project, such as climate compatibility, surface preparation, complexity of the roof design, and the need for professional expertise. These considerations will help you make an informed decision when choosing a roofing material.
Whether you ultimately choose peel and stick roofing or a traditional roofing material, regular inspections, cleaning, and addressing any necessary repairs or maintenance will help maximize the longevity and effectiveness of your roof.
In conclusion, peel and stick roofing presents a valuable option for homeowners and contractors seeking a durable, easy-to-install, and long-lasting roofing system. By understanding its benefits and considering the unique needs of your project, you can make an informed decision that ensures the protection and longevity of your home for years to come.
Frequently Asked Questions about What Is Peel And Stick Roofing
Was this page helpful?
At Storables.com, we guarantee accurate and reliable information. Our content, validated by Expert Board Contributors, is crafted following stringent Editorial Policies. We're committed to providing you with well-researched, expert-backed insights for all your informational needs.


0 thoughts on “What Is Peel And Stick Roofing”