
Articles
How To Make A Bargello Quilt
Modified: August 22, 2024
Learn the step-by-step process of creating a stunning Bargello quilt with our informative articles. Discover expert tips and techniques for this unique quilting style.
(Many of the links in this article redirect to a specific reviewed product. Your purchase of these products through affiliate links helps to generate commission for Storables.com, at no extra cost. Learn more)
Introduction
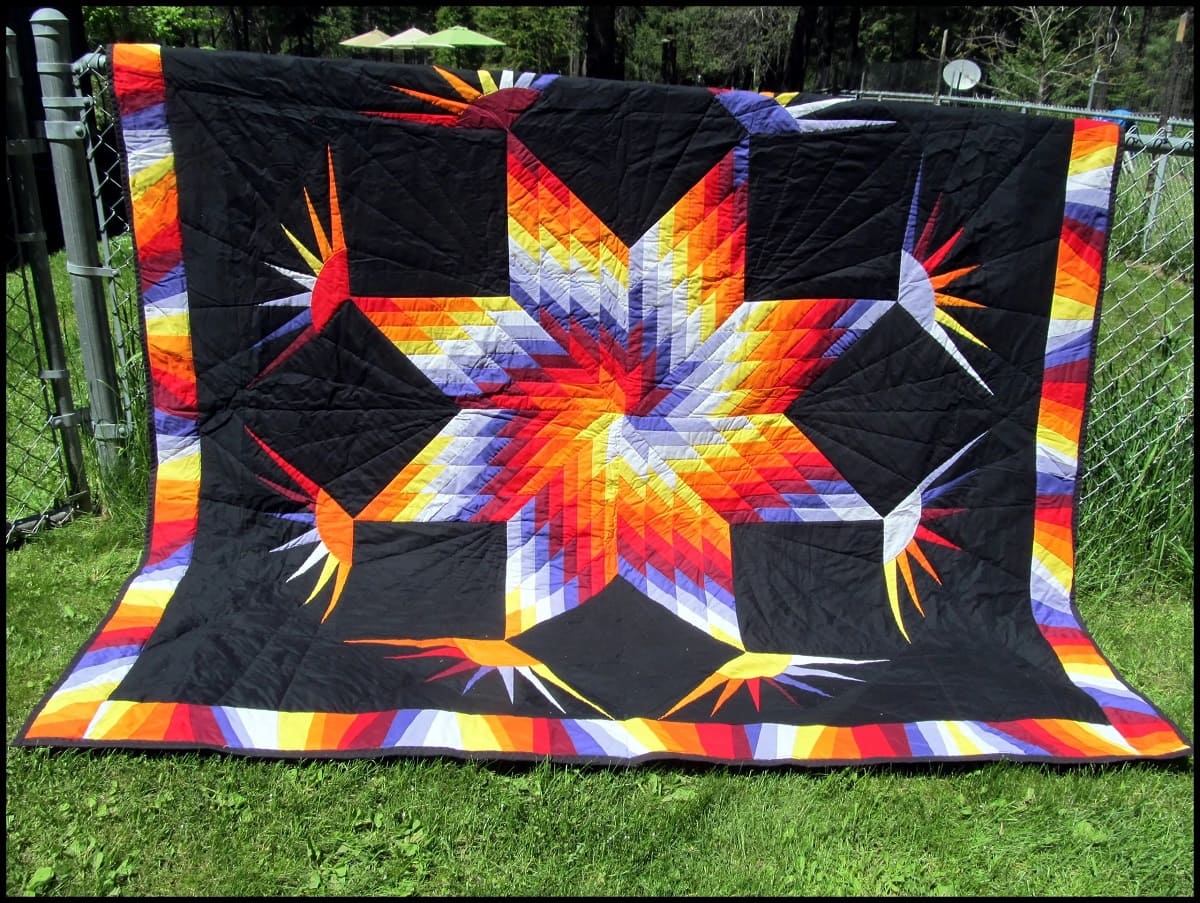
Quilting is a timeless craft that allows you to create beautiful and functional pieces of art. Among the various quilting techniques, Bargello quilting stands out for its mesmerizing geometric patterns and vibrant colors.
In this article, we will explore the step-by-step process of making a Bargello quilt. Whether you are a seasoned quilter looking to try a new technique or a beginner eager to embark on your first quilting project, this guide will provide you with the necessary knowledge and inspiration to create your own stunning Bargello quilt.
Bargello quilts, also known as flame stitch quilts, originated in Florence, Italy, during the 17th century. Named after the Bargello Palace, where similar patterns were commonly found in needlework and tapestry, the technique involves the strategic placement of fabric strips to create an optical illusion of movement and depth.
While Bargello quilts may appear intricate and complex, they can be achieved by quilters of all skill levels. By following the steps outlined in this article and using your creativity, you will be able to make a stunning Bargello quilt that will surely become a cherished piece in your collection or a beloved gift for a loved one.
Before we dive into the process, let’s gather the necessary materials.
Key Takeaways:
- Embark on a creative journey to make a stunning Bargello quilt by carefully selecting vibrant fabrics, precision cutting, and skillful sewing. Let your creativity shine as you craft a mesmerizing work of art.
- Quilting is not just about the final result, but also the joy of expression and the journey itself. Celebrate your dedication and craftsmanship as you create a cherished Bargello quilt to inspire and bring joy to others.
Read more: How To Make A Quilt
Materials Needed
Before you begin your Bargello quilt project, it’s important to gather all the necessary materials. Here’s a list of what you’ll need:
- Fabric: Choose a variety of fabrics in different colors for your Bargello quilt. It’s best to select fabrics that have contrasting colors and patterns to create a visually striking effect. You will need a main fabric for the background and several fabrics for the strips.
- Rotary Cutter: A rotary cutter is a handy tool that allows you to cut fabric with precision. Make sure to have a sharp blade to ensure clean and accurate cuts.
- Cutting Mat: A self-healing cutting mat is essential for protecting your work surface and providing a smooth and stable surface for cutting your fabric.
- Ruler: A clear acrylic ruler with measurement markings is crucial for obtaining accurate and straight cuts. Look for a ruler that is at least 18 inches long to accommodate the width of your fabric.
- Sewing Machine: A sewing machine will make the construction of your Bargello quilt much faster and easier. Ensure that your sewing machine is in good working condition and equipped with a quilting foot or walking foot for smooth and even stitching.
- Thread: Choose a high-quality thread that matches the colors of your fabrics. Cotton thread is commonly used for quilting, as it is strong and durable.
- Quilt Batting: Quilt batting, also known as wadding, is a layer of insulation that provides loft and warmth to your quilt. Select a batting that suits your preference in terms of thickness and fiber content.
- Backing Fabric: Choose a fabric for the backing of your quilt that complements the colors and design of your Bargello pattern. Ensure that the fabric is wide enough to accommodate the quilt top.
- Binding Fabric: Binding is the fabric used to finish the edges of the quilt. Select a fabric that coordinates with your quilt’s colors for a cohesive look.
- Pins and Needles: Straight pins are essential for holding your fabric in place during the sewing process. Additionally, have hand sewing needles on hand for stitching the binding.
- Iron and Ironing Board: An iron is crucial for pressing your fabric and achieving crisp seams. Set up an ironing board in your workspace for convenience.
With these materials ready, you are now prepared to start your Bargello quilt journey. In the next step, we will delve into choosing fabric for your quilt.
Step 1: Choosing Fabric
The selection of fabric plays a vital role in the overall appearance and success of your Bargello quilt. It’s important to choose fabrics that not only complement each other but also create contrast and visual interest in your quilt design. Here’s how you can choose the right fabric for your Bargello quilt:
1. Color Palette: Determine the color palette you want to incorporate into your quilt. Consider the mood or theme you’d like to convey. Do you prefer vibrant and bold colors, or do you lean towards a more subtle and soothing color scheme? Keep in mind that Bargello quilts typically include a range of colors to create the illusion of movement.
2. Contrast: Look for fabrics that have varying levels of contrast. This will ensure that the individual fabric strips stand out in your Bargello design. Consider using light and dark fabrics, as well as prints and solids, to create visual interest.
3. Fabric Pattern: Experiment with different fabric patterns, such as stripes, plaids, florals, or geometrics. Mixing different patterns will add texture and depth to your Bargello quilt. However, be mindful of the scale of the patterns to ensure they work harmoniously together.
4. Fabric Selection: Once you have a general idea of the color palette and contrast you want to achieve, it’s time to select your fabrics. Visit a local quilt shop or browse online fabric stores to explore a wide range of options. Consider purchasing fabric in person if possible, as it allows you to see and feel the fabric before making a decision.
5. Fabric Quantity: Calculate how much fabric you will need based on the size of your quilt and the number of strips you plan to include. A general rule of thumb is to have at least 1/2 yard of each fabric, but this may vary depending on the size and complexity of your Bargello pattern.
Take your time in selecting fabrics that you love and that evoke the desired aesthetic for your Bargello quilt. Remember, this is an opportunity to let your creativity shine. Once you have your fabrics ready, it’s time to move on to the next step: cutting the fabric strips.
Step 2: Cutting the Fabric Strips
Now that you have chosen your fabrics, it’s time to cut them into strips. The width and length of the strips will depend on your desired quilt size, pattern, and personal preference. Here’s how to cut the fabric strips for your Bargello quilt:
1. Determine Strip Width: Decide on the width of your fabric strips. Typically, Bargello quilts have strips ranging from 1 inch to 2 inches wide. Keep in mind that narrower strips will create a more intricate and detailed pattern, while wider strips will result in a bolder and more prominent design.
2. Measure and Cut: Using a rotary cutter and a ruler, measure and cut the fabric into strips of the desired width. Ensure that the strips are cut straight and accurately to maintain consistency in your Bargello pattern.
3. Varying Strip Lengths: To achieve the unique Bargello design, the fabric strips will vary in length. Decide on the length of your first strip, then gradually increase or decrease the length of each subsequent strip. This variation will create the illusion of movement and depth in your quilt.
4. Organize and Label: As you cut the fabric strips, it’s crucial to keep them organized and labeled. Use sticky notes or small tags to mark the fabric’s color, pattern, and strip number. This organization will help you easily assemble the strips in the correct order during the piecing process.
5. Optional: Pre-cutting All Strips: If you prefer, you can cut all the fabric strips at once before beginning the piecing process. This method allows you to have all the strips prepared in advance, making it easier to visualize the final design and ensure a cohesive flow of colors and patterns.
Remember to take your time in cutting the fabric strips accurately and neatly. Straight and precise cuts will contribute to the overall look of your Bargello quilt. With the fabric strips ready, it’s time to move on to the next step: sewing the strips together to create the Bargello pattern.
Step 3: Sewing the Strips Together
Now that you have your fabric strips cut, it’s time to sew them together to create the Bargello pattern. This step will require careful alignment and precise stitching to ensure a seamless and visually pleasing result. Follow these steps to sew the fabric strips together:
1. Arrange the Strips: Lay out your fabric strips in the desired order and pattern. This will help you visualize how the final Bargello pattern will look. Take note of the color placement and any directional elements in the fabrics.
2. Sew the First Two Strips: Take the first two fabric strips and place them right sides together, aligning the edges. Pin the strips together along the edge to secure them for sewing.
3. Sew with a ¼-inch Seam Allowance: Using a ¼-inch seam allowance, sew the pinned fabric strips together. Backstitch at the beginning and end of the seam to secure the stitches. Press the seam open or to one side, depending on your preference.
4. Continue Adding Strips: Take the next fabric strip in the sequence and place it right sides together with the previously sewn strip. Align the edges and pin them in place. Sew the strips together with a ¼-inch seam allowance, repeating this process until all the fabric strips are joined.
5. Press the Seams: After sewing each strip, press the seam open or to one side. This will ensure the seams lay flat and reduce bulk in the quilt top. Use an iron at a medium heat setting and steam for best results.
6. Square Up the Quilt Top: Once all the fabric strips are sewn together, square up the edges of the quilt top by trimming any excess fabric. Use a ruler to ensure the edges are straight and even.
Throughout the sewing process, it’s important to maintain accuracy in aligning the fabric strips and stitching them together. Taking your time and double-checking your work will result in a beautifully pieced Bargello pattern.
With the fabric strips sewn together, we can proceed to the next step: creating the Bargello pattern by manipulating the strip arrangement.
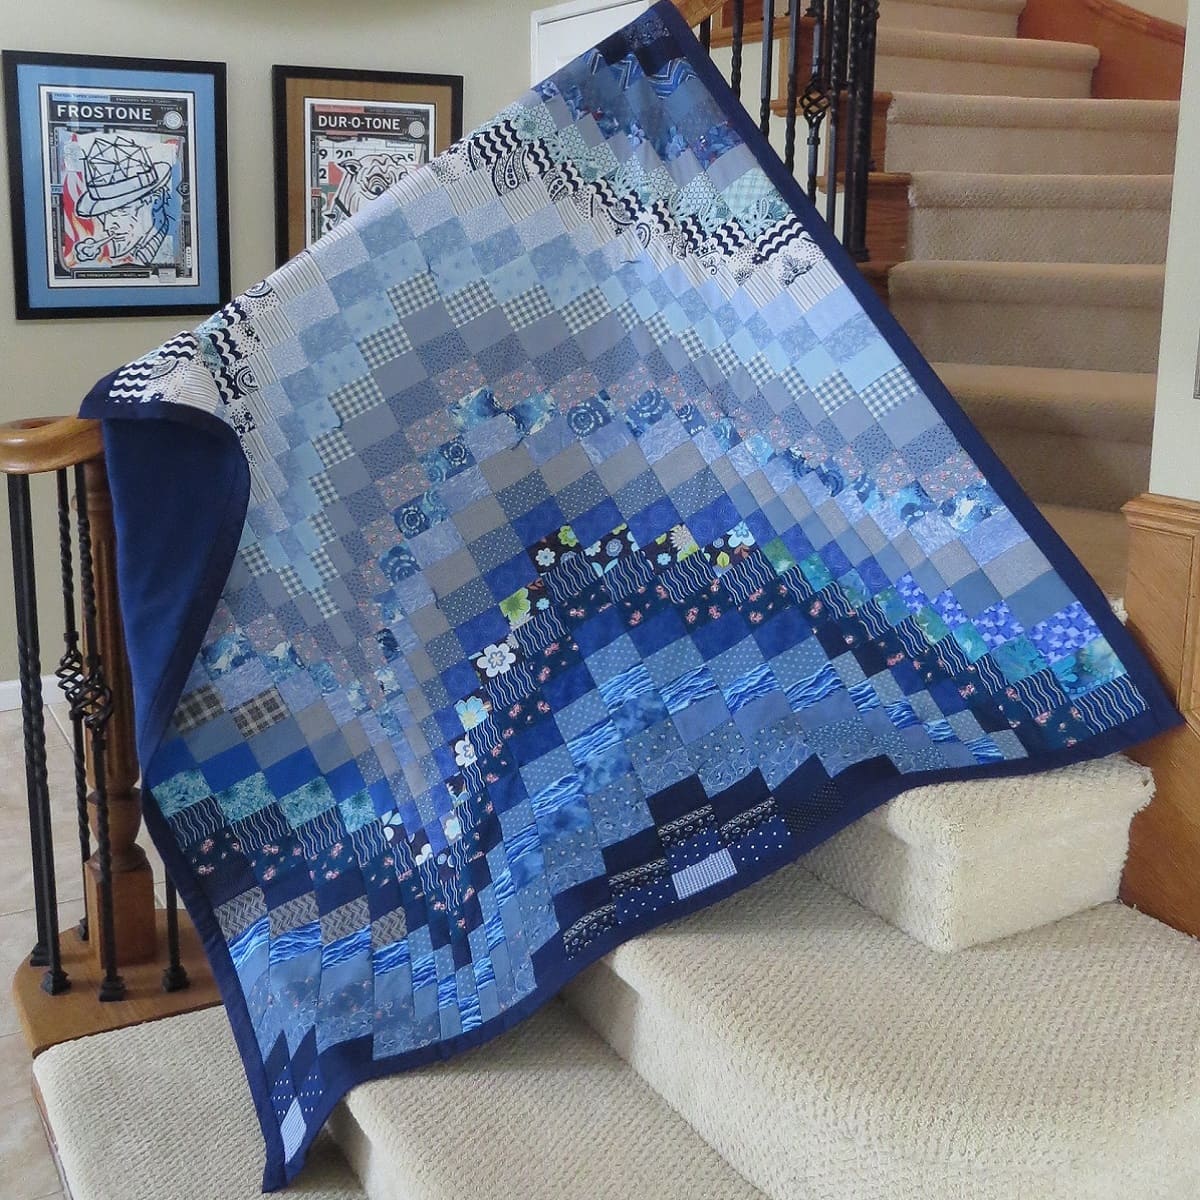
When making a Bargello quilt, be sure to carefully align and sew your fabric strips to create the beautiful wave effect. Take your time and pay attention to the color placement for a stunning result.
Read more: How To Make A Quilt Larger
Step 4: Creating the Bargello Pattern
With the fabric strips sewn together, it’s time to bring your Bargello quilt to life by arranging and manipulating the strips to create the desired pattern. The placement of the strips will determine the overall design and visual impact of your quilt. Here’s how you can create the Bargello pattern:
1. Divide the Strips into Sections: Divide your fabric strips into groups or sections based on the length and color pattern. This will make it easier to visualize the placement of the strips and ensure a smooth transition between the colors.
2. Experiment with Strip Placement: Lay out the sections of fabric strips on a large flat surface or design wall. Play around with the arrangement of the strips to create different patterns and effects. You can start with a simple design, like a zigzag or chevron, or opt for more complex patterns, such as curves or waves.
3. Consider Gradation: To add depth and movement to your Bargello quilt, consider incorporating gradation in color. Gradation involves arranging the strips in a specific order from light to dark, creating a gradual shift in color intensity. This technique can enhance the illusion of movement in the quilt design.
4. Balance the Colors: Pay attention to the balance of colors in your Bargello pattern. Distribute the colors evenly throughout the quilt top to create a harmonious and visually appealing result. Avoid clustering similar colors together or having one dominant color overpower the rest.
5. Secure the Strip Placement: Once you are satisfied with the arrangement of the fabric strips, take a photo or make notes to document the pattern. This will help you maintain the strip placement when it comes time to sew the strips together into rows.
Creating the Bargello pattern requires patience, experimentation, and a keen eye for design. Take your time to find the arrangement that best reflects your vision and aesthetic preferences for your quilt. With the pattern finalized, we can move on to the next step: quilting the layers together to add dimension and texture to your Bargello quilt.
Step 5: Quilting the Layers
Quilting the layers together is an essential step in creating a Bargello quilt. Quilting adds both dimension and stability to your quilt while enhancing the overall visual appeal. Follow these steps to quilt your Bargello quilt:
1. Prepare the Quilt Sandwich: Lay your Bargello quilt top on a flat surface, right side up. Place your quilt batting on top of the quilt top, ensuring it covers the entire area. Finally, lay your backing fabric on top of the batting, right side down. Smooth out any wrinkles or folds in the layers.
2. Baste the Layers: To hold the layers together during the quilting process, baste them using your preferred method. This can be achieved through hand basting, safety pins, or using a basting spray. Choose a method that works best for you and ensures the layers are securely held in place.
3. Choose a Quilting Design: Decide on the quilting design you want to use to stitch the layers together. Popular quilting options for Bargello quilts include stitch-in-the-ditch along the strip seams, free-motion quilting, or using a decorative quilting pattern that complements the design of your Bargello pattern.
4. Quilt the Layers: Using a walking foot or free-motion foot on your sewing machine, start quilting the layers according to your chosen design. Take your time to ensure even stitching and maintain the desired pattern and spacing as you move across the quilt top.
5. Secure Loose Threads: As you quilt, periodically check for and secure any loose threads to prevent them from catching or tangling while quilting. Trim excess thread tails as needed to keep your quilt neat and tidy.
6. Optional: Additional Quilting: Depending on your preferences and the complexity of your Bargello pattern, you may wish to add additional quilting. This can include further decorative stitching, echo quilting around specific elements, or creating texture through stippling or meandering stitches.
7. Finish the Quilt Edges: Once you have completed the quilting, trim any excess batting and backing fabric to create even edges. You can finish the edges of your Bargello quilt by binding them with a complementary fabric, using a self-binding technique, or opting for a decorative edge finish, such as scallops or piping.
Remember, quilting is a personal expression of your creativity. Choose a quilting design that enhances your Bargello pattern and reflects your style. With the layers quilted together, we can move on to the next step: adding the binding to finish off your Bargello quilt.
Step 6: Adding Binding
The binding is the final touch that adds a polished and professional finish to your Bargello quilt. It not only secures the edges of the quilt but also provides a decorative element that complements the overall design. Follow these steps to add the binding to your Bargello quilt:
1. Prepare the Binding Fabric: Determine the width of your binding strips. A common measurement is 2.5 inches, which will result in a 0.25-inch finished binding. Calculate the total length needed by adding the measurements of all four sides of your quilt, plus a few extra inches for corners and joining.
2. Cut and Join Binding Strips: Cut enough binding strips from your chosen fabric to reach the calculated length. If necessary, join multiple strips together mitering the ends, ensuring a clean and seamless finish. Press the binding strips in half lengthwise, wrong sides together.
3. Attach the Binding to the Quilt: Starting from the middle of one side of the quilt, align the raw edges of the binding strip with the raw edges of the quilt top. Leave a tail of binding fabric before the starting point. Using a ¼-inch seam allowance, sew the binding to the quilt, stopping a few inches before reaching the corner.
4. Miter the Corners: To achieve neat and crisp corners, fold the binding strip up, away from the quilt, forming a 45-degree angle. Then fold the binding strip back down, aligning it with the adjacent side of the quilt. Continue sewing along the next edge, repeating this process for each corner.
5. Join the Ends: As you approach the starting point, leave a few inches of excess binding. Trim the end to align with the beginning tail. Open up the binding strips and overlap them, right sides together. Sew a diagonal seam across the overlapped ends and trim the excess. Fold the binding back over the quilt and finish sewing the remaining edge.
6. Secure the Binding: Press the binding away from the quilt, then fold it over to the backside, encasing the raw edges. Hand stitch or machine stitch the binding to the back of the quilt, ensuring the stitches are invisible on the front. Take care to stitch close to the folded edge for a clean finish.
7. Optional: Decorative Binding: If desired, consider adding a decorative touch to your binding. This can include using contrasting fabric, piping, or incorporating a flanged binding technique to enhance the visual appeal of your Bargello quilt.
With the binding securely attached, take a moment to admire your completed Bargello quilt. The binding not only adds a professional finish but also serves to protect the quilt edges and ensure its longevity. Your Bargello quilt is now ready for the final step: adding any finishing touches.
Step 7: Finishing Touches
Now that your Bargello quilt is almost complete, it’s time to add the final finishing touches to make it truly special. These small details can elevate your quilt and add that extra charm. Here are some ideas for adding those finishing touches:
1. Label your quilt: Sew a small fabric label to the back of your quilt, indicating the date of completion, your name, and any other details you’d like to include. This not only adds a personal touch but also serves as a way to mark your creation.
2. Add a personalized message: Consider embroidering or appliquéing a special message, quote, or dedication onto your quilt. This adds sentimental value and makes the quilt unique to you or the intended recipient.
3. Embellish with hand embroidery: If you enjoy handwork, consider adding some hand embroidery to your quilt. You can stitch intricate designs, personal monograms, or decorative motifs on specific blocks or borders to enhance the overall aesthetic.
4. Beadwork and embellishments: For an extra touch of glamour, consider adding beads, sequins, or other embellishments to your Bargello quilt. Use them sparingly for a subtle effect or incorporate them more prominently in certain areas to create focal points.
5. Quilt label: Create a fabric label with important details about your quilt, such as the pattern name, fabric collection, and quilting techniques used. Stitch it onto the back of the quilt for future reference and documentation.
6. Trim loose threads: Take a moment to inspect your quilt for any loose threads or stray pieces of fabric. Trim them carefully using sharp fabric scissors to ensure a polished and tidy final result.
7. Care instructions: Include a care label with instructions on how to clean and care for your Bargello quilt. This will help preserve its beauty and functionality for years to come.
8. Display or gift wrap: Finally, consider how you would like to present your finished Bargello quilt. Whether you plan to display it on a quilt stand or give it as a gift, choose an appropriate display method or gift wrap that showcases the beauty of your creation.
These finishing touches not only add a personal touch to your Bargello quilt but also showcase your craftsmanship and attention to detail. Your quilt is now complete and ready to be cherished and admired. Congratulations on completing your Bargello quilt!
Before you go, don’t forget to take a moment to step back and admire the beauty of your finished Bargello quilt. It’s a testament to your skill, creativity, and dedication. Enjoy the fruits of your labor and consider sharing your masterpiece with others, as it is sure to inspire and bring joy to all who see it.
Read more: How Much Is It To Make A Quilt
Conclusion
Congratulations on completing your very own Bargello quilt! Throughout this article, we have explored the step-by-step process of creating a beautiful and vibrant Bargello quilt. From choosing the fabric to finishing touches, you have learned valuable techniques and tips to make your quilting journey a success.
Working on a Bargello quilt allows you to unleash your creativity and experiment with color and pattern placement. The mesmerizing geometric designs and optical illusions created by the strategically arranged fabric strips make Bargello quilts truly captivating and unique.
By carefully selecting your fabric, cutting the strips precisely, sewing them together to form the Bargello pattern, quilting the layers, and adding the binding, you have transformed ordinary fabric into a stunning work of art. The finishing touches you added have infused your quilt with personality and sentiment.
Quilting is an incredible craft that brings joy, relaxation, and a sense of accomplishment. Through the process of making your Bargello quilt, you have honed your quilting skills, expanded your creative abilities, and created a masterpiece that will be cherished for generations to come.
Remember, quilting is not just about the final result, but also about the journey itself. It’s about expressing yourself, embracing your love for fabric and design, and valuing the time and effort you invest in your craft.
Whether your Bargello quilt becomes a cherished heirloom, a cherished gift for a loved one, or a source of pride and inspiration for yourself, you can be proud of the skill and dedication you have demonstrated throughout the quilting process.
Now, take a moment to step back and admire your completed Bargello quilt. Appreciate the beauty of the colors, the precision of the piecing, and the creativity that went into creating this stunning piece of art.
Quilting is a journey that never really ends. Take what you’ve learned from this experience and continue to explore new techniques, designs, and styles. Allow your love for quilting to flourish and inspire you to create more quilts that bring joy and beauty into the world.
Thank you for joining us on this creative adventure. Happy quilting!
Frequently Asked Questions about How To Make A Bargello Quilt
Was this page helpful?
At Storables.com, we guarantee accurate and reliable information. Our content, validated by Expert Board Contributors, is crafted following stringent Editorial Policies. We're committed to providing you with well-researched, expert-backed insights for all your informational needs.



0 thoughts on “How To Make A Bargello Quilt”