Articles
14 Amazing Mermaid Blanket for 2024
Modified: December 28, 2023
Discover the 14 most incredible mermaid blankets for 2023! Stay cozy and stylish with these enchanting and trendy accessories. Get your mermaid blanket today!
(Many of the links in this article redirect to a specific reviewed product. Your purchase of these products through affiliate links helps to generate commission for Storables.com, at no extra cost. Learn more)
Introducing the 14 Amazing Mermaid Blanket for 2023, a collection designed to turn your ordinary nights into enchanting underwater adventures. These exquisite blankets are crafted with utmost precision and attention to detail, ensuring both comfort and style. Immerse yourself in the dreamy world of mermaids as you wrap yourself in these cozy wonders. Whether you're snuggling up by the fireplace or lounging on the couch, these mermaid blankets will add a touch of magic to your every moment. Dive into a sea of coziness and let these blankets transport you to a realm of whimsy and serenity in the year 2023.

Overall Score: 9/10
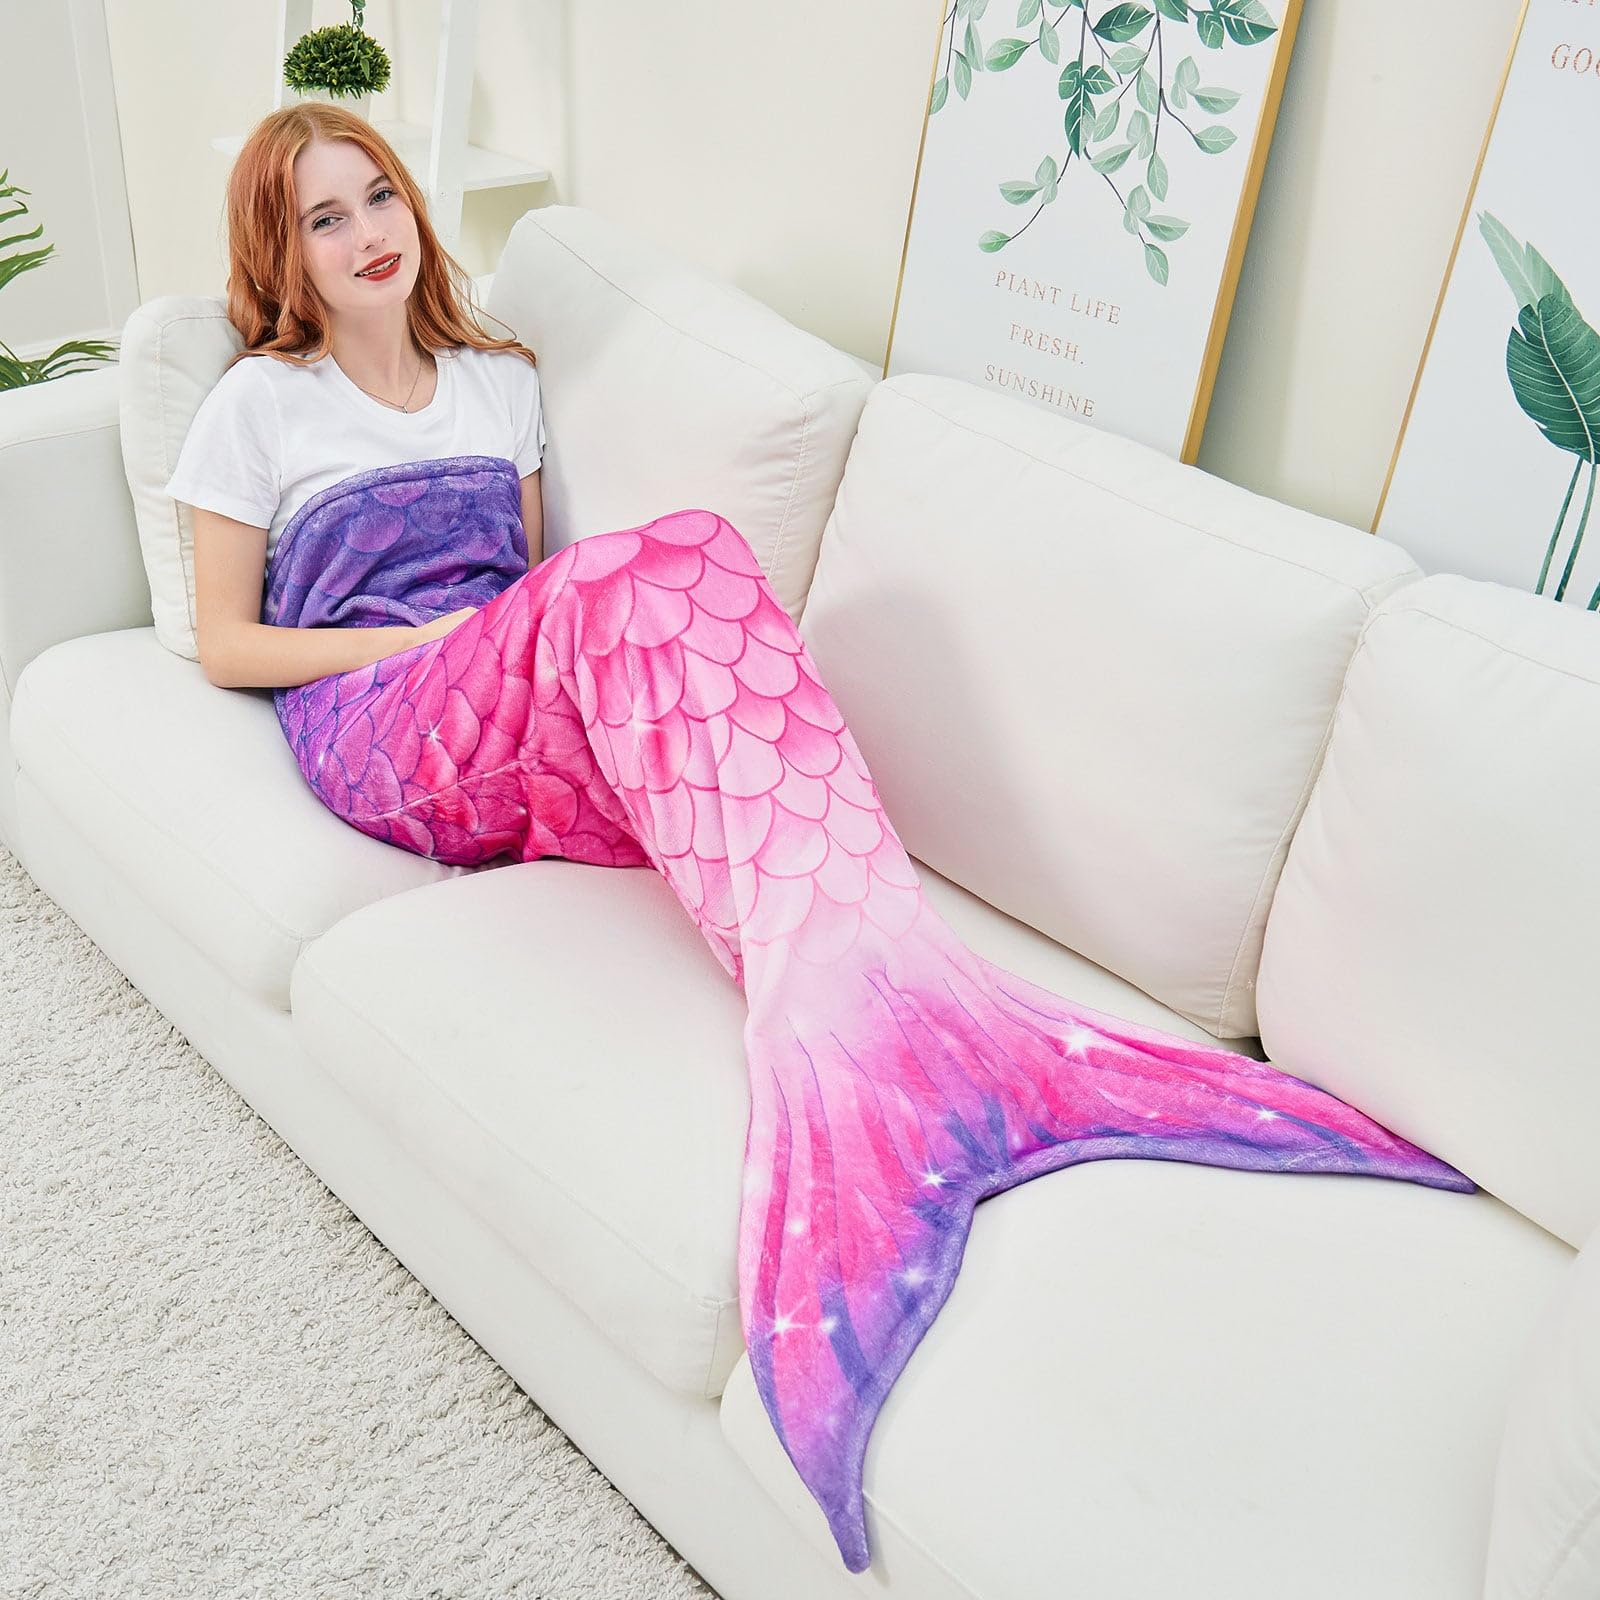
The Mermaid Tail Blanket is a dreamy and cozy blanket perfect for girls and teens who love mermaids. Made with flannel fleece material, it provides a soft and warm touch. The blanket features a vibrant design with colorful scales and glitter sequins, igniting imagination and making it truly special. Its size of 55" x 24" allows for easy wrapping and walking around. Whether you want to relax on the couch, take a nap, or use it for travel, this portable and lightweight blanket is versatile and convenient. Surprise your loved ones with this unique and captivating gift idea that breaks the rules of traditional blankets. Available in a delightful pink color.
Key Features
- Dreamy design with colorful scales and glitter sequins
- Premium flannel fleece material for cozy touch and durability
- Generous size of 55" x 24" designed for both kids and adults
- Versatile use at home, camping, travel, beach nights, and more
- Unique and surprising gift idea for special occasions
Specifications
- Color: Pink
- Dimension: 55.00Lx24.00Wx0.00H
- Size: Normal
Pros
- High-quality and soft material
- Plenty of room for wrapping legs and body
- Portable and lightweight for easy use
- Great for relaxing, napping, and traveling
- Appealing and unique gift option
Cons
- Limited packaging for gifting purposes
The Mermaid Tail Blanket is a magical and comforting accessory that brings the dreams of mermaids to life. Its soft material, vibrant design, and generous size make it perfect for snuggling and lounging. The versatility of this wearable blanket ensures it can be enjoyed in various settings, adding a touch of whimsy and coziness. While it may lack elaborate packaging for gifting, its enchanting appeal and practicality make it an excellent choice for mermaid lovers of all ages. Get ready to dive into a sea of comfort and imagination with the Mermaid Tail Blanket!

Overall Score: 9/10
The AmyHomie Mermaid Tail Blanket is the perfect gift for girls. Handcrafted using eco-friendly and skin-friendly fabric, this blanket is elegant and exquisite. With an easy in and out design, it can be used as a sleeping bag for nap time, cozy movie nights, camping, or car trips. This blanket keeps you cozy in all seasons, protecting you from the chill in air-conditioned rooms and keeping you warm in winter. The package includes a mermaid tail blanket and a sequin mermaid gift. Give your daughters or granddaughters the mermaid tail of their dreams with this sweet and unique gift.
Key Features
- Blankets Size — Kids blanket size: 55×28 in (140×70 cm), Adults blaket size: 71×36 in (180×90 cm)
- Handcrafted by crocheting
- Easy in and out design
- Suitable for all seasons
- Sweet gift for girls
Specifications
- Color: Light Purple
- Dimension: 41.30Lx27.56Wx0.01H
- Size: Kids
Pros
- Eco-friendly and skin-friendly fabric
- Exquisite handcrafted design
- Suitable for all seasons
- Perfect gift for girls
Cons
- Possible shipping label placement issue
- Doubts over durability
The AmyHomie Mermaid Tail Blanket is a unique and thoughtful gift for girls. With its elegant handcrafted design and cozy feel, it’s perfect for all seasons. The easy in and out design makes it practical for various activities, from nap time to camping. The blanket’s eco-friendly and skin-friendly fabric ensures comfort and safety. Although there may be a shipping label placement issue and durability concerns, the overall quality and appeal of this blanket make it a great choice. Give your loved ones the gift of mermaid dreams with the AmyHomie Mermaid Tail Blanket.

Overall Score: 8.5/10
The COSUSKET Mermaid Tail Blanket is a soft and cozy sleeping bag that is perfect for both kids and adults. Made with the softest flannel fleece fabric, this blanket is great for all seasons. The premium fabric and cascading colors make it a beautiful and magical blanket that can be used for snuggling, birthdays, sleepovers, travel, or movie nights. The sewn tail and super soft lining provide a comfortable and enjoyable experience, while the vibrant colors and cute design add a touch of magic. It's a great gift idea for anyone who wants to fulfill their dream of becoming Ariel from The Little Mermaid!
Key Features
- Great gift idea
- Soft, Cozy, Breathable and skin friendly
- High quality
- Good experience
- Guaranteed
Specifications
- Color: Multi-orange
- Dimension: 59.00Lx22.00Wx0.01H
- Size: 16"×52"
Pros
- Soft and cozy fabric
- Beautiful and colorful design
- Can be used in all seasons
- Doubles as a bedtime cozy blanket and daytime minky blanket
- Comfortable and enjoyable experience
Cons
- Size may be too small for older children
- Limited color options
The COSUSKET Mermaid Tail Blanket is a delightful and enchanting product that will bring joy and warmth to both kids and adults. Its soft and cozy fabric, vibrant colors, and beautiful design make it a perfect gift idea for anyone who dreams of being a mermaid. While the size may be a bit small for older children, it is an excellent choice for younger kids. Whether you’re snuggling on the couch, having a sleepover, or going on a movie night, this blanket will provide a cozy and magical experience. Overall, it’s a great addition to your collection of blankets!

Overall Score: 9/10
The Catalonia Kids Mermaid Tail Blanket is a unique and cozy blanket designed to resemble the tail of a mermaid. Made with soft and plush flannel material, this blanket comes in a beautiful Galaxy color with a fish scale pattern. It is the perfect gift idea for mermaid enthusiasts or anyone who wants to feel snug and comfortable. The mermaid tail shape and realistic scales give it an adorable and whimsical touch. This blanket is suitable for children and provides a cozy and snug fit when they slip their legs inside. It can be used for lounging, sleeping, or just keeping warm. With its worry-free policy, you can get a free replacement for any defective items. Experience the magic of being a mermaid with the Catalonia Kids Mermaid Tail Blanket!
Key Features
- Super soft and plush flannel material
- Designed to resemble a mermaid tail with fish scale pattern
- Available in a beautiful Galaxy color
- Suitable for children
- Ideal for lounging, sleeping, or keeping warm
- Open top for easy access
- Worry-free policy for defective items
Specifications
- Color: Galaxy
- Dimension: 44.09Lx20.00Wx0.00H
- Size: Kids
Pros
- Soft and cozy material
- Realistic mermaid tail design
- Variety of colors and patterns available
- Perfect gift for mermaid enthusiasts
- Can be used for a variety of purposes
Cons
- May be too big for smaller children
- Not suitable for adults above size 12-14
The Catalonia Kids Mermaid Tail Blanket is a delightful and cozy blanket that will make any child feel like a magical mermaid. Its soft and plush flannel material, along with the realistic mermaid tail design, creates a comfortable and whimsical experience. The variety of colors and patterns available allow for personalization and make it a great gift idea. Although it may be too big for smaller children and not suitable for larger adults, it is versatile and can be used for various activities. Whether for lounging, sleeping, or simply keeping warm, this mermaid tail blanket is sure to bring joy and comfort to any mermaid-loving girl. Dive into the enchanting world of mermaids with the Catalonia Kids Mermaid Tail Blanket!

Overall Score: 9.2/10
The Newborn Gowns Long Sleeves Baby Sleep Bag Mermaid Newborn Clothes is a perfect gift for both boys and girls. Made of high-quality organic cotton, this baby onesies gown is soft, comfortable, and breathable. The unique mermaid tail design and fashion print style make it a cute and interesting outfit for your little one. It is easy to put on and take off, with no buttons or zippers. This swaddle blanket is also convenient for changing diapers. Suitable for newborns up to 6 months, it is an ideal baby shower or Christmas gift. With a rating of 4.6/5, customers love the adorable design and comfort of this sleep sack.
Key Features
- Unisex-Baby Newborn Gowns
- Comfortable Baby Sleeper Clothes
- Unique Mermaid Tail Design
- Simple&Convenient Knotted Gowns
- Ideal Gift for Newborn baby
Specifications
- Color: Mermaid
- Dimension: 8.60Lx2.00Wx0.04H
- Size: 1 Count (Pack of 1)
Pros
- Suitable for both boys and girls
- Made of high-quality organic cotton
- Breathable and easy to clean
- Unique and cute mermaid tail design
- Convenient knotted gowns for easy diaper change
Cons
- May not fit newborns properly
- Limited size range
- Some customers found it a bit tight to put on
The Newborn Gowns Long Sleeves Baby Sleep Bag Mermaid Newborn Clothes is a charming and comfortable sleep sack for babies. With its adorable mermaid tail design and soft organic cotton fabric, it is sure to keep your little one cozy. The convenient knotted gowns make diaper changes hassle-free. While it may not fit all newborns perfectly, it is still a great choice for babies up to 6 months old. Whether you’re looking for a baby shower gift or a cute outfit for your own little mermaid or merman, this sleep bag is a delightful option.

Overall Score: 8.5/10
The Toddler Mermaid Tail Blanket is a soft, cozy, and breathable blanket made with the softest flannel fleece fabric. It is perfect for all seasons and is skin-friendly, making it suitable for children and adults alike. The blanket features a unique design with cascading colors and a premium fabric that doubles as a bedtime cozy blanket and a daytime minky blanket. It is a great gift idea for anyone who dreams of becoming a mermaid. The blanket comes in various colors and sizes, ensuring a perfect fit for everyone. With its high quality and comfort, this mermaid tail blanket is guaranteed to provide a magical experience.
Key Features
- Soft, cozy, breathable, and skin-friendly
- Great gift idea for kids and adults
- High-quality construction and cascading colors
- Can be used as a bedtime blanket or minky blanket
- Suitable for various occasions and travel
Specifications
- Color: Purple Pink
- Dimension: 39.00Lx14.00Wx0.60H
- Size: Toddlers
Pros
- Soft and comfortable material
- Suitable for all seasons
- Perfect gift for mermaid enthusiasts
- Versatile use as a blanket or throw
Cons
- Fins seam may rip after a few weeks
- Tag placement may be uncomfortable for some
- Stitching in the tail area could be improved
The Toddler Mermaid Tail Blanket is a delightful and cozy blanket that brings the magic of mermaids to life. Its soft and breathable fabric ensures comfort, while its vibrant colors and premium construction make it a perfect gift for kids and adults alike. The versatile use as a bedtime blanket or minky blanket allows for a magical experience anytime, anywhere. Although there may be some minor issues with durability, overall, this mermaid tail blanket provides a wonderful way to fulfill mermaid dreams and stay cozy all year round.

Overall Score: 8.5/10
The Suyfhdc Glow in The Dark Blanket for Girls is a magical and dreamy mermaid blanket that brings warmth and joy to any dull night. This soft and cozy blanket not only provides comfort but also serves as a perfect decoration during the day. It's an ideal gift for girls, bringing them a sense of security and warmth. Made of high-quality polyester microfiber, this blanket is resistant to pilling and perfect for various occasions. The glow in the dark feature adds an extra magical touch, making it a favorite among kids. With easy care and excellent customer service, Suyfhdc ensures a delightful experience for both children and parents.
Key Features
- Glow in the dark mermaid blanket
- Soft and comfortable polyester microfiber
- Perfect size of 50×60 inches
- Easy to clean and machine washable
- Excellent customer service
Specifications
- Color: Pink Mermaid
- Size: 50 x 60 inch
Pros
- Magical and dreamy glow in the dark feature
- Soft and cozy material
- Ideal gift for girls
- Resistant to pilling
- Easy to clean and maintain
Cons
- Rough texture around glow in the dark sections
- Limited glow in the dark effect
The Suyfhdc Glow in The Dark Blanket for Girls is a perfect combination of comfort, magic, and practicality. The soft and cozy blanket, coupled with the enchanting glow in the dark feature, creates a dreamy atmosphere for any child. While some may find the rough texture around the glow in the dark sections bothersome, the overall quality and appeal of this blanket make it a great choice. Whether as a gift or for personal use, this blanket brings warmth, joy, and a touch of magic to any child’s life.

Overall Score: 8.5/10
The Mocaletto Soft Mermaid Kids Throw Blanket is a beautiful and cuddly blanket that is perfect for baby toddler boys and girls. Made with 300GSM flannel material, this blanket is soft, cozy, and durable. It features a variety of beautifully designed patterns including ocean, fox, butterfly, mermaid, dinosaur, car, rabbit, cloud, astronaut, and more. The 50×60 inch size is large enough for most babies to cuddle up in a crib or stroller, and it is lightweight and portable for outdoor trips. This blanket is not only practical, but it also makes a great gift for birthdays, Christmas, and other special occasions. It is easy to care for, machine washable, and suitable for all seasons.
Key Features
- 300GSM Flannel Material
- Perfect Size: 50×60 Inches
- Beautifully Designed Patterns
- Great Gift
- Easy Care
Specifications
- Color: Mermaid 03
- Size: 50×60 Inches
Pros
- Super soft and cozy
- Variety of cute and interestin patterns
- Perfect size for babies
- Portable and lightweight
- Makes a great gift
Cons
- Took a long time to arrive
The Mocaletto Soft Mermaid Kids Throw Blanket is a must-have for any parent or caregiver. With its super soft and cozy flannel material, beautiful patterns, and perfect size, it provides both comfort and style. The easy care instructions make it convenient for busy parents, and the variety of patterns cater to different interests. The blanket’s portability and durability ensure that it can be enjoyed both indoors and outdoors. The only downside is that it may take some time for delivery. Overall, this blanket is a great choice for a baby gift or for any child who loves cuddling up in a soft and cute blanket.

Overall Score: 8.2/10
The Glow in The Dark Blanket for Girls is a comfortable and soft blanket made of 100% polyester microfiber. This unique mermaid blanket design is perfect for girls and boys. It glows in the dark after being exposed to bright light for 5 minutes. The longer the exposure, the brighter it will glow. The blanket is made with high-quality materials that are anti-pilling and durable. It measures 50” x 60” and is soft to the touch, providing comfort and warmth. This blanket is a great gift for girls, suitable for birthdays, Christmas, or any special occasion. Note: This blanket charges best via sunlight, flashlight, or blacklight.
Key Features
- Glow in the dark after 5 minutes of exposure
- Unique mermaid design
- Made of high-quality 100% polyester microfiber
- Soft and comfortable
- Great gift for girls
Specifications
- Color: Blue
- Size: Glow
Pros
- Soft and cuddly
- Great gift for little girls who love mermaids
- High-quality and durable materials
- Provides comfort and warmth
Cons
- Requires exposure to bright light to glow
- May not glow as brightly with energy-efficient bulbs
The Glow in The Dark Blanket for Girls is a perfect gift for any little girl who loves mermaids. Its soft and comfortable design, along with the glowing feature, makes it a unique and enjoyable choice. The high-quality materials ensure durability and long-lasting use. The only downside is that it requires exposure to bright light to achieve maximum glow. Overall, this blanket is a great addition to any child’s bedroom and brings warmth, comfort, and magical fun.

Overall Score: 9/10
The WERNNSAI Mermaid Throw Blanket is the perfect gift for girls who dream of being a mermaid. Made with top-grade polyester and ultra-soft fleece fabric, this blanket is warm, comfortable, and safe for kids. With its vivid prints and cozy underside, it can brighten up any living room. Suitable for all seasons, it can be used on the bed, sofa, couch, or in the nursery. Measuring 50” x 60”, it is the ideal size for swaddling, playing, or snuggling. This blanket is a great birthday or baby shower gift, and it's also perfect for Christmas and Valentine's Day. Overall, it's a dreamy and versatile blanket that will make any little girl's mermaid dreams come true.
Key Features
- Dreamy mermaid design
- Reliable 100% polyester and ultra-soft fleece fabric
- Vivid prints that are fade-less and machine washable
- Perfect gift for children, friends, and special occasions
- Versatile use for bed, sofa, couch, and living room
Specifications
- Color: Mermaid
- Dimension: 60.00Lx50.00Wx0.00H
- Size: 50” x 60”
Pros
- Top-grade materials ensure warmth and comfort
- Delicate prints brighten up any living space
- Suitable for all seasons and versatile in its use
- Perfect gift for various occasions
Cons
- Some customers reported a strong smell upon opening
- Thinner than expected for a few reviewers
The WERNNSAI Mermaid Throw Blanket is a cozy and adorable gift option for children. With its dreamy mermaid design and top-quality materials, it provides warmth, comfort, and style. Its versatile use makes it suitable for all seasons and living spaces. While some customers reported a strong smell upon opening, this can be resolved by washing the blanket. Overall, this blanket is loved by kids and adults alike, making it a great addition to any home or a thoughtful present for birthdays, holidays, or baby showers.

Overall Score: 8/10
The Mermaid Tail Blanket is an elegant and attractive blanket that features a color gradient of pink and green. Made of soft and breathable flannel, it is cozy and gentle on the skin. With a size of 63" x 28", it provides ample space to wrap your legs and body comfortably. The blanket is suitable for all seasons and can be used for various purposes like lounging, camping, or as a decorative piece for your bedroom. It also makes a great gift for birthdays, Christmas, or any other special occasion. The Mermaid Tail Blanket is not only stylish but also functional, keeping you warm and comfortable throughout the year.
Key Features
- Attractive design
- Suitable size
- Soft and skin friendly
- Great ideal gift
- Versatile use
Specifications
- Color: Pink Green
- Size: 63" x 28"
Pros
- Elegant and attractive design
- Soft and breathable flannel material
- Generous size for easy wrapping
- Versatile use for various settings
- Ideal gift for special occasions
Cons
- Material is thin
- May be too big for smaller children
The Mermaid Tail Blanket is a charming and cozy blanket that adds a touch of elegance to any room. Made of soft flannel, it provides warmth and comfort in all seasons. Whether you’re lounging on the sofa, camping under the stars, or simply snuggling up in bed, this blanket is perfect. With its attractive design and generous size, it also makes a unique and thoughtful gift. However, it’s important to note that the material is thin and may not be suitable for colder climates. Additionally, it may be too big for younger children. Overall, the Mermaid Tail Blanket is a delightful and versatile accessory that brings a touch of magical charm to your life.

Overall Score: 9/10
The AIDIYANG Mermaid Blanket is a dreamy and cute blanket that will meet the princess dreams of every kid. Made of microfiber, this blanket is super soft, high-quality, durable, and lightweight. It features a girly 3D printing design with cute mermaid patterns, making it more popular with girls. The combination of mermaid tail and scales is loved by many kids. Measuring 60"x50", it comes in a suitable size to suit your needs. The blanket is easy to care for, as it is machine washable and dries fast. Overall, it is a wonderful gift for girls and women alike.
Key Features
- Dreamy Mermaid design with cute patterns
- Premium microfiber fabric for softness and durability
- Girly 3D printing design loved by girls
- Suitable size of 60"x50"
- Easy to care for with machine washability
Specifications
- Color: Black
- Dimension: 60.00Lx50.00Wx0.01H
- Size: 60"x50"
Pros
- Dreamy and cute design
- Super soft and high-quality fabric
- Suitable size for various needs
- Easy to care for with machine washability
Cons
The AIDIYANG Mermaid Blanket is a must-have for anyone who wants to live out their mermaid dreams. With its soft and durable fabric, dreamy design, and suitable size, it is a perfect gift for girls and women. Whether you want to snuggle up on the couch or create a magical mermaid-themed bedroom, this blanket will keep you warm and cozy. Plus, it is easy to care for, making it a practical choice. Give yourself or your loved ones the gift of whimsy and comfort with the AIDIYANG Mermaid Blanket.

Overall Score: 7/10
The COLLA Mermaid Blanket is a soft and cozy throw blanket made of premium polyester fleece flannel. It features neat stitches and vibrant printed colors, with a plush fabric that makes you feel comfortable when wrapped up. This versatile blanket is suitable for both kids and adults to use on the sofa and bed. It can also be a great birthday or holiday gift for girls, boys, kids, teens, and adults. The blanket is machine washable and easy to care for. However, some customers have mentioned that it is thinner than expected and the design may not be evenly printed. Overall, it has received positive reviews for its softness and quality.
Key Features
- Made of premium polyester fleece flannel
- Neat stitches and vibrant printed colors
- Versatile blanket suitable for all seasons
- Ideal for kids and adults as a throw
- Perfect gift for birthdays or holidays
- Machine washable and easy to care for
Specifications
- Color: Mermaid
- Dimension: 50.00Lx40.00Wx0.01H
- Size: 50"x40"
Pros
- Soft and fluffy material
- Breathable warmth for all seasons
- Comfortable when wrapped up
- Great gift for all ages
Cons
- Thinner than expected
- Unevenly printed design
The COLLA Mermaid Blanket is a soft and cozy throw blanket suitable for people of all ages. Made of premium polyester fleece flannel, it provides breathable warmth throughout the year. The neat stitches and vibrant printed colors enhance its visual appeal, making it a perfect addition to any sofa or bed. It can be a great gift for birthdays or holidays, though some customers have mentioned that it is thinner than expected and the design may not be evenly printed. Overall, the blanket offers excellent comfort and quality, making it a good choice for those seeking a cute and cozy mermaid-themed blanket.

Overall Score: 8.2/10
The EVERYDAY KIDS Toddler Throw Blanket is the perfect blanket for your child. Made from plush microfiber polyester, this super soft and cozy blanket will keep your toddler warm and comfortable. With its large size and high-quality fabric, it will become your child's favorite blanket for years to come. It has so many uses, from tummy time to nap time and can be used as a picnic or travel blanket. The mermaid design and vibrant colors make it a great gift for mermaid fans. It is easy to care for, can be machine washed and dried without fading or shrinking. As a family-owned business, the company offers a 30-day money back guarantee and excellent customer service.
Key Features
- Super soft and plush microfiber polyester
- Large size of 30 x 40 inches
- Versatile for tummy time, car seat, snuggling, and more
- Kid-friendly mermaid design
- Easy to care for and wrinkle-resistant
- Family-owned business with 30-day money back guarantee
Specifications
- Color: Mermaids Undersea Adventure
- Dimension: 40.00Lx30.00Wx0.04H
- Size: 30 x 40 inch
Pros
- Made from high-quality and durable materials
- Vibrant colors and adorable mermaid design
- Versatile for various uses from infancy to toddlerhood
- Easy to clean and maintain
- Family-owned business with excellent customer service
Cons
- Some customers find the blanket to be thinner than expected
The EVERYDAY KIDS Toddler Throw Blanket is the perfect companion for your child’s comfort and warmth. With its super soft material and adorable mermaid design, it’s sure to become their favorite blanket. The large size and high-quality fabric ensure its longevity, providing cozy snuggles for years to come. Its versatility makes it suitable for various stages of your child’s growth, from tummy time to nap time to outdoor adventures. The easy-care and wrinkle-resistant features make it a practical choice for busy parents. Overall, this blanket offers both comfort and style, while also being backed by a family-owned business committed to customer satisfaction.
Buyer's Guide: Mermaid Blanket
Looking to add a touch of whimsy and enchantment to your cozy evenings? Look no further than a mermaid blanket! These fun and fantastical blankets are inspired by the mythical creatures of the sea, and they are perfect for keeping you warm and snug. Whether you're searching for a gift or treating yourself, our buyer's guide will help you navigate the mermaid blanket market and choose the right one for you.
Read also: 14 Amazing Soft Blanket for 2024
Things to Consider Before Buying a Mermaid Blanket:
- Size and Length
- Determine the desired length of your mermaid blanket. Some are designed to cover just the legs, while others can wrap around your entire body.
- Consider the size of the blanket, ensuring it's suitable for adults or kids, depending on who will use it.
- Pay attention to the fabric used in the mermaid blanket. Common materials include fleece, acrylic, and knitted yarn.
- Look for blankets that are soft, cozy, and hypoallergenic to ensure maximum comfort.
- Check if the material is easy to clean and if it can withstand repeated use without losing its softness or color.
- Explore the variety of colors and patterns available, ranging from shimmering scales to vibrant mermaid tails.
- Consider the overall design, including the shape and texture, to find a mermaid blanket that matches your personal style and preferences.
- Some mermaid blankets even come with added embellishments such as sequins or fins, for an extra touch of magic.
- Assess whether the mermaid blanket can be used in different scenarios, such as on the couch, in bed, or while camping.
- Determine if the blanket has openings or buttons that allow for easy movement and access, without feeling restricted in your mermaid form.
- Look for blankets that are lightweight and portable, making them ideal for travel or sleepovers.
- Set a budget before starting your search for a mermaid blanket.
- Research different brands and compare prices to find the best value for your money.
- Read reviews to determine the quality of the blanket, ensuring it will withstand regular use and remain durable over time.
- Check if the mermaid blanket is machine washable, hand wash only, or requires specific care instructions.
- Ensure that the cleaning process will not damage the blanket's fabric, shape, or colors.
Frequently Asked Questions about 14 Amazing Mermaid Blanket For 2024
Mermaid blankets are available in various sizes, and many are designed to fit adults comfortably. Just make sure to check the dimensions and length before purchasing.
Mermaid blankets are generally more suitable for cooler seasons when you crave warmth and coziness. However, if you prefer a lighter fabric, there are options available for warmer weather too.
Not at all! Mermaid blankets can be enjoyed by everyone, regardless of gender. There are plenty of designs available to suit various preferences and styles.
Consider the height and build of the person who will be using the blanket. Make sure the blanket is long enough to cover their legs comfortably and that it provides enough room for movement.
Absolutely! Mermaid blankets come in various tail shapes and designs. Some feature a traditional fishtail shape, while others have flared or wavy tails. Explore different options to find your favorite.
Mermaid blankets are primarily designed for lounging, relaxing, and keeping cozy. While you may be able to move around with a mermaid blanket on, it’s important to ensure that you have freedom of movement and do not trip or stumble.
Yes! Mermaid blankets make unique and delightful gifts for both kids and adults. Consider the recipient’s taste and preferences to select a design they’ll love.
Many mermaid blankets are made from hypoallergenic materials that are suitable for sensitive skin. Look for blankets that specify this feature in their product description.
While some mermaid blankets may be suitable for outdoor use, it’s important to check if they are designed for outdoor conditions. Additionally, be cautious of where you use the blanket to keep it clean and avoid damage.
It depends on the specific blanket. Some mermaid blankets are machine washable, while others require delicate hand washing. Always refer to the care instructions provided by the manufacturer to keep your blanket in the best condition.
Mermaid blankets are available in sizes suitable for both children and adults. Check the product description to ensure the blanket’s dimensions are appropriate for the intended user.
Can I wear a mermaid blanket to the beach?
(End of FAQ)
Was this page helpful?
Trust Storables.com for unbiased and honest product reviews. Our reviews are rigorously assessed by our Expert Board Contributors and adhere to strict Editorial Standards. We ensure that each review is transparent and trustworthy, helping you make informed purchasing decisions.
0 thoughts on “14 Amazing Mermaid Blanket for 2024”