Articles
How To Make A Pocket Prayer Quilt
Modified: August 27, 2024
"Discover step-by-step articles on how to make a pocket prayer quilt. Create a meaningful and comforting keepsake with our easy-to-follow instructions."
(Many of the links in this article redirect to a specific reviewed product. Your purchase of these products through affiliate links helps to generate commission for Storables.com, at no extra cost. Learn more)
Introduction
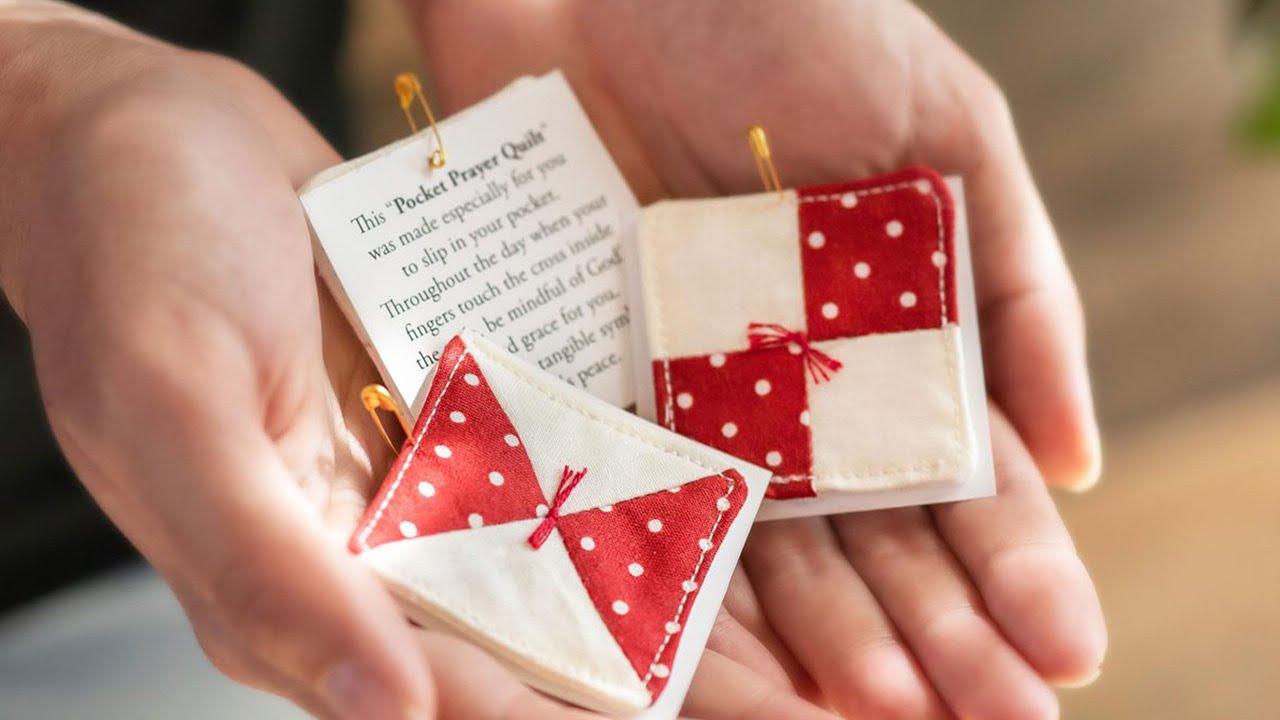
Welcome to the world of pocket prayer quilts! In times of uncertainty and challenges, having a tangible reminder of faith and devotion can bring comfort and solace. A pocket prayer quilt is a small, portable quilt that contains a pocket to hold inspirational notes, prayers, or meaningful items. It is a personal way to connect with your spirituality and provide a source of peace and encouragement.
In this article, we will guide you through the process of making your own pocket prayer quilt. Whether you are a seasoned quilter or a beginner, this project is suitable for all levels of expertise. By following these steps, you can create a beautiful and meaningful pocket prayer quilt that can be cherished for years to come.
Before we begin, let’s gather the necessary supplies and tools for this project. Having everything prepared will make the process smoother and more enjoyable. Here’s a list of items you will need:
– Fabric for the quilt top and backing
– Thread
– Sewing machine
– Scissors or rotary cutter
– Pins or clips
– Iron and ironing board
– Ruler or quilting ruler
– Optional: Embroidery thread, buttons, or other embellishments
Now that you have your supplies ready, let’s move on to the next step: choosing the fabric for your pocket prayer quilt.
Key Takeaways:
- Crafting a pocket prayer quilt is a deeply personal and spiritual journey, allowing individuals to express their faith and creativity through a tangible and comforting piece of art.
- The process of making a pocket prayer quilt is not just about quilting; it’s about infusing love, comfort, and inspiration into every stitch, creating a cherished companion for moments of solace and reflection.
Read more: How To Make Rod Pocket Drapes
Gathering Supplies
Before you start making your pocket prayer quilt, it’s important to gather all the necessary supplies. Having everything at hand will ensure a smooth and uninterrupted creative process. Here’s a list of supplies you will need:
- Fabric for the quilt top and backing
- Batting or quilt batting
- Thread
- Sewing machine
- Scissors or rotary cutter
- Pins or clips
- Iron and ironing board
- Ruler or quilting ruler
- Optional: Embroidery thread, buttons, or other embellishments
Fabric: Choose a fabric that speaks to you and reflects your personal taste. You can opt for a single fabric or mix and match different patterns and colors. Keep in mind that the fabric you choose should be sturdy enough to withstand regular use.
Batting or quilt batting: This is the layer of insulation that goes between the quilt top and backing. Choose a batting that is lightweight yet will provide enough warmth and loft.
Thread: Choose a thread color that will complement your fabric choice. Consider using a high-quality thread that is suitable for machine sewing to ensure durability.
Sewing machine: A sewing machine is essential for quilting. Make sure it is in good working condition and you have the necessary accessories and attachments.
Scissors or rotary cutter: These tools are crucial for cutting fabric and trimming excess threads. Use sharp scissors or a rotary cutter with a cutting mat for precise cuts.
Pins or clips: These will help hold the layers of fabric together while sewing. Choose pins or clips that are suitable for quilting.
Iron and ironing board: Pressing your fabric before and during the sewing process is essential for achieving crisp and accurate seams. Make sure you have a functioning iron and a sturdy ironing board.
Ruler or quilting ruler: A ruler is essential for measuring and making accurate cuts. Consider using a quilting ruler with additional markings for ease and precision.
Optional embellishments: If you want to add a personal touch to your pocket prayer quilt, you can use embroidery thread, buttons, or other embellishments to enhance the design.
Now that you have gathered all the necessary supplies, it’s time to move on to the fun part: choosing the fabric for your pocket prayer quilt!
Choosing Fabric
Choosing the right fabric for your pocket prayer quilt is an exciting step in the quilting process. The fabric you select will not only determine the overall look of your quilt but also influence its durability and feel. Here are some tips to help you choose the perfect fabric:
Consider the purpose: Think about the purpose of your pocket prayer quilt. Will it be used for personal comfort or given as a gift? The intended use can help guide your fabric choice. If it’s for personal use, select fabrics that embody your personal style and bring you joy. If it’s a gift, consider the recipient’s preferences and any specific themes or colors that hold meaning to them.
Color and pattern: Choose colors and patterns that resonate with you or reflect the intended purpose of the quilt. Bright and vibrant colors can bring a sense of energy and positivity, while soft and muted tones can evoke a feeling of tranquility. Consider using fabrics with meaningful patterns or motifs that hold sentimental value.
Fabric type: Consider the fabric type when selecting materials for your pocket prayer quilt. Cotton fabrics are a popular choice for quilting due to their versatility, breathability, and ease of care. You can also explore other fabric options like flannel or linen for different textures and effects.
Coordinate and contrast: When choosing multiple fabrics for your quilt top, aim to create a cohesive and visually appealing composition. Coordinate fabrics that have similar color schemes or patterns, or contrast complementary colors and designs for added visual interest. Lay your fabric choices together and see how they look as a whole before proceeding.
Consider scale and balance: Pay attention to the scale of the patterns on your fabric. If using fabrics with large-scale prints, balance them out with smaller-scale or solid fabrics to avoid overwhelming the design. Achieving a balance between busy and calm elements will help create a visually pleasing quilt.
Remember, there are no strict rules when it comes to selecting fabric for your pocket prayer quilt. Trust your intuition, follow your personal taste, and let your creativity guide you. Have fun experimenting with different combinations until you achieve a look that speaks to you.
Once you have chosen your fabric, it’s time to move on to the cutting stage, where you will prepare the pieces for your quilt top. Let’s dive into the next step: cutting the fabric!
Cutting the Fabric
Now that you have chosen your fabric, it’s time to move on to the next step: cutting the fabric for your pocket prayer quilt. This step is crucial for achieving precise and accurate pieces that will fit together seamlessly. Here’s how you can go about cutting the fabric:
Prepare your workspace: Clear a large, flat surface like a cutting mat or a table where you can lay out your fabric. Ensure that the area is clean and free from clutter to allow for accurate measurements and cuts.
Wash and press your fabric: Before cutting, it’s a good idea to prewash your fabric to remove any chemicals or excess dye. Follow the manufacturer’s instructions for washing and iron the fabric to eliminate any wrinkles or creases.
Measure and mark your fabric: Use a ruler or quilting ruler to measure the dimensions of the fabric pieces you need for your quilt top. Be sure to leave a seam allowance of at least ¼ inch on all sides for sewing. Mark the measurements on the fabric using a fabric pen or chalk.
Cut the fabric: Using sharp scissors or a rotary cutter, carefully cut along the marked lines. Take your time and make smooth, straight cuts to ensure the pieces are accurate and consistent. Remember to cut through only one layer of fabric at a time to avoid any mistakes.
Organize and label your pieces: As you cut the fabric, keep the pieces organized and labeled. This will make it easier to identify and assemble the quilt top later. You can use sticky notes or fabric-safe labels to mark each piece with its corresponding pattern or position in the quilt.
Trim excess fabric: After cutting all the necessary pieces, trim any excess fabric or threads to ensure clean edges. This step is important for achieving neat and professional-looking quilt blocks.
Double-check your measurements: Before proceeding to the next step, double-check the measurements of each fabric piece to ensure accuracy. This will help prevent any issues during the assembly process and save you time and frustration.
Once you have finished cutting all the fabric pieces, you are ready to move on to the exciting part: sewing the quilt top! Organize your cut fabric pieces and get your sewing machine ready for the next step in creating your pocket prayer quilt.
Sewing the Quilt Top
Now that you have cut the fabric pieces for your pocket prayer quilt, it’s time to sew them together to create the quilt top. This step brings your design to life and sets the foundation for the rest of the quilt. Follow these steps to sew the quilt top:
Arrange the fabric pieces: Lay out your fabric pieces according to your desired design. Take the time to experiment with different arrangements until you are satisfied with the overall look. You can mix and match colors and patterns to create a visually appealing composition.
Sew the pieces together: Starting with the first two fabric pieces, place them right sides together and align the edges you want to sew. Pin or clip the edges together to secure them in place. Using a ¼ inch seam allowance, sew along the pinned or clipped edges. Repeat this process for each pair of fabric pieces until all are sewn together.
Press the seams: After sewing each pair of fabric pieces, press the seams open or to one side. This will help create flat and smooth seams, reducing bulk and allowing the quilt top to lie flat.
Continue sewing rows: Once you have sewn all the pairs of fabric pieces, you can start sewing the rows together. Place the first two sewn pairs right sides together, aligning the edges you want to sew. Pin or clip the edges and sew using a ¼ inch seam allowance. Repeat this process for the remaining sewn pairs until all rows are sewn together.
Press the rows: After sewing each row, press the seams open or to one side. This will ensure that the rows lay flat and create a professional and polished look.
Join the rows: With all the rows sewn together, it’s time to join them to create the final quilt top. Place the first two sewn rows right sides together, aligning the edges you want to sew. Pin or clip the edges together and sew using a ¼ inch seam allowance. Repeat this process until all the rows are sewn together.
Press the quilt top: Once you have sewn all the rows together, press the entire quilt top to set the seams and give it a crisp and smooth appearance.
Trim any uneven edges: After sewing the quilt top, trim any uneven edges to ensure that it is squared up and ready for the next steps in the quilting process.
Congratulations! You have successfully sewn your quilt top for the pocket prayer quilt. The next step is to add the prayer pocket, a special feature that makes the pocket prayer quilt unique and meaningful. Join us for the next step: adding the prayer pocket.
When making a pocket prayer quilt, be sure to use fabric that is soft and comforting to the touch, and consider adding a small pocket to hold a written prayer or comforting token.
Read more: How To Make A Quilt
Adding the Prayer Pocket
The prayer pocket is a significant element of a pocket prayer quilt. It provides a special place to hold handwritten prayers, inspirational notes, or meaningful items. Adding the prayer pocket adds a beautiful and personal touch to your quilt. Here’s how you can add the prayer pocket:
1. Choose the placement: Decide where you want to position the prayer pocket on your quilt top. Consider placing it near the center or in a corner where it can be easily accessed and appreciated.
2. Cut the pocket fabric: Cut a piece of fabric for the pocket. The size of the fabric will depend on your preference, but a typical size is around 6 inches by 6 inches. You can adjust the dimensions to accommodate larger items if desired.
3. Fold and press: Fold the fabric in half, right sides together, matching the edges. Press the folded edge to create a crease. This crease will be the top edge of your pocket.
4. Sew the sides: With the folded edge at the top, sew along the two sides of the pocket, leaving the top edge open. Use a ¼ inch seam allowance and backstitch at the beginning and end for reinforcement.
5. Trim and turn: Trim the excess fabric from the corner, being careful not to cut too close to the stitching. Turn the pocket right side out and use a tool, such as a blunt pencil or chopstick, to gently push out the corners for a crisp finish.
6. Press the pocket: Press the pocket with an iron to remove any wrinkles and create a neat appearance. Make sure the top edge is well-pressed to create a professional-looking finish.
7. Attach the pocket: Position the pocket on the quilt top at your chosen location. Pin or clip it in place, making sure it is securely fastened. You can align the sides and bottom edge of the pocket with the quilt top, leaving the top edge open as the pocket opening.
8. Stitch the pocket: Sew along the sides and bottom edge of the pocket, attaching it to the quilt top. Use a ⅛ inch seam allowance for this step. You can reinforce the stitching by sewing over the sides and bottom edges again to provide extra durability.
9. Embellish the pocket (optional): If desired, you can embellish the pocket with decorative stitching, embroidery, or appliqué. This adds a personal touch and can further enhance the overall design of the quilt.
With the prayer pocket now added to your pocket prayer quilt, it is one step closer to completion. The next step is to quilt the layers together. Join us for the next step: quilting the layers.
Quilting the Layers
Quilting the layers is a crucial step in creating a pocket prayer quilt. It involves stitching the quilt top, batting, and backing together to ensure stability, durability, and aesthetic appeal. There are various quilting techniques you can choose from, depending on your preference and skill level. Here’s a step-by-step guide to quilting the layers:
1. Prepare the layers: Lay your quilt backing fabric flat on a clean surface, wrong side up. Smooth out any wrinkles or creases. Place the batting on top of the backing, ensuring it is centered and extends beyond the quilt top edges. Finally, position the quilt top on top of the batting, right side up. Smooth out any wrinkles and align the edges of the layers.
2. Baste the layers: To hold the layers in place during the quilting process, you need to baste them together. There are a few methods you can use, such as thread basting, spray basting, or using temporary adhesive. Choose the method that works best for you. Basting ensures that the layers won’t shift or bunch up while you quilt.
3. Choose your quilting design: Decide on the quilting design you want to use. You can opt for traditional straight-line quilting, free-motion quilting, or even explore decorative quilting patterns. Consider the overall aesthetic of your quilt and the level of detail you want to achieve.
4. Prepare your sewing machine: Ensure your sewing machine is set up for quilting. Install a quilting or walking foot, which helps feed the layers evenly. Set the stitch length according to your preference – shorter stitches for more secure quilting or longer stitches for a more visible quilting design.
5. Begin quilting: Starting from the center of the quilt, begin quilting along the chosen design. Follow the lines or patterns you have marked, stitching through all three layers – the quilt top, batting, and backing. Take your time and maintain a consistent stitch length and speed.
6. Quilt in sections: Depending on the size of your quilt, it may be more manageable to quilt in sections. This allows you to focus on smaller areas at a time and achieve more precise quilting. Start in the center and work your way outward, securing each section before moving on to the next.
7. Backstitch and secure: At the end of each quilting line or section, backstitch to secure the stitches. This prevents any unravelling or loosening of the quilting. Trim the thread tails as you go and continue quilting until the entire quilt is complete.
8. Finishing touches: Once you have finished quilting, inspect the quilt for any loose threads or areas that may need additional stitching. Trim any excess batting or backing that extends beyond the quilt top edges, ensuring a clean and even finish.
Quilting the layers of your pocket prayer quilt not only adds structural integrity but also enhances the aesthetic appeal. It’s a labor of love that brings the quilt to life. The next step is to bind the edges to give your pocket prayer quilt a finished look. Join us for the next step: binding the edges.
Binding the Edges
Binding is the final step in creating a polished and complete look for your pocket prayer quilt. It involves enclosing the raw edges of the quilt with a fabric strip, providing both a decorative finish and ensuring the quilt remains durable over time. Follow these steps to bind the edges of your pocket prayer quilt:
1. Prepare the binding fabric: Cut binding strips from your chosen fabric. The width of the strips is typically around 2.5 inches, but you can adjust it based on your preference. Calculate the total length needed by measuring the perimeter of your quilt and adding a few extra inches for overlap and joining the ends.
2. Join the binding strips: If your quilt requires more than one strip of binding, join them together to create a continuous strip. To do this, place two strips perpendicular to each other, right sides together, and at a 45-degree angle. Stitch diagonally from one corner to the other, creating a diagonal seam. Trim the excess fabric and press the seam open.
3. Prepare the binding: Fold the binding strip in half lengthwise, wrong sides together, and press it with an iron. This creates a crease along the center of the strip.
4. Secure the binding to the quilt: Starting in the middle of one edge of your quilt, align the raw edges of the quilt with the raw edges of the binding strip. Pin or clip them together, ensuring the creased line of the binding aligns with the quilt’s raw edge. Leave a few inches of binding unstitched at the beginning.
5. Stitch the binding in place: Using a ¼ inch seam allowance, stitch along the pinned or clipped edge, securing the binding to the quilt. Sew slowly, removing the pins or clips as you go. Stop stitching a quarter-inch before reaching the corners.
6. Miter the corners: When you approach a corner, stop stitching a quarter-inch away from the edge. Fold the binding strip up, away from the quilt, at a 45-degree angle. Then, fold it back down, aligning the raw edges with the next side of the quilt. Continue stitching from the edge, ensuring the fold creates a neat mitered corner. Repeat this process for all four corners.
7. Join the ends of the binding: When you reach the starting point, leave a few inches of binding unstitched. Trim the excess binding, leaving a tail that is the same length as the unstitched portion. Open up the binding and overlap the ends, aligning the raw edges. Mark the overlap point and trim the excess fabric. Sew the ends together with a diagonal seam, trim the seam allowance, and press it open.
8. Finish stitching the binding: Fold the binding over the raw edges of the quilt, encasing them completely. Secure the folded binding in place by hand stitching along the fold or using your sewing machine’s blind hem stitch. Take care to ensure your stitches are hidden within the binding fold.
Congratulations! You have successfully bound the edges of your pocket prayer quilt. The final step is to add any finishing touches and make it ready for use or gifting. Join us for the next step: the finishing touches!
Finishing Touches
Now that you have completed the main steps in creating your pocket prayer quilt, it’s time to add some finishing touches to make it truly unique and special. These final details will enhance the overall appearance and personal meaning of your quilt. Here are a few ideas to consider:
1. Embroidery or appliqué: Consider adding a personal touch through embroidery or appliqué. You can embroider meaningful words, symbols, or designs onto the quilt top or pockets. Appliqué allows you to attach fabric pieces in various shapes and sizes, creating custom-made embellishments.
2. Hand quilting: If you enjoy the art of hand stitching, you can add hand quilting details to your pocket prayer quilt. Choose a contrasting thread color and quilt simple patterns or intricate motifs around the quilt top, creating a beautiful textured effect.
3. Personalize with labels: Sew a personalized label onto the back of your pocket prayer quilt. Include your name, the date, and any other meaningful information. This adds a sentimental touch and serves as a reminder of the love and care you put into creating the quilt.
4. Fabric markers or embroidery pens: Use fabric markers or embroidery pens to write inspirational quotes, prayers, or messages on the quilt top or pockets. This allows you to infuse the quilt with personalized messages that hold special meaning for you or the recipient.
5. Attached ribbons or loops: Consider adding attached ribbons or loops to your pocket prayer quilt. These can serve as a convenient way to hang the quilt, making it easily accessible for moments of prayer and reflection. You can attach them near a corner or at the top edge of the quilt.
6. Tassel or charm accents: Attach tassels or charms to the corners or edges of your pocket prayer quilt for a decorative touch. Choose ones that hold personal meaning or ones that complement the theme or colors of your quilt.
Remember, these finishing touches are optional, and you can choose to incorporate any or all of them based on your personal preferences and the intended purpose of your pocket prayer quilt. The goal is to add a touch of individuality and create a quilt that resonates with you or the recipient.
Once you have added these finishing touches, take a moment to step back and admire your completed pocket prayer quilt. It’s a testament to your creativity, devotion, and craftsmanship. Whether you keep it for personal use or gift it to someone special, your pocket prayer quilt is sure to bring comfort and inspiration.
Now that you have reached the end of this guide, you are ready to embark on the journey of creating your pocket prayer quilt. Enjoy the process, let your creativity flourish, and may your pocket prayer quilt bring you solace and strength in times of need.
Happy quilting!
Read more: How To Make A Quilt Larger
Conclusion
Congratulations on completing your pocket prayer quilt! This journey has allowed you to unleash your creativity, explore your faith, and create a beautiful and meaningful piece of art. Your pocket prayer quilt is not just a quilt; it is a tangible expression of love, comfort, and spirituality.
Throughout this guide, we have walked you through the process of making a pocket prayer quilt, from gathering supplies to adding finishing touches. We hope this has inspired you to embark on this quilting project and provided you with the knowledge and guidance needed to create a quilt that speaks to your heart.
Remember, your pocket prayer quilt is a personal reflection of your faith and devotion. As you use it for prayer, reflection, or moments of solace, it will become a cherished companion. The prayer pocket will hold your heartfelt prayers, providing a tangible reminder of your spiritual connection.
Feel free to explore variations and add your own personal touch to your pocket prayer quilt. Experiment with different fabric combinations, quilting designs, and embellishments to make it uniquely yours. The possibilities are endless!
As you share your pocket prayer quilt with others, you may bring comfort, hope, and inspiration to their lives as well. Consider making pocket prayer quilts as gifts for loved ones, friends, or those in need. Your quilt can become a source of support and strength for those who receive it.
Thank you for joining us on this quilting journey. We hope that creating your pocket prayer quilt has been an enriching and fulfilling experience. Remember to take pride in your work and embrace the peace and comfort that your pocket prayer quilt can provide.
May your pocket prayer quilt be a gentle reminder of faith, love, and resilience. Continue to explore the world of quilting and let your creativity flourish. Happy quilting!
Frequently Asked Questions about How To Make A Pocket Prayer Quilt
Was this page helpful?
At Storables.com, we guarantee accurate and reliable information. Our content, validated by Expert Board Contributors, is crafted following stringent Editorial Policies. We're committed to providing you with well-researched, expert-backed insights for all your informational needs.


0 thoughts on “How To Make A Pocket Prayer Quilt”